WooCommerce 2.6 introduced shipping zones into the core platform, providing more shipping options for merchants directly within WooCommerce.
Rather than being limited to “Flat rate” and “International Flat Rate” in terms of core shipping methods, merchants can now set up additional shipping options within WooCommerce itself. For example, you can offer multiple flat rates for customers in the US, different rates for international customers, pickup options for local customers, and free shipping to certain postcodes.
While shipping zones give merchants more flexibility and options for shipping, it also complicates the shipping set up for new merchants. Let’s go over some tips and best practices so setting up your own WooCommerce shipping zones and shipping methods.
WooCommerce Shipping Zones: Create Zones
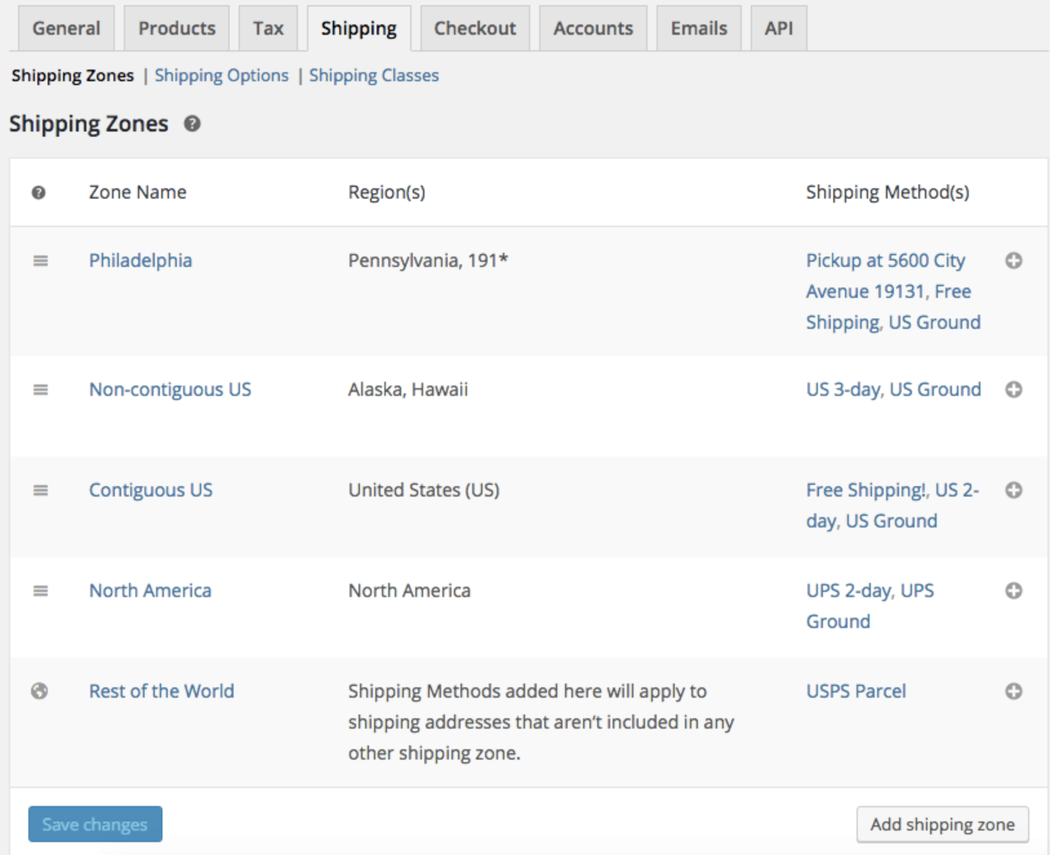
The first thing I’d recommend doing is creating your new zones. Each zone should be a geographical area that will have its own shipping methods and rates. The “Rest of the World” zone is a default, catch-all zone that we’ll get to last.
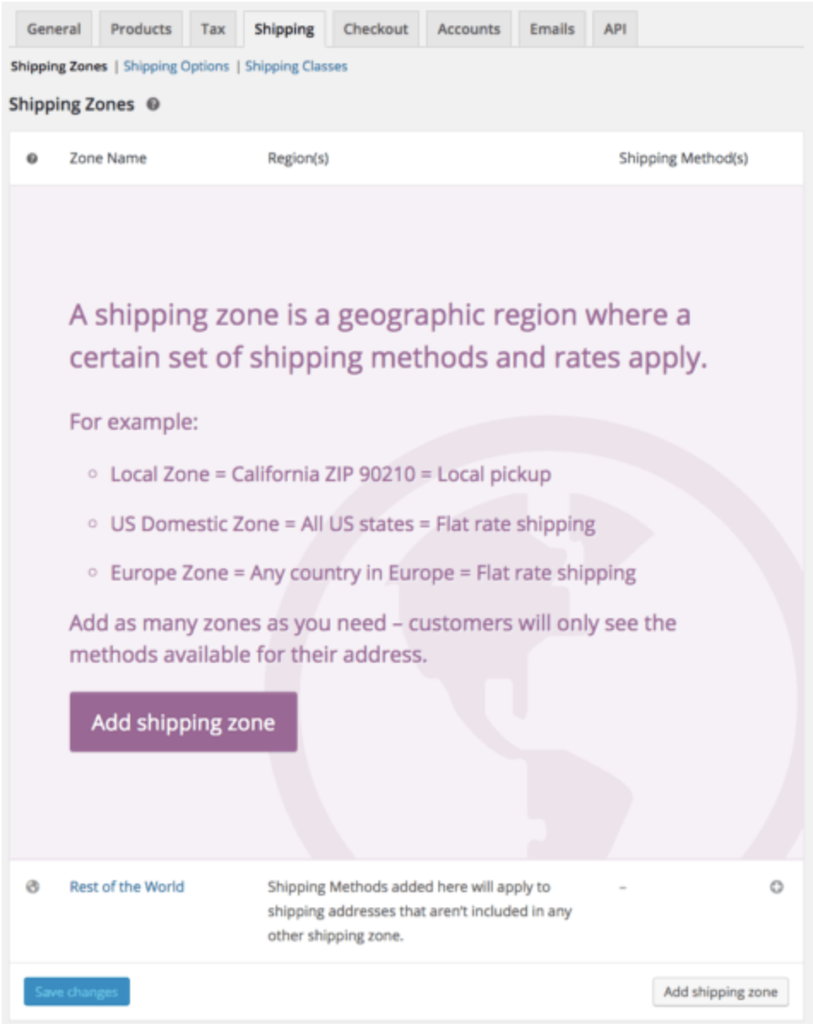
When you create your zones, there’s a very important thing you need to consider: zones are matched in order. This means the first zone in your list will be checked to see if it matches the customer first, then the next zone in the list, etc. If no zone matches the customer location, “Rest of the World” is used (which is why you can’t remove it).
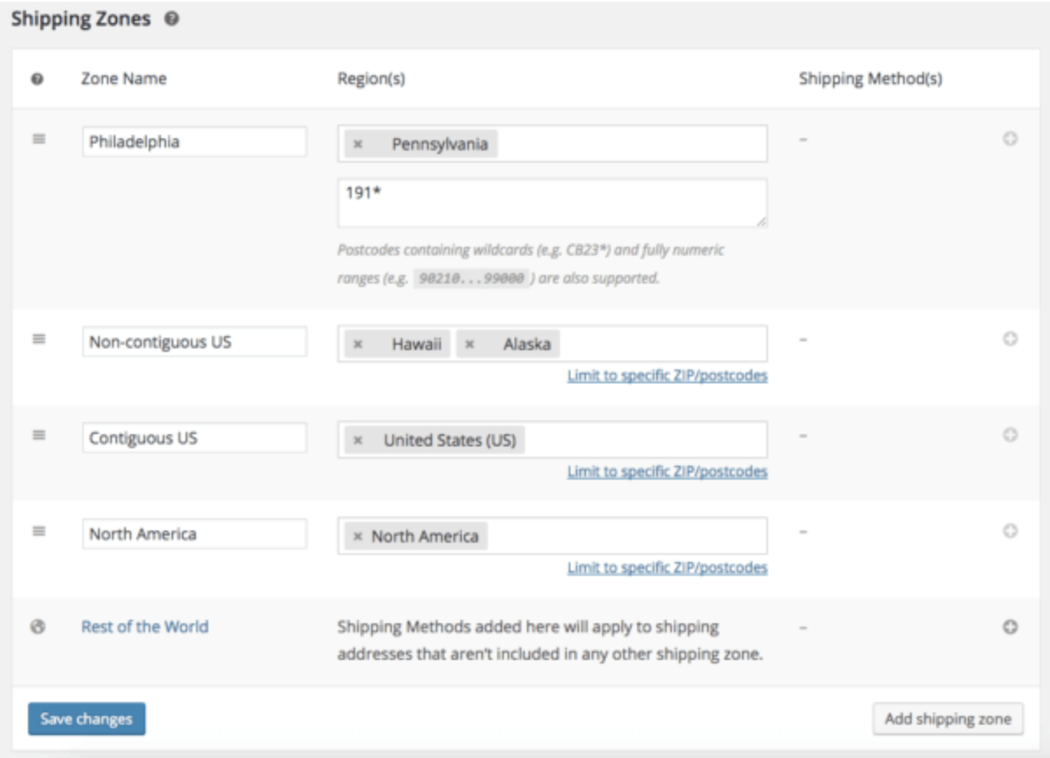
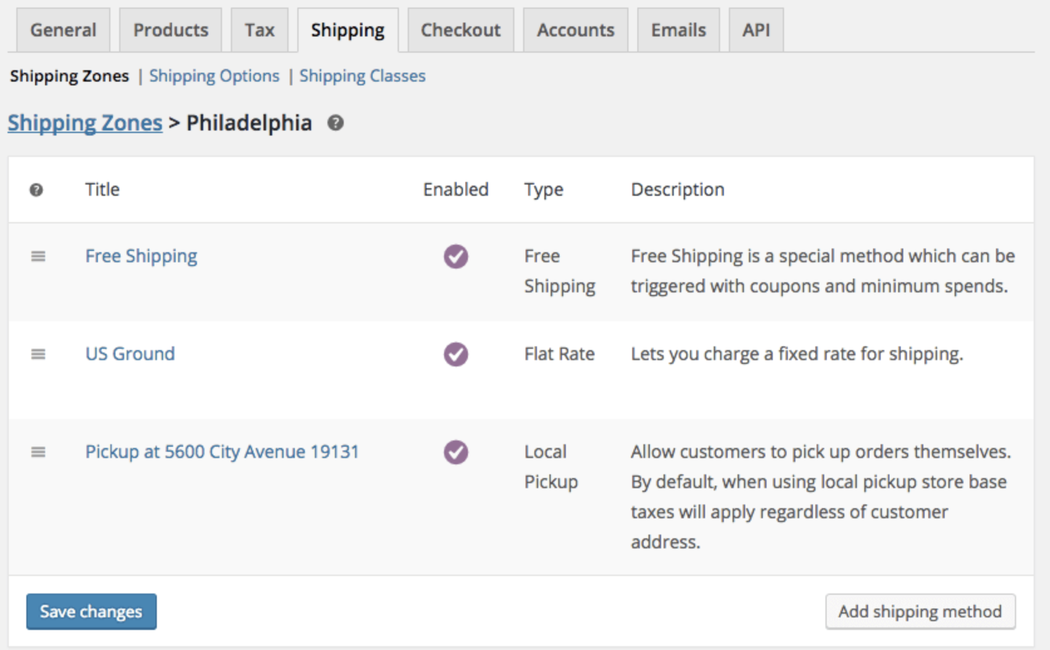
In my case, this means I’d like to set up my local or “more restrictive” zones first, then set up more general zones lower in my list. Example: let’s say I want customers in Philadelphia to be able to select “local pickup” as an option. I should have the “Philadelphia” zone above any other general US zones so that this is matched to the customer first and used instead of other zones that may match.
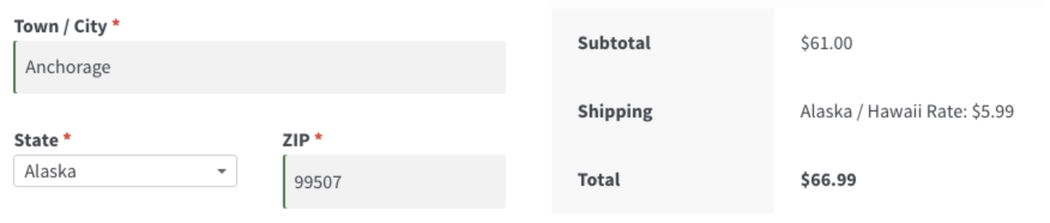
Likewise, this lets you do some “exclusions” as well. For example, if you don’t use USPS for US-based shipping, you may need a more expensive rate for shipping to Hawaii and Alaska (as providers like UPS tend to charge more for this). You can set a zone above the US zone for these states, and customers will be matched to this zone rather than the general US zone.
If you add some zones, but find you need to re-order them later, you can drag and drop them by clicking the “move” icon on the far left. This will let you change the priority of zones and thus change which zones are matched first.
WooCommerce Shipping Zones: How is a customer matched to a zone?
Zones are always matched in order, from the top zone in the list to the bottom. Therefore, if a customer matches a zone at the top of your list, the rates for this zone will be offered to the customer.
With my current set up, here are some examples on how WooCommerce will find rates:
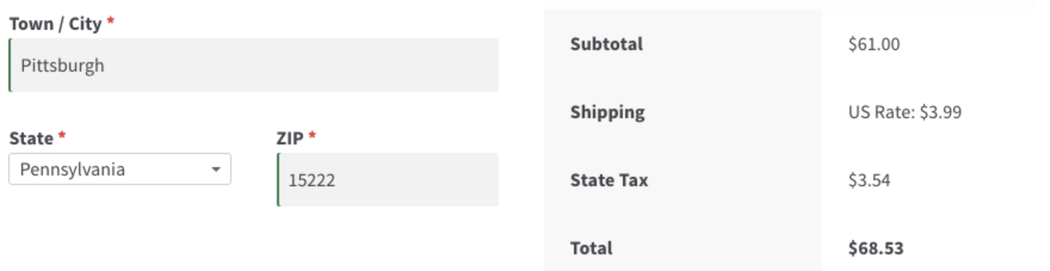
- Example 1: Customer in Pittsburgh — WooCommerce will first check the Philadelphia zone. While, this customer is in Pennsylvania, the address doesn’t match the defined zipcodes for the zone, so it’s skipped. WooCommerce next checks if the customer is in Alaska or Hawaii. As this isn’t the case, the customer is matched to the “Contiguous US” zone, and only the rates for that zone are offered at checkout.
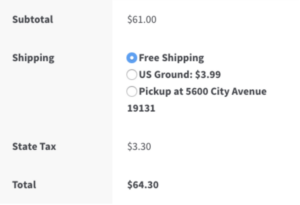
- Example 2: Customer in zipcode 19131 — WooCommerce checks the Philadelphia zone. As this customer matches the state and limited zipcodes, this zone is matched and it doesn’t need to check any other zones. Therefore, only the rates in the Philadelphia zone will be shown to the customer.

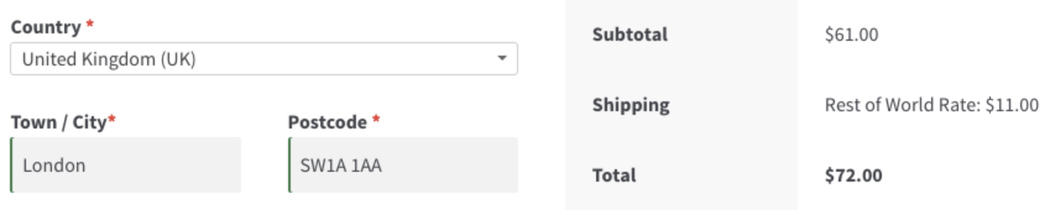
- Example 3: Customer in the UK — WooCommerce will check these zones in order. The customer does not match any of the US zones or the North America zone. As a result, the default rates in the “Rest of the World” zone will be offered to this customer.
- Example 4: Customer in Alaska — The Philadelphia zone is checked and skipped, and then WooCommerce checks our Alaska / Hawaii zone. As this matches the customer, the zone for Alaska / Hawaii is used and its rates are offered rather than the Contiguous US rates.
You can create as many WooCommerce shipping zones as you’d like to offer different shipping methods and rates to customers around the globe.
WooCommerce Shipping Zones: Create Shipping Classes (Optional)
This step may not be needed for every WooCommerce store, but it’s a good one to complete before you start adding methods to each zone.
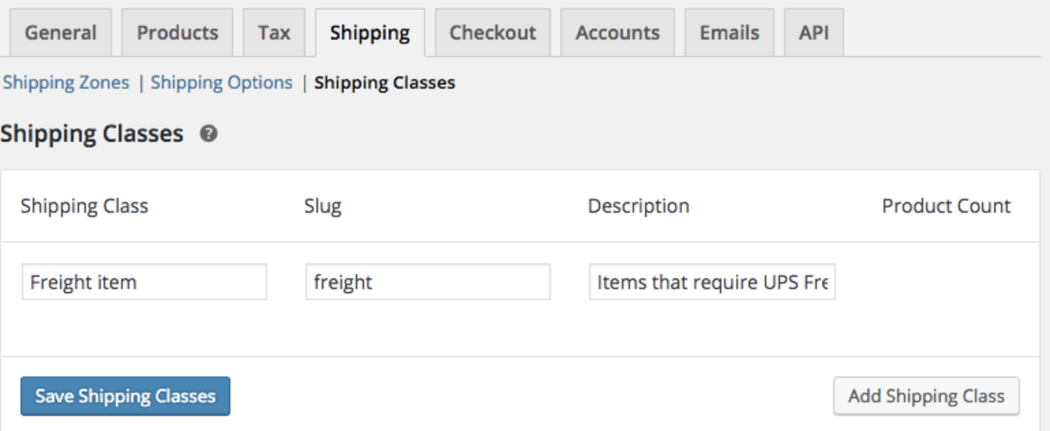
If you have some items that are exceptions for shipping or will require certain costs (ie a cost per item), then a shipping class is a helpful way to indicate this.
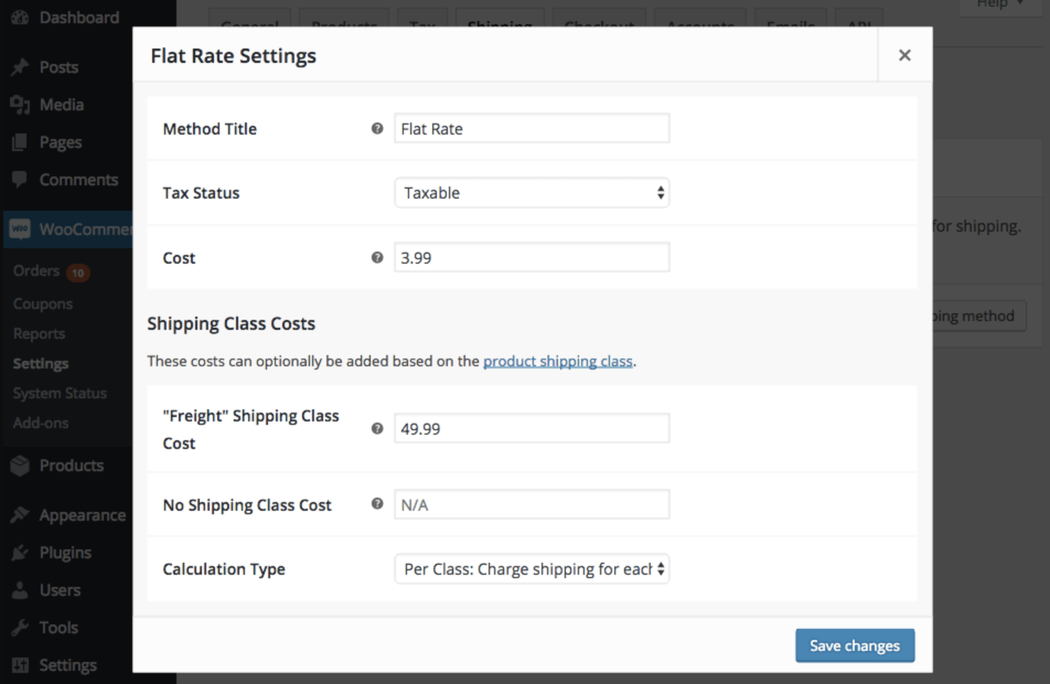
For example, if you have one or two items that would require freight shipping (such as a shower door or a weight lifting power rack), you can create a shipping class that will let you dictate the rate for these items. To do so, go to WooCommerce > Shipping > Shipping Classes and click “Add shipping class”.
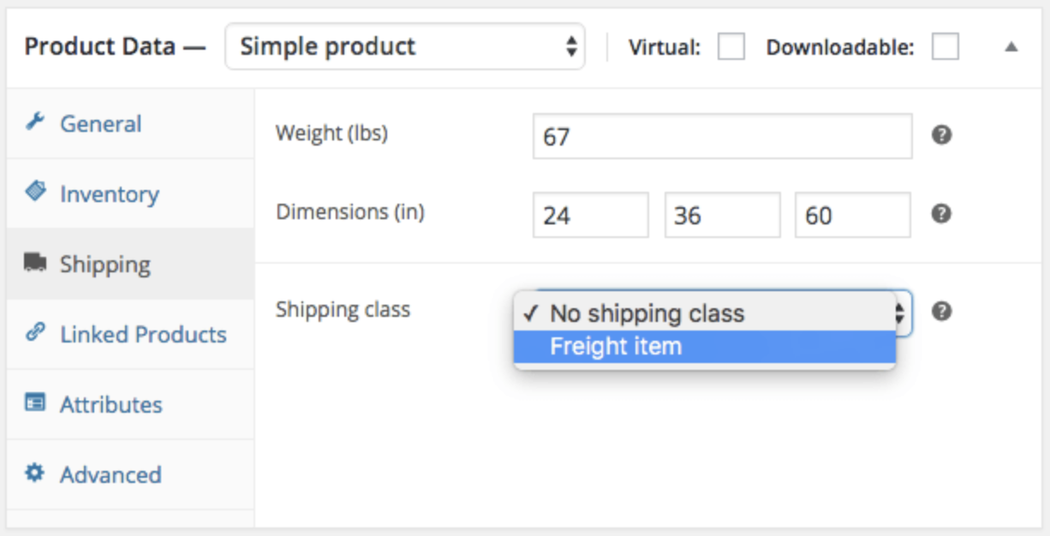
Now when you create products that require this class, you can apply under the “Product Data”.
Once a zone has been created, you’ll be able to set a shipping fee for this zone when adding your methods and rates. This rate could be per class, which means its rate is assessed for every product purchased with this class, or per order, meaning the highest shipping class charge is used once for the order.
WooCommerce Shipping Zones: Add Rates
Before we start adding rates to our zones, you should note that zones are not “combined”. If you have a flat rate of $3.99 for all packages in the “Contiguous US” zone, you may want to add this to the “Philadelphia” zone as well, or it won’t be offered to the customer.
A customer is only offered the methods and rates for the single zone s/he is matched to, and is not offered rates from any other zones, even if they could match the customer as well. This prevents conflicting rates from being offered (ie US Ground at $3.99 and $5.99).
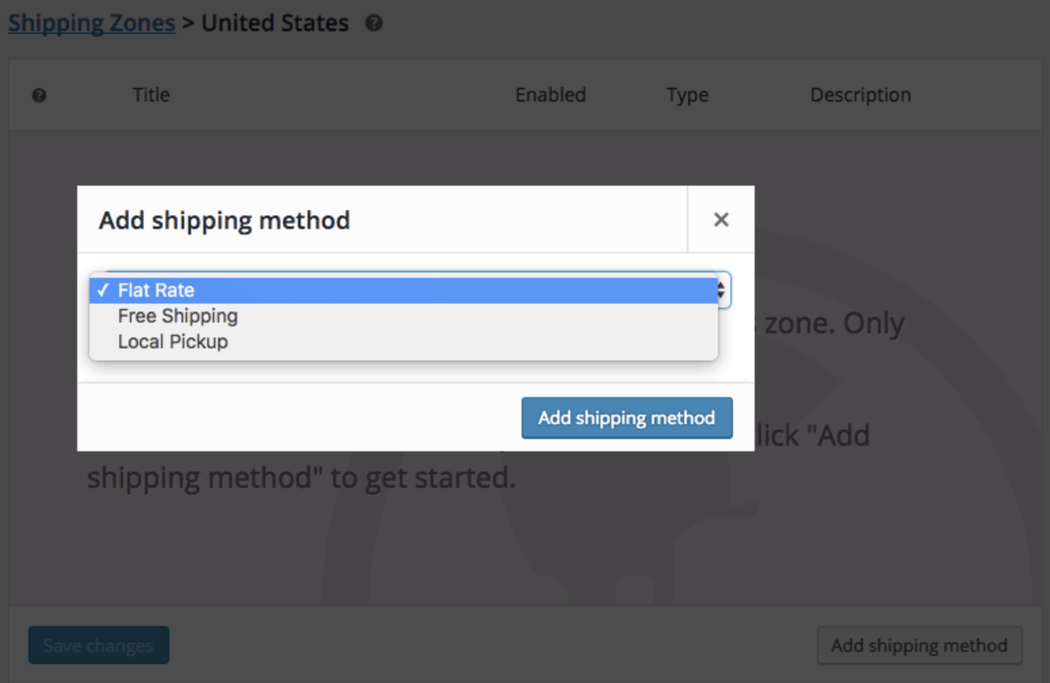
To start adding methods and rates to a zone, you can click on the zone’s name from your zone list.
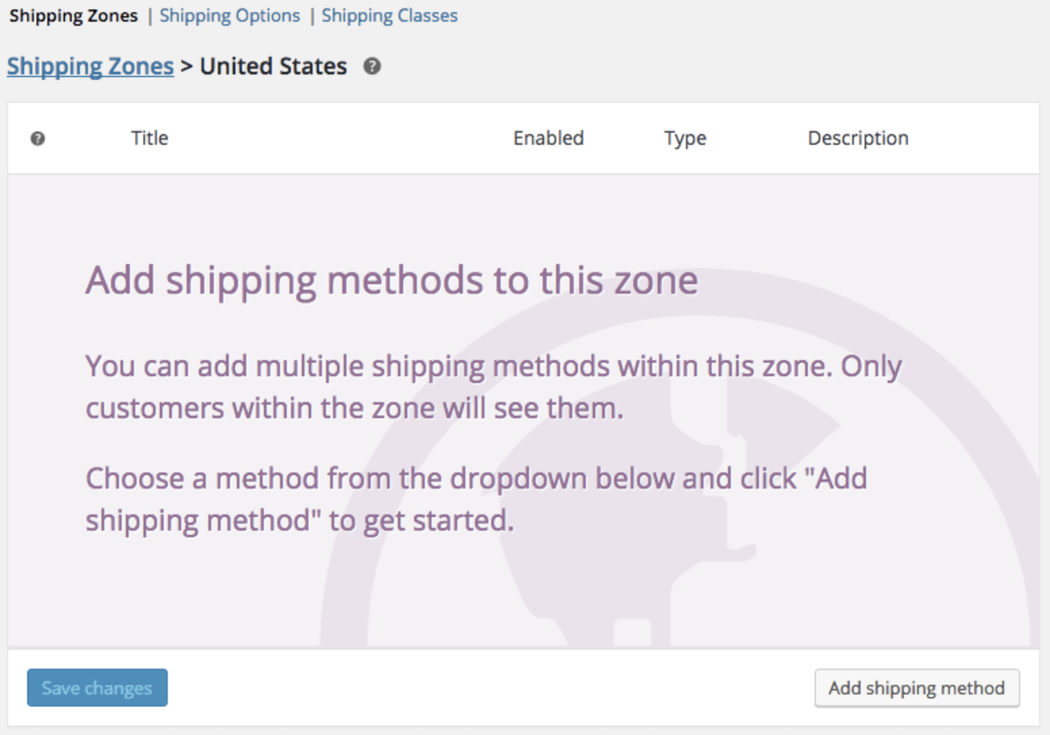
From here, you’ll be able to click “Add shipping method” and select what kind of method should be added to this zone.
Once you’ve added the method, click on its name to adjust its settings and rate. If you’ve leveraged shipping classes, you’ll see them here as well to add your customized costs.
Once you’ve added the available methods for this zone, you can drag and drop them the same way you can zones themselves. This will adjust the way they’re shown to the customer at checkout.
The zone that’s highest towards the top will always be the default selected zone for the customer (if available).
You can repeat these steps for each zone. Remember, a zone should have all methods you want offered to a customer within that zone; a customer can only match one zone at a time.
Managing WooCommerce Shipping Zones
That’s it! You now have super-specific WooCommerce shipping rates that respond automatically to your customer location.
Each of your WooCommerce shipping zones will offer its set rates, and WooCommerce will check the zones in order from top to bottom until a customer is matched to a zone. This lets you:
- offer free shipping only for certain states or countries easily
- as free shipping is now zone-dependent, you can require different order amounts for free shipping in different zones (which is my favorite part — allowing international free shipping for large orders!)
- offer multiple flat rates, such as ground and expedited, for a zone
- limit pickup or other methods to local customers only (for example, give free shipping to your neighbors)
As the legacy shipping methods will be removed in the future, I’d recommend setting up new shipping zones and taking advantage of the improvements they offer soon.