
When selling products in WooCommerce your clients will need to deliver products to their customers. There are a few settings that will need to be tweaked even if products are digital or if the store offers local delivery and/or pickup. It takes some experience to get WooCommerce standard shipping setup just right.
If you haven’t already, you’ll need to install WordPress and the WooCommerce plugin. GoDaddy’s Managed WooCommerce Stores makes this easy to do with just a few clicks.
From this point on I’m going to assume you have WordPress and WooCommerce installed and you’re ready to get started.
A quick note before we dive in. We’ll be using USPS as our carrier since their prices are fairly easy to figure out. Additionally, Automattic provides a free extension you can use to buy and print USPS shipping labels. To find out how to set up WooCommerce standard shipping from beginning to end, keep reading.
Let’s Go!
Setting your location for WooCommerce standard shipping
You’ll need to configure a few options before ever touching the shipping settings in WooCommerce. So that WooCommerce knows where you’re shipping from, and so that it will know where it is allowed to ship to you’ll need to:
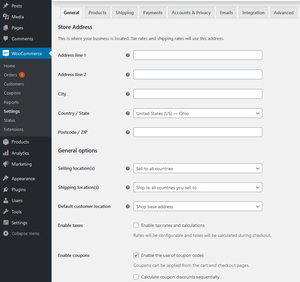
- From your WordPress admin left-hand menu, go to WooCommerce, and then select Settings. You’ll see a series of tabs. The General tab Should be open by default.
- Ensure the address you are shipping from is filled in on the Store Address section near the top.
- In the next section, you’ll see General options. Here you want to select options for your Selling location(s), Shipping location(s), Default customer location, and whether or not to Enable taxes, and/or Enable coupons.
If your client is only selling digital products, you can simply choose which countries to sell to, and then under Shipping location(s) just select Disable shipping & shipping calculations.
Congratulations, digital-only and affiliate stores.
You’re finished setting up shipping. Everybody else, roll up those sleeves. There’s a little more work to do.
Thinking ahead about free shipping
Let’s pause here for just a moment. Chances are your customers may want to offer free shipping at some point. If the shop address is located in the U.S., free shipping in the U.S. isn’t terribly expensive for the seller. But, if the shop address is in the U.S. and they’ve enabled free shipping to all countries, this could be very costly.
This is why WooCommerce provides shipping zones which we’ll get into in just a moment. In my experience the easiest way to deal with this when shipping and selling globally is to:
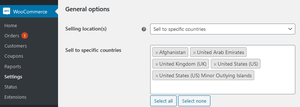
- Under Selling location(s), select Sell to specific countries, and then select all of the countries you want to sell to. You could also click the Select all button just and eliminate the countries you don’t want to sell to, if that’s easier.
- Under Shipping location(s), select Ship to all countries you sell to.
- Set up separate shipping zones for the U.S. (or the home country) and the rest of the world.
Trust me when I tell you getting this right, in the beginning, will save you and your clients a lot of headaches down the road.
Pro tip: If your U.S. clients want U.S. territories such as Puerto Rico to get the same domestic shipping rates that would typically be available to U.S. destinations (small flat rate box for example) through USPS, make sure to include United States (US) Minor Outlying Islands under Selling location(s) > Sell to specific countries. What a deal!
Getting shipping zones right
In this section, I’ll first cover how to set up a shipping zone which you’ll need to know how to do first. I’ll follow up with some very handy tips to help you optimize shipping zone configuration.
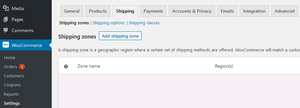
- Go to the WordPress admin left-hand menu, and then from WooCommerce, select Settings. You’ll notice there are three sections just below the tabs: Shipping Zones, Shipping Options and Shipping Classes. (The first being shipping zones).
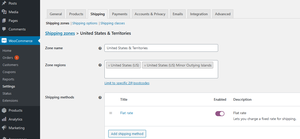
- Under Shipping zones enter a descriptive name for the Zone name section (e.g. United States & Territories). Be as specific as possible.
- Under Zone regions begin typing the name of the region (United States for example) you want to ship to in the form field on the right. Select the region to add it. You can add multiple selections in a single zone. In this example, I’ve included United States and United States (US) Minor Outlying Islands.
- Under the Shipping methods section, click the Add shipping method button. By default, your options will be Flat rate, Free shipping, or Local pickup. Select one and click the Add shipping method button.
- Mouse over the shipping method you just created and click edit.
- You’ll be greeted with a popup window that allows you to change the Method title, Change the Tax status, or enter a Cost. Complete those sections as desired.
- Click the Save changes button.
Note that in the Cost section, there are a few ways to enter an amount:
Adding a single sum
You could just add a single sum, like $2.00. Doing it this way would mean that no matter how many items are added to the shopping cart, the shipping is going to stay $2.
Creating an equation
Another way to do this is to add the sum followed by an asterisk, followed by the abbreviation qty (for quantity) in square brackets [qty]. It should look something like this 2.00*[qty]. This way the $2.00 shipping fee is charged for each item in the cart. If you have 2 items then shipping is $4, three items, and shipping is $6, and so on.
Charging base shipping
Lastly, you can charge a base shipping cost plus a percentage of the order total with minimum and maximum fees. You start with the base fee which in the previous example was 2.00 ($2). Then a plus sign + followed by [fee percent=” “]. So if you want to set a base shipping price with an additional fee of 1% of the total sale and a minimum shipping cost of $2 with a maximum shipping cost of $50 it should look something like this: 2+[fee percent="1" min_fee="2" max_fee="50"]
You’ve just created a shipping zone. In my example:
- The Zone name is United States and Territories.
- The Zone regions are United States and United States (US) Minor Outlying Islands.
- The Shipping method is Flat rate.
In this scenario, any customer shipping a package to a United States address or a U.S. territory address will receive the flat rate shipping rate specified in Cost from step number 6 above.
You’ll notice the default Shipping methods are pretty basic and don’t provide dynamic pricing or carriers.
For that feature, you’ll need a premium WooCommerce extension, which is beyond the scope of this article. We’re just talking about the default WooCommerce shipping setup.
However, if you get this initial setup done correctly, integrating extensions and plugins later should be a breeze. Just know that if (more likely when) your client needs a premium WooCommerce Shipping extension, the shipping method for that extension (once installed) will appear as an additional selectable option under Shipping methods.
Pro tip: If your client is selling products in the U.S. and under 70 lbs the USPS Shipping Method extension can help you set up dynamic shipping rates based on package size, weight, and USPS rates. It also works with their free WooCommerce Shipping plugin so your clients can print shipping labels from directly within the WooCommerce orders page.
Optimizing shipping zones
Before moving on, I’m going to share with you a few killer tips that I wish I would have known as a beginner setting up WooCommerce.
Countries as shipping zones
When creating a shipping zone or zones, you can include an entire country or just specific regions within that country (like states) under Zone Regions. In the U.S. you can include the entire United States, U.S. territories, specific states, or even U.S. military destinations.
Adding military discounts
If your clients want to add discounted or free shipping to those serving in the military, you could create a separate shipping zone for that. Just give it a Zone name like APO/FPO/DPO or something similar. Then just enter United States under Zone regions and scroll to the bottom of the list of states where you’ll see:
- Armed Forces (AA), United States (US) (Central and South America)
- Armed Forces (AE), United States (US) (Europe, Canada, Middle East, Africa)
- Armed Forces (AP), United States (US) (Pacific)
Click each one to add them to your Zone Region. You can now add free shipping as your shipping method or provide a discount compared to the normal shipping rate.
From Flat rate, go to edit, and then select Cost.
If/when your client wants to add a premium shipping extension this zone can also be used to provide domestic USPS rates to those Armed Forces locations that would normally be international.
Nifty, right?
One more quick tip for WooCommerce Standard Shipping setup
If your client is based in the U.S. and offers local delivery or pickup you can create a separate shipping zone for their state. Once you do:
- Click Limit to specific ZIP/postcodes (located just under the Zone regions box).
- Add the zip codes your client will deliver to or zip codes close enough for local pickup.
If your client offers delivery in addition to pick up, and charges a delivery fee, you’ll probably want to create one zone for delivery, and another for pickup using the same methods as described above. - Go to Shipping method, select Flat rate.
- Go to Cost, and then enter the delivery fee or change the cost to $0 if local pickup is offered.
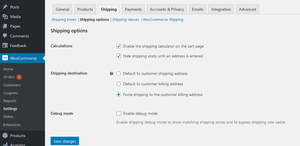
Shipping Options & WooCommerce standard shipping
The next section under the Shipping tab, just to the right of Shipping zones (below the row of tabs), is Shipping Options. There are three sections here. Calculations, Shipping destination, and Debug mode.
- Under Calculations, you’ll see two options. Enable the shipping calculator on the cart page and Hide shipping costs until an address is entered. Tick one or both checkboxes.
- Under Shipping destination, you’ll see three options. Default to customer shipping address, Default to customer billing address, and Force shipping to customer billing address. Note: if using PayPal for payments you’ll want to select Force to customer billing address if you want to take advantage of PayPal seller protection.
- Click the Save changes button
You don’t need to do anything with Debug mode unless you’re troubleshooting or testing. You can just leave this option unchecked.
About estimated shipping
Unless you have geolocation services or a geolocation plugin active it is a good idea to enable Hide shipping costs until an address is entered under Calculations. Leaving it unchecked/disabled can result in WooCommerce either overestimating or underestimating shipping on the cart page, surprising the customer during checkout. This can happen especially when you’ve installed a premium shipping extension that displays prices dynamically.
The last thing you want is to have your client’s customers abandoning their shopping carts because shipping is outrageous.
If WooCommerce underestimates shipping you could have a situation where your client’s customers think they’re getting a lower rate for shipping on the shopping cart page only to find out the shipping is higher once they reach the checkout page and entered their address.
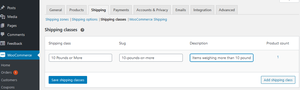
Shipping classes & WooCommerce standard shipping
Your client may have one group of products where the shipping tends to be a bit higher or lower. They can adjust shipping rates based on classes. For example, if the USPS shipping rate goes up by $2 for items that weigh 10 pounds or more, you could create a shipping class to handle that adjustment.
Here’s how to do it:
- From WordPress admin go to WooCommerce, and then select Settings.
- Go to the Shipping tab, and then click Shipping Classes.
- Click the Add shipping class button located on the bottom right side of that section.
- Give your shipping class a name in the box that says Shipping class name. (e.g. 10 pounds or more)
- You can ignore the slug box in the middle. WooCommerce will fill that in with your shipping class name after you save.
- In the box that says Description for your reference enter a description. (e.g. items weighing more than 10 pounds)
- Click Save shipping classes.
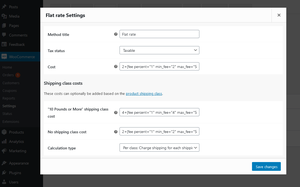
You may have noticed there’s no place to enter a price for the shipping class here. That’s because you’ll need to go back to your Shipping zones and select the zone(s) you want to modify to add the price adjustment.
Here’s how to do it:
- From WordPress admin, go to WooCommerce, and then select Settings.
- From Shipping, go to Shipping zones, mouse over one of the shipping zone names, and then click edit.
- In the Shipping methods section mouse over a shipping method’s title, and then click edit.
- You’ll now see a new section of Shipping class costs. Under that section, you should see the name of the shipping class you just created (e.g. 10 pounds or more) followed by shipping class cost. You can enter a price in the box just to the right of that. So, if your cost goes up by $2 for items over 10 lbs and your normal flat rate cost is $2 you’ll want to enter $4 or more to offset the difference.
- Just below “Your Shipping class name” shipping cost you’ll see No shipping class cost. Here you can just enter whatever your base rate is if you want. This way when there is no shipping class assigned to a product the customer is charged the standard shipping rate.
- Next, you’ll see Calculation type where you can choose either Per class or Per order. If you select Per class the customer will be charged a separate shipping fee for each item in the shopping cart that has a different shipping class. If you select Per order the customer is charged shipping based on the highest priced shipping class only
- Click Save changes.
To get an idea of what shipping should cost you can head on over to the USPS Mailing and Shipping Prices page where you’ll see standard shipping rates.
Once on that page, scroll down to Prices and click the down arrow for either Domestic Prices or International Prices to reveal standard shipping costs.
Figuring out prices based on weight and packages is pretty simple using USPS, but isn’t so straightforward with carriers like UPS or FedEx. You’ll probably want a premium extension if you’re using any of the latter.
Add shipping to products for WooCommerce standard shipping setup
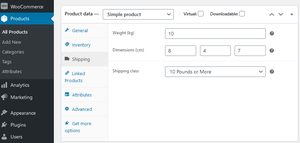
For shipping to work correctly you’ll need to add a shipping weight and dimensions in your product pages. Here’s how to do that:
- From the WordPress admin left-hand menu, mouse over Products, and then click Add New to create a new product.
- In the Product data section, go to the left side which has a vertical tabbed menu, and then click Shipping
- Enter the weight of a single product, then the dimensions of the package that a single item might be shipped in. This step is not required, but you can select a shipping class at the bottom of this section if you need to.
- Fill out whatever product information you like on the rest of the page and click the Publish button in the far top-right sidebar.
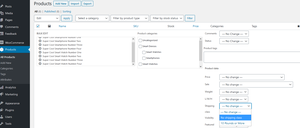
If you already have a number of products and don’t want to update shipping on each one individually you can use the bulk edit feature built into WordPress.
- From The left-hand menu in WordPress admin, mouse over Products, and then click All Products.
- Here you’ll see a list of published products. Mark the checkbox next to each product you want to edit.
- Just above this list on the top left, you’ll see the Bulk actions dropdown menu. Click the down-pointing arrow to the right of that and select Edit.
- You’ll now see a list of options available for editing in bulk. In the menu on the far right you’ll have the shipping options for Weight, L/W/H (dimensions), and Shipping class. Make your changes then click the Update button. This will update all of the products you have marked with the checkbox to the new settings that you had selected in step 2 above.
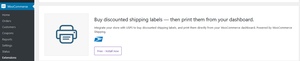
Shipping labels for WooCommerce standard shipping
That’s it for the basic shipping setup in WooCommerce, but I have a little bonus for you. WooCommerce does not provide a way to print shipping labels by default. You’ll need an extension for that. Fortunately, they provide one that you can install for free.
A word about Jetpack
Before we get started on this let me say upfront I’m not a fan of Jetpack which WooCommerce tries to get you to install during the initial setup. They have some great features but Jetpack can make your website slow. Unfortunately to get the specified free version of the shipping labels extension to work your clients will need a WordPress account, plus Jetpack installed.
I recommend disabling most of the features in Jetpack to keep things running faster.
You’ll need your client’s WordPress credentials to set this up as well, or just have them go through that part of the process themselves since they’ll need to add a payment method to buy labels anyway.
Creating shipping labels
You might have already enabled this extension during the initial setup for WooCommerce. If so, you’re all set. If you missed the free USPS shipping labels extension during setup you can still get it.
- From The left-hand menu in WordPress admin, mouse over WooCommerce, and then click Extensions. You can either scroll down that page a little to find it in the featured section or just search for “WooCommerce shipping”. To find it.
- Click the Free - Install now button.
From here just follow the instructions. When you get to the section about activating Jetpack you can stop and advise your client to follow steps 3 through 7 below.
- From WordPress admin, go to Plugins, and then select Installed Plugins. A Jetpack banner should display at the top of the page.
- Click the Activate Jetpack and connect button.
- From WooCommerce, go to Settings, and then on the Shipping tab, click the WooCommerce Shipping link located just below the row of tabs on the right.
- Enter a payment method by clicking the Add a credit card button.
- Follow instructions, and then click Save card.
Closing thoughts on WooCommerce Standard Shipping setup
So there you have it: the (I hope) complete guide to setting up shipping with WooCommerce (mainly) default settings. I hope this article has helped you get started on the right foot in setting up WooCommerce shipping and provides a solid foundation for you to add some awesome extensions for your clients.
More time = happier clients
When you use The Hub from GoDaddy Pro, suddenly there’s more time in your day to focus on what matters most. Forget about juggling admin tasks. Reclaim your time and use it to make clients feel like the center of your universe.