Choose an alternative to catch-all after moving to Microsoft 365
A catch-all email is an account that collects messages addressed to a misspelled or non-existent email address on your domain name. However, using a catch-all email can put your security at risk, as it may result in the delivery of unwanted mail, including spam and phishing attacks. As a result, Microsoft 365 does not allow or support catch-all email. If you were previously using a catch-all with Media Temple Mail, it will not work after you move to Microsoft 365.
We have several alternatives you can choose from instead. We strongly recommend using one of the following options for a safer email experience.
Choose a safer alternative to catch-all email
- Alias: Create an address that sends all your mail to another inbox of your choosing. For example, if your address is jane@coolexample.com, and you create the alias sales@coolexample.com, all mail that’s sent to either jane@ or sales@ automatically goes to jane@coolexample.com. Find out how to create an alias.
- Distribution group: Instead of contacting individual recipients, send one email to a group of people, such as a department or team working on a project. When you send mail to the distribution group, every member receives it. Find out how to create a distribution group.
- Shared mailbox: Allow a group of people to read and send messages from a common email address. For example, you can set up the shared mailbox questions@coolexample.com so employees who have access can receive and respond to its messages. Find out how to create a shared mailbox.
If none of these options meet your specific needs and you still require a catch-all email, an admin can create a similar experience where mail sent to any of your account's domains is forwarded to a single mailbox. However, please note that Microsoft does not support catch-all email, and we strongly recommend using one of the features above for better security and functionality.
Create an experience that simulates a catch-all
Step 1: Change the domain status
First, change the domain status so it accepts messages to recipients that don't already exist in your organization and aren't valid users.
- Sign in to the Exchange admin center. Use your Microsoft 365 email address and password (your GoDaddy username and password won't work here).
- On the leftmost side, select Mail flow, and then Accepted domains.
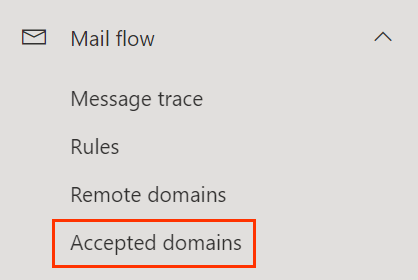
- Select your domain name. A menu will open on the rightmost side. If the menu doesn't open, make sure you selected the domain itself, and not the checkbox next to it.
- On the rightmost side, select Internal relay.

- Select Save. You'll see a success message when your domain is updated.
Required: If you have multiple domains in your Microsoft email plan, they're listed on the Accepted domains page. You must change every domain you want to work with the catch-all email to Internal Relay.
Step 2: Create a shared mailbox
Next, create a shared mailbox to check mail caught by the catch-all.
- On the leftmost side, under Recipients, select Mailboxes.
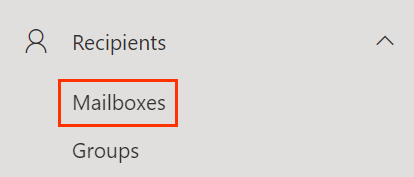
- Select + Add a shared mailbox.
- Enter the following:
- Display Name: This is what recipients will see when they get mail from this address.
- Email address: Name the email address catchall before the @, and then select your domain from the list.
- Select Create. You’ll see a success message when the shared mailbox is created. It could take about 15 minutes for the shared mailbox to become available.

Step 3: Create a dynamic distribution group
Create a group of valid users so their mail is still sent to them and doesn't go to the catch-all.
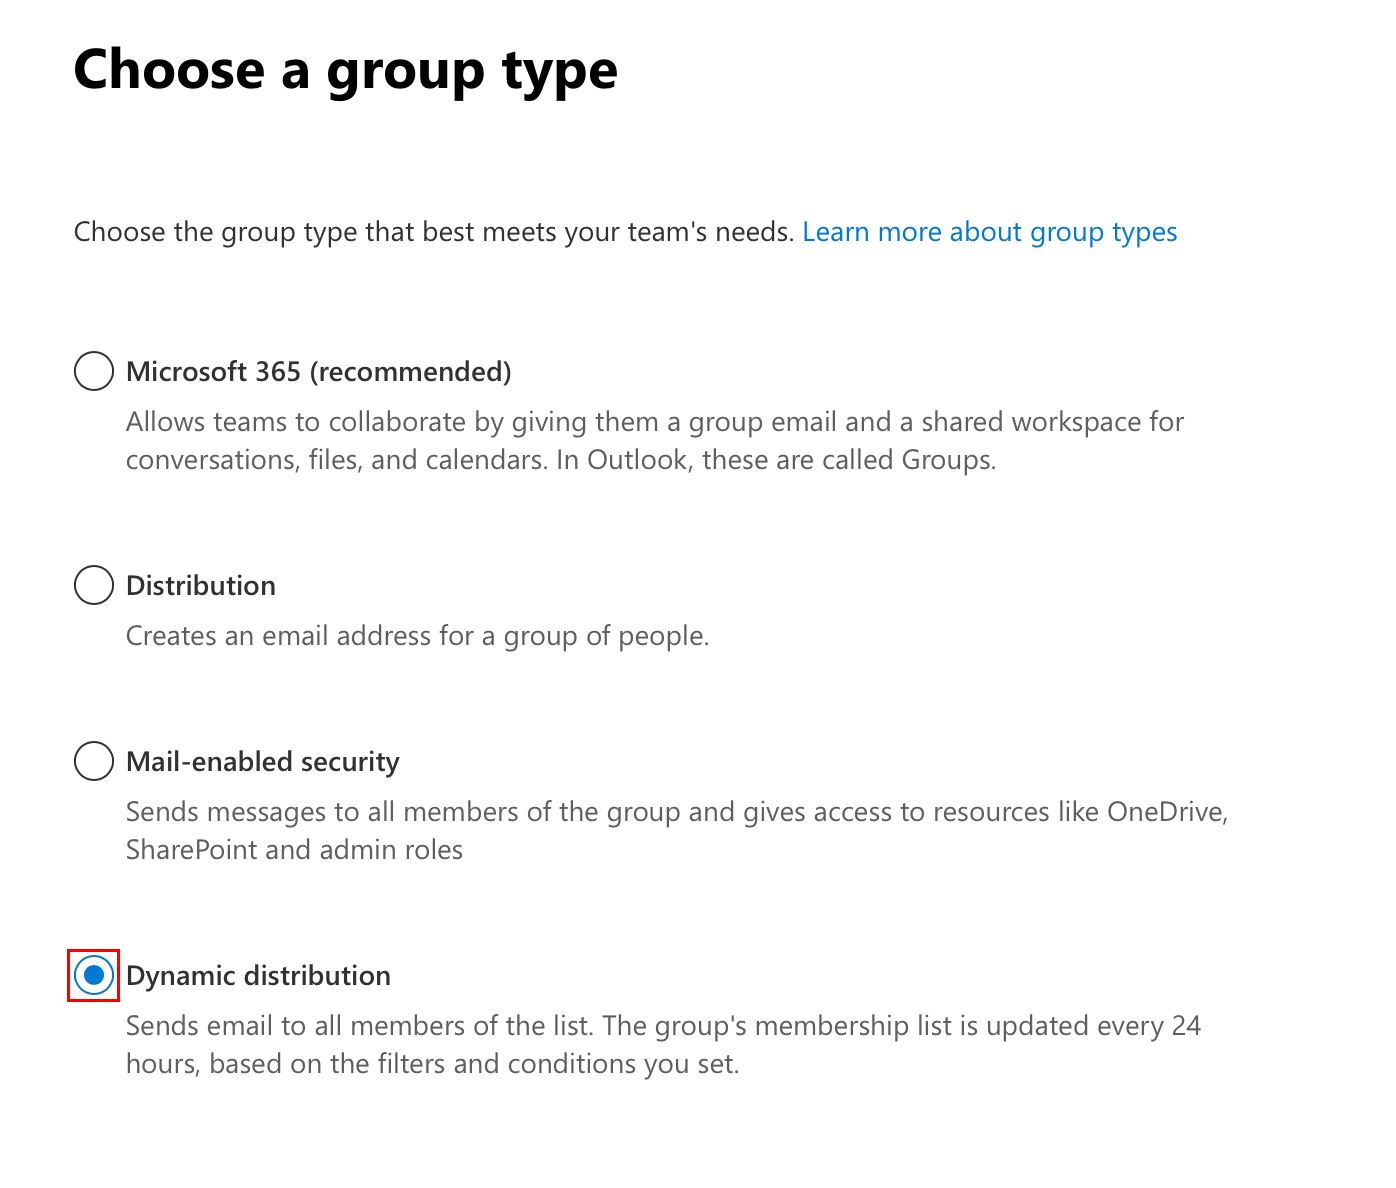
- Under Recipients, select Groups.

- Select Add a group.
- Select Dynamic distribution, and then Next.
Note: The dynamic distribution group’s membership list is updated every 24 hours, which means there may be a delay before a newly created user is recognized as a member of the group.
- Under Name, enter All users. Select Next.
- You will need to click into the description box before the Next button will become available.
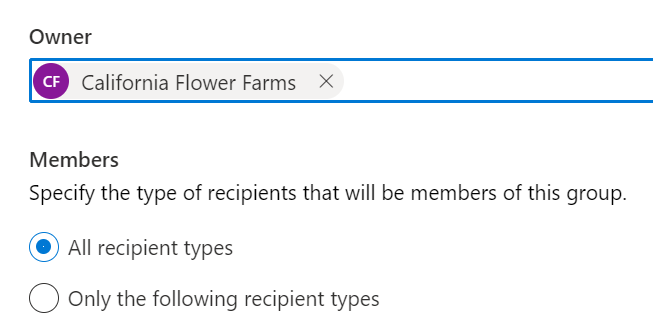
- Under Owner, select your email address from the list. Under Members, select All recipient types.
- Select Next.
- Under Group email address, enter allusers (for example, allusers@coolexample.com) before the @, and then select your domain from the list. This is used as the email address.

- Select Next.
- Verify the details, and then select Create group. You’ll see a success message when the group’s created.
- Select Close.
Step 4: Create a rule to catch mail
Create a rule so mail sent to a misspelled or nonexistent email address goes to the catchall@ shared mailbox.
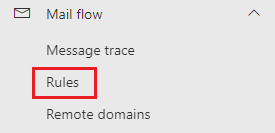
- Under Mail flow, select Rules.
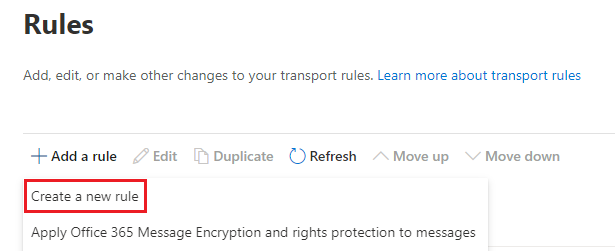
- Select + Add a rule, and then Create a new rule.
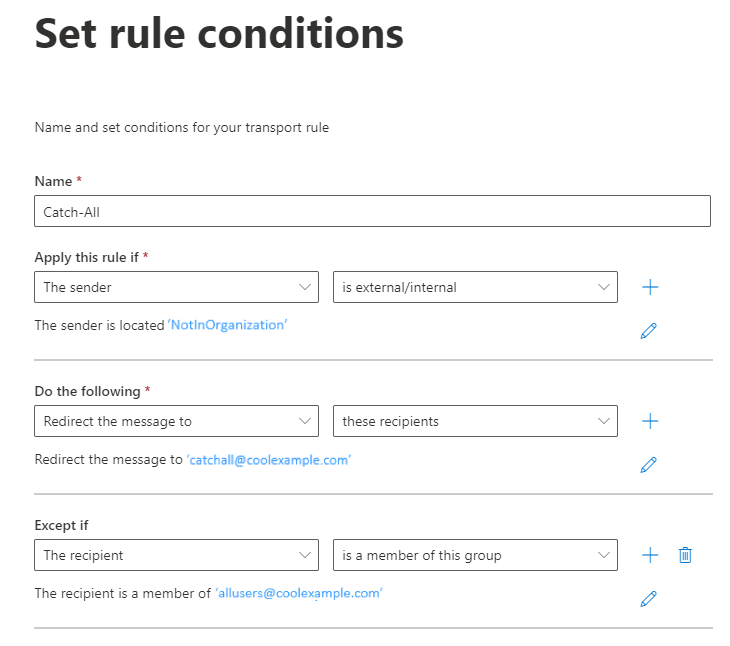
- For Name, enter Catch-All.
- Choose the following:
- Apply this rule if: Select The sender, and then is external/internal. Under select sender location, select Outside the organization, and then Save.
- Do the following: Select Redirect the message to, and then these recipients. Select your shared mailbox (catchall@), and then Save.
- Except if: Select add exception, then The recipient, and then is a member of this group. Select allusers (your dynamic distribution list), and then Save.
- Select Next.
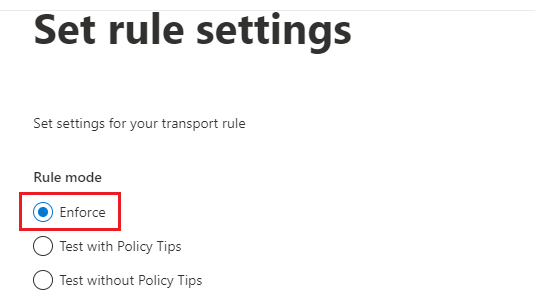
- Select Enforce, and then select Next.
- Review the details of your rule and select Finish
- Select Done.
- Select the rule that you just created and turn on the Enable or disable rule toggle.
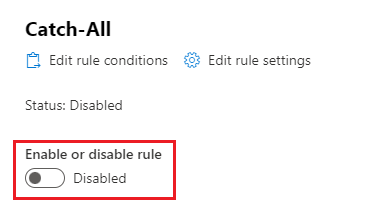
Now all mail from outside of your organization will be delivered to this mailbox if the recipient isn't a member of your allusers distribution list. You can come back anytime and change these settings.
Step 5: Decide how you want to access the catch-all
Use one of these options to set up access to the catch-all’s email (select a tab to learn about each option and follow its instructions).
Send email to one or multiple users. Since you don't have to check the shared mailbox separately from the user’s own inbox, this is most like the Media Temple Mail experience.
- (Optional) If you want the catch-all to forward messages to multiple users or users outside of your organization, create a distribution group, and then add external contacts to it.
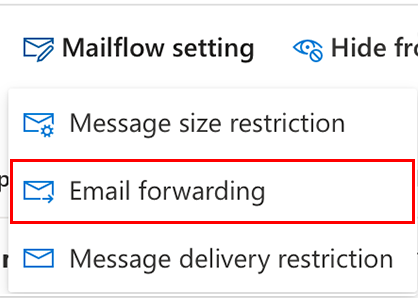
- In the Exchange admin center, on the leftmost side, select Recipients, and then Mailboxes.

- Next to your catchall@ shared mailbox, select the checkbox.
- Above your list of mailboxes, select Mailflow setting, and then Email forwarding.
- Turn on the Forward all emails sent to this mailbox toggle.
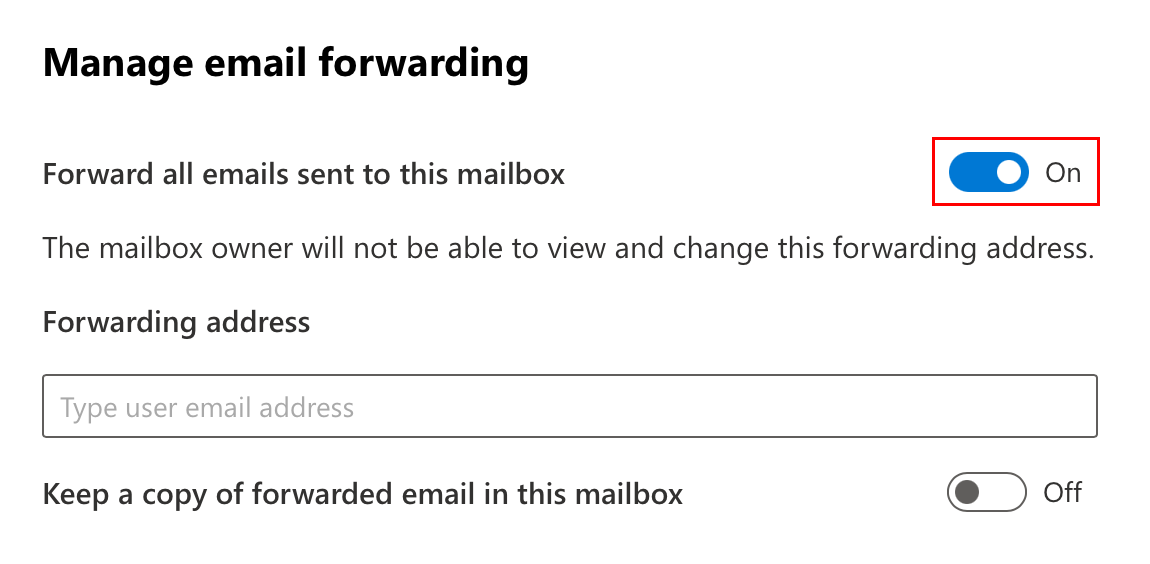
- Under Forwarding address, start to type the email address you want to receive all catch-all messages. Select the email address you want to use after it appears in the dropdown menu.
Note: The email address you are forwarding to must be part of the same organization as the catch-all.
- Select Save changes.
The selected email address will now receive all email caught by the catch-all.
Send email to a separate shared mailbox that multiple people can access.
- On the leftmost side, under Recipients, select Mailboxes.
- Next to your catchall@ shared mailbox, select the checkbox.
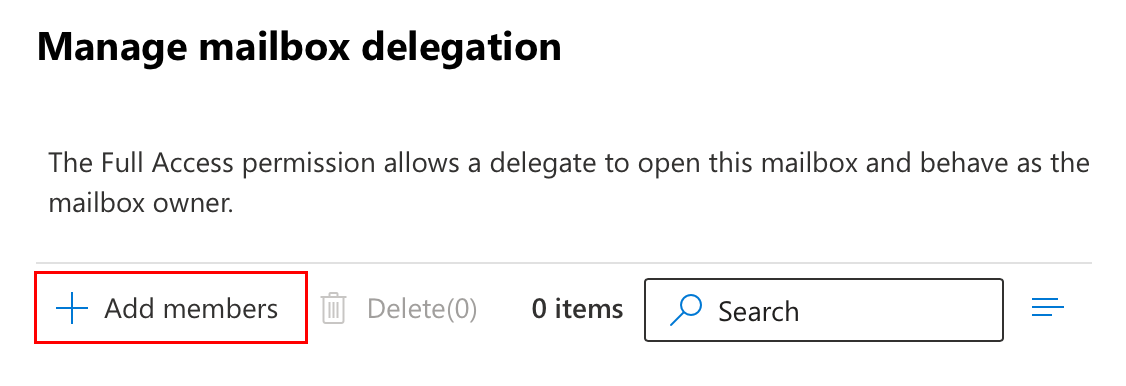
- Above your list of mailboxes, select Mailbox delegation. You might need to select the
 menu to see Mailbox delegation.
 - Under Read and manage (Full Access), select Edit.
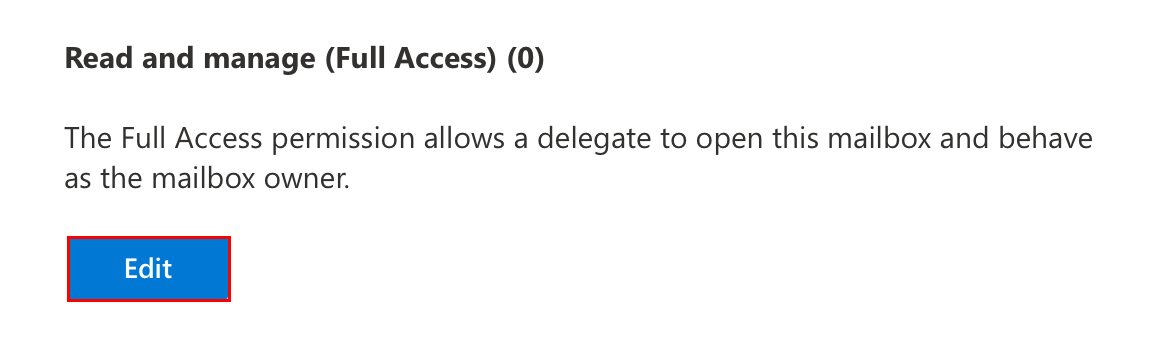
- Select + Add members.
- Next to the user(s) you want to give access to the shared mailbox, select the checkbox.
- Select Save.
The selected user(s) can now access the catch-all as a shared mailbox.
Related step
- To get the most secure and reliable email, update your account to Exchange for all devices.
More info
- If you need help with your active Media Temple Mail account, check out our PDF.