เชื่อมต่อ GoDaddy Conversations กับบัญชี Gmail ของฉัน
ส่งต่อบัญชี Gmail ของคุณไปยัง GoDaddy Conversations เพื่อรับข้อความ Gmail ทั้งหมดในกล่องจดหมายแบบรวม Conversations ของคุณช่วยให้จัดการการสื่อสารทางธุรกิจได้ง่ายขึ้น
จำเป็น: คุณจะต้องมีสิทธิ์เข้าถึงทั้งการตั้งค่าบัญชี Conversations และการตั้งค่า Gmail เพื่อเชื่อมต่อ Gmail ดังนั้นโปรดตรวจสอบให้แน่ใจว่าคุณสามารถสลับไปมาระหว่าง 2 แท็บเบราว์เซอร์บนอุปกรณ์ของคุณได้อย่างสะดวกสบายก่อนที่จะเริ่มต้น
- ในเว็บเบราว์เซอร์ให้ไปที่ ผลิตภัณฑ์ ของ GoDaddy
หากคุณมี Conversations เวอร์ชันสแตนด์อโลนให้ขยาย Conversations Unified Inbox ทางด้านขวาของแผน Conversations ให้เลือก กล่องจดหมายทางเว็บ
หรือ
หากคุณมีแผน Websites + Marketing ให้เลื่อนไปที่ Websites + Marketing แล้วเลือก จัดการ ถัดจากเว็บไซต์ของคุณ ในเมนูด้านซ้ายให้ขยาย Conversations
- เลือกการตั้งค่า
- Select Channels.
- Expand Email, and then select Connecct. (If you already have a connected Gmail address, select Add another.)
Note: If you have a Websites + Marketing plan and have enabled chat for your website, you’ll have a default email address to receive chat notifications. This is an internal email address created for you by GoDaddy. Connecting Gmail to Conversations will not affect this default email address.
- เลือก Gmail แล้วเลือก ถัดไป
- ป้อนที่อยู่ Gmail ที่คุณต้องการเชื่อมต่อกับการสนทนาและเลือก ถัดไป
- ป้อนชื่อที่ลูกค้าของคุณจะเห็นเมื่อคุณส่งอีเมลและเลือก ถัดไป
- เลือก เปิดการตั้งค่า Gmail
- A new tab will open, showing your Gmail settings.
Warning: Make sure you keep both tabs open because you’ll need to switch between them to be guided through the steps.
- Go back to the Conversations tab and select Copy next to the forwarding address.
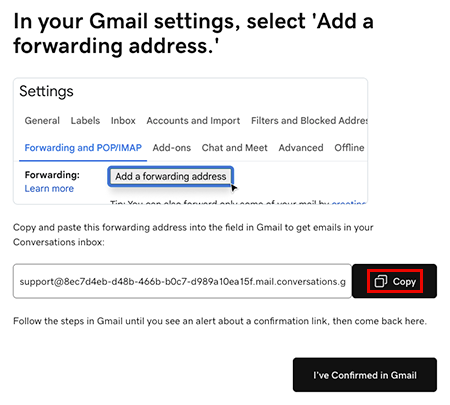
- ไปที่แท็บการตั้งค่า Gmail ภายใต้การ ส่งต่อและ POP / IMAP ให้ เลือก เพิ่มที่อยู่สำหรับส่งต่อ วางที่อยู่ลงในกล่องข้อความแล้วเลือก ถัดไป คุณอาจต้องยืนยันว่าเป็นคุณ ทำตามคำแนะนำบนหน้าจอเพื่อดำเนินการนี้
- คุณจะได้รับข้อความแจ้งว่ามีการส่งลิงก์ยืนยันไปยังที่อยู่อีเมลที่คุณป้อน เลือก ตกลง
- Back in the Conversations tab, select I’ve Confirmed in Gmail, and then select Confirm Forwarding in Gmail.
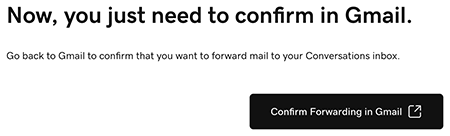
- A new tab will open, showing a Gmail confirmation. Select Confirm. When you see the Confirmation Success! message, you can close this tab.
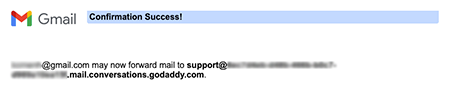
- Go to the Gmail settings tab and reload the page.
Warning: If you don’t reload the page you might not see the option to select Forward a copy of incoming mail.
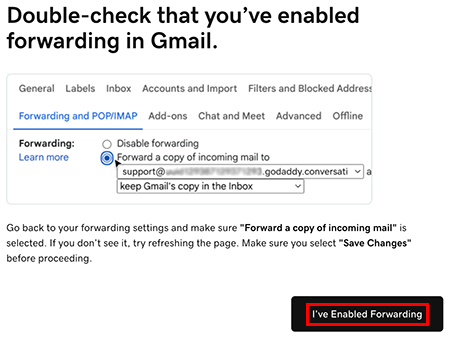
- Under Forwarding and POP/IMAP, make sure Forward a copy of incoming mail is selected. At the bottom of the page, select Save Changes.
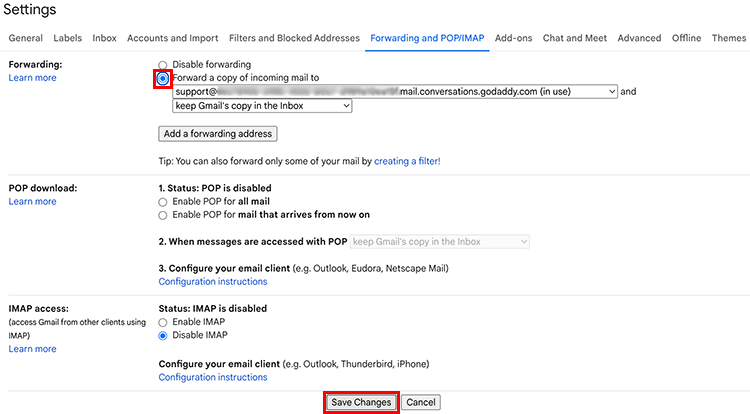
- You’ll be taken to your Gmail inbox. At the top of the page you’ll find a message saying you’re now forwarding your email.

- In the Conversations tab, select I’ve Enabled Forwarding.
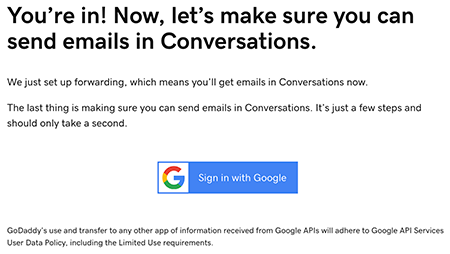
- A message will let you know you’ve successfully set up email forwarding. It could take up to 5 minutes for this message to show. Select Sign in with Google to start the process of making sure you can also reply to Gmail messages from Conversations.
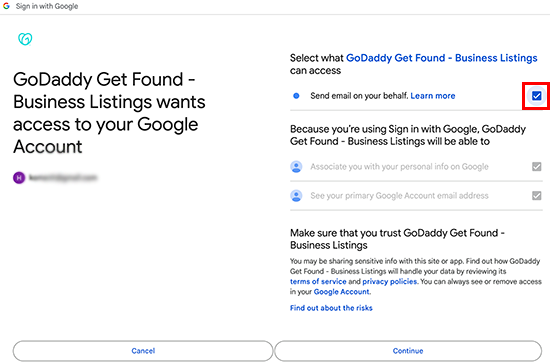
- ลงชื่อเข้าใช้บัญชี Gmail ที่คุณเชื่อมต่อกับ Conversations แล้วเลือก ดำเนินการต่อ
- Make sure Send email on your behalf is checked and select Continue.
- ในข้อความล่าสุดของ Conversations คุณจะพบอีเมลยืนยันว่าได้ตั้งค่าการส่งต่อแล้ว
หมายเหตุ: แม้ว่าคุณจะได้รับข้อความที่ส่งไปยังบัญชี Gmail ของคุณทั้งใน Gmail และ Conversations หากคุณตอบกลับจากบัญชี Gmail การตอบกลับของคุณจะไม่ปรากฏใน Conversations นี่เป็นเพราะวิธีการส่งต่อใน Gmail
คุณพร้อมแล้ว! ตอนนี้คุณสามารถใช้กล่องจดหมายแบบรวม Conversations เพื่อจัดการข้อความ Gmail ทั้งหมดของคุณรวมถึงข้อความจากช่องทางอื่น ๆ ที่คุณเชื่อมต่อกับ Conversations