Edit daftar pengirim aman dan diblokir saya
Catatan: Keamanan Email Tingkat Lanjut hanya tersedia dalam bahasa Inggris. Meskipun artikel bantuan tersedia dalam bahasa lokal Anda, namun antarmuka produk, fungsionalitas, dan keluarannya hanya tersedia dalam bahasa Inggris.
Kontrol email mana yang dikirim ke karantina dengan menambahkan alamat email, domain, atau alamat IP tertentu ke Daftar Izinkan atau Daftar Blokir Anda. Email dari pengirim yang diizinkan tidak akan dikarantina, sedangkan email dari pengirim yang diblokir akan dikarantina.
- Masuk ke halaman Keamanan Email Lanjutan GoDaddy (gunakan nama pengguna dan kata sandi GoDaddy Anda).
- Pilih Masuk ke Keamanan Email Lanjutan . Halaman masuk akan terbuka.
- Masukkan alamat email Anda, pilih Masuk , lalu Masuk Dengan Microsoft .
- Ikuti perintah di layar untuk masuk dengan alamat email dan kata sandi Microsoft 365. Portal Keamanan Email Lanjutan akan terbuka.
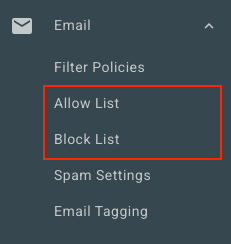
- Di sisi paling kiri, pilih Email . Tergantung pada apakah Anda ingin menambahkan pengirim ke Daftar Perbolehkan atau Daftar Blokir, tentukan pilihan:
- Izinkan Daftar : Pilih Izinkan Daftar . Di sudut kanan atas, pilih Tambah Izinkan Entri .
- Daftar Blokir : Pilih Daftar Blokir . Di sudut kanan atas, pilih Tambah Blokir Entri .
- Di bawah Izinkan atau Blokir yang berikut , masukkan alamat email, domain, atau alamat IP. Pisahkan setiap pengirim dengan koma atau titik koma, atau dengan memasukkannya di baris baru.
- Pilih Simpan.
Edit Izinkan dan Blokir Daftar untuk semua pengguna
Jika Anda adalah admin, Anda bisa melihat dan mengedit Izinkan dan Daftar yang Diblokir untuk semua pengguna di organisasi.
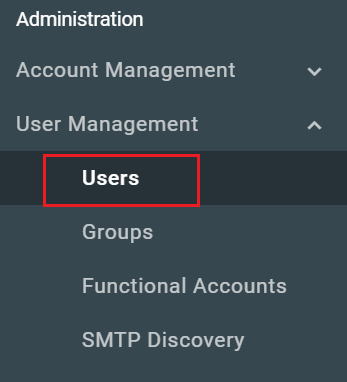
- Di sisi paling kiri, pilih Manajemen Pengguna , lalu Pengguna .
- Pilih Nama / Alamat Email pengguna yang ingin Anda edit.
- Di bagian atas halaman, pilih Izinkan Daftar atau Blokir Daftar , tergantung pada daftar yang ingin Anda edit.
Anda dapat melihat dan mengedit daftar setiap pengguna dengan mengulangi langkah-langkah ini.