เข้าถึงและปล่อยอีเมลที่ถูกกักบริเวณโดยใช้การรักษาความปลอดภัยของอีเมลขั้นสูง
หมายเหตุ: การรักษาความปลอดภัยอีเมลขั้นสูงให้บริการเป็นภาษาอังกฤษเท่านั้น แม้ว่าบทความช่วยเหลือจะพร้อมให้บริการในภาษาท้องถิ่นของคุณ แต่อินเทอร์เฟซฟังก์ชันการทำงานและเอาต์พุตของผลิตภัณฑ์จะเป็นภาษาอังกฤษเท่านั้น
ด้วยการรักษาความปลอดภัยอีเมลขั้นสูงผู้ใช้และผู้ดูแลระบบสามารถค้นหาและปล่อยอีเมลที่ถูกกักบริเวณได้ อีเมลจะถูกกักกันเมื่อสงสัยว่ามีมัลแวร์หรือฟิชชิ่ง
การรักษาความปลอดภัยอีเมลขั้นสูงอาจกักเก็บข้อความที่ Microsoft 365 อาจไม่ได้ส่งผลให้อีเมลเหล่านี้ถูกจัดเก็บไว้ในเขตกักบริเวณการรักษาความปลอดภัยของอีเมลขั้นสูงแทน คุณสามารถตรวจสอบข้อความที่ถูกกักบริเวณแล้วตัดสินใจว่าจะดำเนินการอย่างไรกับข้อความเหล่านั้นเช่นปล่อยหรือลบข้อความ
- ลงชื่อเข้าใช้หน้า การรักษาความปลอดภัยของอีเมลขั้นสูง ของ GoDaddy (ใช้ชื่อผู้ใช้และรหัสผ่าน GoDaddy ของคุณ)
- เลือก ลงชื่อเข้าใช้การรักษาความปลอดภัยของอีเมลขั้นสูง หน้าลงชื่อเข้าใช้จะเปิดขึ้น
- ป้อนที่อยู่อีเมลของคุณเลือก ลงชื่อเข้าใช้ แล้ว ลงชื่อเข้าด้วย Microsoft
- ทำตามข้อความแจ้งบนหน้าจอเพื่อลงชื่อเข้าใช้ด้วยที่อยู่อีเมลและรหัสผ่าน Microsoft 365 ของคุณ พอร์ทัลการรักษาความปลอดภัยอีเมลขั้นสูงจะเปิดขึ้น
- เลือก การค้นหาบันทึก
- เลือกแท็บที่ตรงกับว่าคุณเป็นผู้ดูแลระบบหรือผู้ใช้
- เลือก ผู้ใช้เฉพาะตาม ด้วยที่อยู่อีเมลที่มีข้อความที่ถูกกักบริเวณ

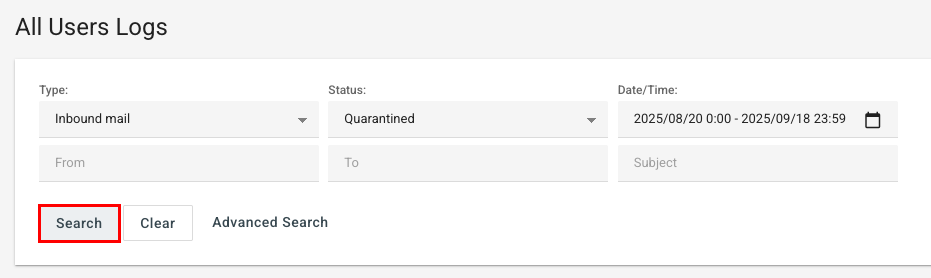
- ภายใต้ ประเภท ให้เลือกว่าอีเมลเป็นอีเมลขาออกหรือขาเข้าจากนั้นเลือกช่วงวันที่ที่ส่งหรือรับอีเมล
- ภายใต้ สถานะ ให้เลือก กักบริเวณ
- เลือก ค้นหา การดำเนินการนี้จะส่งคืนรายการข้อความที่ถูกกักเก็บสำหรับผู้ใช้ดังกล่าวภายในตัวกรองที่คุณระบุ
- หากต้องการดำเนินการกับข้อความใดข้อความหนึ่งให้เลือกภายใต้ การดำเนินการ
 ดูตัวอย่าง จากที่นี่คุณสามารถทำสิ่งต่อไปนี้ได้:
- ปล่อย : ปล่อยข้อความจากเขตกักบริเวณเพื่อส่งไปยังกล่องขาเข้าของผู้รับ
- ปล่อยและรายงาน : ปล่อยข้อความจากเขตกักบริเวณเพื่อส่งไปยังกล่องขาเข้าของผู้รับและรายงานว่าเป็นอีเมลเชิงบวก (อีเมลที่ทำเครื่องหมายว่าเป็นสแปมอย่างไม่ถูกต้อง)
- ลบ : ลบข้อความออกจากเขตกักบริเวณ ข้อความจะไม่ถูกส่งไปยังผู้รับและไม่สามารถกู้คืนได้

- หากต้องการดำเนินการกับหลายข้อความให้เลือกช่องทำเครื่องหมายถัดจากแต่ละข้อความ เหนือรายการข้อความให้เลือก การดำเนินการ แล้วเลือกรายการใดรายการหนึ่งต่อไปนี้:
- ปล่อยจากเขตกักบริเวณ : ส่งข้อความที่เลือกไปยังกล่องขาเข้าของผู้รับ
- ปล่อยและอนุมัติ : ส่งข้อความไปยังกล่องขาเข้าของผู้รับและเพิ่มผู้ส่งไปยังรายการอนุญาตดังนั้นข้อความในอนาคตจากผู้ส่งรายเดียวกันจะไม่ถูกกักบริเวณ
- รายงานว่าเป็นข้อมูลเท็จ : ทำเครื่องหมายข้อความที่เลือกเป็นอีเมลที่ถูกต้องซึ่งระบุไว้อย่างไม่ถูกต้องว่าเป็นสแปม
- รายงานผลลบเท็จ : ทำเครื่องหมายข้อความที่เลือกว่าเป็นสแปมหรือเป็นอันตรายแม้ว่าข้อความเหล่านั้นจะไม่ได้ถูกกักบริเวณก็ตาม
- ซ่อนอีเมลจากบันทึก : ซ่อนข้อความเพื่อไม่ให้ปรากฏในการค้นหาบันทึก
หมายเหตุ: การรายงานข้อความหลายข้อความว่าเป็นผลบวกเท็จหรือเชิงลบเป็นเท็จเป็นคุณสมบัติที่ผู้ดูแลระบบเท่านั้น
- ภายใต้ ประเภท ให้เลือกว่าอีเมลเป็นอีเมลขาออกหรือขาเข้าจากนั้นเลือกช่วงวันที่ที่ส่งหรือรับอีเมล
- ภายใต้ สถานะ ให้เลือก กักบริเวณ
- เลือก ค้นหา การดำเนินการนี้จะส่งคืนรายการข้อความที่ถูกกักเก็บสำหรับผู้ใช้ดังกล่าวภายในตัวกรองที่คุณระบุ
- หากต้องการดำเนินการกับข้อความใดข้อความหนึ่งให้เลือกภายใต้ การดำเนินการ ดูตัวอย่าง จากที่นี่คุณสามารถทำสิ่งต่อไปนี้ได้:
- รายงานผลบวกลวง : รายงานว่าข้อความถูกทำเครื่องหมายว่าเป็นสแปมอย่างไม่ถูกต้อง
- ปล่อย : ปล่อยข้อความจากเขตกักบริเวณเพื่อส่งไปยังกล่องขาเข้าของผู้รับ
- ลบ : ลบข้อความออกจากเขตกักบริเวณ ข้อความจะไม่ถูกส่งไปยังผู้รับและไม่สามารถกู้คืนได้

- หากต้องการดำเนินการกับหลายข้อความให้เลือกช่องทำเครื่องหมายถัดจากแต่ละข้อความ เหนือรายการข้อความให้เลือก การดำเนินการ แล้วเลือกรายการใดรายการหนึ่งต่อไปนี้:
- ปล่อยจากเขตกักบริเวณ : ส่งข้อความที่เลือกไปยังกล่องขาเข้าของผู้รับ
- ปล่อยและอนุมัติ : ส่งข้อความไปยังกล่องขาเข้าของผู้รับและเพิ่มผู้ส่งไปยังรายการอนุญาตดังนั้นข้อความในอนาคตจากผู้ส่งรายเดียวกันจะไม่ถูกกักบริเวณ
- ซ่อนอีเมลจากบันทึก : ซ่อนข้อความเพื่อไม่ให้ปรากฏในการค้นหาบันทึก
อาจใช้เวลาถึง 24 ชั่วโมงอีเมลที่ถูกปลดออกจากเขตกักบริเวณจึงจะปรากฏในกล่องขาเข้า หากข้อผิดพลาดเกิดขึ้นให้รอ 5 นาทีแล้วลองอีกครั้ง
ตามค่าเริ่มต้นอีเมลที่ถูกกักเก็บจะถูกเก็บไว้หรือถูกเก็บไว้ในเขตกักบริเวณเป็นเวลา 30 วัน ผู้ดูแลระบบสามารถ เปลี่ยนระยะเวลาการเก็บรักษาได้ ในการตั้งค่าสรุปการกักเก็บ
ขั้นตอนที่เกี่ยวข้อง
- อัพเดตรายชื่อผู้ส่งที่ปลอดภัยและถูกบล็อก เพื่อให้แน่ใจว่ามีการส่งข้อความไปยังเขตกักบริเวณ
- แทนที่จะเก็บสแปมและอีเมลขยะส่วนใหญ่ไว้ในเขตกักบริเวณแล้วส่งสรุปรายวันให้คุณคุณสามารถส่งข้อความไปยังโฟลเดอร์อีเมลขยะได้โดยตรง เรียนรู้เพิ่มเติมเกี่ยวกับแท็กและการนำส่งและดูว่าสามารถใช้งานแท็กได้หรือไม่สำหรับบัญชีของคุณ
ข้อมูลเพิ่มเติม
- หากต้องการเปลี่ยนผู้ที่ปล่อยอีเมลที่ถูกกักกันได้ให้แก้ไข การตั้งค่าสแปม
- รับประโยชน์สูงสุดจากการรักษาความปลอดภัยอีเมลขั้นสูง
- ปล่อยหรือลบข้อความที่ Microsoft 365 กักไว้