Modifier mes listes d'expéditeurs sécurisés et bloqués
Contrôlez quel email est envoyé en quarantaine en ajoutant une adresse email, un domaine ou une adresse IP spécifique à votre liste verte ou à votre liste rouge. Les emails des expéditeurs autorisés ne seront pas mis en quarantaine, contrairement aux emails des expéditeurs bloqués.
- Connectez-vous à votre page Sécurité avancée de la messagerie GoDaddy (utilisez votre nom d'utilisateur et votre mot de passe GoDaddy).
- Sélectionnez Se connecter à Advanced Email Security . La page de connexion s’ouvre.
- Entrez votre adresse email, sélectionnez Se connecter , puis Se connecter avec Microsoft .
- Suivez les invites à l'écran pour vous connecter avec votre adresse email et votre mot de passe Microsoft 365. Le portail Advanced Email Security s'ouvre.
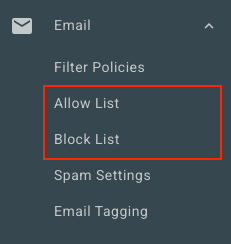
- Sur le côté gauche, sélectionnez Email . Selon que vous souhaitez ajouter un expéditeur à votre liste verte ou à votre liste rouge, sélectionnez une option:
- Autoriser la liste : sélectionnez Autoriser la liste . Dans le coin supérieur droit, sélectionnez Ajouter une entrée autorisée .
- Liste de blocage : sélectionnez Liste de blocage . Dans le coin supérieur droit, sélectionnez Ajouter une entrée de bloc .
- Sous Autoriser ou bloquer les éléments suivants , entrez une adresse email, un domaine ou une adresse IP. Séparez chaque expéditeur par une virgule ou un point-virgule, ou en le saisissant sur une nouvelle ligne.
- Sélectionnez Enregistrer.
Modifier les listes d’autorisation et de blocage pour tous les utilisateurs
Si vous êtes un administrateur, vous pouvez afficher et modifier les listes autorisées et bloquées pour tous les utilisateurs de l’organisation.
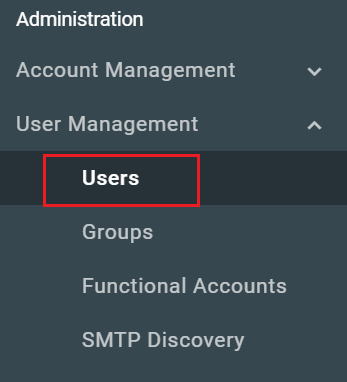
- Sur le côté gauche, sélectionnez Gestion des utilisateurs , puis Utilisateurs .
- Sélectionnez le nom / l'adresse mail de l'utilisateur que vous souhaitez modifier.
- En haut de la page, sélectionnez Liste verte ou Liste rouge , en fonction de la liste que vous souhaitez modifier.
Vous pouvez voir et modifier la liste de chaque utilisateur en répétant ces étapes.