Modifica i miei elenchi di mittenti sicuri e bloccati
Nota: Advanced Email Security è disponibile solo in inglese. Sebbene gli articoli della guida siano disponibili nella tua lingua locale, l'interfaccia, le funzionalità e i risultati del prodotto sono esclusivamente in inglese.
Controlla quale email viene inviata in quarantena aggiungendo un indirizzo email, un dominio o un indirizzo IP specifico al tuo elenco di indirizzi consentiti o all'elenco di indirizzi bloccati. Le email dei mittenti consentiti non andranno in quarantena, a differenza di quelle dei mittenti bloccati.
- Accedi alla pagina Sicurezza email avanzata di GoDaddy (usa il nome utente e la password di GoDaddy).
- Seleziona Accedi a Advanced Email Security . Si aprirà la pagina di accesso.
- Inserisci il tuo indirizzo email, seleziona Accedi , quindi Accedi con Microsoft .
- Segui le istruzioni sullo schermo per accedere con il tuo indirizzo email Microsoft 365 e la tua password. Si aprirà il portale Advanced Email Security.
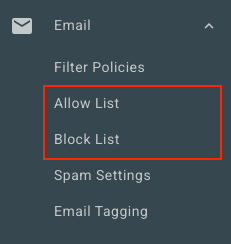
- Sul lato più a sinistra, seleziona Email . A seconda che tu voglia aggiungere un mittente all'Elenco consentiti o all'Elenco bloccati, seleziona un'opzione:
- Consenti elenco : seleziona Consenti elenco . Nell'angolo in alto a destra, seleziona Aggiungi Consenti voce .
- Elenco di blocco : Seleziona Elenco di blocco . Nell'angolo in alto a destra, seleziona Aggiungi voce di blocco .
- In Consenti o blocca quanto segue , inserisci un indirizzo email, un dominio o un indirizzo IP. Separare ogni mittente con una virgola o un punto e virgola oppure inserendolo in una nuova riga.
- Seleziona Salva.
Modifica gli elenchi di indirizzi consentiti e bloccati per tutti gli utenti
Se sei un amministratore, puoi visualizzare e modificare gli elenchi di elementi consentiti e bloccati per tutti gli utenti dell'organizzazione.
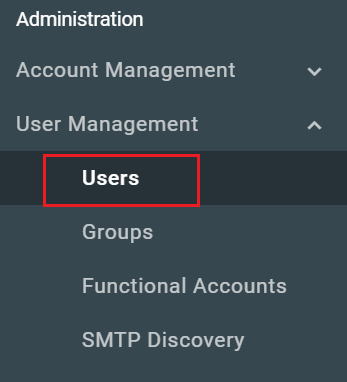
- Sul lato più a sinistra, seleziona Gestione utenti , quindi Utenti .
- Seleziona il nome/indirizzo email dell'utente che desideri modificare.
- In cima alla pagina, seleziona Elenco consenti o Elenco elementi bloccati , a seconda dell'elenco che desideri modificare.
Puoi visualizzare e modificare l'elenco di ciascun utente ripetendo questi passaggi.