Crear publicación en el blog
En una publicación de blog, escribes contenido basado en un tema o palabras clave, le das formato y agregas una foto. Todo lo que queda es publicar ahora o programarlo para más adelante. ¿No sabes qué decir? Las versiones en borrador se guardan automáticamente, así que solo anota una idea rápida y termina cuando estés listo. Recuerda agregar una sección de blog a tu sitio web para mostrar las publicaciones.
Este video es parte de la serie de Cómo usar un blog para tu negocio .
- Ve a la página de tu producto GoDaddy.
- Desplázate hacia abajo, expande Websites + Marketing y selecciona Administrar al lado de tu sitio.
- En tu panel de control, expande Marketing y luego selecciona Blog .
- Selecciona Crear publicación .
- Puedes elegir que la inteligencia artificial (IA) genere una publicación para ti o crear una tú mismo.
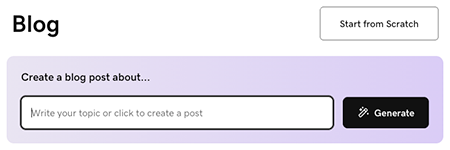
Para que AI genere una publicación para ti:
- Ingresa un tema o una breve descripción para guiar de qué se trata la publicación del blog, o simplemente selecciona Generar para permitir que la IA genere una publicación basada en lo que sabe sobre tu negocio.
- La IA generará una publicación de blog y la mostrará para que puedas previsualizarla. Usa la interfaz de chat para hacer cambios, si es necesario, o selecciona Editar en la vista previa de la publicación del blog para editar manualmente la publicación.
Para escribir una publicación tú mismo, selecciona Comenzar desde cero y sigue estos pasos:
- Comienza con el título. Debe contener la palabra clave de tu idea principal y dar a los lectores una idea del beneficio que obtendrán al leer tu artículo. Tu título debe tener menos de 65 caracteres.
- Agrega el cuerpo del texto. Escribe en un tono de conversación y usa encabezados para separar ideas. Resalta el texto para darle formato y vincularlo.
- Con el cursor en el área de texto, selecciona
 agregar para agregar imágenes, video o un separador . Agrega una imagen o video de archivo, o una de tus propias imágenes o videos. Obtén más información sobre cómo crear una imagen de aspecto profesional .
 - Agrega tu imagen destacada. Se mostrará en tu publicación y en la sección del blog de tu sitio web.
- Elige una categoría o agrega una nueva. Las categorías te permiten crear varios blogs en tu sitio web.
Nota: Para eliminar una línea divisoria, selecciona la línea y presiona la tecla de retroceso o eliminar en tu teclado. - Selecciona Publicar ahora para publicar tu publicación de blog inmediatamente, o selecciona Programar , y luego selecciona la fecha y hora en que deseas que la publicación de blog se publique automáticamente.
- Para completar el proceso, selecciona Publicar ahora .
Mejores prácticas para publicaciones en el blog
Estos videos son parte de la serie Cómo usar un blog para tu negocio .
Más información
- ¡Has creado una publicación! Ahora es el momento de agregar una sección de publicación de blog a tu sitio web .