Bearbeiten Sie meine Listen für sichere und blockierte Absender
Steuern Sie, welche E-Mail an die Quarantäne gesendet wird, indem Sie entweder eine bestimmte E-Mail-Adresse, Domain oder IP-Adresse in Ihre Zulassungsliste oder Sperrliste aufnehmen. E-Mails von zugelassenen Absendern werden nicht unter Quarantäne gestellt, E-Mails von blockierten Absendern dagegen.
- Melden Sie sich auf der Seite für erweiterte E-Mail-Sicherheit von GoDaddy an (verwenden Sie Ihren Benutzernamen und Ihr Passwort für GoDaddy).
- Wählen Sie Anmelden bei Advanced Email Security . Die Anmeldeseite wird geöffnet.
- Geben Sie Ihre E-Mail-Adresse ein, wählen Sie Anmelden und dann Mit Microsoft anmelden .
- Befolgen Sie die Anweisungen auf dem Bildschirm, um sich mit Ihrer Microsoft 365-E-Mail-Adresse und Ihrem Passwort anzumelden. Das Portal für erweiterte E-Mail-Sicherheit wird geöffnet.
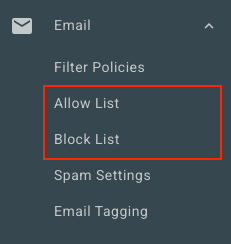
- Wählen Sie ganz links E-Mail aus. Je nachdem, ob Sie einen Absender zu Ihrer Zulassungsliste oder Sperrliste hinzufügen möchten, wählen Sie eine Option:
- Liste zulassen : Wählen Sie Liste zulassen . Wählen Sie in der rechten oberen Ecke Add Allow Entry (Zulassen) .
- Blockierliste : Wählen Sie Blockierliste . Wählen Sie oben rechts die Option Blockeintrag hinzufügen .
- Geben Sie unter Folgendes zulassen oder blockieren eine E-Mail-Adresse, eine Domain oder eine IP-Adresse ein. Trennen Sie jeden Absender durch ein Komma oder Semikolon oder geben Sie ihn in eine neue Zeile ein.
- Wählen Sie Speichern.
Bearbeiten Sie Zulassungs- und Sperrlisten für alle Benutzer
Als Administrator können Sie die Listen für zugelassene und blockierte Benutzer für alle Benutzer in der Organisation anzeigen und bearbeiten.
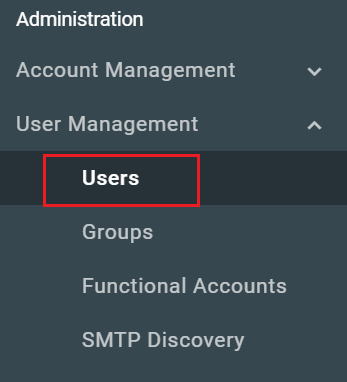
- Wählen Sie ganz links Benutzerverwaltung und dann Benutzer .
- Wählen Sie den Namen / die E-Mail-Adresse des Benutzers aus, den Sie bearbeiten möchten.
- Wählen Sie oben auf der Seite entweder Zulassen oder Blockieren aus , je nachdem, welche Liste Sie bearbeiten möchten.
Sie können die Liste der einzelnen Benutzer anzeigen und bearbeiten, indem Sie diese Schritte wiederholen.