Troubleshoot an external Smart Terminal printer
Try these troubleshooting steps if your external printer isn’t printing Smart Terminal order receipts correctly.
For help with an internal printer, follow our steps for troubleshooting the built-in printer for a GoDaddy Smart Terminal Duo or GoDaddy Smart Terminal Flex.
Complete the steps in the following order until you find the one that resolves your issue.
Step 1: Double-check your setupClick here to verify that all components are connected correctly and the printer has power.
- Follow the connection steps to confirm that the printer is connected correctly to the GoDaddy Smart Terminal via an Ethernet, USB or Bluetooth connection.
- For all wired connections, make sure the cords are undamaged. Unplug and plug in each end of the cord to ensure that all connections are tight.
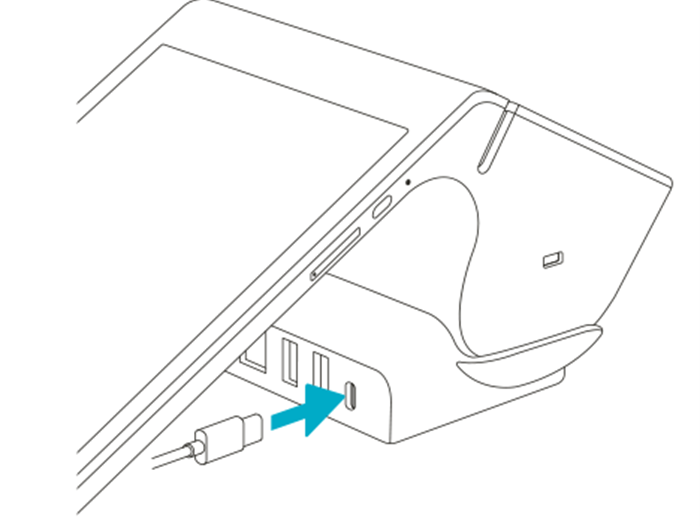
- USB connection (Duo, Pro): Verify that the USB cord is plugged into the correct port on the printer. For Star Micronics TSP-143 model printers, this port is labeled Windows USB-C. For different models, please review the printer instruction manual to verify the correct port.
- Smart Terminal Duo: The Smart Terminal must remain in the charging dock while using the USB printer.
- Ethernet (LAN) connection (Duo, Pro, Flex): Verify that the Ethernet cord is plugged securely into the router and the printer. The GoDaddy Smart Terminal must be connected to the same router (via Wi-Fi or a second Ethernet connection) as the printer.
Note: If your Smart Terminal is connected to the router via Ethernet, it must remain on the charging dock to support the wired Ethernet connection.
- Bluetooth connection (Duo, Pro): Make sure the printer and the Smart Terminal are close, generally within 10-15 feet.
- For connections using the charging dock, run a diagnostic test to make sure the charging dock is connected properly.
- Tap Help on the second page of the Smart Terminal home menu.
- At the bottom of the screen, tap Diagnostics.
- Tap Dock to test the connection to the dock or hub.
- If the test result shows Docked, everything is connected correctly. If it shows Not Docked, review your connections, then try scanning again:
- Smart Terminal Duo: Seat the Smart Terminal in the docking station with the ports facing toward the merchant screen.
- Smart Terminal Duo: Seat the Smart Terminal in the docking station with the ports facing toward the merchant screen.
- Verify that the printer has power.
- Make sure there is no damage to the printer’s power cord and plug one end of the cord into the printer and the other into a wall outlet.
- Check that all connections are tight. This includes the connections at the power source, the power brick (if included) and the printer port.
- For power cords that include a power brick with an LED light, verify that the LED light is on.
- Press the power button on the printer.
- If there’s no power to the printer, try plugging the power cord into a different wall outlet or power source.
Step 2: Look for error messages or LED lightsClick here to check for error indicators on the printer.
For issues within the printer itself (such as paper jams or software errors), there may be an error message or combination of flashing or solid LED lights on the printer to help alert you to the problem.
The instruction manual for your printer includes information about how to decode and solve these alerts. Review the information for current compatible printers below, or check with your printer manufacturer for assistance:
Step 3: Reload the printer paperClick here to verify that the paper roll is loaded correctly.
Make sure that the paper roll is loaded correctly and there are no obstructions in the paper compartment. Then, complete a self-print test to rule out any issues with the printer paper connection.
Double-check the printer paper roll
- Make sure you’re using the correct type of paper for your printer. Most compatible external receipt printers use thermal printer paper rolls (not ink).
- Verify that the printer paper is loaded correctly into the external printer. Review the instruction manual that came with your printer to check the paper roll orientation.
- Clear the printer paper compartment of any torn or loose bits of paper. The paper roll should be properly rolled, and not too loose.
Perform a self-print test
- With the printer powered off, press and hold the printer’s feed button.
- While holding the feed button, press and hold the power button until the printer begins printing. (You may need to hold it for a few seconds.)
- The printer will print two test receipts. Release the feed button when the first receipt begins printing.
Step 4: Enable paper receipts and run a receipt testClick here to adjust your receipt settings.
The external printer will only print the types of receipts you enable in the settings. Check the device settings to make sure that the external printer and paper receipts are enabled.
Enable the external printer
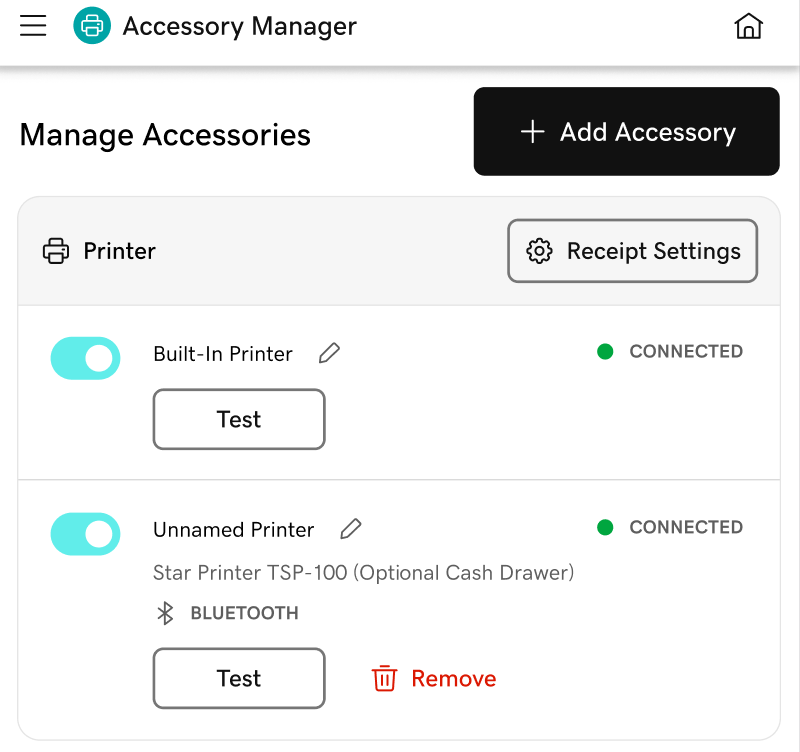
- Tap Accessories on the first page of the Smart Terminal home screen.
- Under Printer, use the toggle to turn on the external printer. You should see Connected next to the printer.
Enable paper receipts
- Tap Accessories on the first page of the Smart Terminal home menu.
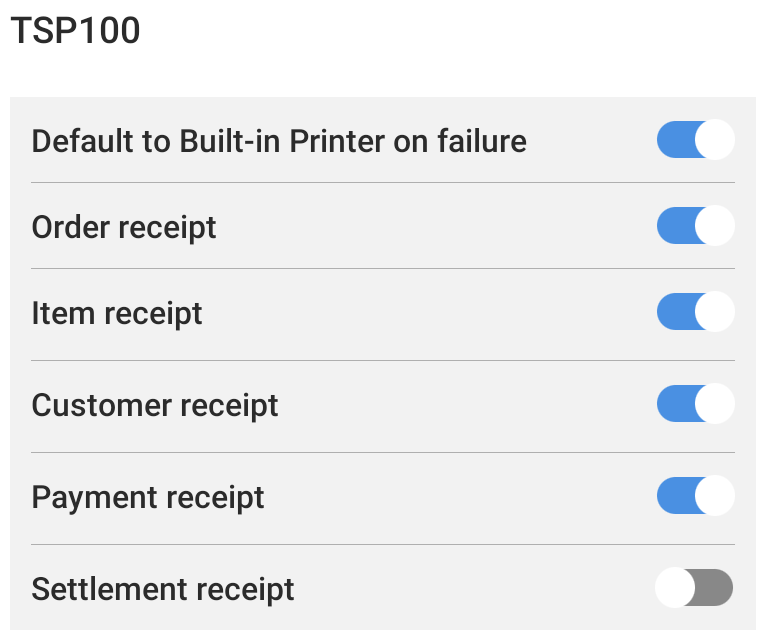
- Tap Receipt Settings to access the receipt settings for your Smart Terminal.
- Under Store Settings, use the toggle to turn on Enable paper receipt.
- Scroll down to your printer model. Use the toggles to turn on the applicable receipt types (Order receipt, Item receipt, etc.).
Reboot and run a receipt test
- Hold down the Smart Terminal power button until the screen goes dark, wait about 30 seconds, then press and hold the power button until it turns back on again.
- Tap Accessories on the first page of the Smart Terminal home screen.
- Under Printer, tap Test next to the printer name to print a test receipt.
Step 5: Reset the printerClick here for steps to reset your printer.
Perform a factory reset on the printer and try printing again.
The instruction manual for your printer includes steps to restore it to factory defaults. Review the steps for current compatible printers below, or check with the manufacturer for your scanner for assistance with resetting it:
Step 6: Contact customer supportClick here for additional support.
If you’ve gone through troubleshooting and the printer still isn’t working, it may need to be replaced. It’s a good idea to check the device manual or manufacturer first, though, to make sure you’ve covered all your bases.
If replacement is needed:
- For accessories purchased from GoDaddy, please contact us for assistance.
- For all other accessory purchases, please contact the device manufacturer or the retailer where you made the purchase.
Note: If you purchased the accessory through a different retailer, make sure that the printer is compatible with your GoDaddy Smart Terminal.
More info
- Connect a barcode scanner or a different external accessory to your GoDaddy Smart Terminal.
- Check compatible accessories and order an accessory for your GoDaddy Smart Terminal.
- Learn about the warranty for hardware and accessories purchased through GoDaddy.