Add an MX record
MX records (or Mail eXchanger record) tell email services connected to your domain, such as Microsoft 365, where and how to deliver emails. If your domain is using GoDaddy nameservers and it's connected to one of our email services, we'll automatically add the required MX records for you. Otherwise, you'll need to get the correct MX records settings from your email provider.
Note: Adding, editing, and deleting MX records may interrupt any email services currently connected to your domain. Be cautious and verify your settings before changing MX records.
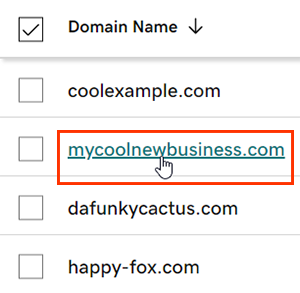
- Sign in to your GoDaddy Domain Portfolio. (Need help logging in? Find your username or password.)
- Select an individual domain to access the Domain Settings page.
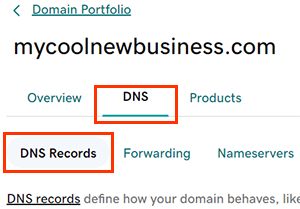
- Select DNS to view your DNS records.
- Select Add New Record and then select MX from the Type menu.
- Enter the details for your new MX record. These will come from your email service provider.
- Name: The hostname or prefix of the record, without the domain name. Enter @ to put the record on your root domain, or enter a prefix such as mail to deliver mail to an email address like info@mail.coolexample.com. The Name must follow these guidelines:
- Periods (.) are allowed but not as the first or last character
- Consecutive periods (…) are not allowed
- Cannot begin or end with a hyphen (-)
- 63 characters in a row not separated by a period (.)
Example: 63characters.63characters.coolexample.com
- 255 characters maximum
- Priority: The priority determines which record to contact first when multiple MX records exist on the domain. A lower number means more preferred, and the record with the lowest priority will be used first.
- Value: The domain of the mail server, such as smtp.secureserver.net.
- TTL (Time to Live): The amount of time the server should cache information before refreshing. The default setting is 1 hour.
- Name: The hostname or prefix of the record, without the domain name. Enter @ to put the record on your root domain, or enter a prefix such as mail to deliver mail to an email address like info@mail.coolexample.com. The Name must follow these guidelines:
- (Optional) Select Add More Records to add multiple DNS records at the same time. If you change your mind, select
 Delete to remove any records that haven't been saved yet.
 - Select Save to add your new record. If you added multiple records at the same time, select Save All Records.
- Domains with Domain Protection require additional identity verification. If you've had 2-step verification (2SV) turned on for at least 24 hours, enter the code we sent via SMS, or enter the code from your authenticator app. Otherwise, enter the one-time password we sent to the email address on your GoDaddy account.
Most DNS updates take effect within an hour but could take up to 48 hours to update globally.
Related steps
- Edit an existing MX record if you need to make any changes.
- Create a DNS template to quickly apply DNS records to your domains.
- Get started with professional email and stay connected to your community.
More info
- Turn on auto-renew to continue your domain registration uninterrupted.
- Set up 2-step verification for the best security on your domains and account.