Have a product that you want to promote online? Looking to direct traffic to your merchandise? Want to start your own e-store? This article is for you!
We know that building an online store seems like a huge step for small businesses, especially from a fiscal perspective. Even if you are not a tech-head, we have the perfect solution to your problem.
Whether you own a brick and mortar business and want to expand online or you’re interested in starting a new business from scratch, eCommerce can be a highly profitable venture.
Never created a website before? No worries! We kept in mind how daunting this may appear in our guidelines. Regardless of your experience level and technical knowledge, we’ll take you through the steps and checklist to help you launch your e-store today.
Related: Introducing GoDaddy Arabic Website Builder and E-Store
The e-store checklist

In 5 steps, you’ll have your store up and ready without even breaking a sweat. One thing to keep in mind is your e-store’s widgets. The ‘Store Widget’ enables you to sell products on your site. Our robust eCommerce system is easy to set up, compatible with multiple payment processors and shipping providers and can import products from CSV or other shopping cart systems, such as XCart or LiteCommerce.
In addition to having more products, each e-store plan has different features and functionality according to your needs. For more information, see e-store plans here.
1. Add Products to the store
The first step you need to do is create your website. With GoDaddy Arabic Website Builder, you’ll have already completed over 50% of what you need to do. Then, you’ll need to start setting up your products.
To add products to your store:

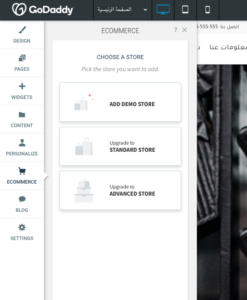
- In the left panel, click eCommerce.
- Click Manage Store.
- Click Catalog and then click Products.
- Click +Add New Product. To import products, click Import Products, select a CSV, XCart, or LiteCommerce file, and click Import.
- Type the product details (name, SKU, price, and so on) and upload an image for each product in your store. Click Save.
- To add more products, click Add New Product.
For more information, see Add and Edit Products in the Store.
2. Localize your store
By localizing your e-store, you’ll already have completed 75% of the setup process including customizing and configuring your E-store. For this, you’ll need to provide units of currency and weight for your products. The default currency is U.S. dollars and kilograms, but you may wish to change these to better suit your location.
To configure your location settings:
- Go to the E-Store Control Panel, click Settings, and then click General.
- Click Regional Settings.
- Configure your preferences for Currency, Weight & Size, Store Language and Date & Time.
- Click Save.
3. Configure shipping
Shipping can be a tricky part of the process but, if you follow this guide, you’ll realize it isn’t as complicated as first thought. If you are selling physical goods, set up your shipping method on your store to make sure your customers pay you for the cost of shipping and they won’t have to worry about it. If you are not selling physical goods, disable the shipping option for those products.
To configure shipping:
- Go to the E-Store Control Panel, and click Shipping & Pickup.
- To add shipping and pickup methods, click +Add Shipping Method or +Add In-store Pickup.
For more information, see shipping options.
4. Set-up payment options
For the most part, you would like to get paid for selling your product online unless you have a promotion or specific coupons.There are several options for your payment method. By default, PayPal and Stripe are the set methods and are the easiest ways for your customers to pay you. However, there is always room for other payment methods depending on what’s popular and convenient for your customer. We allow for a huge variety of other payment methods to be configured on your E-store.
To configure payment options:
- Go to the E-Store Control Panel, and click Payment.
- Click the PayPal, Square or Stripe options to select a payment method, or click Add Manual
- Payment Method to use a different method.
For more information, see about payment options.
You can also set the payment to cash on delivery.
5. Manage the store
Yes, you are almost done! This is the final step for your e-store to be running and ready for merchandise sale and purchase. Once you’ve created your e-store, you will want to manage it by clicking on the eCommerce tab in the left panel, and then clicking the Manage Store to go to the E-Store Control Panel. With this panel, you can manage sales, catalog (products), promotions, and store settings.
You could also add Widgets (for example, cart, search box), store categories as a subpage of your home page or another page on your site and upgrade your store to feature more products.
Start creating your e-store today
No matter what your industry is, GoDaddy Arabic Website Builder and e-store provides customizable templates to fit any and all business types and needs. Ready to start? You can check our plans and pricing and start a free trial here.
For a more information on how to setup your E-store, you can check out our guidelines or contact our GoDaddy Guides to help you get started.


