
If you are wondering how to build a WordPress website, read on for our complete guide to help you get started!
But firstly, why should you master the art of creating a WordPress website?
Now imagine you are a business owner, and you bump into an old friend in your neighbourhood. In your conversation, you talk about how you've recently launched your business and it's picking up pace.
"That's fantastic!", exclaimed your friend. "I must look it up... Can you share your website URL?"
Panic sets in. You realize you've not yet addressed the seemingly daunting task of crafting a website. You've decided that WordPress is your preferred platform, but the process of building a WordPress website is still a mystery to you.
However, learning to create a WordPress website for the first time isn't as challenging as you might assume. Considering that WordPress powers 43.5% of all websites worldwide and is used by more than 540,000 CMS-based websites in India, it's definitely a skill worth acquiring. Plus, many successful websites like Tech Crunch and The New York Times were built using WordPress, proving its effectiveness and versatility.
Mastering the art of building a WordPress website for beginners may not be as difficult as you perceive.
How to build a WordPress website — A tutorial for first-timers
Whether you're building out your new page or want to install plugins, learn how to make a website with WordPress from our guide. From WordPress installation to picking out fonts and templates, we've got you covered.
What is WordPress?
WordPress is a popular, free, and open-source content management system (CMS) that allows anyone to create and manage websites easily, even without any coding knowledge.
Originally launched as a blogging platform, WordPress has evolved to support all types of websites, including business sites, e-commerce stores, portfolios, and more.
Its user-friendly interface, thousands of themes and plugins, and strong community support make it a top choice for beginners in India and around the world. With WordPress, you can customise your website’s design and functionality to suit your needs, making it an ideal platform for building a professional online presence.
Content management systems serve a specific purpose — managing and displaying your content in an organized manner.
All you need is to supply the material you want to present on your site, and the website builder takes up the task of showcasing it. This makes a content management system an excellent tool for anyone looking to create or maintain an aesthetically pleasing, professional website without prior knowledge of programming and coding.
Who should use WordPress?
Mastering how to build a WordPress website is a smart move for anyone seeking an easily maintained yet highly adaptable web solution. Despite the common notion that WordPress is primarily a platform for bloggers, this versatile system is equally effective for a wide array of web pages.
Whether it's a small business aiming to promote their products through ecommerce, a family eager to share their latest photos and news with relatives, or a professional keen to offer their services to a wider audience, WordPress is the tool of choice.
And let's not forget, for bloggers, WordPress is an excellent option, offering superior functionality and ease for all blogging needs.
How does WordPress work?
Let's imagine that building a website is like building a house, using WordPress as your framework.
Consider WordPress as the backbone of your website, providing the structure and support for your site's main functions, much like the frame of a house.
When learning how to build a WordPress website, the first step is adding content, such as text, images, and videos to communicate your message to visitors. This content aligns with the furniture and decor within a house analogy.
The overall appearance of your site, including colors and page layouts, is controlled by your WordPress theme, analogous to the paint and carpet in a house.
However, WordPress's advantage lies in its flexibility. Say you decide to switch your color schemes or reshuffle your layout, you won't require a new website. You can simply alter your design without having to reconstruct your pages.
The charm of WordPress is its ease of editing content, adding features, or entirely redesigning your site without starting from scratch.
You can expand, remove or edit content without any change in functionality. Furthermore, you can change your WordPress theme to give your site a new look without losing any content or having to rebuild your page structure.
WordPress's functionality extends beyond its standard offerings, thanks to plugins. Plugins are like apps that you can install onto your WordPress site to add more functionality. They serve as integrations, enhancing your site's capabilities beyond what WordPress provides by default. Just like adding apps to your mobile device, you can enrich your website's functionality with plugins.
What you need to build a WordPress website?
Every website needs two primary elements: a custom domain name (also referred to as your URL or web address) and a web hosting service.
The domain name is the pathway people will use to reach your site, while the web hosting service pertains to the physical computers that hold and distribute the website's files.
TIP: opt for a reliable hosting company. Choosing so-called "discount" or "free" hosting could end up costing significantly more over time. Begin by securing your web hosting service and domain name.
Starting with a GoDaddy WordPress Hosting account could be a smart move. With these plans, WordPress is automatically installed and set up. In the case of managed hosting, routine tasks like core software updates, website backups, and malware scanning are done for you. Before making a decision, read more about what is web hosting.
If you prefer an unmanaged hosting plan, looking to have a self-hosted website and want to install WordPress on your own, you can download the latest version from WordPress.org. Any hosting plan is viable as long as you have access to a database for storing values and a space for uploading files. We'll delve into self-installation later.
Once you've secured a hosting service and registered a custom domain name, there are a few more things you need to assemble to get your website operational:
- Content — What message are you conveying?
- Images and/or videos — To avoid the monotony of a solely text-based website.
- Theme — WordPress comes pre-installed with several free themes, and there are numerous additional free themes available if you want more choices.
What you DON'T need:
- Pricey editing or web-design software — All content in WordPress can be created, added, and edited through your web browser.
- Large amounts of cash — WordPress is cost-free and hosting plans are quite affordable.
- An advanced degree in computer programming, mathematics, or physics — Once you grasp the basics, navigating WordPress is straightforward!
The easiest way to build a WordPress website
The single easiest way to set up WordPress is to start with a hosting account specifically designed for WordPress websites. If you choose a plan like the Daddy’s WordPress Managed Hosting account, for example, WordPress is already installed for you. Furthermore, if you purchase any annual WordPress Hosting plan from GoDaddy, you can also get a free domain.
Many hosts will offer a one-click option or simple directions to install WordPress directly from their control panel. If WordPress is already installed, you can skip the next section.
Steps for creating your first WordPress website
Step 1: Choose a domain name for your WordPress website
A domain name represents your website's identity, essentially forming the core of your online presence. Comparable to a physical address or telephone number, a domain name is unique, implying that no two domain names can be identical.
A domain name is not just an address, but a critical component of your online existence.
Step 2: Choose a web hosting provider for your website
Choosing the right web hosting provider for your WordPress website is a crucial decision that can significantly impact your site's performance and success.
When scouting for the best options, consider factors such as uptime reliability, server speed, customer service, and scalability. Uptime reliability ensures your site remains accessible to users around the clock, while server speed contributes to user experience and SEO performance. Excellent customer service is vital, as it can help troubleshoot issues quickly and effectively. Scalability is another important consideration, as your hosting provider should be able to accommodate your site's growth and increased traffic over time. Additionally, look for a hosting provider that offers easy WordPress installation and specific WordPress optimization.
Remember, the right web hosting can make a significant difference in your website's performance, so choose wisely.
Step 3: Installing WordPress manually
If you are looking to install WordPress independently, we're here to support you. Some preparation work is required before you can set up WordPress. Let's dive into the process to manually install WordPress.
1. Create a database
We begin the process by creating a database for your WordPress website. Unlike conventional websites from the early days of the internet, which were merely a collection of files stored on a computer, a WordPress website operates on a more advanced level.
In the case of a WordPress website, the site is generated using a blend of files stored on a server and information preserved and retrieved from a database. This necessitates the creation of a database for WordPress to utilize.
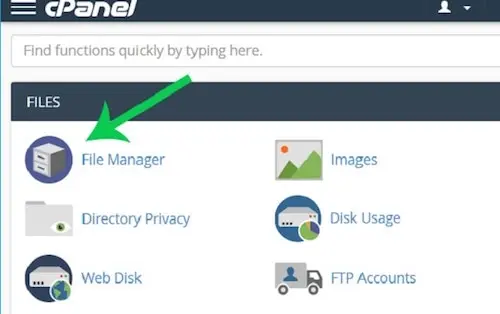
Upon receiving your login credentials, you can access your hosting control panel or cPanel. Once logged in, you'll find a multitude of options on your administrative dashboard. Our first step is to locate the Databases section, where we will create a database using the MySQL Database Wizard.
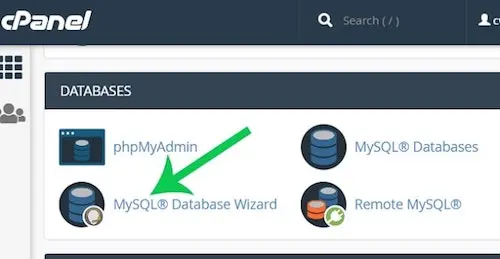
By following the wizard's prompts, you can easily create your database. This involves specifying a database name and creating a database user with a password. Ensure that the user is granted "All Privileges" to the database when prompted.
Keep a record of the database name and the username and password you set up - these will be required shortly. This process underscores the unique way in which we create a WordPress website.
2. Upload the WordPress files
First, download the most recent version of WordPress from WordPress.org.
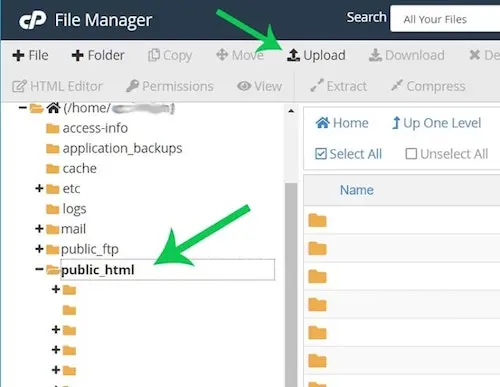
Navigate back to your cPanel dashboard and locate your File Manager. Once you're in, identify the public_html folder—it's the location where you'll set up your files. Click on Upload and transfer the zip file you've just obtained from WordPress.org. After the file finishes uploading, return to the main File Manager window. Right-click on the file and choose "Extract".
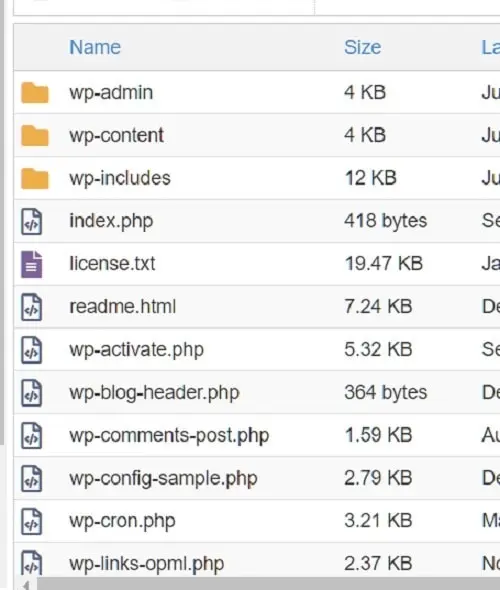
This action will decompress all the WordPress-required files into your working directory. Upon completion, a “wordpress” directory will appear under your “public_html” folder. Click on this directory and select everything within.
At the top of your screen, hit Move and shift all the files into your pubic_html directory. The now-empty “wordpress” folder and the original WordPress zip file can be deleted.
If you've executed all steps correctly, you should you should now see all WordPress files directly under the public_html folder. It resembles the following:
3. Install WordPress and necessary dependencies
Before proceeding, ensure that your server meets the minimum requirements for running WordPress.
This includes having the appropriate versions of PHP and MySQL installed.
You may need to install or update PHP and MySQL to the recommended versions.
Consult your hosting provider's documentation or support resources for guidance on installing these dependencies.
4. Set proper file permissions and ownership
For security purposes, it's crucial to set the correct file permissions and ownership on your WordPress files and directories. You can adjust these settings through your File Manager or using FTP clients. Additionally, ensure that the file ownership is set to the user under which your web server operates.
5. Configure the web server
If you're using Apache or Nginx, you'll need to configure your web server to serve your WordPress site properly.
For Apache, ensure that the mod_rewrite module is enabled to support pretty permalinks.
For Nginx, you'll need to set up the appropriate server blocks and rewrite rules.
6. Secure wp-config.php with unique Authentication Keys and salts
Open the wp-config-sample.php file in your public_html directory and add your database credentials.
Obtain unique authentication keys and salts by visiting the WordPress secret key service.
Replace the placeholders in the wp-config-sample.php file with the generated keys and salts. Save the file as wp-config.php.
7. Install WordPress
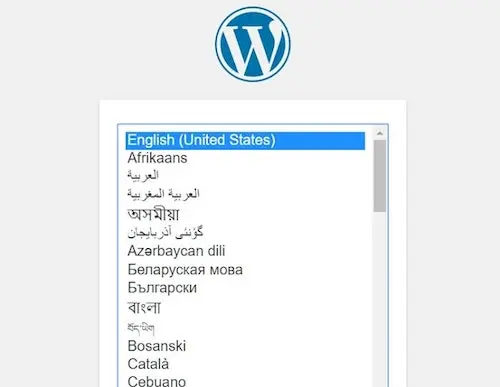
Now, visit your domain in a web browser to run the WordPress installation script.
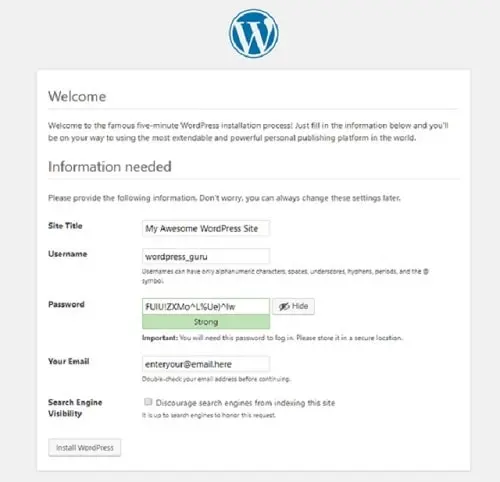
The installation process is quick and straightforward, typically taking less than five minutes. Follow the on-screen instructions to complete the installation. During the installation, you'll set the username and password for your WordPress admin account.
Avoid using "admin" as your username to enhance security. Choose a strong password or let WordPress generate one for you.
Give your website a title if you wish, and complete the installation.
8. Discourage search engines from indexing during development
While developing your site, you might want to prevent search engines from indexing it.
In your WordPress dashboard, go to Settings > Reading and check the option "Discourage search engines from indexing this site".
Remember to uncheck this option when your site is ready to go live.
9. Troubleshoot common installation issues
If you encounter errors during installation, double-check your database credentials in the wp-config.php file.
Ensure that PHP and MySQL are running properly on your server.
Consult the WordPress support forums for guidance on specific error messages.
For additional support and learning resources, you can refer to the official WordPress documentation and community forums.
These platforms provide extensive information and connect you with a community of users who can assist you.
Step 4: Implementing security measures and regular maintenance
After successfully installing WordPress, it's crucial to prioritize the security and maintenance of your website.
Regular backups, timely updates, and robust security measures are essential to protect your site from potential threats.
1. Update WordPress core, themes, and plugins
Ensure that your WordPress core, themes, and plugins are always up to date.
Updates often include security patches and new features that enhance your site's performance and security.
2. Use strong passwords
Create strong, unique passwords for your WordPress admin account, hosting account, and any other accounts associated with your website.
Avoid using common phrases or easily guessable information.
3. Enable two-factor authentication (2FA)
Adding an extra layer of security with 2FA can significantly reduce the risk of unauthorized access.
Consider using a plugin that provides two-factor authentication for your login page.
4. Install security plugins
Enhance your site's security by installing reputable security plugins. These plugins can help monitor your site for suspicious activity, block malicious attempts, and provide firewall protection.
5. Regular backups
Set up a regular backup schedule to ensure you have recent copies of your site. Backups can save you from data loss in case of hacking, server failure, or other issues. Use plugins or hosting services that offer automated backups.
6. Use secure hosting
Make sure your hosting provider offers robust security features, including SSL certificates, firewall protection, and regular malware scanning.
7. Limit login attempts
Limit the number of login attempts to prevent brute force attacks. Security plugins often provide this functionality. By implementing these security measures and maintaining regular updates and backups, you can significantly enhance the protection of your WordPress website.
Step 5: Familiarising yourself with the WordPress dashboard
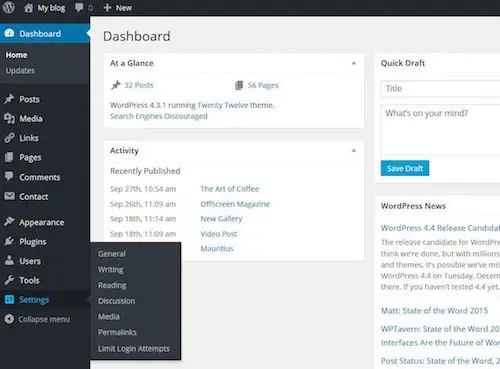
Getting to know the WordPress dashboard is crucial as you understand how to build a WordPress website. The dashboard is the control hub for all aspects of your project. You can access it by typing “yourdomainname/wp-admin” on your browser and logging in with the credentials set during the install process.
The WordPress dashboard is the command center for all WordPress-related tasks. So where to begin?
Start with a brief overview of the various sections that you can leverage to add content to your site and configure WordPress.
Components of your WordPress dashboard
The primary content of your website will be created using posts and pages. Posts are typically used for content that gets updated frequently, like blog articles. Pages are more suitable for content that doesn’t change often, like About Us or Contact Us links.
By default, most themes will showcase your most recent posts on the home page (akin to blogs). However, you can modify this setting to always display a static page, if you prefer. You can find this option and other settings - like timezone setup or administrator email modification - under the Settings tab on the left menu.
The Appearance menu is where you control your theme and all things related to your website's visual display. Here, you can select and upload themes, create menus, and determine sidebar content using widgets.
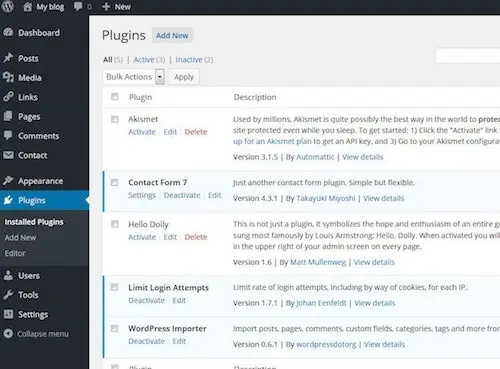
The Plugins menu lets you observe installed plugins and add new ones to your WordPress website.
All plugins installed on your website will appear on this page. However, only activated plugins can be utilized on your site.
Sometimes, upon installing a plugin, a new menu item may appear on the left-hand menu (themes can also add these menus). More often though, new options will be assimilated into the existing menu items.
The Media Library is where you can view, edit, or delete images added to your website. All images, no matter where they're added, will appear in the media library. For instance, you can add an image directly from the post or page edit screen, and it will still show up in the gallery. If an image is added directly to the media gallery, it can be accessed from the Content section of your pages.
Now that you're acquainted with the various areas, let's proceed with some basic setup work. Begin by setting your URL structure.
Step 6: Setting your URLs by configuring permalinks
By default, WordPress uses a URL structure that is not beneficial to SEO (search engine optimisation). To improve the ranking of your website pages on search engine results, we must modify this setup.
It is essential to make this change swiftly, even before you commence the publishing of pages or blog posts. There are numerous other SEO strategies you'll be able to apply later, but for now, let's concentrate on configuring your permalinks.
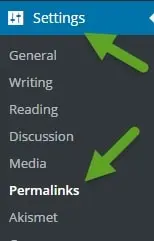
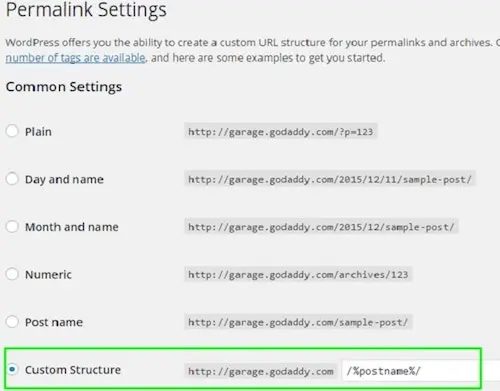
To do this, navigate to the Settings category from your Dashboard, found on the left rail navigation. Choose Settings, followed by Permalinks. By default, the Plain URL writing rule will be activated. This needs to be altered, so pick the Post Name and click Save Changes.
So, what exactly does this achieve?
Originally, WordPress employs "messy" URLs that denote the post ID. We've transformed them into a more user-friendly and readable format. This will not only assist our visitors in locating the pages they desire, but it's also significantly better for SEO.
Now, when we add content, WordPress will generate "pretty" links, allowing us to focus on the website's appearance.
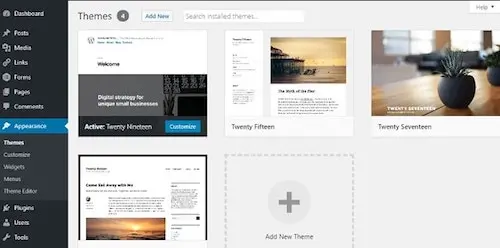
Step 7: Pick a theme for your WordPress website
Building a WordPress website involves several significant elements, with content being the most crucial. However, the WordPress theme you choose also plays a pivotal role as it impacts the website's presentation and the impression it leaves on your visitors.
Selecting a good theme involves various factors, but even without being a web designer, you can learn to design a webpage effectively. The ideal theme should be stable, uncluttered, and user-friendly. It's essential that your chosen theme is responsive, meaning it should seamlessly adapt to different screen sizes such as desktops, tablets, and mobile devices.
The market offers a variety of themes, from free themes for those on a budget or starting out, to premium themes that guarantee a unique and polished web design. Many of these themes, particularly WordPress themes, come with high customizability features, enabling you to modify colors and backgrounds effortlessly. This flexibility helps you attain a distinctive appearance that aligns with your website design concept.
Tips for selecting themes
- Check for Regular Updates - Themes that receive frequent updates are more likely to be secure and compatible with the latest version of WordPress.
- Read User Reviews and Ratings - Feedback from other users can provide insights into the theme's performance and any potential issues.
- Ensure Compatibility with Your Plugins - Verify that the theme works well with the plugins you plan to use.
- Install from Trusted Sources - Obtain themes from reputable sources like the official WordPress repository or well-known developers.
Step 8: Customizing your theme using the WordPress customizer
Once you've selected a theme that fits your website's aesthetic and functional needs, you can further personalize it using the WordPress Customizer. The Customizer is a powerful tool that allows you to make changes to your site's appearance and see those changes in real time.
To access the Customizer, navigate to your WordPress dashboard, then go to Appearance > Customize.
This action will open the Customizer interface, where you'll see a live preview of your site on the right and customization options on the left.
Adjusting colours, fonts, and layouts
Within the Customizer, you can tailor various aspects of your site's design to better reflect your brand and improve user experience:
Colors: Modify the colour scheme of your site, including the background, text, links, and buttons. Consistent use of your brand colours can enhance recognition and professionalism.
Fonts: Choose typography that fits your site's tone and improves readability. You can select different fonts for headings and body text and adjust sizes and styles.
Layouts: Depending on your theme, you can adjust the layout of pages and posts, altering sidebar positions, header layouts, and overall page structure.
Updating logos and site identity
In the Site Identity section, you can upload your site's logo and favicon (the small icon that appears in browser tabs).
You can also edit the site title and tagline, which are important for branding and SEO.
Managing menus and navigation
The Customizer allows you to create and edit menus, improving your site's navigation.
You can add new pages to your menu, rearrange menu items, and assign menus to different locations such as the header or footer.
Preview and publish changes
One of the advantages of the WordPress Customizer is that you can preview all your changes in real time without affecting the live site until you're ready.
Once you're satisfied with the adjustments, simply click the "Publish" button to make the changes live.
Step 9: Building pages and adding content to your WordPress website
Content is typically uploaded to a WordPress website through either a post or a page.
The process of adding content to both is identical.
There are a few important things to remember while managing your content. On the right-hand side, you'll find few additional options. For example, setting a featured image automatically generates a thumbnail image that accompanies posts in many themes. If your content is incomplete, you can save it as a draft. This preserves your edits without publishing them live on your website.
Only the published posts and pages will be visible to the readers.
Basic pages of a website often include the Home, About Us, Services, and Contact Us pages. A basic WordPress website comprises several standard pages, such as a blog page where all your posts are displayed, and a contact page with contact form for readers to get in touch. It’s important to include essential legal and compliance pages such as Terms of Service, Privacy Policy, and Contact pages. These pages not only help you comply with legal regulations but also build trust with your visitors by providing transparency about how you handle their data and how they can get in touch with you.
Step 10: Use plugins and tools to enhance your website
Leverage plugins and tools to augment your WordPress website both aesthetically and functionally.
Below is a concise list of WordPress plugins that can simplify your web design process:
Marketing plugins
These tools can consolidate your marketing efforts on your WordPress website. They offer functionalities like forms, live chat, email marketing, analytics, and more, enhancing your site's user experience.
Security plugins
A security plugin can serve as an excellent add-on to your existing security measures. It provides auditing, monitoring, and scanning functionalities, along with valuable recommendations and notifications.
Tips for Selecting Plugins:
- Check for Regular Updates - Regularly updated plugins are more likely to be compatible with the latest WordPress version and have recent security fixes.
- Read User Reviews and Ratings - Reviews can highlight any issues or benefits experienced by other users.
- Ensure Compatibility with Your WordPress Version - Verify that the plugin is compatible with your current WordPress installation.
- Install from Trusted Sources - Download plugins from reputable sources like the official WordPress plugin repository or trusted developers.
FAQs on building a WordPress website
How much does it cost to build a WordPress website?
WordPress itself is free, but the cost to build a WordPress website can vary a lot depending on the scope of the project.
How hard is it to build a WordPress website?
Building a website can be a challenge, but building a website on a content management system, like WordPress site can make it smoother. With WordPress as a platform, adding pages, updating a website, or changing images can be done easily once you get the hang of it.
How do I build a simple WordPress site?
To build a simple WordPress site you need to follow these steps: choose a domain name, install WordPress, learn how to use the dashboard, set up your URLs, choose a theme and plugins, and start to add content to your website.
How long does it take to build a website in WordPress?
The amount of time it takes to build a WordPress site varies a lot depending on some factors, such as the type and complexity of a website and the experience a web developer has with WordPress. You can build a simple WordPress site in a couple of hours or a couple of months.
Editor's Note: This article was first published on Aug 17, 2023. It was localized and updated on Sep 9, 2024 and May 23, 2025.