使用虛擬主機管理員 (WHM) 設定名稱伺服器 DNS
按照這些步驟設定,即可將您的網域名稱當作伺服器託管網站的名稱伺服器。
必要操作:開始之前,請先為網域名稱建立 WHM 帳戶。如需更多資訊,請參閱在WebHost管理員(WHM)中建立帳戶。
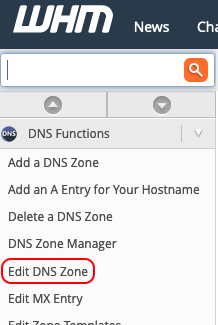
- 登入 WHM。
- 點選「DNS 功能」下的「編輯 DNS 區域」。
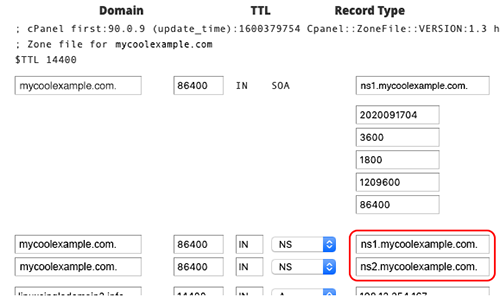
- 選取您想使用的網域名稱,然後點選「編輯」。

- 在功能表顯示「NS」的兩列中,將最右側的欄分別編輯為「ns1.您的網域名稱.」 及 「ns2.您的網域名稱.」。
請注意:別忘記在這些欄位的名稱伺服器後方加上半形句號字元 (「.」)。
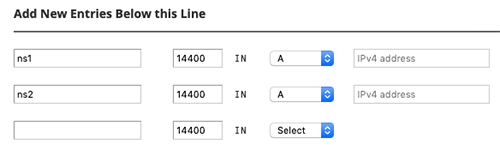
 在「在此行下方新增項目」 部分,對首列執行以下操作:
- 第一個欄位:輸入 ns1
- 第二個欄位:輸入 14400
- 第三個欄位:點選 A
- 第四個欄位:輸入伺服器 IP 位址
- 第一個欄位:輸入 ns2
- 第二個欄位:輸入 14400
- 第三個欄位:點選 A
- 第四個欄位:輸入伺服器 IP 位址
- 點選「儲存」。
請注意:變更後,DNS 可能需要 24-48 小時才能傳播完畢。
然後在第二列執行以下操作:
相關步驟
您現在必須完成以下步驟,以將您的網域名稱作為名稱伺服器:
- 新增您自己的主機名稱,即可將您的網域名稱當作名稱伺服器使用。
- 然後,將您網域的名稱伺服器變更為新的自訂名稱伺服器。