Dodaj minutnik
Promuj ograniczone czasowo oferty lub nadchodzące wydarzenia w witrynie Websites + Marketing za pomocą licznika czasu.
- Przejdź do strony produktu GoDaddy.
- Przewiń w dół, rozwiń pozycję Websites + Marketing i wybierz opcję Zarządzaj obok swojej witryny.
- Wybierz Edytuj witrynę .
- Przejdź do strony i lokalizacji, w której chcesz dodać minutnik, a następnie dodaj sekcję , wyszukując odliczanie czasu w kategorii Ogólne i wybierając Dodaj .
- Ustaw datę początkową i końcową minutnika w lokalnej strefie czasowej. Minutnik nie pojawi się w Twojej witrynie przed datą i godziną rozpoczęcia odliczania.

- Aby edytować wiadomość, która powinna być wyświetlana podczas odliczania, wybierz opcję Podczas odliczania , zaznacz pole Opis , a następnie zaktualizuj opis.
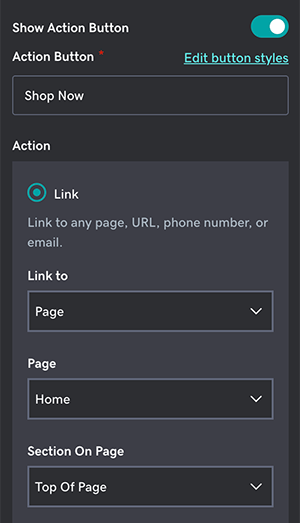
- Aby wyświetlić przycisk zachęcający klientów do wykonania działania, nadal w panelu Podczas odliczania włącz przełącznik Pokaż przycisk akcji . Masz do wyboru następujące dodatkowe opcje:
- Edytuj styl i kolory przycisków.
- Edytuj tekst przycisku.
- Wybierz, co się stanie, gdy klient kliknie przycisk akcji & mdash; połącz go ze stroną, adresem URL, sekcją w Twojej witrynie, numerem telefonu lub adresem e -mail .
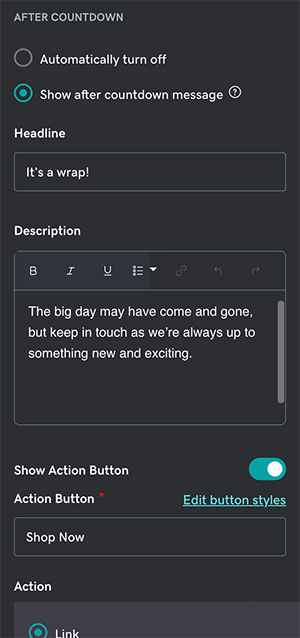
- Aby edytować, co dzieje się po zakończeniu odliczania, wybierz opcję Po odliczaniu i wybierz jedną z następujących opcji:
- Automatycznie wyłącz : Zatrzymuje wyświetlanie licznika czasu w opublikowanej witrynie po wygaśnięciu.
- Pokaż wiadomość po odliczaniu : Zapewnia dalsze opcje wyświetlania krótkiej wiadomości i przycisku akcji, tak jak w kroku 7.
- Usuń lub edytuj obraz tła, który pojawi się za minutnikiem.
- Twoje zmiany są zapisywane automatycznie. Wybierz Podgląd, aby zobaczyć wyniki. Gdy wszystko będzie gotowe, aby opublikować zmiany, opublikuj witrynę .