

If you’ve been around the internet for more than 10 minutes, you already know that computers find each other using unique numerical addresses, or internet protocol (IP) addresses. The domain name system (DNS) serves as the telephone directory that a computer uses to look up the IP address associated with a particular domain. Generally this works smoothly, but there are times when you might need to help it along by modifying the hosts file.
Related: DNS records — A beginner’s guide
Why would you modify the hosts file?
What if you’ve registered a new domain, but the domain name hasn’t propagated around the internet yet and you want to start working on your new site right away?
Or what if you’re working on a development or staging website, but you want your computer to think it’s the actual domain?
This is where a little text file named hosts, nestled deep within your computer, comes in handy.
How does the hosts file work?
When your computer attempts to resolve a host name, it actually starts by checking the hosts file first. If it doesn’t find what it needs there, then it moves on to DNS.
So if you want your computer to associate a domain name with a particular IP address, RIGHT NOW, all you have to do is add the appropriate entry to your local hosts file.
Because your computer checks the hosts file before DNS, you can effectively override DNS.
The hosts file is a simple text file. A line in it looks something like this:
123.45.67.89 www.somedomain.comwhere 123.45.67.89 is the IP address you want www.somedomain.com to point to.
The procedure for editing your hosts file depends on your machine’s operating system.
Modifying a Windows hosts file
To modify the hosts file on a Windows computer, use the Notepad text editor. Recent versions of Windows enforce User Account Control (UAC), so to make changes to the host file you’ll need to run Notepad as an Administrator.
Windows 10 and Windows 8
- Press the Windows key.
- Type Notepad in the search box.
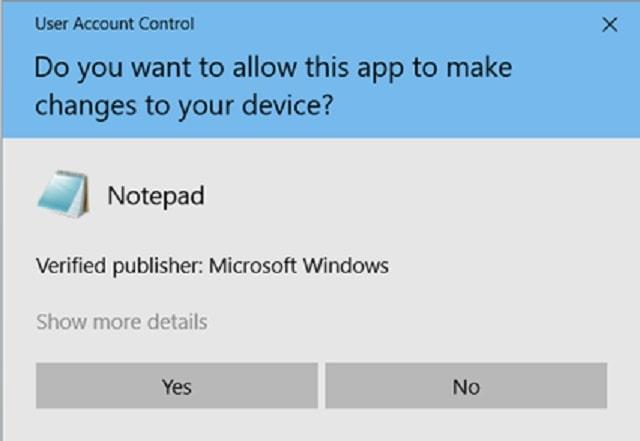
- Right click on Notepad and select Run as administrator.
- Click Yes on the popup that appears.
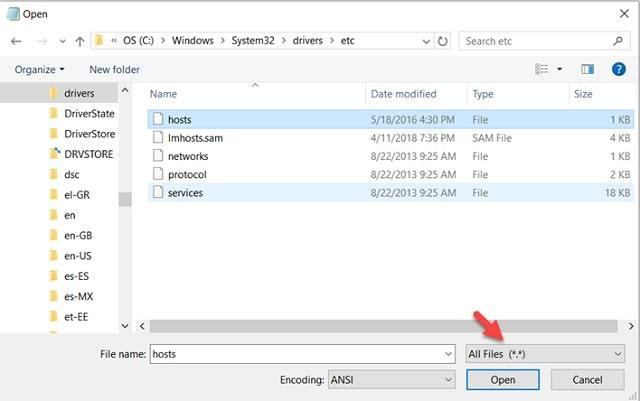
5. Navigate to c:WindowsSystem32driversetc
6. Open the hosts file. (Make sure you have the file type selection set to show all files, not just .txt files.)
When you open the file, it will look similar to this:
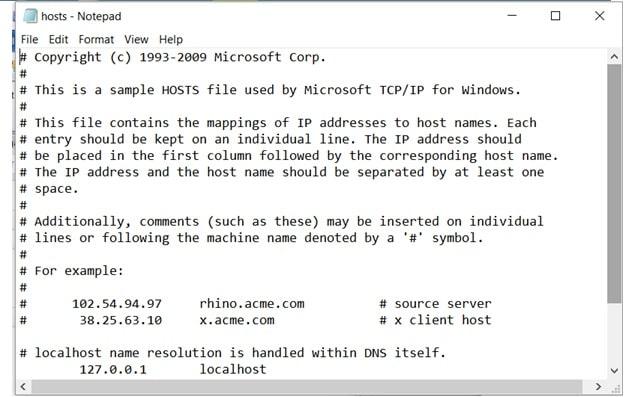
7. Add the new lines to the file. It’s best to navigate to the end of the file and add your new entries beneath the existing entries. Lines preceded by # are commented out and have no effect.
8. Click File > Save.
Windows 7 and Windows Vista
The procedure is essentially the same, but to open Notepad:
Start > All Programs > Accessories
Then proceed as above.
Windows NT, Windows 2000, and Windows XP
These versions of Windows don’t employ User Access Control (UAC), so you can skip the step for running Notepad as administrator and just open it normally:
Start > All Programs > Accessories > Notepad
Editor’s note: You can use the open source desktop app HostsFileEditor to manage the hosts file on your Windows machine.
Modifying your hosts file on a Mac
These instructions apply to Mac OS X 10.6 through 10.12. Editing the hosts file on a Mac is done using the Terminal app.
1. Open Applications > Utilities > Terminal
2. Open the hosts file by typing the following into the terminal window:
sudo nano /private/etc/hosts3. Navigate through the file using the arrow keys and append your new mappings underneath the existing ones.
4. Press Control-X and then answer Y to save the changes.
5. Flush the DNS cache by entering the following terminal command:
dscacheutil -flushcacheEditor’s note: You can also use the open source desktop app Gas Mask to manage the hosts file on your Mac.
Keep in mind ...
Make a backup copy first, so you have something to restore if anything goes awry.
The IP address and host name should be separated by at least one space, though more are allowed.
# indicates a comment in the file. When you’re done using a temporary mapping you can either remove it or comment out the line.
Your browser caches DNS information, so it’s good procedure to close all browser windows before editing the hosts file. Then save your edits and restart your browser.
Remember to remove your changes when you no longer need them.