Buy now, pay later (or shop now pay later) emerged as a solution to combat the high credit card fees that make it difficult for shoppers to finance goods. The payment method has proven successful as research shows that over 55% of consumers have used a buy now, later service to complete an ecommerce order. In this post, we will examine how this rapidly growing payment method works and how you can quickly integrate buy now, pay later financing into WooCommerce .
Get paid fast and keep more of what you sell
Keep more of what you sell — whether that's online or in-person — thanks to the lowest payment processing rates in the industry. With GoDaddy Payments, you get the quick and easy way to get started, approved and taking credit card payments with no set-up fees, long-term contracts, or hidden charges.
You’ll only pay a low fee, starting at 2.3% plus $0.30 per transaction, and get your money the next business day.
And with the GoDaddy Payments Smart Terminal point-of-sale hardware, you can seamlessly manage your in-person and online transactions all in one place.
How does buy now, pay later work?
With a buy now, pay later method, customers have the ability to quickly finance their ecommerce purchases, either paying nothing or a very small amount upfront. Your business gets the proceeds from the sale and the customer is able to enjoy their item without bearing the brunt of its cost at once. In a sense, you can view buy now, pay later as similar to accepting a credit card payment for your business.
When a customer makes this type of purchase, they enter into a contract that requires them to reimburse the company. There are several ways the agreement may be structured.
Some work like traditional financing, where you need to repay the principal plus interest. For these, buy now, pay later providers may offer a consistent rate for all items, or they can set different interest rates based on an item’s price. Buy now, pay later financing offers like this also have a more traditional underwriting process where the customer needs to go through a credit check.
Another type of agreement involves interest-free payment installments. These are repaid over a shorter period, typically a few weeks or months, covered with four or so payments. Some companies also offer “Pay Later” options where the customer has to pay the full amount after a specified amount of time, commonly 30 days.
Having a customer select a buy now, pay later option for payment will not be free from the processing fee, as the service provider will charge a transaction fee. These are similar to normal credit card processing fees and can range from 2% to 5% given the provider and what you sell.
What are the advantages of offering buy now, pay later?
Increased sales
The most obvious reason to offer buy now, pay later is to increase sales. By giving your customers the ability to finance their orders, you make your products more accessible to a larger number of people. Many shoppers that could not afford to pay in full for an item can instead pay over a few months.
With the knowledge of this convenient financing option, the sticker shock of your high-ticket items is reduced. Fewer customers will abandon their carts, and your sales will grow as a result.
Improved customer experience
Today’s customers demand a stellar shopping experience. From personalized recommendations to a fast and seamless checkout, there is a lot you need to do to impress them.
By adding additional payment methods like buy now, pay later, you give your customers more flexibility, helping to lead to a better customer experience.
Higher customer lifetime value
By increasing your average order value and your total number of sales, flexible financing can also lead to significant boosts in customer lifetime value (CLTV). Additionally, offering a positive purchasing experience through buy now, pay later helps improve customer loyalty and ultimately customer retention. Shoppers come back for more, and your average CLTV increases as your best customers make regular orders.
How to set up buy now, pay later for WooCommerce
With a better understanding of how buy now, pay later works and the benefits it can provide, let’s how you can implement some of the most popular options into your WooCommerce shopping experience:
Affirm
Affirm is one of the most popular solutions and is currently used by over 12,000 online retailers. To add this payment option to your WooCommerce store, you will want to download the Affirm Payment Gateway extension.
After you download the extension, you need to add your API keys from your Affirm account to sync with the plugin. Go to WooCommerce > Settings > Payments > Affirm and find the fields for Public API Key and Private API Key.
Before making the gateway live to your customers, it can be helpful to test it using sandbox mode. Go to https://sandbox.affirm.com/ and copy your Sandbox API keys.
To set up how the promotional messaging will appear on your site, click Expand. Decide if you want Affirm messaging to appear on your category pages, product pages, and cart pages.
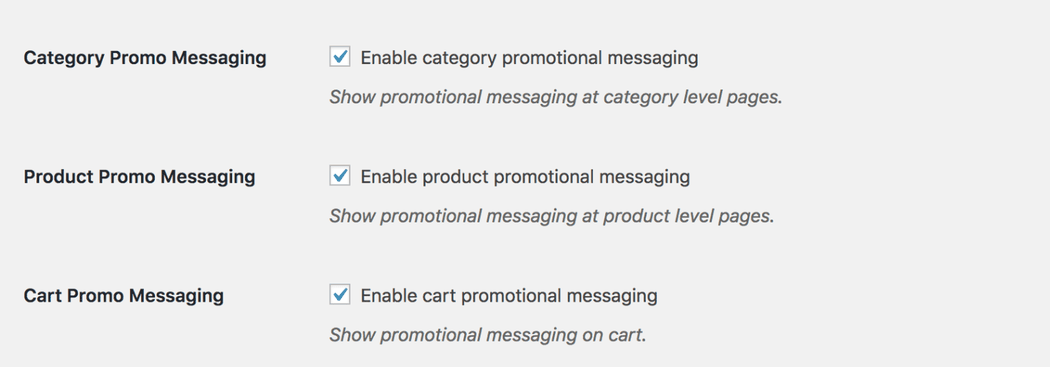
If you have an Affirm Promo ID, you can enter in the settings to display different styling or messaging.
Klarna
Based in Stockholm, Klarna is a buy now, pay later service offering flexible payment solutions to merchants in 20 countries. The service’s core offering is the pay-in-four installment plan that enables customers to split their payments into a set of interest-free payments
To integrate the payment service, you will need the Klarna Checkout for WooCommerce extension. Like the Affirm plugin, it uses your APIs to sync your payment account with your WooCommerce store.
After you download the extension go to WooCommerce > Settings > Payments > Klarna Checkout to configure your settings. Check Enable Klarna Checkout to activate the extension.
If you want to display a description for the payment method on the checkout page, add the text to the Description field.
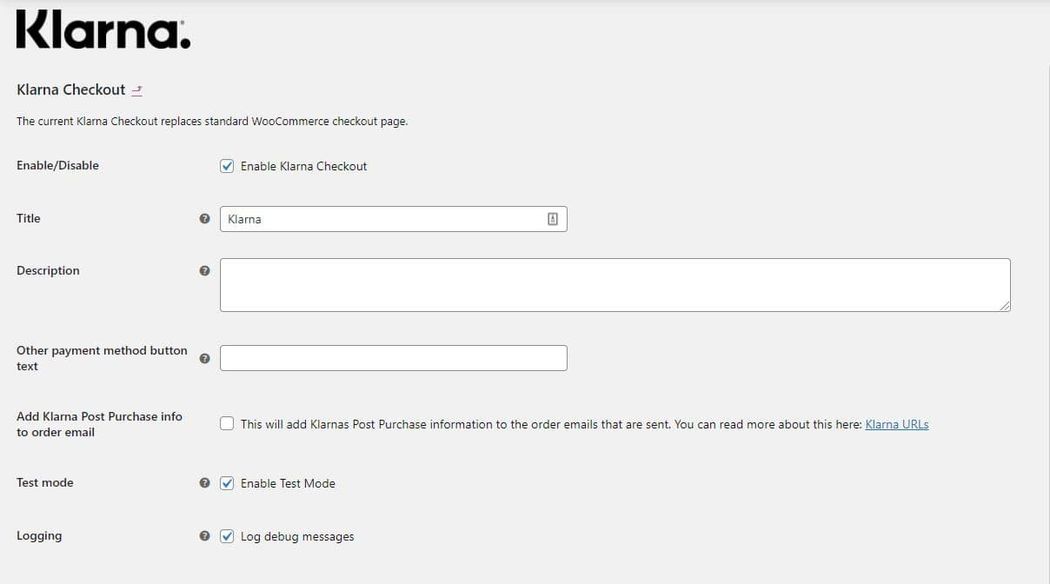
To test the payment gateway using test API keys, check Enable Test Mode. After you confirm that the gateway is working properly, return to the API Credentials where you will enter your Klarna API details.
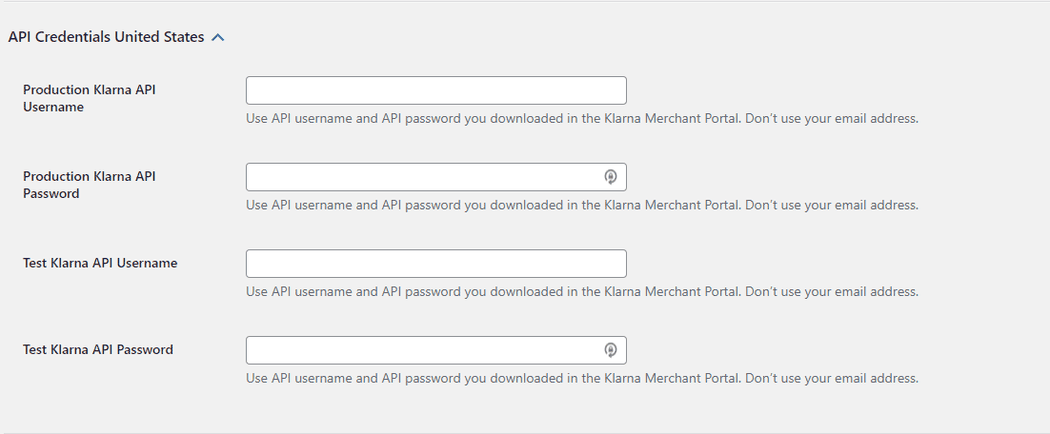
You can find your Klarna API credentials by going to Settings > API credentials from your Merchant portal. When the gateway is up and running, you can configure its design and behavior using the Checkout and Color settings. The latter lets you change the button, button text, header, and link colors to match your store’s branding.
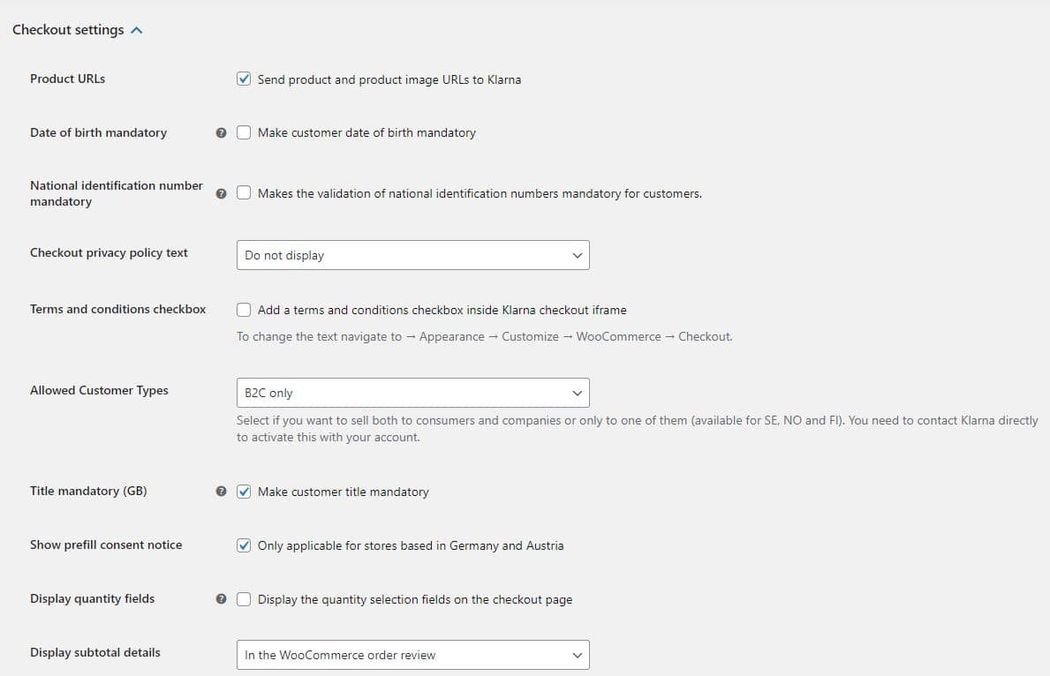
With the Checkout settings, you can decide whether to display your store’s privacy policy and terms of service.

Customizing the Klarna checkout layout
The default layout for the Klarna Checkout page is a two-column format with the cart details, delivery options, and customer notes in the left-hand column and the Klarna checkout option in the right column.
Depending on how you want to shape your checkout experience, you may want to modify the display of the Klarna checkout. For simple changes, some slight CSS adjustments will do the trick in most cases.
For example, if you only wanted to use a single column for your checkout page, you could add the following CSS to your WordPress theme.
#kco-wrapper #kco-order-review,
 #kco-wrapper #kco-iframe {
 width: 100%;
 float: none;
 clear: both;
 }
For more extensive changes, you will want to employ some action hooks. Below are some of the hooks you can use to add new content or functionality to the checkout page.
- kco_wc_before_snippet
- kco_wc_before_order_review
- woocommerce_before_checkout_form
- kco_wc_after_order_review
- kco_wc_after_snippet
- Woocommerce_after_checkout_form
If you can’t achieve your desired changes via action hooks, you can always override the checkout template file with a template of your own. The template file for Klarna Checkout is located in the templates folder for the plugin. To overwrite the file, copy it and paste it into the /woocommerce folder for your theme.
Make your changes as needed but be sure to keep the action hooks woocommerce_before_checkout_form and woocommerce_after_checkout_form, otherwise the plugin will fail to work correctly.
Another useful way to customize the Klarna checkout is to add extra checkboxes to your checkout forms. This allows you to capture newsletter subscribers or other options for your customers to select.
Below is an example of how to use the filter kco_additional_checkboxes to include additional checkboxes:
 <?php
 /**
 * Filter the additional checkboxes to add to the Klarna Checkout iframe. Works with Klarna Checkout for WooCommerce 2.4.3 and above.
 */
 add_filter( 'kco_additional_checkboxes', 'add_custom_checkboxes' );
 function add_custom_checkboxes( $additional_checkboxes ) {
 $additional_checkboxes[] = array(
 'id' => 'custom_checkbox', // The ID to be used in the backend to read when we get the order during the checkout process.
 'text' => 'Custom checkbox', // The text that you want to display to the customer.
 'checked' => false, // true if it should be automatically checked, false if not.
 'required' => true, // true if its required to be able to place an order, false if not.
 );
 return $additional_checkboxes;
 }
Afterpay
Next on our list of buy now, pay later solutions is Afterpay. The provider and its gateway function similarly to its competitors. It gives customers the ability to pay over time combined with a streamlined checkout experience that eliminates tedious steps. Like Affirm, Afterpay offers shoppers interest-free installments for their orders.
The simplest way to integrate Afterpay with your WooCommerce store is to use the Afterpay extension. The plugin is free and can be downloaded from your WordPress dashboard. Keep in mind that you must have WordPress version 5.1.1 for the plugin to work correctly.
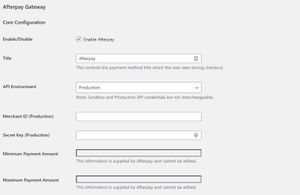
Once you download the extension, you can configure the settings by going to WooCommerce > Payments and selecting AfterPay. Start by selecting Enable Afterpay and choose your API Environment; sandbox to test the gateway, production to make it live.
Find the Merchant ID and Secret Key within your Afterpay account and add them to the corresponding fields. Once you save the credentials, the Minimum Payment Amount and Maximum Payment values will appear.
With the API configured, you will want to enable Express checkout. With Express checkout, customers can select Checkout with Afterpay from the cart page and Afterpay will pre-fill the shipping and billing details. By doing so, customers are able to move their orders much faster and can complete their orders with a single click.
Now, you will determine where on your site you want the payment information to appear. You have the option to have the details appear on category pages and individual product pages. You also have the option to show the pricing info when variants are selected.
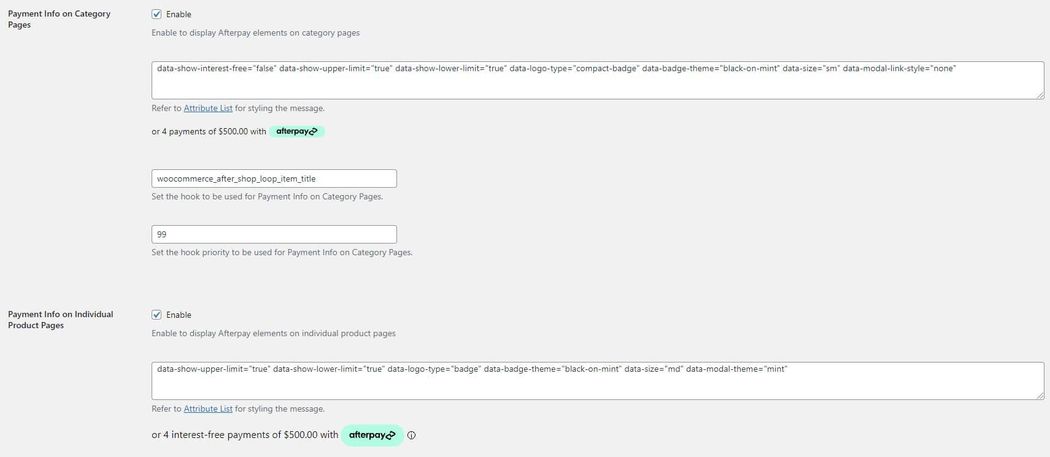
I recommend enabling the payment details for individual product pages but disabling them on category pages. If enabled on category pages, the payment badge and calculated installment cost will appear next to every product. This can be excessive, especially if your site uses autoload to show a bunch of products.
Your third-party plugins can filter the HTML content rendered on product pages using the filter hook: afterpay_html_on_individual_product_pages. If you want to hide the HTML for a subset of products, you can use the following filter hook: afterpay_is_product_supported. Below is an example:
 /**
 * @param string $str_html
 * @param WC_Product $product
 * @param float $price
 */
 function afterpay_hoipp_callback( $str_html, $product, $price ) {
 # Show a different message for products below a custom threshold.
 # Note that this will only be called if the product price is within
 # the payment limits defined at the account level.
 if ($price < 10.00) {
 $str_html = "<p>Shop Now, Pay Later with Afterpay. Supported for orders over $10.00</p>"; }
 return $str_html;
 }
 add_filter( 'afterpay_html_on_individual_product_pages', 'afterpay_hoipp_callback', 10, 3 );
Closing thoughts on buy now, pay later for WooCommerce
Digital payment methods continue to evolve as more people shop online. In the past, pay later options were reserved exclusively for higher ticket items or store card owners. Now everything from apparel to commodity products on Amazon can be acquired instantly with a later payment.
Merchants who want to provide their customers the best shopping experience must look to offer these flexible financing options. If you are yet to offer buy now, pay later to your customers, I encourage you to evaluate the top service providers to find the best partner for your business. You can then use the steps in this guide to set your WooCommerce store up for buy now, pay later success.


