As Kubernetes is becoming the de facto container orchestration platform, more and more application developers have started using the kubectl CLI tool. The purpose of this article is to provide application developers with a set of tools and best practices to become more confident when interacting with the Kubernetes cluster.
At GoDaddy, we have been using Kubernetes for quite some time now - this article is the first edition of what will become a living document of our best practices.
Kubernetes architecture - a quick overview
As an application developer, you probably won’t be building Kubernetes clusters. Instead you’ll use it as a PaaS, just like you would do with Heroku. You don’t have to understand all the internals of Kubernetes; however, basic knowledge of the architecture is helpful for understanding how to deploy and debug your applications.
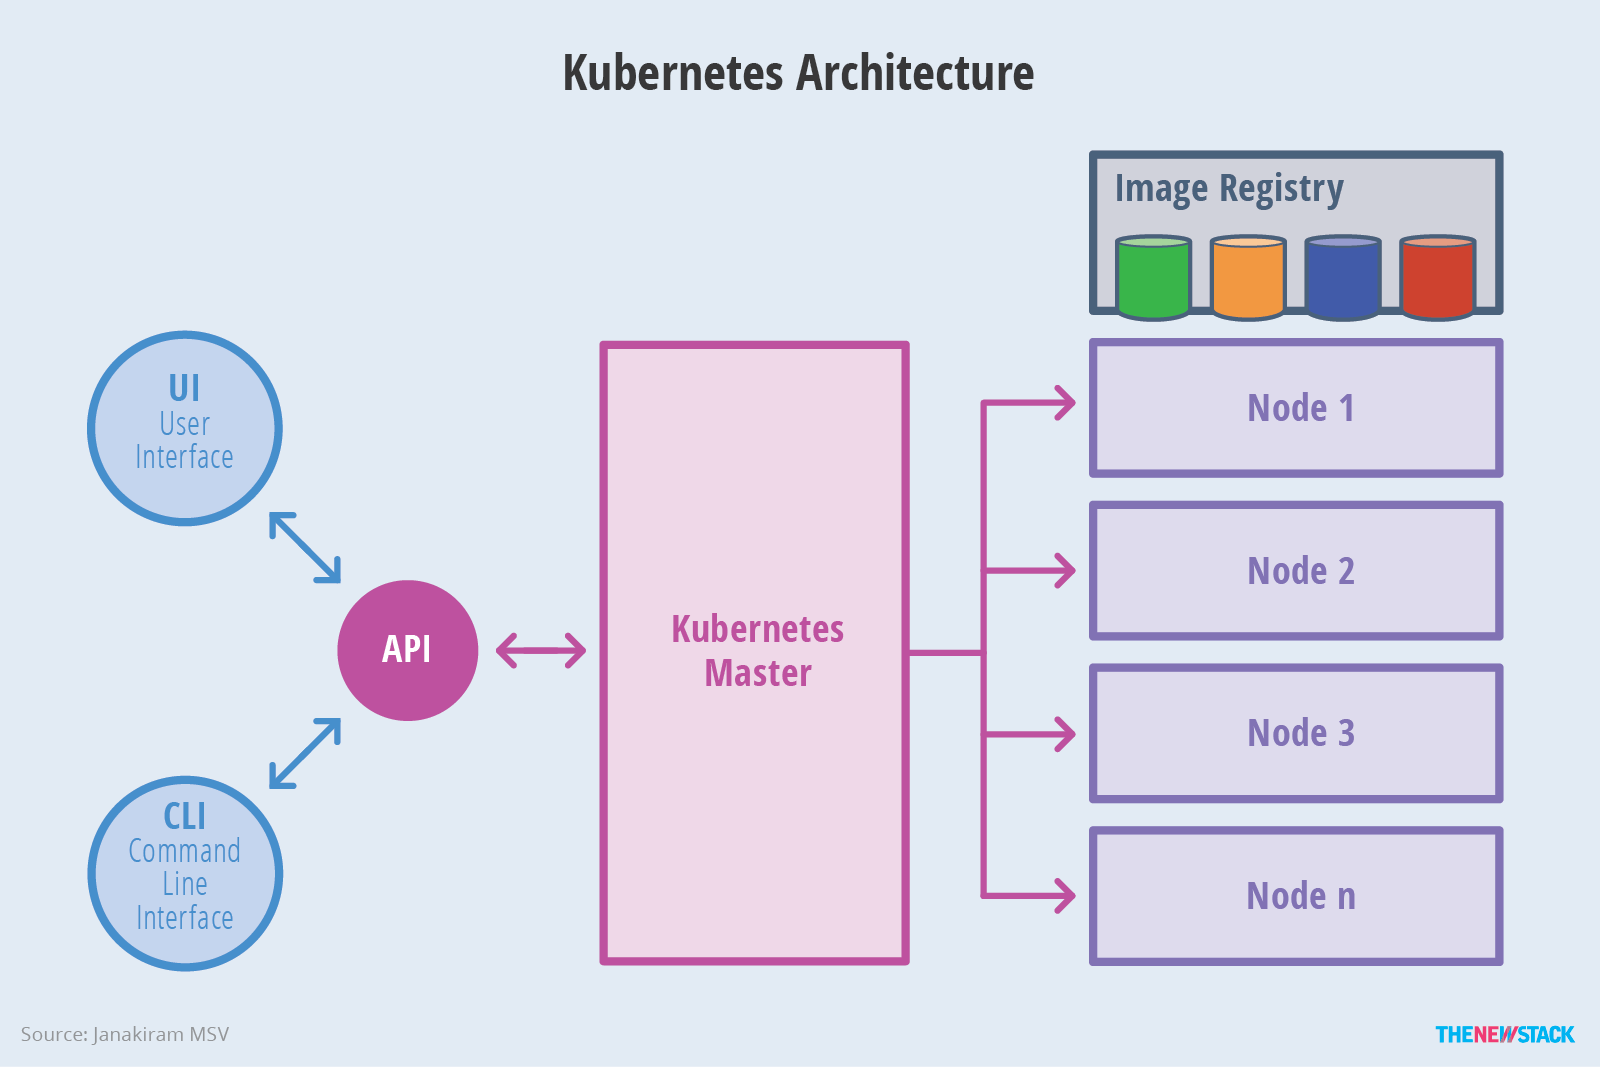
Kubernetes has a master-worker design, meaning it has at least one master, and multiple compute nodes, known as worker nodes.
 Overview of Kubernetes - image courtesy of TheNewStack
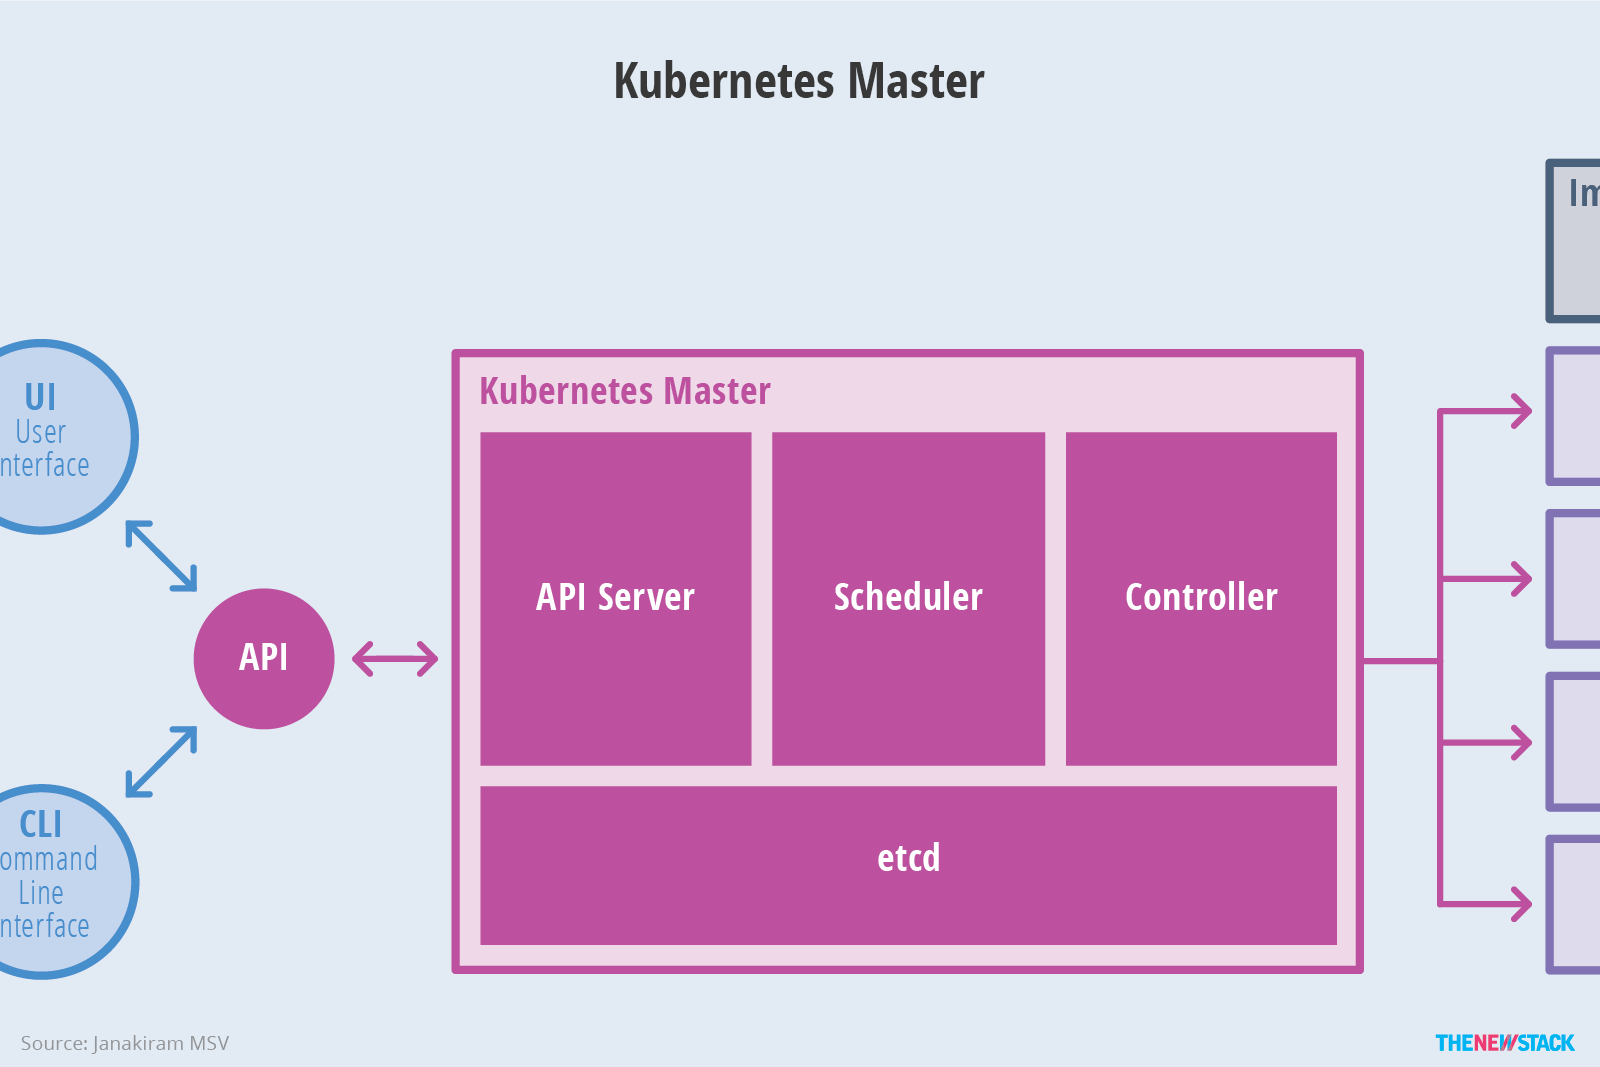
The master nodes provide the control plane for the cluster. When you are using kubectl, you describe the desired state for your cluster or application. The master node is responsible for making sure the cluster reaches the desired state.
 The master node of Kubernetes - image courtesy of TheNewStack
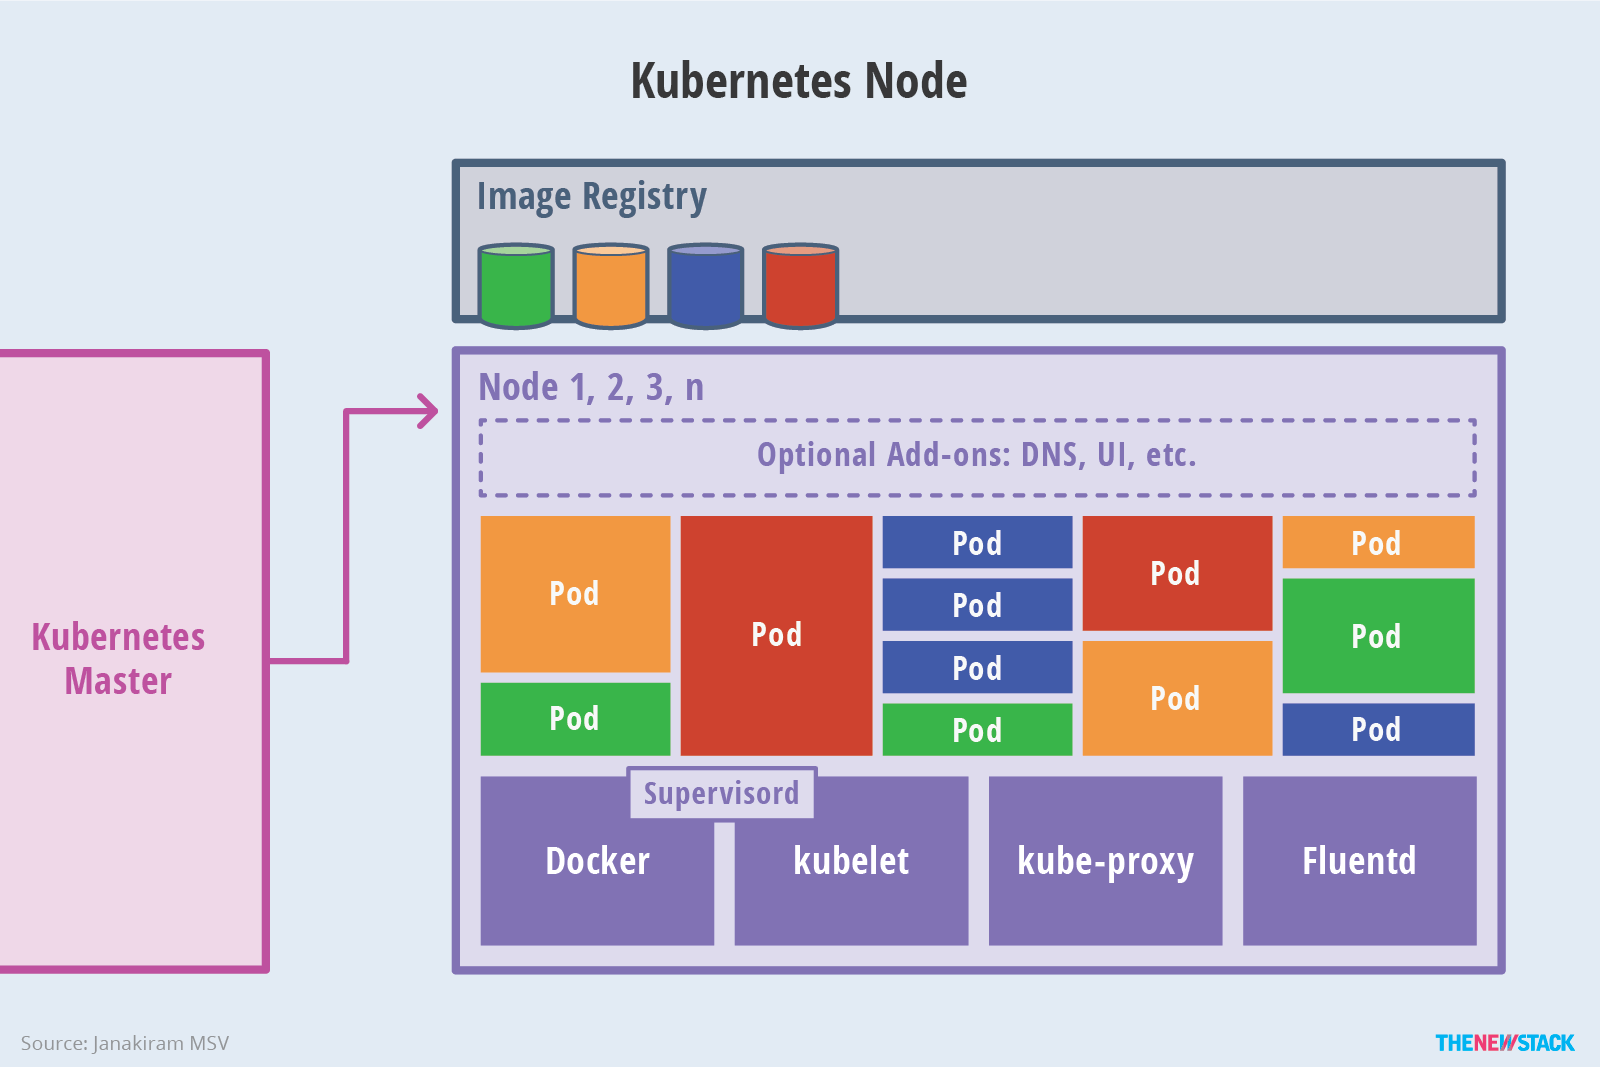
The worker nodes are responsible for providing the Kubernetes runtime. This is where all your applications are running.
 The worker nodes of Kubernetes - image courtesy of TheNewStack
To read more on the architecture of Kubernetes, I’d recommend reading the Kubernetes overview article on TheNewStack.
Application life-cycle
Your applications will be running in pods, the smallest deployable unit in Kubernetes. Each pod represents one or more running processes.
Pods can be in the following states:
- Pending
- Running
- Succeeded
- Failed
- Unknown
To help Kubernetes determine the state of your application, and to make decisions based on that (like restarting them), you can expose probes. The liveness probe can be used to determine when an application must be restarted by Kubernetes, while the readiness probe can be used to determine when a container is ready to accept traffic.
To help you build these probes, we’ve developed the terminus library for Node.js applications. It enables to you quickly add readiness and liveness HTTP checks.
Using Kubernetes for local development
Developing against Kubernetes clusters got a lot easier with the release of skaffold. Skaffold is a command line tool that facilitates continuous development for Kubernetes applications.
In practice, Skaffold can:
- detect changes in the source code and automatically build, push and deploy,
- automatically update image tags, so you don’t have to do that manually in the Kubernetes manifest files,
- build/deploy/push different applications at once, so it is a perfect fit for microservices,
- support both development and production environment, by running the manifests only once, or continuously watching for changes.
To read more on how to setup Skaffold, read the Using Kubernetes for Local Development article.
At GoDaddy we build next-generation experiences that empower the world's small business owners to start and grow their independent ventures.
Mastering kubectl
kubectl is a command line interface for running commands against Kubernetes clusters.
The kubectl has the following interface:
$ kubectl [command] [TYPE] [NAME] [flags]
where:
- command specifies the operation you’d like to perform, such as
createordelete, - TYPE specifies the resource type, like
pod, - NAME specifies the name of the resource - if omitted, details for all resources for the given type are shown,
- flags specifies optional flags, like the
namespaceif you are not using the default one.
Accessing logs
When you are troubleshooting production systems, it is crucial to have access to logs. While we recommend collecting all logs in a centralized location, like an ELK cluster, it can be useful to be able to access logs for pods through the kubectl interface. To do so, you can run the following command to get all the logs for a given pod:
$ kubectl logs my-pod-name
If you’d like to keep monitoring the logs, you can modify it to stream to your terminal too:
$ kubectl -f logs my-pod-name
Or if you have multiple containers in the same pod, you can do:
$ kubectl -f logs my-pod-name internal-container-name
Execute commands in running Pods
During troubleshooting, it can come in handy to be able to execute commands in the running container. To do so, you can start bash or sh depending on your Linux distribution:
$ kubectl exec -it my-pod-name -- /bin/sh
Once you’ve run it, you will get the prompt in the running container, and you can perform any action you’d like.
Rolling back deployments
No matter how great your test coverage is, sometimes things will break, and you will need to roll back the latest deployment. To help the process, kubectl comes with the rollout command.
A Deployment controller provides declarative updates for Pods and ReplicaSets. In practice, when you are deploying applications to the Kubernetes cluster, you will do so by creating deployments instead of pods. In practice, a simple
Deploymentmanifest looks like this:apiVersion: apps/v1 kind: Deployment metadata: name: nginx-deployment labels: app: nginx spec: replicas: 3 selector: matchLabels: app: nginx template: metadata: labels: app: nginx spec: containers: - name: nginx image: nginx:1.7.9 ports: - containerPort: 80Once you run
kubectl apply -f manifest.yml, it will create three running pods based on thenginx:1.7.9docker image. You can learn more about deployments here.
To get all the deploys of a deployment, you can do:
$ kubectl rollout history deployment/DEPLOYMENT-NAME
Once you know which deploy you’d like to roll back to, you can run the following command (given you’d like to roll back to the 100th deploy):
$ kubectl rollout undo deployment/DEPLOYMENT_NAME --to-revision=100
If you’d like to roll back the last deploy, you can simply do:
$ kubectl rollout undo deployment/DEPLOYMENT_NAME
To read more on kubectl, check out the Kubectl Cheat Sheet.


