In our recent article on the REST API, I laid out what exactly hides behind the term and the things you will eventually be able to do with it.
However, at this point you might still be clueless as how to use the API in real life. Where do you even start? What’s the first step?
Since it’s always best to learn by doing, let’s explore those questions with the help of a concrete use case. In this article I will show you how to install the WP REST API on a website and use it to pull content from a remote site via a GET request so you can output it on your own.
Sounds good? Then let’s get going!
Before we get started...
To create the aforementioned scenario, we will need a number of tools. I’m as eager to get started as you, so let’s make it quick.
Create your test environment
First off, to pull content from one site to another we will need – you guessed it – two websites.
The easiest way to get this done is to simply set up two WordPress installs in a local server environment. (In case you don’t know how to do that, check this out). It’s also possible to use websites on a remote server, but a local environment is sufficient for now. Just be sure not to experiment with a live site!
Because the API is not yet fully implemented in WordPress core at the current time (early 2016), we need to get its full functionality via the WP REST API plugin. Install and activate the plugin on both test sites.
Apart from that, we need a test post on the remote site that we can call, and an empty page on the destination website where it can be displayed. For the latter we need to create and assign a custom page template that will house our function for the GET request. See this article if you are a bit foggy on the details.
My own setup
To make it easier for you to follow along, let me quickly tell you about my test setup. The addresses for my two test sites are simply http://localhost/wordpress/ and http://localhost/remote/.
On the remote site I have created a post named API Test Post and inserted a paragraph of Lorem ipsum placeholder content. The wordpress site has an API Test Page that’s been assigned a page template of the same name, which so far is a one-to-one copy of my theme’s page.php.
Test the connection with your first GET request
With the API active, we can now access JSON objects on our sites via the browser. It’s the same GET request that we will do with a function below. This works because the API is based on HTTP and its end points are therefore simple URLs.
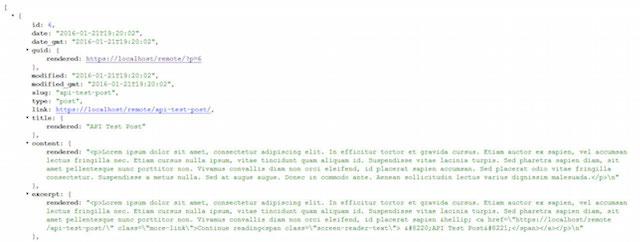
Consequently, I can access the list of posts on my remote site simply by typing http://localhost/remote/wp-json/wp/v2/posts into my browser bar.
Here’s part of what I see:
If yours is gibberish, that’s because you are looking at raw JSON data. Use JSONView to make it readable (also available for Chrome).
Now that everything is working, it’s time to get serious.
How to GET a post from a remote site via the WP REST API
Here’s the real meat and potatoes of this post – we will now create a function to send a GET request to the remote site and then include it in our destination page template.
Step 1: Define the URL.
The first step is to define the endpoint that we will be pulling data from. As we have seen, with the API this is simply a URL.
Single posts can be accessed by using the same path as before plus the post ID. With my post having an ID of 6, my first line of code is this:
$url = 'http://localhost/remote/wp-json/wp/v2/posts/6';Step 2: Create the request.
Next we will request and load the raw response data. That’s done via wp_remote_get like this:
$response = wp_safe_remote_get( $url );Step 3: Decode the post body.
We can’t do much with that yet. For the data to become usable we need to pull the body of the JSON object and decode it.
We will do this with wp_remote_retrieve_body and then run it through json_decode in order to make it readable. Together it looks like this:
$remote_post = json_decode( wp_remote_retrieve_body( $response ) );Step 4: Output the post.
All that’s left is adding the part that spits out the post title and content:
echo esc_html( $remote_post->title->rendered );
echo wp_kses_post( $remote_post->content->rendered );
Step 5: Put it all together.
Here’s what it looks like inside the page template, with some error checks and theme markup thrown in:
<?php
/**
 * The template for displaying posts from a remote site via the REST API.
 *
 * Template Name: WP REST API Test
 *
 */
get_header(); ?>

<div id="primary" class="content-area">

	<main id="main" class="site-main" role="main">
		<?php
		// Start the loop.
		while ( have_posts() ) : the_post(); ?>

		<article id="post-<?php the_ID(); ?>" <?php post_class(); ?>>
			<header class="entry-header">
				<?php the_title( '<h1 class="entry-title">', '</h1>' ); ?>
			</header><!-- .entry-header -->

			<?php twentysixteen_post_thumbnail(); ?>

			<div class="entry-content">
				<?php
				the_content();

				/**
				 * Get a post from a  remote site
				 */
				$url = 'http://localhost/remote/wp-json/wp/v2/posts/6';

				//make request
				$response = wp_safe_remote_get( $url );

				//check for error
				if ( ! is_wp_error( $response ) ) {

					//decode body and return
					$remote_post = json_decode( wp_remote_retrieve_body( $response ) );

					//remote post's title
					echo '<h3><a href="' . esc_url( $remote_post->link ) . '">' . esc_html( $remote_post->title->rendered ) . '</a></h3>';

					//remote post's content
					echo '<p>' . wp_kses_post( $remote_post->content->rendered ) . '</p>';
				}
				?></div><!-- .entry-content -->

			<?php
			// End of the loop.
			endwhile; ?>

	</main><!-- .site-main -->

	<?php get_sidebar( 'content-bottom' ); ?>

</div><!-- .content-area -->

<?php get_sidebar(); ?>
<?php get_footer(); ?>
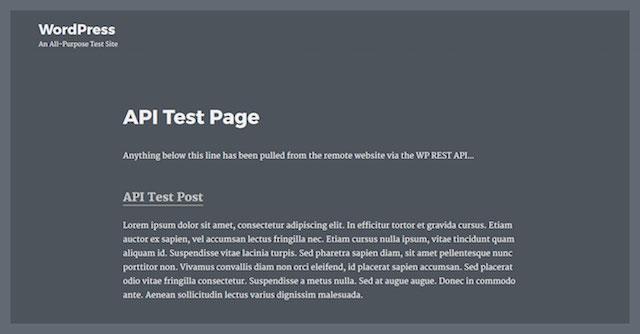
And here is output of the API Test Page:
While the above example works, on a live site it would most likely result in too many remote requests and stall page load time. I used it here for simplicity’s sake and demonstration reasons.
A better solution would be to add an empty container for the remote content and call it via jQuery AJAX after the page is loaded.
Conclusion
Many people in the WordPress community are still intimidated by the WP REST API. While that’s understandable, much of its mystery will disappear after taking it for a spin.
Although the above example is plenty for getting familiar with how to use the API, it’s just the first step. From here you can branch out to other parts like HEAD, POST, PUT and DELETE requests.
If the article has given you a thirst for more, check out the following excellent complementary resources:
- WordPress REST API White Paper by Human Made
- The Ultimate Guide to the WordPress Rest API by Josh Pollock
- The Official WP REST API Documentation
Aside from that, we are excited to hear about your experience. Have you test driven the WP REST API in real life, and if so, for what purpose, and what results did you have? Let us know in the comments section!


