Selling online offers businesses new and exciting ways to connect with their customers. One of the most impactful is WooCommerce personalization. With it, you can craft a unique, highly relevant experience for each buyer. This is enabled by the digital nature of an ecommerce site.
You can not implement the same way in a physical store, as not everyone shops in the same place.
In this post, we will examine how you can use WooCommerce to personalize the shopping experience for your customers.
Save money selling products, your way
Our managed WooCommerce hosting plan includes more than 40 premium WooCommerce extensions, empowering you to sell products, your way, with additional customization.
Specialized store extensions can cost hundreds, even thousands of dollars per year once you get them all added to your store.
But with our Managed Hosting for WooCommerce, you can build the exact store you needed to sell subscriptions, book appointments, enable digital downloads and much, much more — with free access to more than $5,000 in premium WooCommerce extensions.
What are the benefits of WooCommerce personalization?
Boost your conversions
WooCommerce personalization can help improve your conversion rates. It does so by giving customers the content and products that they are looking for. Instead of showcasing items that may not be popular with all of your customers, you are able to streamline the shopping experience for your buyers.
Builds connection with the brand
A personalized user experience makes your customers feel special by showing that your business is actually listening and putting in the effort to make their lives easier. Research has shown that 44% of consumers say they would buy from a brand again after a personalized experience. These customers eventually become brand advocates and start recommending you to others.
Know your customers better
WooCommerce personalization can give you an enhanced perspective on your customers. To run a personalization strategy you need to collect a lot of information about your customers. When you gather this data, you will likely pick up on valuable insights. You can use these insights when creating new products or deciding where to invest your focus.
How can you personalize the WooCommerce shopping experience?
Much of the rise in online personalization has been driven by advancements in technology. Specifically artificial intelligence (AI) and machine learning (ML). AI can process massive amounts of data quickly. Your business can use this data to personalize the shopping experience in real-time.
AI also enables automated implementation of your personalization strategy. This in turn allows you to scale your personalization. Achieving such through strictly manual efforts is much more difficult.
Pricing
Another way to use WooCommerce personalization is with pricing. People love good deals. Many also like feeling special. By offering unique prices and offers, you create an incentive for your customers to keep coming back for more. You can offer special discounts and exclusive offers to your top customers. Or you can use intro pricing for first-time visitors.
Recommendations
Product recommendations are likely the most commonly used form of ecommerce personalization. When well-executed, they are known to boost your conversion rates and sales.
You can recommend products based on the customer’s past purchases and browsing behavior. Or you can promote cross-sells and complementary items.
The best example of an ecommerce company employing this tactic is Amazon. They are well known for the frequently bought together sections and other recommendation throughout their product pages.
Search results
Personalized search results are less common than the other tactics. However, the few businesses that have added this functionality to their store have experienced higher conversion rates on average.
With personalized search, users are given results most relevant to them. These results can be based off their browsing history or other data collected by the platform.
Ways to implement personalization with WooCommerce
1. Personalized pricing and promotions
First, let’s look at personalized prices and discounts. With the flexibility afforded by WooCommerce, there are a variety of ways you can create unique pricing for your customers. For example, you could set dynamic pricing rules to show different prices to various segments of your audience.
Another way is to establish a points program that rewards customers for each of their purchases.
As they gather enough points, they can redeem their rewards in exchange for discounts on future purchases. You can add this functionality to your WooCommerce store by using the WooCommerce Points and Rewards extension (included with Managed Hosting for WooCommerce from GoDaddy).
With this extension, you can quickly set up a points program that rewards customers each time they make a purchase. These points are applied to their account and can be redeemed on future orders.
After you activate the plugin, go to WooCommerce > Points & Rewards > Settings to set up your rewards program. Start by defining the Earn Points conversion between points and dollars.
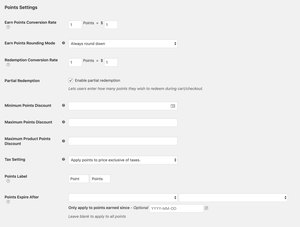
This will determine how many points users earn for each dollar they spend. For instance, a 1:1 ratio will reward one point for each dollar spent.
You’ll also need to determine the Redemption conversion rate. This determines the value of points redeemed for a discount. For example, if you want customers to receive a $1 discount for every 10 points, you would enter 10 and 1.
Further down, you will have the option to customize the display messages shown to customers on the product and checkout pages.
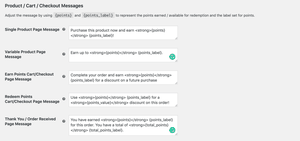
Next, you will determine how to allocate points for different items in your catalog. When you install the plugin, two new options are added to your product categories that allow you to set a points earned conversion rate specific to that category.
The extension also gives you the ability to do this on the product level. If you go to the product data tab, you can see options for adjusting the Earn Points conversion rate in the General section.

2. Adding product recommendations and frequently bought together sections
Recommendations are a powerful method of WooCommerce personalization and a key part of any ecommerce store. The native WooCommerce allows you to make recommendations in the form of upsells and cross-sells. These are applied individually to each item.
While this gives you the ability to recommend products, it is not personalized, as every customer sees the same items. Additionally, it can get a bit time consuming to manually add recommended items to each product in your catalog — more so if you have a large assortment.
With the Products Recommendations extension, you can create cross-sells and upsells in bulk. And with the rules-based recommendation engines, you can create unique recommendations for different groups in your audience. You can then add these to various places throughout the site using the locations feature.
To create a persnaolized recommendation section go to WooCommerce > Recommendations > Engines, and then click Create new.
For the title, enter a name for the recommendations that you want customers to see. This could be as simple as Frequently Bought Together. Or, you may want something more in line with your brand’s tone of voice.
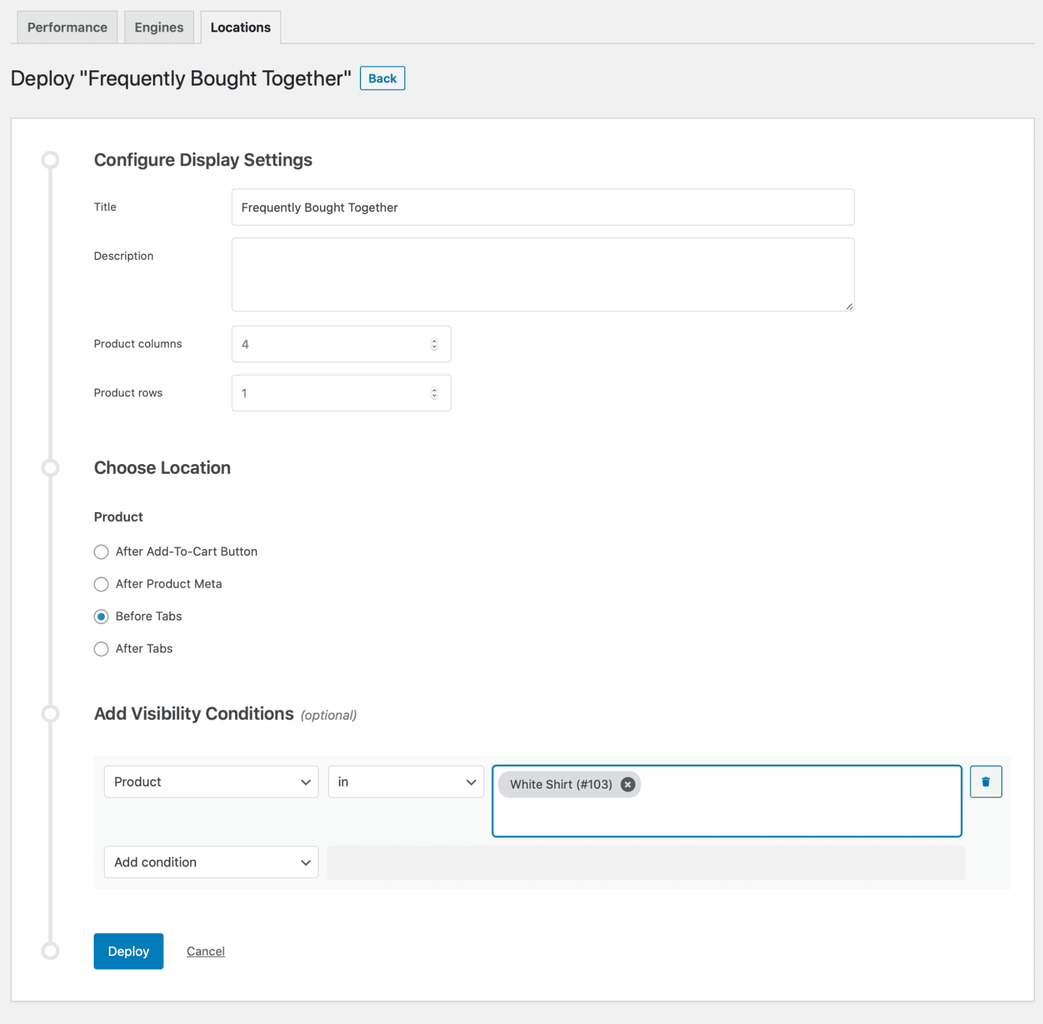
To deploy the engine, you can click th notification message that appears after saving the changes. You can also deploy from the location page. Go to WooCommerce > Recommendation > Locations and select the recently created engine. Once there, click Deploy.
The default layout is a single row with four products. With the Visibility conditions, you can set the engine to display for specific products.
You’ll then need to select the locations where you want the engine to appear. The extension lets you limit the number of recommendation blocks per location. This will ensure that you do not have too many going on a single page as it can alienate customers.
To determine the block limit, go to WooCommerce > Settings > Recommendations and adjust the limit.
3. Displaying recently viewed items
Another great way to personalize your WooCommerce store is to allow customers to see which items they have previously viewed. With a recently viewed section, you also make it easier for shoppers to navigate your store.
Depending on your theme, you may be able to enable a recently viewed widget in your theme editor. If you theme does not come with this option, you can enable it with a plugin.
A solid option is the Recently Viewed Products for WooCommerce extension. This extension adds a dedicated page for recently viewed items to your store. You can then link to this page in your navigation menu.
The plugin also allows you to add a block for recently viewed products to your individual product pages. To enable this feature go to and select Display “Recently Viewed Products” Section on Product Page.
Shoppers that can move between items rapidly are more likely to become customers. Instead of having to search your site for it again.
There are a few other extensions that you can use to add this feature to your store. You can also add the recently viewed section using shortcode. Below is an example of snippet
//short code to get the woocommerce recently viewed products
<?php function custom_track_product_view() {
if ( ! is_singular( 'product' ) ) {
return;
}

global $post;

if ( empty( $_COOKIE['woocommerce_recently_viewed'] ) )
$viewed_products = array();
else
$viewed_products = (array) explode( '|', $_COOKIE['woocommerce_recently_viewed'] );

if ( ! in_array( $post->ID, $viewed_products ) ) {
$viewed_products[] = $post->ID;
}

if ( sizeof( $viewed_products ) > 15 ) {
array_shift( $viewed_products );
}

// Store for session only
wc_setcookie( 'woocommerce_recently_viewed', implode( '|', $viewed_products ) );
}

add_action( 'template_redirect', 'custom_track_product_view', 20 );
function rc_woocommerce_recently_viewed_products( $atts, $content = null ) {
// Get shortcode parameters
extract(shortcode_atts(array(
"per_page" => '5'
), $atts));
// Get WooCommerce Global
global $woocommerce;
// Get recently viewed product cookies data
$viewed_products = ! empty( $_COOKIE['woocommerce_recently_viewed'] ) ? (array) explode( '|', $_COOKIE['woocommerce_recently_viewed'] ) : array();
$viewed_products = array_filter( array_map( 'absint', $viewed_products ) );
// If no data, quit
if ( empty( $viewed_products ) )
return __( 'You have not viewed any product yet!', 'rc_wc_rvp' );
// Create the object
ob_start();
// Get products per page
if( !isset( $per_page ) ? $number = 5 : $number = $per_page )
// Create query arguments array
$query_args = array(
'posts_per_page' => $number,
'no_found_rows' => 1,
'post_status' => 'publish',
'post_type' => 'product',
'post__in' => $viewed_products,
'orderby' => 'rand'
);
// Add meta_query to query args
$query_args['meta_query'] = array();
// Check products stock status
$query_args['meta_query'][] = $woocommerce->query->stock_status_meta_query();
// Create a new query
$r = new WP_Query($query_args);

// ----
if (empty($r)) {
return __( 'You have not viewed any product yet!', 'rc_wc_rvp' );

}?>
<?php while ( $r->have_posts() ) : $r->the_post();
$url= wp_get_attachment_url( get_post_thumbnail_id($post->ID) );

?>

<!-- //put your theme html loop hare -->
<li >
<a class="product-picture" href="<?php echo get_post_permalink(); ?>" title="Show details for Watches">
<img alt="Picture of Watches" src="<?php echo $url;?>" title="Show details for Watches" />
</a>
<a class="product-name" href="<?php echo get_post_permalink(); ?>"><?php the_title()?></a>
</li>
<!-- end html loop -->
<?php endwhile; ?>

<?php wp_reset_postdata();
return '<div class="woocommerce columns-5 facetwp-template">' . ob_get_clean() . '</div>';
// ----
// Get clean object
$content .= ob_get_clean();
// Return whole content
return $content;
}
// Register the shortcode
add_shortcode("woocommerce_recently_viewed_products", "rc_woocommerce_recently_viewed_products");
?>
This snippet will show up to five products in the recently viewed section. If you want to adjust this number you can do so by modifying the per_page attribute in the shortcode.
For example, if you wanted the section to show eight product, you would use the following: [woocommerce_recently_viewed_products per_page="8"].
4. Use a standalone personalization solution
If you want to take a more comprehensive approach to personalization, you can use a dedicated software solution. This will help automate some of your personalization efforts.
It will also afford you better data on your customers.
A great example of one such solution is PureClarity. The platform offers a wide variety of ecommerce personalization features to engage your customers. It is powered by extensive data collection and machine learning algorithms. These are able to predict customer behavior and interests based on the learnings from similar users.
Personalization can be added in the form of real-time product recommendations, banners, promotions, pop-ups, as well as live chat experiences. You can download the extension from your WordPress dashboard.
PureClarity uses Data Feeds to collect data from your WooCommerce store. There are several types of data feeds. The data feed cron processes used by the plugin generate the data for each type of feed. Once the plugin generates the feeds, they will be sent to PureClarity.
After PureClarity has your store data, it can begin crunching away to come up with real-time recommendations for your customers. The software will then uses Zones to display your personalized content. These zones are applied to different areas throughout your WooCommerce site. By default, zones are added to the following pages.
- Home Page
- Product Listing Page
- Search Results
- Product Page
- Cart Page
- Order Received Page
You can choose to disable any of these Zones by going to PureClarity > Settings and finding the Zones Settings.
If you want to add Zones to any page not included in the default options, you can do so by editing your theme template. You can also manually add zones to a page from the page editor. Once there, you can use the following shortcode: [pureclarity-bmz id="HP-01"]. The “id” is the Zone ID you have configured in PureClarity.
There are additional parameters that you can use to adjust the appearance of the zone. For example:
- top=”10″ – to add buffer space (in px) to the top of the Zone.
- bottom=”10″ – to add buffer space (in px) to the bottom of the Zone.
- class=”XXX” – to apply a custom CSS class to the Zone.
Below is the code you can use to add the Zone to your theme template: <?php echo do_shortcode("[pureclarity-bmz id='HP-01']"); ?>.
Closing thoughts on WooCommerce personalization
Personalizing the shopping experience can help your business stand out in an otherwise crowded market. Shoppers can find what they are looking for with greater ease, while also knowing that you are making the effort to solve their needs.


