
Moving your WordPress website to a new host might sound intimidating to the inexperienced and a downright pain to the seasoned pro. But it's entirely manageable with the right plan in place — even if you've never done it before.
This comprehensive guide walks you through three migration methods:
- GoDaddy's automated 1-click tool (easiest)
- Plugin-based migration (beginner-friendly)
- Manual migration (for those wanting complete control)
Before you get started, keep in mind that most migrations take 1-3 hours from start to finish.
We'll cover everything from preparation and backup through the actual move and post-migration testing, with clear instructions written for beginners and intermediate users alike.
By the end, you'll have the know-how to migrate your site without downtime or data loss.
Why migrate your WordPress site? Signs you need a better host
The first step when switching WordPress hosts is to recognize the signs that it’s the right time to switch. Moving hosts can be a tough task, so it is important to be sure you’re making the right decision for your business. Here are some symptoms of a not-so-ideal fit:
- Frequent downtime or outages: Unexpected downtime is bad for business, and frequent drops in traffic can also affect your search rankings. If your site is down multiple times each month, and the host is to blame, it’s a clear indication you need to switch to a new host.
- Slow site performance: Having a fast and responsive site is an important factor when optimizing your site for higher search rankings and providing a better user experience. If your site continues to load slowly even after disabling unnecessary WordPress plugins and performing optimizations, a new host with better infrastructure might be the right solution.
- Poor customer support: When your site is down, the last thing you want is to hear that customer support can’t help you. If your host’s support team is slow to respond, difficult to reach, or they simply don’t know how to help, it’s time to look for a new one.
- Missing essential features: Say you’re looking to add ecommerce functionality to your WordPress site, but your host doesn’t support it. Rather than trying to set up and manage the software yourself, it’s easier to find a host that either manages the functionality for you, or at least supports it.
- No automatic backups: Having frequent backups of your site is critical. Without them, recovering your site can be slow and painful, if not impossible. If your current host doesn’t provide frequent backups of your site for you, it’s prudent to look for a new one.
- No managed WordPress updates: Most managed WordPress providers should automatically install WordPress core updates and security patches for you. If your current host makes you manage this on your own, you can save time and reduce risk by switching to a managed WordPress host instead.
- Security concerns or vulnerabilities: Outdated hosting is a major security liability. One hack can destroy customer trust, trigger Google blacklisting, cause expensive downtime, and require costly cleanup. Modern managed hosting like GoDaddy's provides proactive security — automatic updates, DDoS protection, malware scanning, and expert monitoring — removing the security burden from you entirely.
- Cost vs. value: When you are overpaying — Low hosting prices often cost more through hidden expenses, such as slow speeds deterring customers, security breaches requiring cleanup, and poor uptime damaging credibility. Audit what you're actually getting. Does your hosting include automatic backups, SSL certificates, staging environments, and performance optimization that modern websites need? Features matter more than price.
Pre-migration checklist: What to do before moving your WordPress site
Success starts with preparation in advance. From the size of your database and files to the number of plugins, backups, and media, everything factors into how slow or fast the migration can be, and how you can plan for a more seamless migration.
So, what should you do before you migrate a website? Before you roll up your sleeves and get started, follow these steps:
1. Back up your website files
Before touching anything, create a complete WordPress backup of your entire installation. This is your safety net—if anything goes wrong during migration, you can restore everything exactly as it was. Use your current hosting provider's backup tool if available, or install a backup plugin like UpdraftPlus or Duplicator.
Download the backup file to your computer, not just cloud storage, so you have a local copy you can access regardless of server issues.
Your backup should include all WordPress core files, your wp-content folder (containing themes, plugins, and uploads), your wp-config.php file with database credentials, and any custom files you've added. Verify the backup completed successfully and that you can access the downloaded files before proceeding.
2. Export the database
Your WordPress database contains all your content — every post, page, comment, user, and setting that makes your site unique. Exporting it is critical for migration. Access phpMyAdmin through your current hosting control panel (usually found under Databases).
Select your WordPress database from the left sidebar, click the "Export" tab at the top, choose "Quick" export method and "SQL" format, then click "Go" to download the .sql file to your computer. This file typically ranges from a few kilobytes to several megabytes depending on your content volume.
Keep this file safe and note its name — you'll need it when setting up your database on the new host.
3. Document your current site configuration
Before migrating, document critical settings so you can replicate them on your new host. Record this important information:
- WordPress version (found in Dashboard under Updates)
- PHP version (usually in hosting control panel under PHP settings or Software)
- Current permalink structure (Settings > Permalinks)
- Active theme name and version
- All active plugins with version numbers
- Custom configurations in wp-config.php beyond default settings
- Any custom .htaccess rules you've added
- Email account settings if using hosting email
- Any third-party integrations like payment gateways or APIs
Screenshot important settings pages for visual reference. This documentation ensures you configure your new hosting environment identically, preventing compatibility issues or broken functionality after migration.
4. Take inventory of all content, themes, and plugins
Catalog everything on your site so nothing gets lost during migration. Navigate to Posts and Pages in your dashboard and note the total count of each — this helps verify everything transferred. Go to the Media Library and check the total files (images, videos, documents).
Under Appearance > Themes, list all installed themes, not just the active one, as you may want them available. Under Plugins, document all installed plugins, their versions, and activation status. Note any custom code snippets you've added through theme files or plugins.
Check for custom post types or taxonomies if you're using advanced features. Export your menus from Appearance > Menus as a reference. This inventory serves as a checklist after migration to confirm everything transferred successfully.
5. Choose the best host
As you’re evaluating hosting providers, don’t forget the value of peace of mind. Pricing is one thing, but can you hang a tag on the confidence that you’ll get the job done quickly and without hassle? For example, GoDaddy Managed WordPress Hosting removes the technical complexity from migration and ongoing site management.
This specialized hosting is specifically engineered for WordPress, optimizing speed, performance, and security based on WordPress's unique requirements.
The platform handles technical details automatically—including one-click migration tools that transfer your site without manual file uploads or database imports. Managed hosting takes care of WordPress core updates, security monitoring, daily backups, performance optimization, and server configurations, so you can focus on running your business rather than managing technical infrastructure.
For users wanting a streamlined migration experience with professional-grade hosting features, managed WordPress hosting eliminates guesswork and reduces migration time significantly while providing ongoing peace of mind.
Migrate WordPress site with 1-click
If you have any lingering doubts at this point, remember you can skip the technical complexity entirely. GoDaddy's Auto Migration tool is the fastest, safest option for most users, especially if you're uncomfortable with FTP, databases, or DNS settings.
This automated approach handles everything — files, database, configurations—in a single streamlined process, typically completing in under an hour with minimal input required. The tool eliminates human error and ensures nothing gets missed during transfer.
We recommend performing any PHP or WordPress core updates possible before migrating to ensure compatibility.
If you prefer more hands-on control or are migrating from a host that doesn't support automated migration, the plugin-based and manual methods covered below provide alternative approaches with step-by-step guidance.
| Criteria | Host-assisted (GoDaddy Auto Migration) | Plugin-based migration | Manual migration |
|---|---|---|---|
| Technical skill required | Beginner | Beginner to Intermediate | Advanced |
| Time investment | 15-30 minutes hands-on time | 30-60 minutes hands-on time | 2-3 hours hands-on time |
| Best for | Any site size; users wanting simplicity; those uncomfortable with technical steps | Small to medium sites; users wanting some control; migrations between any hosts | Large or complex sites; users needing complete control; troubleshooting failed migrations |
| Cost | Included with GoDaddy Managed WordPress Hosting | Free (basic plugins) to $29-99 (premium plugins with support) | Free (only requires new hosting) |
| Risk level | Low - automated process with built-in safeguards | Medium - depends on plugin quality and user following steps correctly | High - many steps where errors can occur |
| Support available | Full GoDaddy support team assistance available 24/7 | Plugin documentation; premium plugins include support | Community forums; hosting provider for hosting-specific issues only |
| Pros | • Completely automated with minimal user input• Fastest method with professional-grade reliability• Zero technical knowledge required | • Works between any hosting providers• Visual interface guides you through process• Good balance of simplicity and control | • Complete control over every aspect• No dependency on tools or plugins• Best for troubleshooting complex issues |
| Cons | • Only available when migrating to GoDaddy• Less control over specific migration settings• Requires GoDaddy hosting purchase | • Quality varies significantly between plugins• May struggle with very large sites• Some plugins have file size limitations | • Requires FTP, database, and DNS knowledge• Time-consuming with many steps• Higher chance of errors causing downtime |
The bottom line: Choose host-assisted if you're migrating to GoDaddy and want the easiest experience. Choose plugin-based if you need flexibility between different hosts and have basic WordPress familiarity. Choose manual only if you have technical experience or are troubleshooting a failed automated migration.
Migrate WordPress using plugins (recommended for most users)
One of the easiest ways to do a semi-automated migration is with the help of a plugin. There’s lots of great options out there, but two of the more reliable and tested ones are Duplicator or All-in-One WP Migration tool.
For either, you simply set up the plugin and use their Export and Import functions. We’ll focus in on the Duplicator plugin and the steps involved to migrate your website using Duplicator:
1. Prepare your old WordPress site for migration
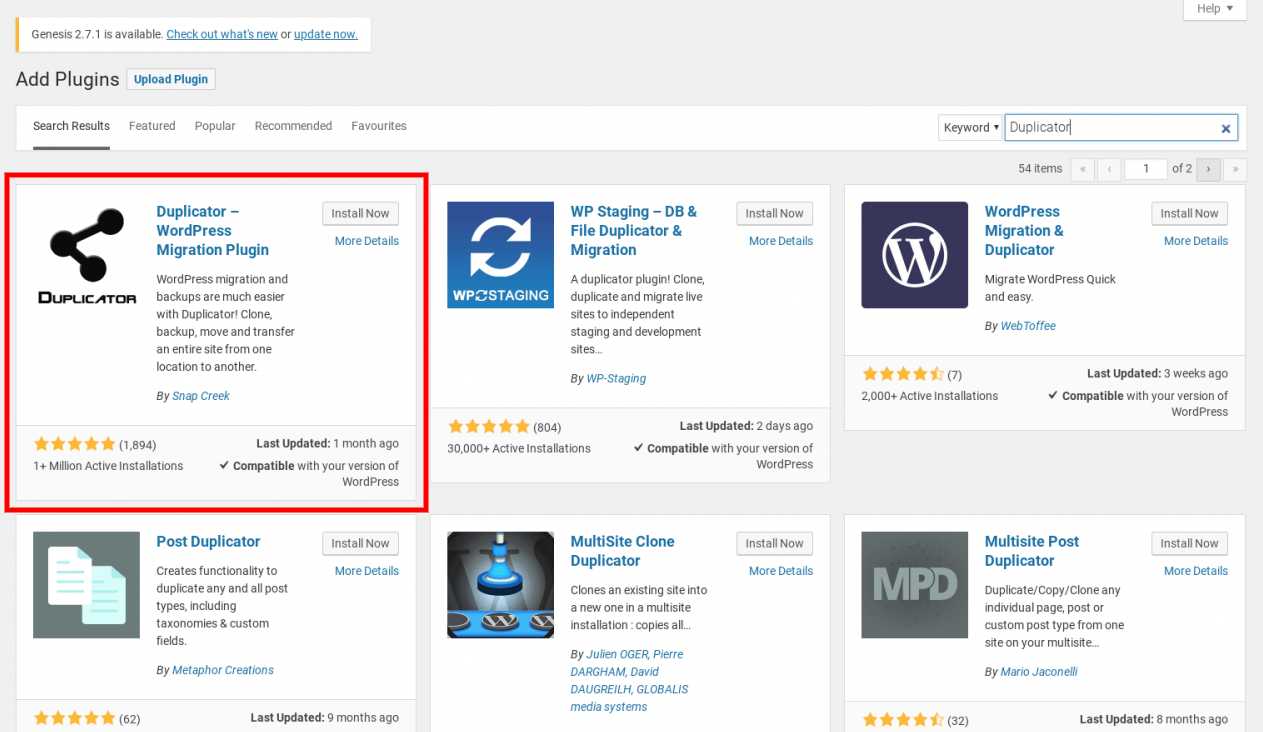
The first thing to do is to download the plugin. Navigate to Plugins > Add New and type Duplicator into the search bar. Once you find the right plugin (as in the screenshot), click Install Now, and then activate the plugin once it’s installed.
2. Package up your old WordPress database (and site)
Now that you’ve installed Duplicator, you can use it to package up your site for moving it to a new host.
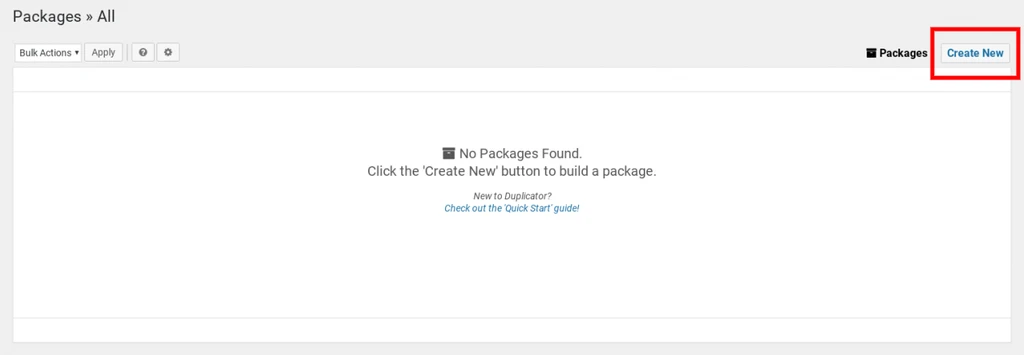
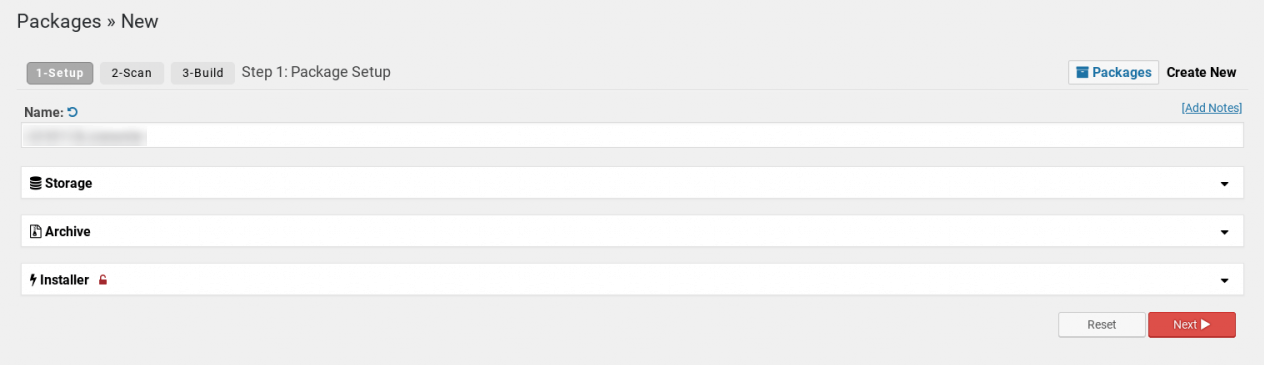
To get started, from your side menu, go to Duplicator > Packages, then click Create New in the top right-hand corner.
On the next screen, you’ll see a few options for creating the package, including where you want to store the archive and the installer, and components that should be archived, including plugins, themes, and more.
Note that while you do get some additional options as part of the Duplicator Pro package, such as cloud storage for backups and a branded installer, if you don’t want to upgrade, you don’t need to, as most sites can make do with the default settings.
One important thing to note is the size of your website. As of the writing of this article, unless you have Duplicator Pro, larger websites need to be migrated using their “Two-Step Install” method or the “Database Only” method. This is mainly for Duplicator Lite, where your file may be bigger than what the Lite version can support.
In that case, you’ll have to either follow the “Two-Step Install” method or get Duplicator Pro. The “Two-Step Install” method just lets you archive the database only in this step, and then relies on you to transfer your website files yourself (easily done by compressing them, downloading the compressed file, and uncompressing them on the new host).
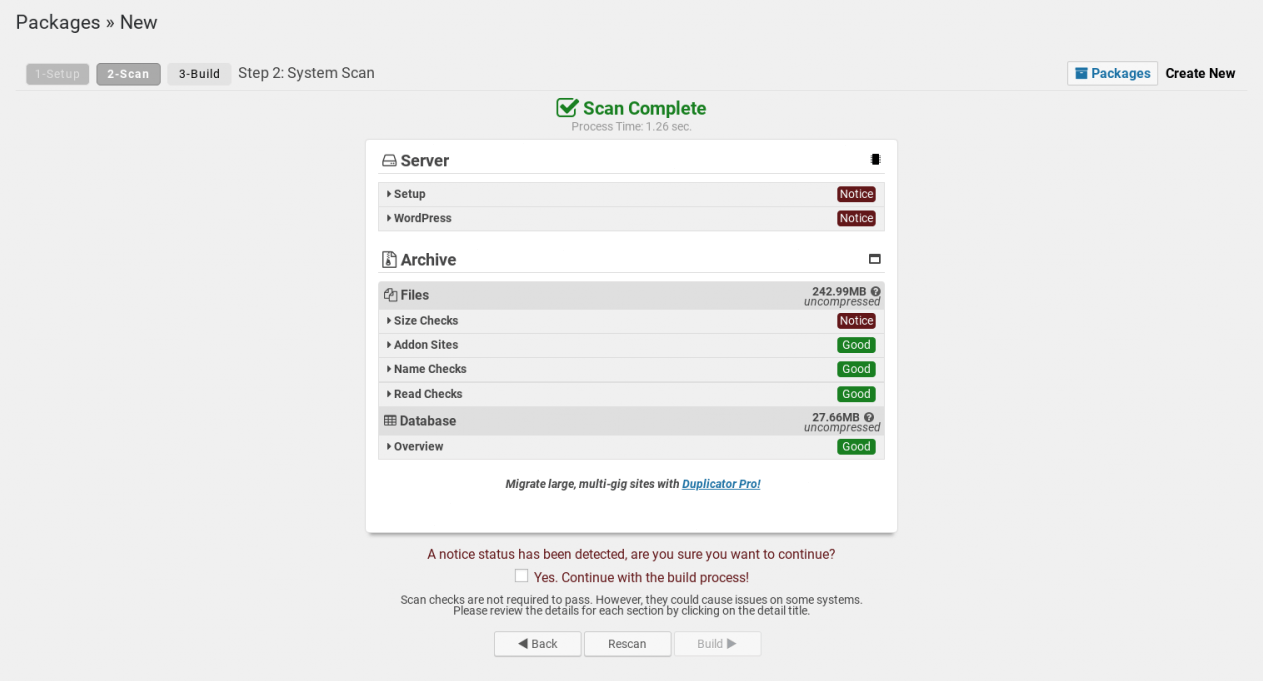
Once you click Next, Duplicator will scan your environment to do a quick check, revealing a page with the results of the scan. The scan should only take a few seconds. At this point, the plugin will warn you if you have any issues that might affect the migration of your site, such as an unsupported server setup or any enormous files.
If any errors come up, you can check the FAQ page for the plugin for more information on how to resolve the issues before running the scan again.
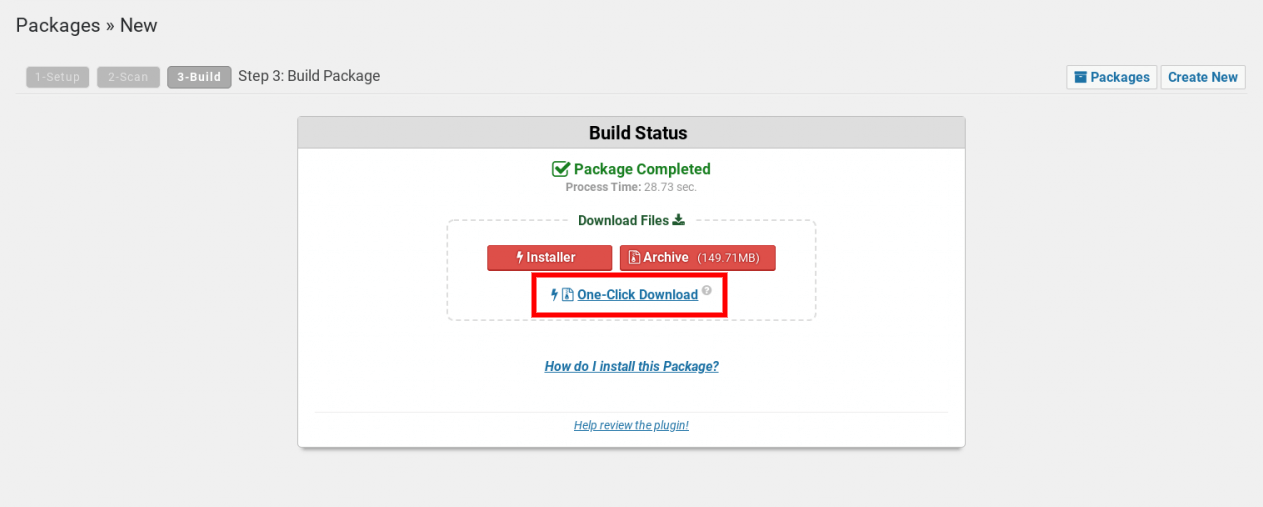
If everything looks good, click Build to build the package! Depending on the size of your site, it may take a few minutes for the build process to complete. Once it is complete, you’ll see a page saying Package Build Completed and you’ll be able to download both the Archive and the Installer files. Simply click Download Both Files to download both to your computer.
3. Create the MySQL database and user on the new host
This step assumes you’re moving to a vanilla web host without a managed WordPress offering. If your provider offers managed Hosting for WordPress, it’s much more convenient to have your provider take care of the migration for you.
While the Duplicator installer can install WordPress for you on the new host, you still need to manually create the database and set up a new user, since the plugin can’t do that on its own.
If your new host offers cPanel access, you can quickly set up the new database and user from within cPanel. (Here are instructions for how you can set up the database on GoDaddy’s cPanel hosting.)
If your new host doesn’t offer cPanel access, you should be able to find instructions for creating the database in their support documentation.
When you create the database, make sure to give it a memorable name, since you’ll need to enter it into the Duplicator plugin later. It can help to prefix the database name with “wp_” so you remember it’s a WordPress database, especially if you have multiple databases on the same server.
Make sure you also record the new username and password somewhere secure, as we’ll also need those when we set up the new site within the Duplicator plugin.
Finally, make sure the new database user has all privileges assigned for the database you’ll be using.
OK, time for the next step — installing the site on the new host!
4. Import the Duplicator files to your new host.
Next, you’ll need to upload both the installer and archive files you downloaded from Duplicator earlier to the root folder on your new host. Make sure the root folder is completely empty, then upload the files using the File Manager in cPanel or using FTP.
5. Perform the migration.
Once the files are uploaded, you’ll need to access the installer.php file in your browser to start the installation process. There’s one caveat, though: your domain is still pointing to the site on the old host, so you’ll need to access the new site directly via its IP address.
If your site is on a shared hosting provider, you’ll also need to include your username in the address as well.
In cPanel, find the IP address of the new server, along with your username. In your browser, enter the IP address of the server, followed by “~username/installer.php”. Be sure to replace username with your username. Both the IP Address and the username are marked in red in the screenshot below.
The address bar should look something like this:
http://12.34.56.78/~myusername/installer.phpWhen you make it to the installer, the first page will prompt you to go over the installation overview (in most cases you’ll want to just keep those settings), and also input the database details you had from earlier when you created a new database and user. Input those details here in the Database Connection portion.
Click Validate and the installer will go through a couple of validation steps to make sure it can connect to the database properly. Once it does, it’ll give green lights or notices. If there are any issues, go back to the FAQ page for the plugin to check before you proceed.
Click Next and you’ll see the Install Confirmation. If everything looks good, click OK!
If everything has gone according to plan, the final screen should show you all green and good, with a database report and a blue button to login to the WordPress admin portal for the new site.
Congratulations! You’ve completed the migration!
6. Log in to the site and ensure everything is working properly.
At this point, it’s a good idea to double-check that all your files have been migrated properly to the new host before deleting anything from the old host or canceling your account.
First login using the same Admin login as your old website, and make sure everything is working properly, including the public-facing site. Alongside that, using the File Manager in cPanel or your FTP software, ensure all the files on the new host match the files on the old host.
If you spot a few extra files on the new host from the installation process, they can be safely ignored. If you happen to spot anything that’s missing, simply transfer the file over manually using cPanel.
7. Update your DNS records to point to the new host.
Once you’ve checked that all your files have transferred properly, you’ll need to update your domain name to point at the new host. The exact method of updating your DNS records varies by DNS provider, so it’s best to look up specific instructions in your provider’s support documentation.
On the new host, follow the instructions to add your domain to the new account. After linking the domain to your account, you should be provided with two or more name server addresses to point your domain name to. Add those name servers to your existing DNS host, making sure to completely clear out the old addresses.
Remember, any changes to your DNS records could take up to 48 hours to propagate throughout the world. If you just can’t wait to get started on your new site, be sure you’re able to access the new site on your existing domain before making changes!
Manual WordPress migration without plugins (maximum control)
Manual WordPress migration gives you complete control without relying on third-party tools. This method suits advanced users, very large sites (especially databases over 5GB that plugins struggle with), or situations where automated tools fail or aren't permitted. You'll need comfort with FTP clients, phpMyAdmin, and editing configuration files.
While it’s time-intensive (2-4 hours for first-timers), manual migration becomes routine with practice — and how many professionals prefer to work. Each step below is explained clearly, walking you through transferring files, exporting and importing databases, updating configurations, and testing thoroughly before going live.
1. Upload your website files to the new server
To upload your website files, log in to the destination account using FileZilla and browse to the web root of the destination hosting account. If you are using cPanel, this is typically the public_html/ folder. Drag your website files from your local computer to the new host’s web root.
Depending on the size of your uploads folder and plugins, this process may take some time.
2. Create a database to a new host
Create a database in the new destination by logging in to the destination account’s control panel. If you’re using cPanel, look for the option MySQL® Databases. Create a new database and name it appropriately for your site.
Once you’ve created the database, create a new database user and then add the new user to the new database with ALL PRIVILEGES. Make sure to write down the database name, username, and password — you’ll need them for later.
3. Import database to new server
Import the database by logging in to phpMyAdmin on the destination account and clicking on the name of the new database that you just created. Then, on the top bar, click Import. Click the browse button and select your .sql file that you made earlier. Click Go, and the database will begin importing. Depending on the size of your site, this process might take some time to complete.
4. Edit the wp-config.php file with new credentials
Next, fix the wp-config.php file to meld the files and database. You can edit this file in FileZilla by right-clicking on it and selecting Edit (cPanel also provides a file manager where you can make edits to this file). What you’re looking for are the following settings in this file:
<em>define('DB_NAME', 'new_db'); define('DB_USER', 'new_db_username'); define('DB_PASSWORD', 'new_db_password'); define('DB_HOST', 'localhost');</em>Take the database information that you wrote down earlier and replace the old database information in these lines of code with the new credentials.
Navigate to the public site using the IP address method above, and you should be able to see your site up and online!
5. Update DNS records to point to the new host
Before updating DNS, test your migrated site thoroughly using your new host's temporary URL or by editing your computer's hosts file to preview the site before it goes live. Manual migrations have more room for configuration errors, so confirming everything works — links, forms, images, functionality — is critical before DNS changes.
Once verified, log in to your domain registrar, navigate to DNS settings, and update nameservers to your new host's provided nameservers. DNS propagation takes 24-48 hours globally, though many users see changes within a few hours. During this time, some visitors see your old site while others see the new one.
Leave your old hosting account completely untouched for at least 72 hours after DNS changes. This provides a safety window for rollback if critical issues emerge that weren't caught during testing.
For more clarity on this procedure, check out this resource on understanding DNS.
Post-migration checklist: Ensuring everything works
Kudos on successfully migrating your WordPress site. This final checklist ensures long-term stability and performance. Skipping these verification steps causes roughly 80% of "everything was fine, then it broke a week later" problems.
Investing just 15-30 minutes now catches configuration issues, broken links, and performance problems before they affect visitors or revenue. Think of this as your quality assurance phase after setting up WordPress — the difference between a migration that's technically complete and one that's truly successful.
Work through each item methodically, and you'll have confidence that your site is fully functional, optimized, and ready to serve your audience without surprises down the road.
Here’s what you need to check off before launching:
- Regenerate permalinks: Navigate to Settings > Permalinks in your WordPress dashboard and click "Save Changes" without modifying anything. This simple action regenerates your .htaccess file with the correct server paths for your new hosting environment. Skipping this step is a common cause of 404 "Page Not Found" errors where all your pages exist but WordPress can't find them. Even if pages seem to work initially, regenerating permalinks ensures proper URL routing and prevents issues with custom post types, category archives, and complex URL structures that might break later.
- Clear all caches (plugin, server, CDN, browser): Caching stores old versions of your site, which means you might see outdated content or broken functionality even after successful migration. Clear every cache layer systematically: deactivate and reactivate caching plugins (or clear their cache through plugin settings), contact your new host to clear server-level cache if using managed hosting, purge your CDN cache if using Cloudflare or similar services, and clear your browser cache or test in an incognito/private window. Until all caches clear, you're not seeing the true migrated site, which can hide problems or create false alarms.
- Verify and reconfigure SSL certificate: SSL certificates don't automatically transfer during migration. Check if your new host provides free SSL certificates through Let's Encrypt or similar services—most modern hosts do. Install or activate the SSL certificate through your hosting control panel, then update your WordPress URL settings at Settings > General, changing both "WordPress Address (URL)" and "Site Address (URL)" from http:// to https://. Install the Really Simple SSL plugin to handle remaining redirects and mixed content warnings. Test by visiting your site with https:// to confirm the secure padlock appears.
- Test email functionality: WordPress and website forms send email notifications that often break after migration due to different server configurations. Test every email touchpoint: submit your contact form and verify you receive the message, test newsletter signup forms if applicable, check that WordPress sends password reset emails successfully, and verify comment notification emails if you allow comments. If you’ve set up an email address on your domain but these messages aren't working, install WP Mail SMTP plugin to route emails through a reliable SMTP service like Gmail, SendGrid, or your hosting provider's SMTP server rather than relying on unreliable PHP mail() function.
- Update DNS records for email (MX, SPF, DKIM): If you use email addresses associated with your domain (you@yourdomain.com ), the DNS records controlling email delivery must be updated separately from website DNS. Log into your domain registrar or DNS management panel and verify MX records point to your email provider (your hosting company, Google Workspace, Microsoft 365, etc.). Update SPF and DKIM records according to your email provider's specifications—these authenticate your emails and prevent them from being marked as spam. Your email provider's documentation includes the exact DNS records needed. Test by sending emails from your domain address and checking they're received without going to spam folders.
- Remove migration plugins and installer files: Migration plugins and temporary files served their purpose and now represent unnecessary security risks and performance drags. Deactivate and delete any migration plugins you installed (like Duplicator, All-in-One WP Migration, or UpdraftPlus if only used for migration). Check your WordPress root directory via FTP or File Manager for installer files like installer.php, migration.php, or similar files that some plugins create—delete these immediately as they can provide backdoor access to your site. Also delete any compressed backup files (.zip, .tar.gz) you uploaded during migration, as these can be massive files consuming storage and potentially accessible to others.
- Monitor uptime and performance for 48 hours: Set up active monitoring for the critical first 48 hours after DNS changes complete. Use free uptime monitoring services like UptimeRobot or Pingdom to check your site every 5 minutes and alert you immediately if it goes down. Run daily speed tests using Google PageSpeed Insights or GTmetrix to establish baseline performance metrics on your new host—it should be faster than your old host, not slower. Check your website from multiple devices and locations if possible. Watch for any error messages, broken functionality, or performance degradation. This vigilant monitoring period catches issues while they're fresh and easier to troubleshoot.
- Deactivate old hosting after confirmation period: Don't cancel your old hosting immediately—keep it active for at least 7-14 days after successful migration as insurance against unforeseen issues. This grace period allows you to catch problems that only emerge with real traffic and varied usage patterns. If a critical issue appears that can't be quickly resolved on the new host, you can temporarily revert DNS back to your old host while troubleshooting. Once you're confident everything works perfectly—all functionality tested, traffic flowing normally, no errors appearing, emails working consistently—then contact your old host to cancel the account. Download any final backups before cancellation for archival purposes.
Special cases: Advanced migration scenarios
Most WordPress migrations follow straightforward processes, but certain scenarios have unique technical requirements and elevated risks. These require extra care, extensive testing, and significantly more time. There's no shame in hiring WordPress migration professionals — expert help often costs less than prolonged downtime, lost data, or damaged SEO.
- WordPress multisite networks: These present exponentially more complexity than single-site migrations. Multisite runs multiple WordPress sites from one installation, sharing core files but maintaining separate databases. Migration requires mapping multiple domains correctly, preserving network configuration, migrating the primary network plus all subsites without breaking internal links, and updating hardcoded database paths. Database search-and-replace operations are particularly risky—a single error breaks every site simultaneously. Strongly consider professional migration assistance or GoDaddy's specialized multisite hosting with migration support.
- Large enterprise websites: Sites with databases exceeding 1GB, thousands of media files, or complex custom functionality require special considerations. Plugin-based migrations frequently fail with databases over 500MB due to resource limits and timeouts. These migrations often require migrating databases via command-line tools, transferring media through direct server-to-server transfer, optimizing databases beforehand, and using staging environments for testing. Enterprise sites frequently have custom code, API integrations, and performance configurations requiring exact replication. Budget 6-8 hours or multiple days.
- WooCommerce stores: These require exceptional care because migration errors directly impact revenue and customer relationships. You're migrating critical business data, including order history, customer accounts with credentials, product catalogs with inventory, payment gateway configurations, tax and shipping settings, SSL certificates, and subscription data. Botched migrations can result in lost orders, inaccessible accounts, broken checkout, or compliance violations. Best practices include scheduling during low-traffic periods, enabling maintenance mode, testing checkout thoroughly before DNS changes, verifying payment gateways with test transactions, and confirming notification emails work. Many store owners wisely invest in professional WooCommerce migration services.
- Changing domains or rebranding: This adds complexity beyond standard transfers. Every database reference to your old domain must be updated—thousands of instances in post content, widgets, settings, and media URLs. Use specialized tools like Better Search Replace plugin or WP-CLI that handle serialized data correctly—simple find-and-replace corrupts data structures. Domain changes also require comprehensive 301 redirects from every old URL to new URLs, preserving SEO and preventing broken external links. Update Google Search Console and Analytics, inform subscribers about the change, and monitor search rankings for several weeks. If possible, change hosts first, verify functionality, then tackle the domain change as a separate phase.
In all special scenarios, test exhaustively before making DNS changes permanent, maintain complete backups throughout, and don't hesitate to seek professional assistance when complexity or business impact exceeds your comfort level.
Common WordPress migration problems (and how to fix them)
Migration issues are common and almost always fixable—don't panic if something doesn't work immediately after transferring your site. Approximately 90% of migration problems fall into a few predictable categories with straightforward solutions.
This troubleshooting guide helps you diagnose and resolve the most frequent post-migration issues.
Work through fixes in the order presented, and don't hesitate to contact your hosting support team for server-specific problems beyond your control. Bookmark this section as a quick reference if issues arise days or weeks after migration.
Site displays "Error establishing database connection"
This error means WordPress can't connect to your database, usually because database credentials in your wp-config.php file are incorrect or outdated. During migration, database names, usernames, passwords, or host addresses often change between hosting environments.
Fix:
Access your wp-config.php file via FTP or File Manager and update the database credentials (DB_NAME, DB_USER, DB_PASSWORD, DB_HOST) to match the new database information from your current hosting provider. If the credentials are correct but the error persists, verify that your database was imported properly or contact hosting support to check if the database server is operational.
If credentials are correct but the error persists, your database may not have imported properly or your database server might be down — contact hosting support.
Images and CSS not loading (mixed content issues)
Your site loads but images are broken, styling looks wrong, or browsers show "insecure content" warnings. This happens when your site URLs change from HTTP to HTTPS (or vice versa) during migration, or when absolute URLs in your database still reference your old domain or protocol.
Fix:
Use the Better Search Replace plugin to find and replace all instances of your old URL with the new one (including the correct protocol), making sure to search across all database tables. After running the search/replace, clear all caches and consider installing Really Simple SSL plugin if using SSL to automatically fix any remaining mixed content issues.
500 Internal Server Error
This generic error indicates something went wrong on the server but doesn't specify what. Common causes include corrupted .htaccess file, PHP memory limit exceeded, or plugin conflicts that survived migration.
Fix:
Temporarily rename your .htaccess file to disable it and check if the site loads; if so, regenerate it through WordPress Settings > Permalinks. If the .htaccess isn't the issue, disable all plugins by renaming the plugins folder via FTP, then reactivate them one by one to identify the culprit. If neither solution works, contact hosting support for server configuration adjustments like increased PHP memory limits.
If neither .htaccess nor plugins are the issue, contact hosting support—you may need increased PHP memory limits or other server configuration adjustments.
White screen of death after migration
Your site displays a completely blank white screen with no error message. This typically results from PHP memory exhaustion, plugin conflicts, or theme compatibility issues with your new server's PHP version.
Fix:
Enable WordPress debugging by adding WP_DEBUG and WP_DEBUG_LOG definitions to wp-config.php to reveal the actual error messages in the debug.log file. Based on the errors you find, deactivate problematic plugins or themes via FTP, increase PHP memory limits in wp-config.php if needed, or update incompatible themes and plugins to their latest versions. Contact hosting support if PHP version compatibility issues persist.
Admin login redirects or loops
You enter correct login credentials but get redirected back to the login page endlessly, or redirected to your old domain. This happens when WordPress site URLs in the database don't match your actual domain, or when cookie settings are incorrect.
Fix:
Access your database through phpMyAdmin and update the "siteurl" and "home" values in the wp_options table to match your new domain with the correct protocol. Clear your browser cache completely after making changes, and if the issue persists, temporarily add WP_HOME and WP_SITEURL definitions to wp-config.php with your correct domain URL.
Related: Fix redirect loop error in WordPress
Plugins not working on new host
Specific plugins that worked on your old host are broken, showing errors, or missing functionality on the new host. This usually stems from different server configurations, PHP versions, or missing server modules.
Fix:
Update all plugins to their latest versions and verify with your hosting support that required PHP extensions (like cURL, GD Library, or Imagick) are enabled on your new server. Reconfigure any API keys or webhook URLs to point to your new domain, and for caching or security plugins, completely remove and reinstall them rather than just deactivating. If issues persist, check PHP version compatibility or contact the plugin developer for support.
If specific business-critical plugins remain broken after these steps, contact the plugin developer's support or consider alternative plugins compatible with your new hosting environment.
Related: Fix WordPress plugin errors
Email stopped working after migration
Contact forms don't send, WordPress notification emails never arrive, or your domain-based email accounts (you@yourdomain.com ) have stopped working. Email uses separate DNS records (MX records) from your website, and migration often disrupts email configuration.
Fix:
Install and configure the WP Mail SMTP plugin to use your hosting provider's SMTP server or a third-party email service for WordPress notifications. For domain-based email, verify that MX records in your DNS settings still point to the correct email provider and haven't been altered during migration. Update SPF and DKIM DNS records as needed, and allow up to 48 hours for DNS changes to propagate fully.
Slow performance despite better hosting
Your new hosting promised better performance, but your site loads slower than on your old host. This typically occurs when optimization settings weren't migrated or when new server configurations aren't optimized yet.
Fix:
Clear all existing caches and reconfigure or install a caching plugin compatible with your new host, enabling any server-level caching available through your hosting control panel. Verify that your new host is using an updated PHP version (8.0+) and that any included CDN services are activated. Run speed tests to identify specific bottlenecks and contact hosting support for optimization services often included with managed WordPress hosting.
Remember, some performance issues take 24-48 hours to resolve as DNS propagates and caching systems warm up. If performance remains poor after this period, investigate further or contact hosting support.
FAQs about WordPress migration
How long does it take to migrate a WordPress website?
Migration time depends on your method and site size. Using GoDaddy's automated migration tool takes 15-30 minutes of hands-on time, though the actual transfer process may run 1-3 hours. Plugin-based migrations typically require 30-60 minutes of active work, while manual migrations take 2-4 hours for first-timers. Add 24-48 hours for DNS propagation to complete globally. Most small to medium sites can be fully migrated in a single afternoon.
Will I lose data during migration?
You won't lose data if you follow proper migration procedures and maintain backups. Always create a complete backup before starting—this ensures you can restore everything if anything goes wrong. Modern migration tools and plugins are designed to transfer 100% of your content, including posts, pages, images, comments, users, and settings. The key is testing thoroughly after migration to verify everything transferred correctly before deactivating your old hosting.
Is GoDaddy hosting good for WordPress?
Yes, GoDaddy's Managed WordPress Hosting is specifically optimized for WordPress with features like automatic updates, built-in security, daily backups, and performance optimization. It offers one-click WordPress installation, free SSL certificates, 24/7 WordPress-specific support, and staging environments for testing changes. GoDaddy handles the technical aspects automatically, making it an excellent choice for beginners and business owners who want reliable hosting without managing server configurations.
How do I export an entire WordPress site?
The easiest method is using a migration or backup plugin like Duplicator, All-in-One WP Migration, or UpdraftPlus—install the plugin, click to create a complete backup/export, and download the resulting file containing your entire site. For manual export, download all files via FTP from your hosting account and export your database through phpMyAdmin (select your database, click Export tab, choose Quick method, and download the SQL file). GoDaddy's automated migration tool handles exports automatically without requiring manual steps.
Can I migrate WordPress without downtime?
Yes, proper migration involves zero visitor-facing downtime. The migration happens entirely in the background while your old site remains live and accessible. You build and test your site completely on the new host using temporary URLs or hosts file previewing before changing DNS. Only after verifying everything works perfectly do you update DNS to point to the new host. During the 24-48 hour DNS propagation period, some visitors see the old site while others see the new one, but your site remains accessible throughout.
Can I reverse a migration if needed?
Absolutely, as long as you keep your old hosting active during the confirmation period. If critical issues emerge after migration, simply change your DNS settings back to point to your old host—your original site remains untouched and functional. This is why it's crucial not to cancel old hosting for at least 7-14 days after successful migration. Keep complete backups from both before and after migration, providing multiple restoration points if needed. Once you've confirmed everything works perfectly for a week or two, then safely cancel your old hosting.