

This post was originally published on Oct. 17, 2018, and was updated on March 4, 2020.
Do you need to create a 301 redirect in WordPress? There are many good reasons to use this technique to automatically forward users (and web crawlers) from one URL to another. Every WordPress webmaster needs a solid understanding of how redirects work, why they are important, and how to set them up. Not there yet? After this article, you will be.
Launch your business in minutes with GoDaddy Airo®
Guide to setting up 301 redirects in WordPress
Here’s what we’re going to cover:
- What is a 301 redirect?
- When do you need to use 301 redirects in WordPress?
- How do you create 301 redirects in WordPress?
- Creating a 301 redirect in WordPress without a plugin.
- Creating a 301 redirect with a plugin.
- Other types of redirects.
- Conclusions and next steps.
What is a 301 redirect?
A redirect is a way to automatically forward a visitor, whether it’s a person or a web bot, from one page to another from behind the scenes. It keeps users and search engine bots happy.
Who likes to go somewhere only to find it closed for business?
When a browser attempts to load a page that’s been configured to redirect, instead of returning the requested page the server sends the browser a new location. It simultaneously sends a code that provides additional information. The code, called an HTTP Status code, indicates, for example, whether the redirection is permanent (301 redirect) or temporary (307 redirect). Only the web browser sees this code; it isn’t displayed to the user.
Most redirects are 301 redirects, which indicate the old page has been permanently retired. For WordPress webmasters, 301 redirects are the most important, so we’re going to cover them in detail in this article.
When do you need to use 301 redirects in WordPress?
There are plenty of uses for implementing 301 redirects in a WordPress website, for example:
- You redesign your site and some URLs change.
- You rename a post (sometimes WordPress will handle this for you but not always).
- You transfer your site to HTTPS/SSL.
- You change your permalink or slug structure.
- To forward users to the preferred version of your website (www or non-www).
Redirects ensure the visitor gets to the appropriate page and avoids an annoying “Page not found” message. A redirect also helps transfer the old page’s SEO juice and backlinks to the new page.
When a web crawler, such as Google, receives a 301 redirect, it knows to update its index to remove the old page URL and replace it with the new one.
Related: How to stay on top of WordPress security issues
How do you create 301 redirects in WordPress?
As with most things WordPress, there are multiple ways to set up 301 redirects. You can do so with or without a plugin. It’s entirely your preference.
WordPress admins often opt for the no-plugin route to save overhead, but plugins have their pros too. This article covers the different ways you can set up 301 redirects. The most common methods are:
- By editing your site’s .htaccess file
- Via PHP modifications
- Through a WordPress plugin
Creating a 301 redirect in WordPress without a plugin
While using a plugin to implement redirects might be the quick and easy route, every plugin you activate on your site adds a little more processing overhead.
More overhead = slower site.
Plugins also have to be kept current. Do you really want another plugin to update?
If you want to set up 301 redirects without a plugin, you have two go-tos: your site’s .htaccess file and modifications to the PHP of your theme.
Creating a 301 redirect in .htaccess
An .htaccess is a plain text file you can use to make configuration changes affecting how your web server delivers your pages. It’s a Linux/Apache web server thing. Most web hosting these days runs on Linux, and if your hosting plan is a Linux plan, it’s most likely running Apache and you have the power of .htaccess at your fingertips.
A website can have more than one .htaccess file, but there’s usually one located in the root (top level, often named public_html) of the website. It was created when you installed WordPress. If you installed WordPress in a subdirectory, such as /blog, the .htaccess might be there.
Creating a WordPress 301 redirect in your .htaccess file works well, but create a backup copy before making any edits.
What you put in a root-level .htaccess file will affect your full site. That’s why creating WordPress 301 redirects in .htaccess works so well. You can modify the file with any text editor, which makes updating your .htaccess much more accessible.
Before you touch an .htaccess file, make a backup copy! If you introduce a typo into your site’s .htaccess, boom goes the site and out comes the 500 Internal Server Error message. It’s an easy fix if you have a backup, but otherwise a potential hassle.
A basic .htaccess redirect command takes the following format:
Redirect [status] [URL-path] URL
.htaccess redirect examples
Here are a few examples covering common redirection scenarios:
Redirect to a page on the same host
Redirect 301 /oldpage.html /newpage.html
Redirect to a page on a different host
Redirect 301 /oldpage.html https://www.example.com/newpage.html
Redirect entire WordPress site to a new site
Redirect 301 / https://www.yournewsite.com/
You can stack up as many of these as you need in your .htaccess file.
Editing .htaccess through cPanel
You can edit .htaccess via cPanel. Here’s how to do it, step-by-step:
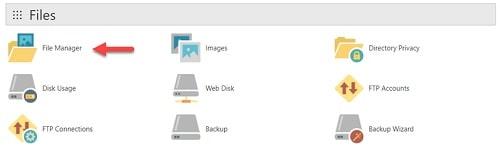
1. Log into cPanel.
2. Under the Files section and click on the File Manager icon.
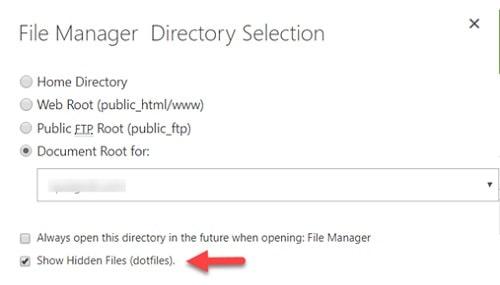
3. In the popup window, select the Document Root for the site you are working on and make sure Show Hidden Files is checked.
Note that some versions of File Manager might have a slightly different interface but will require the same setting selections. If the below window doesn’t pop up automatically when you click on File Manager, look for a Settings icon and click on that to reach these settings.
4. Look for the .htaccess file and right-click on it. From the drop-down menu that appears, select Edit.
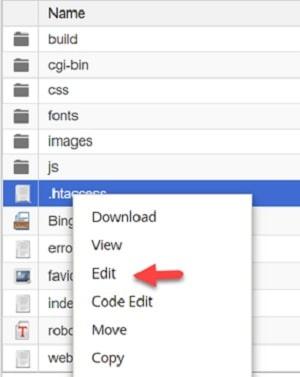
5. You will now be in the text editor, where you can make and save changes.
For the full scoop on other nifty things you can do with .htaccess, see our .htaccess tutorial and cheatsheet.
Creating a 301 redirect with PHP
If you prefer to add redirects without using a plugin or altering your .htaccess, you can opt to manually code the redirects into the PHP of your WordPress theme. This is the most advanced option.
While you could add code directly to the header.php file, it’s better practice to place it in the functions.php file and use a WordPress hook. This way you aren’t altering core files and you can keep your modifications in one place.
You should also use a WordPress child theme to make your edits. Otherwise if you update your theme, your changes will be overwritten and lost.
Related: Understanding the WordPress theme structure
wp_redirect syntax
The WordPress PHP code to redirect a page is structured like this:
wp_redirect( ‘http://mysite.com/mynewpost’, 301 );
 exit;
http://mysite.com/mynewpost is the URL you want to redirect to. 301 is the status code to use. The exit statement is required.
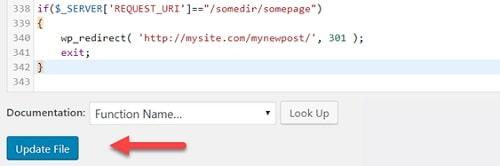
Since the code in functions.php gets executed on every page, you’ll need to wrap the redirect in a conditional requirement if you only want to redirect a specific URL. For example:
if($_SERVER['REQUEST_URI']=="/somedir/some_page_you_want_to_redirect")
 {
 wp_redirect( ‘http://mysite.com/mynewpost’, 301 );
 exit;
 }
Note that the request URI will be everything after your domain name. So in the example below, the request URI string to use would be everything in bold.
http://mysite.com/somedir/somepost
How to edit your functions.php file in WordPress
Editor’s note: Editing theme files via /wp-admin/ is risky. Bad code could prevent WordPress from loading, which then prevents you from fixing the code. We recommend making edits via SFTP on a staging site. One-click staging sites are a feature in our WordPress Hosting plans.
You can add your redirect code to functions.php through the Admin control panel. From the Admin dashboard, select Appearance, then from the submenu, select Editor. The right side of the screen will list files you can edit. Select Theme Functions (Functions.php).
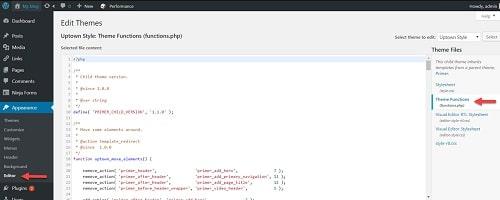
Scroll to the bottom of the file and insert your code snippet. Then click the Update File button to save your changes.
Visit the old page and confirm that the redirection is working.
Once again, an error here can bring your site down, so be careful!
Creating a 301 redirect with a plugin
The most painless way to add 301 redirects to a WordPress installation is via a plugin. There are many plugins that will handle this for you. Top options include:
- Redirection by John Godfrey (free)
- Simple 301 Redirects (free)
- Yoast SEO (premium version)
Redirection
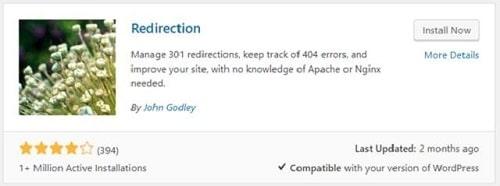
This free plugin has more than 1 million active installations for good reason — it’s simple and does the job well.
Redirection handles everything from basic redirects to redirects based on particular conditions, such as the user’s login status, browser type, referrer, or other conditions. This plugin will also track all 404 (Page not found) errors on your site.
Once you install and activate it (Plugins > Add New), it will be located under Tools > Redirection. Adding a new redirection is as simple as entering a source and a target URL.

Simple 301 Redirects
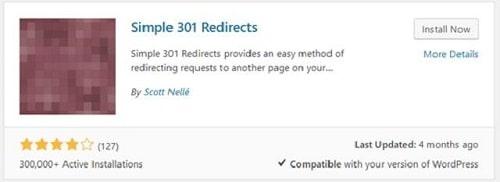
Simple 301 Redirects is another great option. It doesn’t offer as many features as Redirection but it’s simple and works smoothly. Once you install and activate it (Plugins > Add New), it will be located under Settings > 301 Redirects. From there, you can easily add source and target URLs.

Creating a 301 redirect in Yoast SEO
If your website is one of the millions using Yoast SEO, you might be wondering if it offers a redirection feature. The answer is yes - IF you have the premium version (currently $89).
Premium users will find an additional “Redirects” menu item under the main SEO menu that was created when you installed Yoast SEO. Click on that and you’ll be taken to a screen where you can select the type of redirect, the old URL, and the new URL.
It’s pretty straightforward, but if you need more info, visit the Yoast knowledge base for further details.
Related: 14 critical steps for setting up the Yoast SEO plugin for WordPress
Other types of redirects
While 301 redirects are by far the most common, at times you might need to do something a bit different. This is going to get geeky because the status codes also affect the programmatic method used to access the new location - i.e. GET or POST.
You can skip over this part if you don’t care about the rarely used redirection codes.
HTTP methods are beyond the scope of this article, but generally speaking, GET is used to load a basic page.
POST is used when the browser needs to send data to the server, such as when submitting a form. Additional methods exist to perform other actions.
| Code | Text | Method Handling | Use |
|---|---|---|---|
| 301 | Moved Permanently | GET methods unchanged. Others possibly changed to GET. | Page permanently moved, site reorganization. Visitors should update the URL they’re using. |
| 302 | Found | GET methods unchanged. Others possibly changed to GET. | Page temporarily unavailable. Largely superseded by codes 303 & 307 but still works. |
| 303 | See Other | GET methods unchanged. Others changed to GET. | Used after a PUT or a POST to prevent a page refresh that would re-trigger the operation. |
| 307 | Temporary redirect | Method not changed | Better than 302 when non-GET links are on the site. Users should continue to use the original URL to access the resource. |
| 308 | Permanent redirect | Method not changed | Reorganization of site with non-GET operations. For example, can be used to smoothly redirect form submission.. |
There are also a couple of special cases. Code 304, not modified, redirects to a locally cached copy of the file. Code 300, Multiple Choice, is rarely used. It presents a page of links for the user to choose among.
Conclusion and next steps
There are even more ways to add redirects to your website. For example, if you moved your entire site, you could automatically forward visitors from your old domain by adding the below to the header.php file of your theme on the old site:
php header("HTTP/1.1 301 Moved Permanently"); header("Location: http://www.yournewwebsite.com");
Which route you choose is a matter of preference. The plugins offer a quick and easy interface that many people prefer. However, if you don’t want to add more plugins to your site, .htaccess might be the best route for you. Modifying your site’s PHP files directly should be reserved for advanced users.
You can always check if a redirect is working by going directly to that page and seeing where you end up.
If a new redirect doesn’t work, and you previously visited the page, try refreshing your browser cache as the page might be loading from memory.
You can also use an HTTP status code checker to find out exactly which status codes your site is returning for any URL.
Taking the time to set up 301 redirects in WordPress is definitely worthwhile. You’ll elevate your site’s user experience and keep old, dead links from negatively affecting that search engine ranking you’ve worked so hard to achieve.
Ready to get started with WordPress? Try WordPress Hosting from GoDaddy. It’s the perfect solution for anyone who wants the power and simplicity of WordPress without the hassle of constant updates and technical adjustments.