This is an introductory tutorial to help you get started with customizing the backend of your WooCommerce Memberships site:
For this tutorial, I am going to assume that you are familiar with HTML, basic PHP, and WordPress filters and actions. Also, while you are reading this tutorial, I’d suggest you to keep the files of WooCommerce Memberships at hand, especially the template files, which are located inside the folder /templates/ of the Memberships plugin. Those concerning the Member Area which we are going to discuss here are located inside: /templates/myaccount/
Understanding Member Area Sections
The Members’ Area is accessed and generated when a logged-in customer clicks on a Membership Plan he or she is member of, among those listed in “My Memberships” table in “My Account” page (template file: my-memberships.php). When the user follows the corresponding link on each table row, he or she is brought to the first section of the Member Area of that Membership.
So, the Members’ Area has sections:
- each section is an “endpoint” that uses the template, similar to how the WooCommerce “Shop” page is rendered
- each plan may have different sections depending on which you have enabled for the plan in the corresponding Membership Plan edit screen in WordPress admin
- each section has some content in it, relative to the current Membership Plan along with few more user variables, such as the member join date (which affects things like access time for contents or products that have a delayed access since sign up)
These sections can be accessed via tabbed navigation at the top of the Member Area (template file: my-membership-tabs.php).
You can create entire new sections by custom code, but we’ll get there soon in another tutorial – let’s first see how you can edit the existing templates and start with something more simple.
Adding a new section in the Member Area
By default, Memberships provides currently 4 core sections: My Content, My Products, My Discounts and Membership Notes. In the Membership Plan admin page you can choose which of these sections a particular plan should feature (or choose none to deactivate the component altogether).
How about if you needed an additional section, like a welcome screen and display some static content, along with a YouTube video? We can add this section by hooking into the Member Area and with a sprinkle of code.
First, let’s add the section, giving it an id and a name, like so:
function my_custom_members_area_sections( $sections ) {
    $sections['welcome'] = __( 'Welcome', 'my-textdomain' );
    return $sections;
}
add_filter( 'wc_membership_plan_members_area_sections', 'my_custom_members_area_sections' );
If you visit your Membership Plan admin page with only this code, you will notice that now you have a new section available there. It was that easy!

New Section available
Let’s now have a look what happened in the front end. To move quickly between WordPress admin and the front end as a customer sees it, you could use the User Switching plugin – it will allow you to quickly switch between users (it’s intended for use in test and staging sites).
You can have a dummy customer purchase your plan and then you can see the resulting Member Area the dummy user can then access to. You will notice that the new section is in the navigation tabs at the top of the Member Area but there’s no content for it.

New section added
Let’s move on the second step and add that!
Adding content in a custom Member Area section
The code you’ve just added before will be used in Memberships internal functions whenever there are sections involved. However, for the customer-facing side of things, you will need a second bit of custom code. This will be the actual template file.
Unlike the custom coding you added before, which can be placed in a child theme’s functions.php or in any custom theme file according to your project, the template file itself is sensitive about naming and placement. It needs to have a name that matches the id you used before to define the new section (the array key, more appropriately).
In our case, as in the example above, this key is 'welcome'. You will have to add a welcome.php file in your /myaccount/ folder inside the templates folder you use for your WooCommerce customizations.

Memberships will only look for files that match the section ID for templates, so naming is important. The contents of this file are entirely up to you. In our example, we want this to display a welcome video, so we’ll add an embed of the video in the template.
<?php
/**
 * WooCommerce Memberships: "Welcome" section
 * Custom template added to the "Member Area"
 */

if ( ! defined( 'ABSPATH' ) ) exit; // Exit if accessed directly

/**
 * Renders the welcome section for the membership in the my account area.
 *
 * @param array $args {
 *		@type \WC_Memberships_User_Membership $user_membership user membership object
 *		@type int $user_id current user's ID
 * }
 */
?>

<h3><?php esc_html_e( sprintf( 'Welcome, %s!', wp_get_current_user()->display_name ), 'my-textdomain' ); ?></h3>

<?php do_action( 'wc_memberships_before_members_area', 'welcome' ); ?>

<div>
<iframe class="aligncenter" width="560" height="315" src="https://www.youtube.com/embed/YQHsXMglC9A" frameborder="0" allowfullscreen></iframe>
</div>

<p><?php esc_html_e( 'Congratulations, you are a member!', 'my-textdomain' ); ?></p>

<?php do_action( 'wc_memberships_after_members_area', 'welcome' );
Feel free to use this as a starting point for your own template file. We recommend keeping the hooks before and after the member area in your template as we’ve done here in case other code modifies this area to preserve consistency.
If you compare this example with the bundled templates for the default sections inside the plugin folder, you will notice that there is more extended code, for example to query specific content and so on, filter the results according to Membership characteristics and so on.
Once you’ve added this template to
YourTheme/woocommerce/myaccount/{sectionID}.phpyour custom member area section will now render your template:

Now you have a completely custom section to render your own member area template
Changing a Member Area Section’s heading text
Suppose you have a Membership Plan that grant special discounts to its members. The Members Area section that shows member discounts has, by default, an heading that says “My Membership Discounts”. You don’t like this heading and would like to change it into “Exclusive Discounts” instead.
If you just want to change a heading, all you need is to add a filter in your theme’s functions.php file, custom plugin, or the Code Snippets plugin. If you look at the bundled template files, you’ll notice that each one has a filter for the heading title text. The one for discounts is called 'wc_memberships_members_area_my_membership_discounts_title'. Therefore you can use this code to change the output:
function sv_members_area_discounts_section_title( $title ) {
    return __( 'Exclusive Discounts', 'my-theme-text-domain' );
}
add_filter( 'wc_memberships_members_area_my_membership_discounts_title', 'sv_members_area_discounts_section_title' );

Renaming Member Area Sections
By default, the Members’ Area sections have generic names: “My Content”, “My Products”, etc. However, you may want to change these based on your site’s branding or membership names, just like we did with the headings as outlined above. The titles of these sections are filterable, and we can adjust them as needed if you want the section link to be the same as your heading link:
function sv_rename_member_area_sections( $sections ) {

    $sections['my-membership-content'] = __( 'Club Articles', 'my-theme-text-domain' );
    $sections['my-membership-products'] = __( 'Club Products', 'my-theme-text-domain' );
    $sections['my-membership-discounts'] = __( 'Exclusive Discounts', 'my-theme-text-domain' );
    $sections['my-membership-notes'] = __( 'Notes from MySite', 'my-theme-text-domain' );

    return $sections;
}
add_filter( 'wc_membership_plan_members_area_sections', 'sv_rename_member_area_sections' );
This gives us updated section titles, which we can couple with updated heading titles as desired.

Removing a member area section’s table column
Content, Products, and Discounts sections of the Members Area contain a table that lists content or products accessible to the user. Each row in the table has different columns with useful information.
Suppose that the part of your theme where the Members Area appears isn’t particularly wide, the table columns are a bit squeezed. You decide that you don’t really need to show the ‘excerpt’ to users. There’s a filter for that!
The snippet below is meant for the Products section found in my-membership-products.php, but you can compare the other Members Area sections template files and you’ll notice they all follow the same pattern.
function sv_members_area_products_table_columns( $columns ) {
    unset( $columns['membership-product-excerpt'] );
    return $columns;
}
add_filter('wc_memberships_members_area_my_membership_products_column_names', 'sv_members_area_products_table_columns', 10, 1 );


You can compare with the other items in this array filtered by the hook apply_filters() to notice that it contains column names and their matching ids. These are looped further down in the template to populate columns. If you unset one of these as shown above, both the column header and the corresponding column cells will not be printed, completely removing this column
Adding a new members’ area section column
That brings us to the next possibility, which is to add a column that is not in the bundled template my-membership-content.php. Suppose that for your “Content” section you want to show the author of a post listed here. One way to do this could be to copy over the template in your theme and add some markup or the post author below the title, but we typically recommend avoiding this approach as you’ll have to keep your templates updated with each plugin update.
Let’s say you want to put that information in a column instead in a more upgrade-safe way; you can insert the column into the existing array of columns for that section:
// Replaces the My Content "Type" column with an "Author" column
function sv_members_area_content_table_columns( $columns ) {

    // unset the "type" column, which shows post, page, etc
    unset( $columns['membership-content-type'] );

    $new_columns = array();

    foreach( $columns as $column_id => $column_name ) {

        $new_columns[$column_id] = $column_name;

        // insert our new column after the "Title" column
        if ( 'membership-content-title' === $column_id ) {
            $new_columns['membership-content-author'] = __( 'Author', 'my-theme-text-domain' );
        }
    }

    return $new_columns;
}
add_filter( 'wc_memberships_members_area_my_membership_content_column_names', 'sv_members_area_content_table_columns', 11 );
This code will remove the ‘Content Type’ column and replace it with a column called ‘Author’. But you need now to add some content for it.
If you look further down in the template file, you will see that each column in the $columns array you just filtered is looped in a foreach loop. For each key (the column id) the template calls a do_action() with a name matching the column id. In our case, this id will be:
'wc_memberships_members_area_my_membership_content_column_membership-content-author'
(compare with the code above).
We’ll use this action to fill the new table cell with our content for that cell (in this case, the author).
// Fills the "Author" column with the post author
function sv_members_area_content_author( $post ) {
    $author = get_user_by( 'ID', $post->post_author );
    echo $author->display_name;
}
add_action( 'wc_memberships_members_area_my_membership_content_column_membership-content-author', 'sv_members_area_content_author' );
This will just print the author’s name, but you can get the idea of the customization possibilities here.
Custom sorting for membership content
You can filter the list of My Content, My Products, or My Discounts within the member area from the same hook: wc_memberships_get_restricted_posts_query_args. We’ll focus on the “My Content” section in this tutorial, but it provides a base for how you’d adjust other sections of the Members Area.
Here’s the doc block for the hook we want:
/**
 * Filter restricted content query args
 *
 * @since 1.6.3
 * @param array $query_args Args passed to WP_Query
 * @param string $query_type Type of request: 'content_restriction', 'product_restriction', 'purchasing_discount'
 * @param int $query_paged Pagination request
 */
$query_args = apply_filters( 'wc_memberships_get_restricted_posts_query_args', $query_args, $type, $paged );
Notice that you can check for different types of queries, then filter the arguments present in these as needed.
Let’s walk through a couple of examples on adjusting query arguments.
Sorting My Content posts
By default, the posts and pages under “My Content” are sorted with the newest content at the top.

Let’s make a small tweak to this to show the content from oldest to newest instead. We’ll just need to adjust the query order and order by arguments to do so.
First, I’ll bail out if we’re not adjusting the “My content” query, then I’ll adjust these arguments.
/**
 * Sorts posts in "My Content" by date from oldest to newests instead of newest first (default).
 *
 * @param array $query_args args for retrieving membership content
 * @param string $type Type of request: 'content_restriction', 'product_restriction', 'purchasing_discount'
 */
function sv_wc_memberships_sort_my_content( $query_args, $type ) {

    // bail if we're not looking at "My Content"
    if ( 'content_restriction' !== $type ) {
        return $query_args;
    }

    $query_args['order']   = 'ASC';
    $query_args['orderby'] = 'date';

    return $query_args;
}
add_filter( 'wc_memberships_get_restricted_posts_query_args', 'sv_wc_memberships_sort_my_content', 10, 2 );
Now my content uses oldest-to-newest sorting instead:

This is a pretty simple example of changing query parameters, but this gives us a lot more power of which content we show and how.
Changing Post Types Included in My Content
Now let’s make a slightly larger change. By default, Memberships will show any non-product content that’s restricted under “My Content”. If you use other plugins, such as bbPress or portfolio plugins, this means that this content will all be in the same list.

If you want to remove some content, you can specify which post types to include instead. Let’s take this back to only posts and pages instead of all content.
/**
 * Only includes posts and pages in "My Content" section, allowing other post types
 *  to be output in custom sections.
 *
 * @param array $query_args args for retrieving membership content
 * @param string $type Type of request: 'content_restriction', 'product_restriction', 'purchasing_discount'
 */
function sv_wc_memberships_adjust_my_content_query( $query_args, $type ) {

    // bail if we're not looking at "My Content"
    if ( 'content_restriction' !== $type ) {
        return $query_args;
    }

    $query_args['post_type'] = array( 'post', 'page' );
    return $query_args;
}
add_filter( 'wc_memberships_get_restricted_posts_query_args', 'sv_wc_memberships_adjust_my_content_query', 10, 2 );
Now we’re back to regular content, no bbPress forums or topics included:
Creating menus for the membership area
One popular customization among membership site owners is to create a menu for members. Once you have the Nav Menu Roles helper plugin, you’ll be able to select membership plans as menu restriction options in addition to your roles.
You can then go to Appearance > Menus and look at an item from your menu. If you choose to only show this menu item to logged-in users, you can choose who can see it based on role, and now also based on the membership plan the member has active:
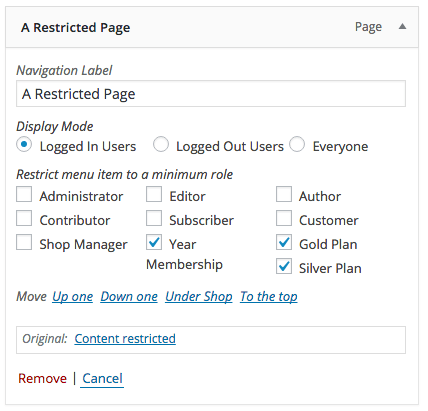
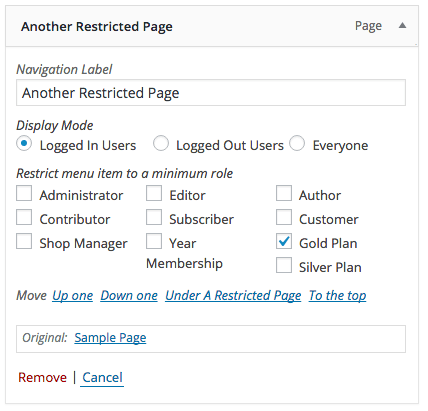
Now when a menu item is restricted to members-only, it will be hidden from the navigation until the member logs in, and these menu items are only shown if the membership is active.
What’s next
I hope you have found this tutorial useful and that you will be able to move through the new WooCommerce Memberships template files with more agility. In the next tutorial, I am going to show you how to add an entire new section to a plan’s Member Area.
Meanwhile, you can familiarize with the hooks introduced in this tutorial, compare them with the others found in the templates and run some experiments. You may have noticed that most of them pass more than one parameter in apply_filters() or do_action(). This means that those variables can be accessed by your callback functions (the function you attach to add_action() or add_filter() ) — this is particularly useful if you want to alter the output of that filter using information from such variables.
Read more on the WordPress Codex how to pass more than one accepted argument for filters or actions in your hooked functions.