

As the ecommerce market becomes more competitive, brands must devise new ways to differentiate themselves. To do this, many create a membership program with WooCommerce to reward the brand’s most loyal customers.
Whether through discounts, community building or simply increased engagement, memberships programs help you provide more value.
With a well-made membership program, you can strengthen the connection with customers, maximizing their lifetime value and encouraging referrals of other members.
In this post, we will examine how to turn your WooCommerce store into a membership site equipped with exclusive content, products, and discounts using one of the best membership plugins on the market: WooCommerce Memberships.
Get help from GoDaddy with Woocommerce Memberships
Whether you need help with a problem or adding new features, premium support from GoDaddy Managed WooComerce Stores gives you direct access to real WooCommerce experts — right from your WordPress Admin dashboard. From how-tos and demonstrations to managing products and configuring plugins and extensions, GoDaddy’s advanced WooCommerce support is ready to help with your most advanced user inquiries, including creating a membership WooCommerce site.
What are the benefits of offering membership plans with WooCommerce?
Increased customer retention and lifetime value
One of the most notable advantages of a membership program is the immediate improvement in customer retention rate. When someone joins your program, they are more likely to continue doing business with you long term. The perks of a membership plan give customers a reason beyond your products to engage with your business.
Improved engagement
Membership programs are a great way to increase customer engagement. When someone joins your plan, they are more likely to read emails and your other forms of content. As you begin to build a connection with customers, many will become brand advocates. They will spread the word about your business to their family and friends.
Higher average order value
With a membership plan, you have more opportunities to cross-sell items across your catalog. Customers with whom you already have an established relationship will be more receptive to you marketing complementary products.
Plus, if users need to pay for a membership they, will feel more inclined to buy more items and earn more incentives to justify the cost of the program.
Recurring revenue
Paid membership plans can give you predictable, recurring revenue. By creating a recurring source of revenue for your business, you can better weather the ups and downs of the typical retail cycle.
Gain feedback from customers
Your most loyal customers are also the ones most likely to give you feedback. You can use your membership plan as a way to ask your customers about what they value the most and how you can improve.
Best WooCommerce membership plugins (free and premium)
So now that we’ve discussed the benefits of offering memberships via WooCommerce, it’s time to choose the plugin that will work best for you. In this section, we’ll delve into the four best WooCommerce membership plugins available in the market, both free and premium, to help you choose the right one for your business. We'll examine their key features, pricing, and why they might be a good fit for your WooCommerce store. Let's get started!
WooCommerce Memberships
WooCommerce Memberships is a full membership solution integrated with your content and shop. And, in the next section, we’ll be covering how to use WooCommerce Memberships for your site.
Key features:
- Ability to sell or assign memberships independently from products for maximum flexibility.
- Option to “drip” content, scheduling when members gain access to certain posts or pages.
- Capability to turn your store into a purchasing club by restricting product viewing or purchasing to members only.
- Opportunity to offer better shipping options or special discounts to members.
- Functionality to import or export members to manage them within WooCommerce or connect to other services.
These features provide control over content, member perks, and membership management for an enhanced user experience.
Price: $199/year
Restrict Content
Restrict Content is a versatile WordPress membership plugin for content monetization and access control. This plugin is available as both a free and pro version, with extra features offered through the pro version.
Key features:
- Create unlimited membership levels or subscription packages with varying access to site content.
- Sell memberships and collect payments directly on your WordPress site.
- Control content access based on membership plan, status and more.
- Manage members through an intuitive admin interface.
- Members can manage their accounts, view payment history and modify account details.
- Offer prorated memberships and auto-renew payment options.
- Restrict access based on user role, access level or membership level.
- Protect sensitive content and separate public from private content.
- Auto-generate member pages and allow members to change subscription level anytime.
- Send member emails, provide printable invoices and restrict access to WooCommerce products.
Price: Free (with limited features), $99+/year for pro
Deals for WooCommerce
Deals for WooCommerce is a versatile plugin that offers a wide range of features to streamline the process of offering deals on your WooCommerce membership site. This plugin allows you to place restrictions on your inventory to ensure only limited quantities of a product carry a deal price.
Key features:
- Works for both members and guests, with restrictions on deal quantity.
- Progress bar which tracks the deal inventory on the deals page and single product page.
- A countdown timer which displays a deal's start and end time.
- Customers can view the original price, struck to display the deal price, as well as both the amount and the percentage of savings.
- Admins can monitor the performance of their deal campaigns from a separate table.
Price: $49/year
Membership Suite for WooCommerce
Membership Suite for WooCommerce is a comprehensive plugin that is designed to optimize your WooCommerce website into a fully functional membership site. It boasts diverse features that allow for a customized and user-friendly membership experience.
Key features:
- Multiple modes for membership acquisition including signup, purchase, and manual assignment.
- Free or fee-based first-time membership.
- Ability to restrict specific products, pages, posts, URLs, shipping methods, and payment methods to members.
- Various restriction types for products such as making them not purchasable, displaying alternate content, or redirecting users.
- Option to hide product details like price, description, and short description.
- Different restriction types for pages, posts, and URLs, including alternate content, excerpt content, or redirection.
- Alternate contents can be displayed on the page or in a pop-up.
- Membership plan duration types include limited duration, scheduled date, or unlimited duration.
Price: $199/year
Steps to create a membership with WooCommerce Memberships plugin
1. Set up the WooCommerce Memberships plugin
While packed with features, the out-of-the-box version of WooCommerce does not offer support for membership plans. If you want to turn your ecommerce store into a hub for your most loyal customers, you will need to install and set up a membership plugin.
There were some very good options available (mentioned above), but my preferred tool for offering membership benefits is the WooCommerce Memberships plugin.
With this membership plugin for WooCommerce, you can create stand-alone plans for customers to purchase. You can also include membership as an add-on to a product purchase. With member discounts, you can offer special promotional pricing to plan members.
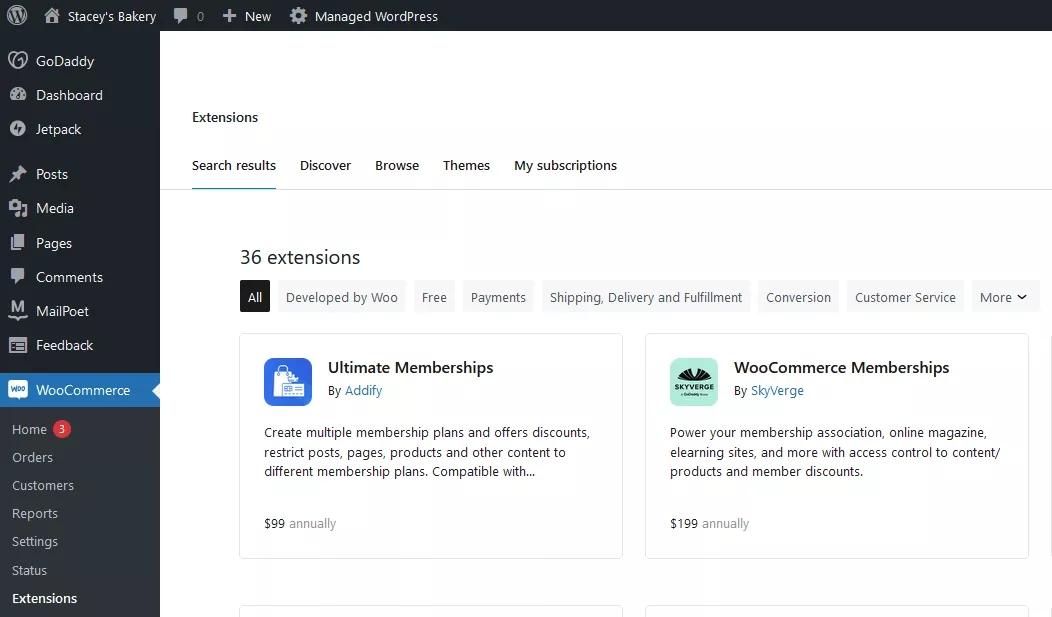
Before we get started on how to use WooCommerce Memberships, you’ll want to install the plugin first. To do so, from your WordPress admin panel, go to WooCommerce > Extensions and search for WooCommerce Memberships:
2. Create a member plan
To create a membership plan, go to WooCommerce > Memberships > Membership Plans and click Add New.
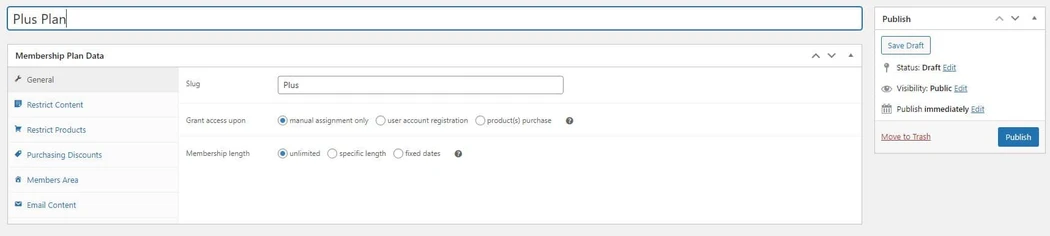
Name the plan and set the membership length. You will also need to determine how to grant users access to the membership plan. With user account registration, your customers can join the plan by signing up for a customer account for your store.
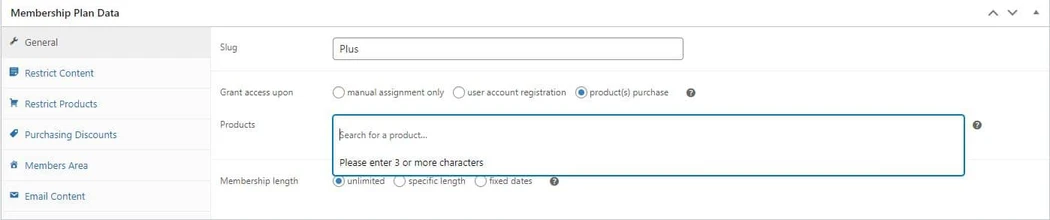
If you want to create a paid plan, you will need to select product(s) purchase and then create a product in WooCommerce for the membership plan. Memberships can be tied to any kind of product on your site. This includes simple products, a variable product, a specific variation of a product, or a subscription product among others.
Let’s say you want to sell a one-year membership to a site. In this scenario, you can create a simple product for the membership plan, using the plan cost as the product price.
After you create the product, you can select the plan from the dropdown menu for products.
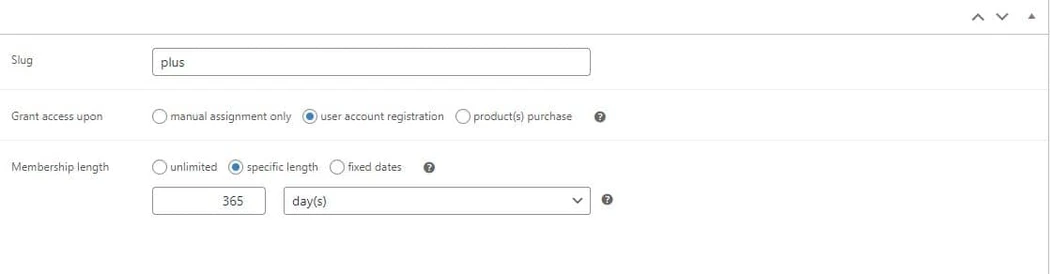
Now, you will need to determine how long the membership will last. You can choose a set period of dates, a specific length of time, or you can make the membership indefinite.
3. Choose the content and products to restrict
After you complete the initial settings for the membership plan, you will need to choose which parts of your website to limit to members only.
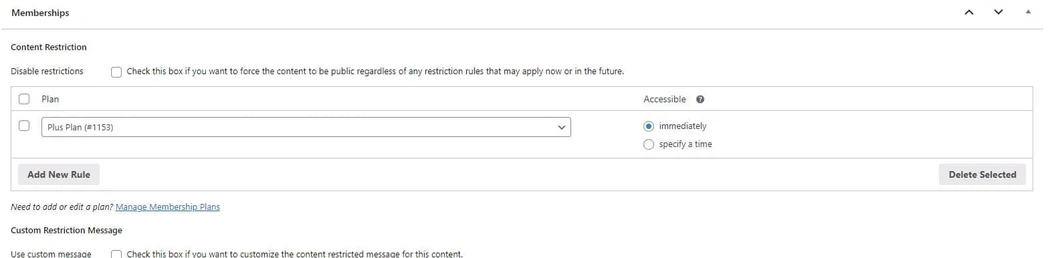
To limit access to certain content, go to the Restrict Content section from the plan data tab. Next, click Add New Rule.
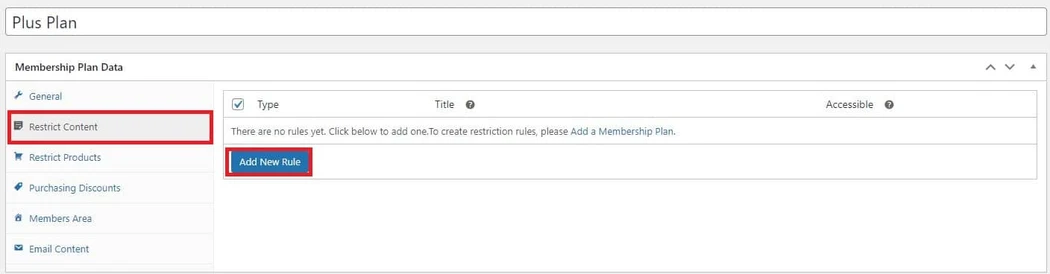
Choose the type of content and search for the name of what you want to restrict. With the Restrict Content tool, you can block access to posts, pages, categories, and tags.
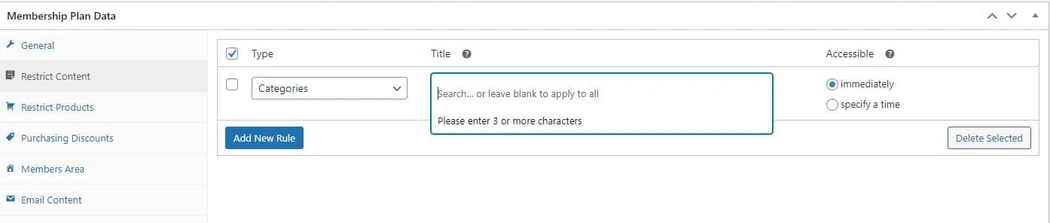
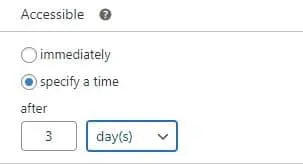
If you want to drip the content to members, change the Accessible setting to specify a time. You can then choose how long to make new members wait before they can access the content.
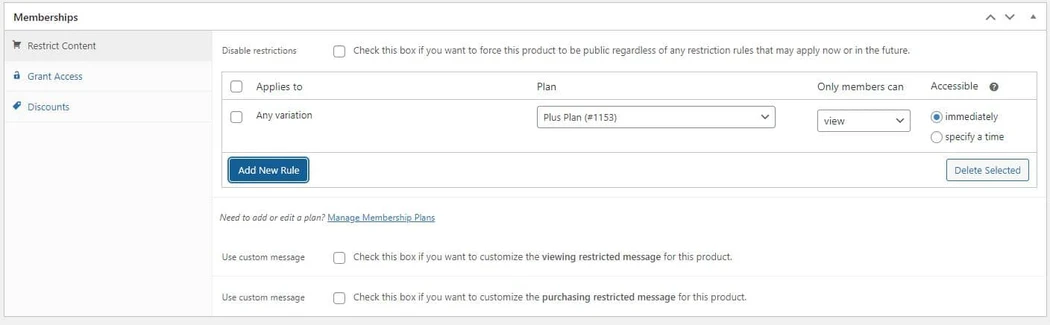
Next, we will examine how to make products exclusive to your plan members. There are two ways to restrict products: viewing and purchasing.
With restricted viewing, only members have the ability to access the product detail page for the specified item. As a result, anyone who is not a member cannot see or purchase the item. With restricted purchasing, non-members can view the specified items but are unable to add them to their carts or complete an order.
To choose your exclusive products, go to Restrict Products. Leave the Type as Products and search for the product.
Use the Only members can dropdown to select the restriction type. Like restricting content, when barring access to products, you can choose to make the items available immediately upon sign up, or to delay access until the person has been a member for longer.
If you want to restrict an entire product category, select Product categories for Type and find the appropriate category.
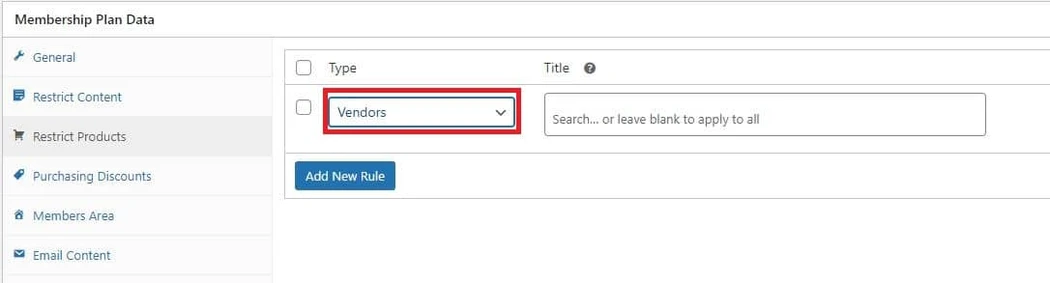
The Memberships plugin is compatible with several other WooCommerce extensions including Product Vendors. If you run a multi-vendor ecommerce store, you can restrict access to vendors based on the membership plan.
Go to Restrict Products and select the type Vendors. You can then select a vendor to make all their products available to members only.
With the Product Vendors extension, vendors are given a Customer or Subscriber role on your site. As such, they are unable to restrict their products or modify the details of your membership plan.
4. Set discounts for incentives for members
Discounts and other incentives make your membership plan more attractive to customers. With the WooCommerce Memberships plugin, you can assign member-only discounts to items across your catalog.
Go to Purchasing Discounts. Select the items that you want to discount. You can assign promotions on an individual product level or to the category as a whole.
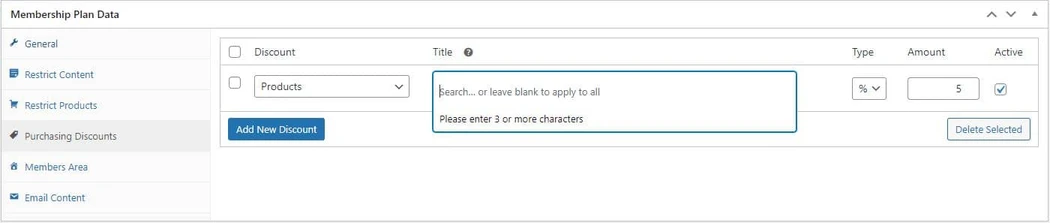
Discounts can be a percentage or a set dollar amount. After you finish setting up the membership discount, make sure to check Active to make it live on your site.
You can display a product’s discount by using the following shortcode: [wcm_product_discount]
This is a generic shortcode that returns the discount offered by all of your membership plans. You can modify the shortcode to include details for a specific plan by adding additional attributes. For example, [wcm_product_discount plan="123"]
There are other options that can be set here to restrict user access, including:
- Early access to content
- Remove access restrictions on a schedule
- Adding a lock icon to restricted posts
- Adjust message templates
5. Set up the Members Area
Next, you will want to set up the Members Area for those in your plan. This is where users will go to see what their membership gives them access to. They can access the members areas from their account page.
You can set up the Members Area by going to the corresponding section of the Membership Plan Data tab.
There are five sections you can choose to enable for the Members Area:
- Content: shows all pages and posts
- Products: shows all products and categories that can be viewed or bought
- Discounts: shows a list of products with membership discounts
- Notes: shows any notes that have been emailed to the customer
- Manage: shows the membership status and includes links to manage account
By default, all five sections of the Members Area are enabled. If you want to disable a certain section of the members area, click the box to remove it from the list.
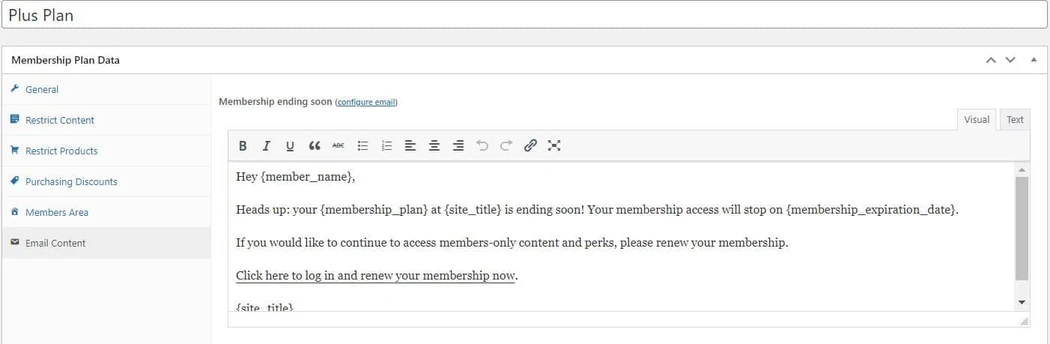
6. Set up email reminders and customer communications
The final area of your membership plan you need to configure is the email content. The WooCommerce Memberships plugin can send automated emails to members when there are any changes to their plans.
To enable these emails, you first need to go to WooCommerce > Settings > Emails to turn them on. In total, there are five messages you can enable. They are listed below:

After you enable the emails, you can return to your membership plan to customize the content of the messages.
7. Recurring billing with the WooCommerce Subscriptions extension
Predictable, recurring revenue is one of the biggest benefits of creating a membership plan for your WooCommerce store. If you want to collect a residual fee from your customers, you’ll need a way to charge recurring payments
The WooCommerce Memberships plugin does not support recurring payments. However, it does integrate with the WooCommerce Subscriptions extensions which you can use to gain more flexible billing options for your members.
The process for setting up a recurring membership plan is straightforward. To start, you will need to create a subscription product using WooCommerce Subscriptions.
After you create the subscription product, you can go to the General section of your membership plan and select the subscription product as the method for granting access to the plan. You’ll then need to specify the length of the membership. Choose subscription length to make the membership last as long as the paid subscription stays valid.
8. Managing your membership plan and members
Once you finish setting up all the settings for your plan, you can activate it by selecting Publish. If you want to wait to make the program live, select Schedule and choose a future launch date.
You can manage your plans by going to WooCommerce > Memberships > Membership Plans.

Managing members
As members start to sign up for your plans you can view and manage their profiles by going to WooCommerce > Memberships > Members.
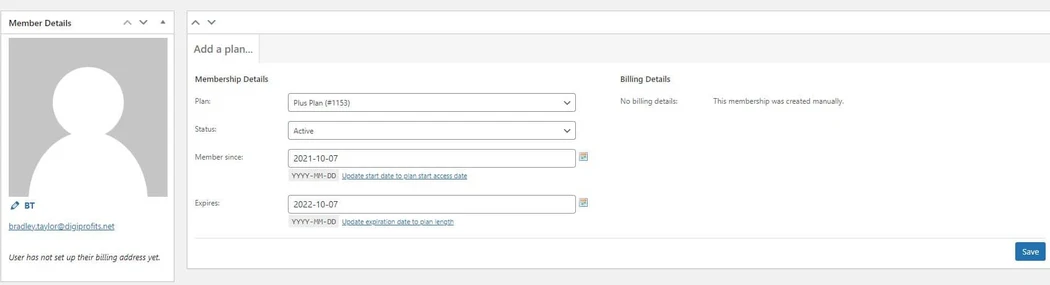
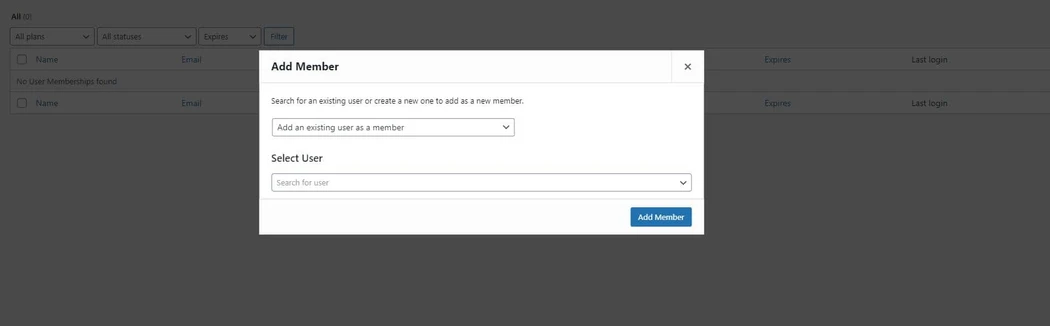
You can manually add members by going to WooCommerce > Memberships > Members and clicking Add Member.
If the person already has an account for your WordPress site you can link their user account to a membership plan. If they are a new user, you will need to create a new user with an email address and name.
When you launch your membership program you may notice some customers purchased a product that would qualify them for a membership but did so before the plan was active. With the Memberships extension, you can use the purchase import tool to grant plan access to customers who bought items before the plan.
Adding new content and products
During the course of your business, you will inevitably create new content and products for your store. When you do, you will want to restrict access to some of this material.
With the Memberships extension, you can quickly add content to the membership plan straight from the page/post editor. Scroll to the Memberships tab and select the plans you want to add the content to.
When you add new products, you will see a similar meta box that you can use to include the item as part of a membership plan. You can also apply member discounts to products from the edit product page.
Help members renew with a different plan
By default, WooCommerce Memberships includes a “Renew” link for an expired membership. This allows the member to renew the membership by repurchasing the product (if available and at its current price) to resume the membership. This lets your member continue with any dripped content s/he already has access to once a set-length membership had expired if the member chooses to re-purchase.
Conclusion
A thoughtful membership program using the WooCommerce Memberships plugin can be a valuable tool for rewarding your most loyal customers. They can enjoy exclusive discounts and products while you get to benefit from lower churn rates and better customer retention. If you have been looking for new ways to engage your audience consider using WooCommerce to create a membership plan with plenty of useful benefits.
FAQs about WooCommerce Memberships plugin
What is WooCommerce Memberships?
WooCommerce Memberships is a plugin available for WooCommerce sites that enables site owners to restrict their content to members only.
Can I sell memberships on WooCommerce?
Yes, plugins and extensions are available within WooCommerce that will allow you to sell memberships via WooCommerce.
Is WooCommerce Memberships plugin free?
While the WooCommerce Memberships plugin is not free, there are other membership management plugins that are available for free (but with limited features).
What is the difference between WooCommerce subscription and WooCommerce membership?
WooCommerce Memberships cannot be used to charge a recurring payment, while WooCommerce Subscriptions does allow for recurring charges.
How does WooCommerce Memberships work?
The WooCommerce Memberships plugin allows WooCommerce site owners to restrict their website content to members only.
Disclaimer: All known trademarks contained herein are the property of their respective owners and their inclusion does not represent any affiliation, endorsement, or sponsorship.