The WordPress WooCommerce combination is one of the most flexible, user-friendly ways to build and manage an online store. Part of what makes the platform so flexible is its APIs. With the APIs, you have a powerful tool for handling your ecommerce operations and building custom applications to manage your business.
In this post, we’ll examine how the WooCommerce REST API works and how you can use it to improve your ecommerce store.
Related Article: 15 must-have plugins & extensions for your WooCommerce store
Launch your business in minutes with GoDaddy Airo™
What can you do using the WooCommerce API?
The WordPress REST API enables outside applications to interact with WordPress’s functionality. The WooCommerce API is a fully integrated extension of the WordPress REST API. It can read, create, update, and delete data using JSON requests and standard HTTP verbs.
When you make a REST API call, WooCommerce and WordPress connect with the PHP and SQL backend. They then process your request and generate the output.
With endpoints exposed for essentially every part of your WooCommerce store, there is a lot you can do with the API.
To start, the API is a powerful tool for implementing custom functionality for your store. You may find that plugins and extra code snippets are not enough for creating all the features that you need. With the API you can pull data and execute requests from your own custom-made platform.
The API also gives you the ability to decouple the frontend and backend of your website. By doing so, you can use another platform or language to create pages and designs while using WordPress to power your backend.
Save money selling products, your way
Our Managed Hosting for WooCommerce includes more than $5,000 in free premium WooCommerce extensions, empowering you to sell products, your way, with additional customization.
Specialized store extensions can cost hundreds, even thousands of dollars per year once you get them all added to your store.
But with our Managed Hosting for WooCommerce, you can build the exact store you needed to sell subscriptions, book appointments, enable digital downloads and much, much more — with free access to more than $5,000 in premium WooCommerce extensions.
Here are some of the operations you can perform using the API.
Adding updating and deleting products
There are endpoints for single products, attributes, and variations that you can use to modify the item’s quantity or delete it altogether. The API also lets you batch edit your products to make bulk changes faster.
Processing orders
With the API, you can process your orders individually or in bulk by updating statuses and applying tracking details. You can also use the API to retrieve an individual order or a list of all your orders.
Creating dashboards
The WooCommerce API allows you to create custom dashboards and interfaces. You can use these to review any metric that you want to get a better insight into your business.
Viewing settings
If you want to view and manage your WooCommerce settings from a custom backend platform you can do so using the API.
When you make a GET request, the JSON response will contain each of your WooCommerce settings groups and their current parameters.
Creating coupons
With the coupons API, you can create, view, update, and delete individual coupons. You can also modify coupons in batches similar to products.
Steps to start using the WooCommerce API
Before we begin, you’ll want to make sure access to the WooCommerce API is enabled within WordPress.
Enable API access
Go to WooCommerce > Settings > Advanced > Legacy API. Look to see is the API is enabled. If not, check the box and save the changes.

Create an API key
The WooCommerce API uses a digital key-based system for granting access. When you create a new API connection, you will be given a consumer key and a consumer secret. Each time you make a call to the API, you will need to use these keys for authentication. This process helps ensure that all API requests are legit.
To create a new API key go to WooCommerce > Settings > Advanced > REST API and click Add key.

Enter a description, choose a user to own the API keys, and set the permission levels. If you want the ability to create, update, and delete data, choose Read/Write permissions.
Click Generate API to create the authentication credentials.
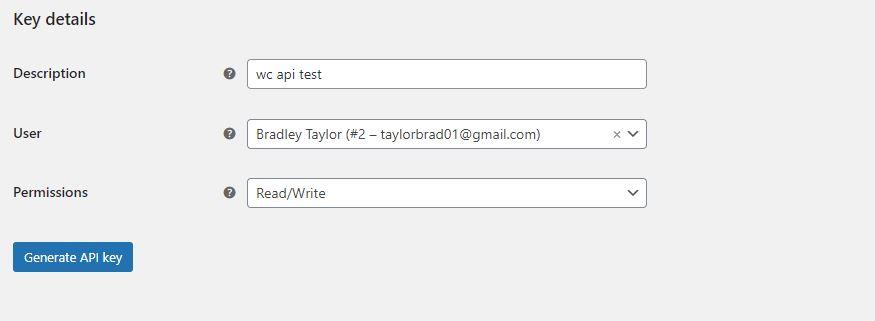
The next page will display your consumer key and consumer secret. Copy these down as you will need them to connect your API client to the WooCommerce REST API.
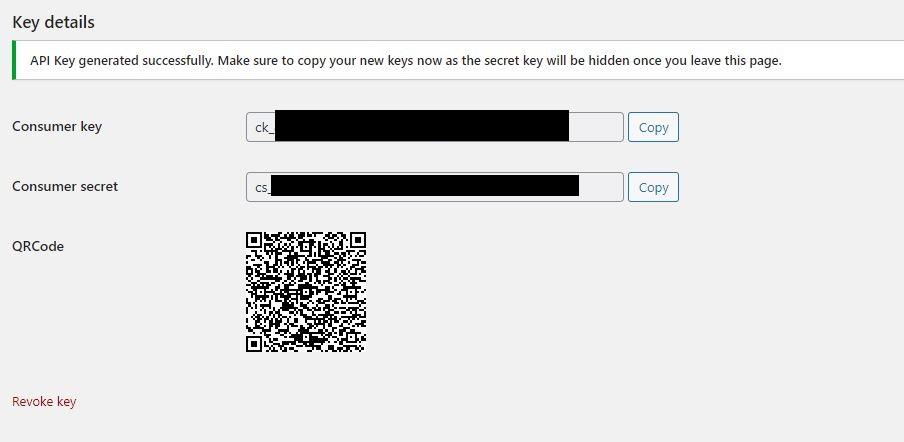
The moment you leave the page you will no longer be able to access the keys so if you do not write them down there is no way to get them back if lost.
Connect to the client with API keys
Once you have your API keys, the next step is to set up an API client. You will use the client to make requests and view responses.
There are several clients that work well with the WooCommerce API. In our example, we will use Postman.
When you open your Postman workspace, either through a web browser or the desktop application, you will see the fields to enter a new API request.

Before you can make the request, you will need to provide the authorization credentials. Click on Authorization and select Basic Auth for the type.
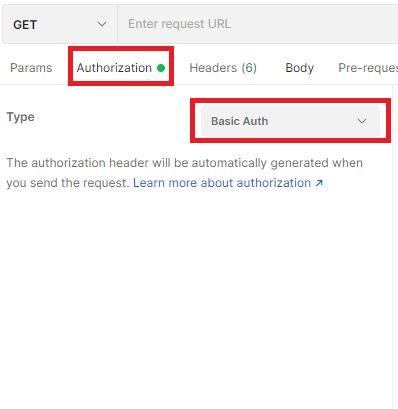
Next, you will use your API credential to fill in the Username and password. Enter your consumer key in the Username field and the consumer secret in the Password field.
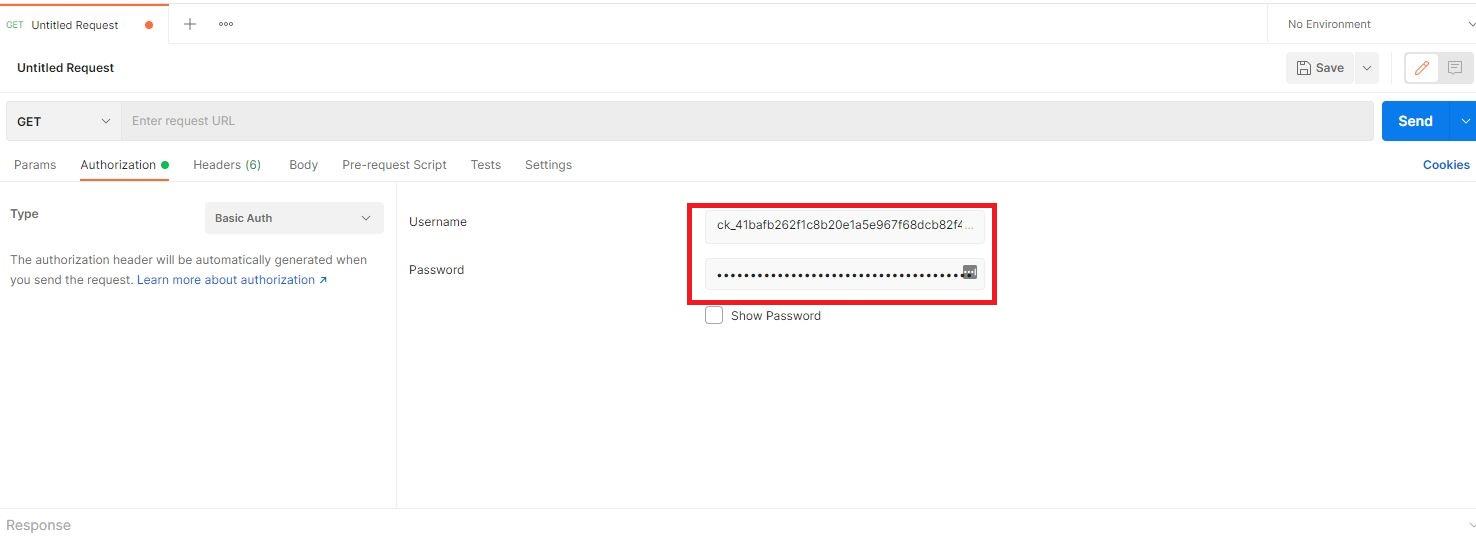
Once you enter your credentials, you are ready to make your first request. For our walkthrough, let’s begin with a request to list all products.
Use the following GET request, substituting your domain for the placeholder
https://yoursite.com/wp-json/wc/v3/productsIf the configuration is set up properly, the body of the response should contain the data for your WooCommerce products. The response of this API request is a JSON string that Postman parses for you.
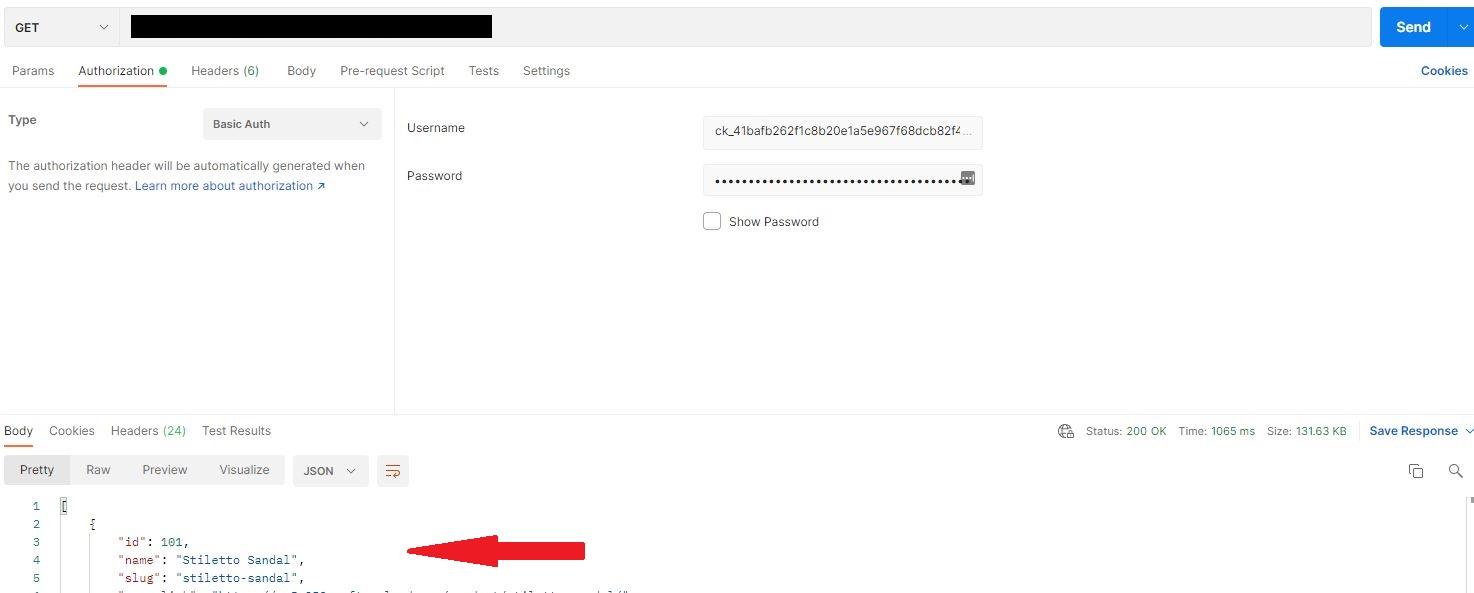
If something is wrong, you may get an error with a 401 or other code. Errors like this can happen. We will discuss how to address some of these a bit later on.
Start making API requests
After you make your first successful GET request, you’ll want to test a PUT request as well to ensure that you do indeed have write access.
Below, we will examine how to update a WooCommerce product using a PUT request.
To start, you will need to make the following GET request to fetch the product’s information.
https://yoursite.com/wp-json/wc/v3/products/For our example, we will use the first product result from our earlier request. This item has an id of 101 so our request URL is;
https://yoursite.com/wp-json/wc/v3/products/101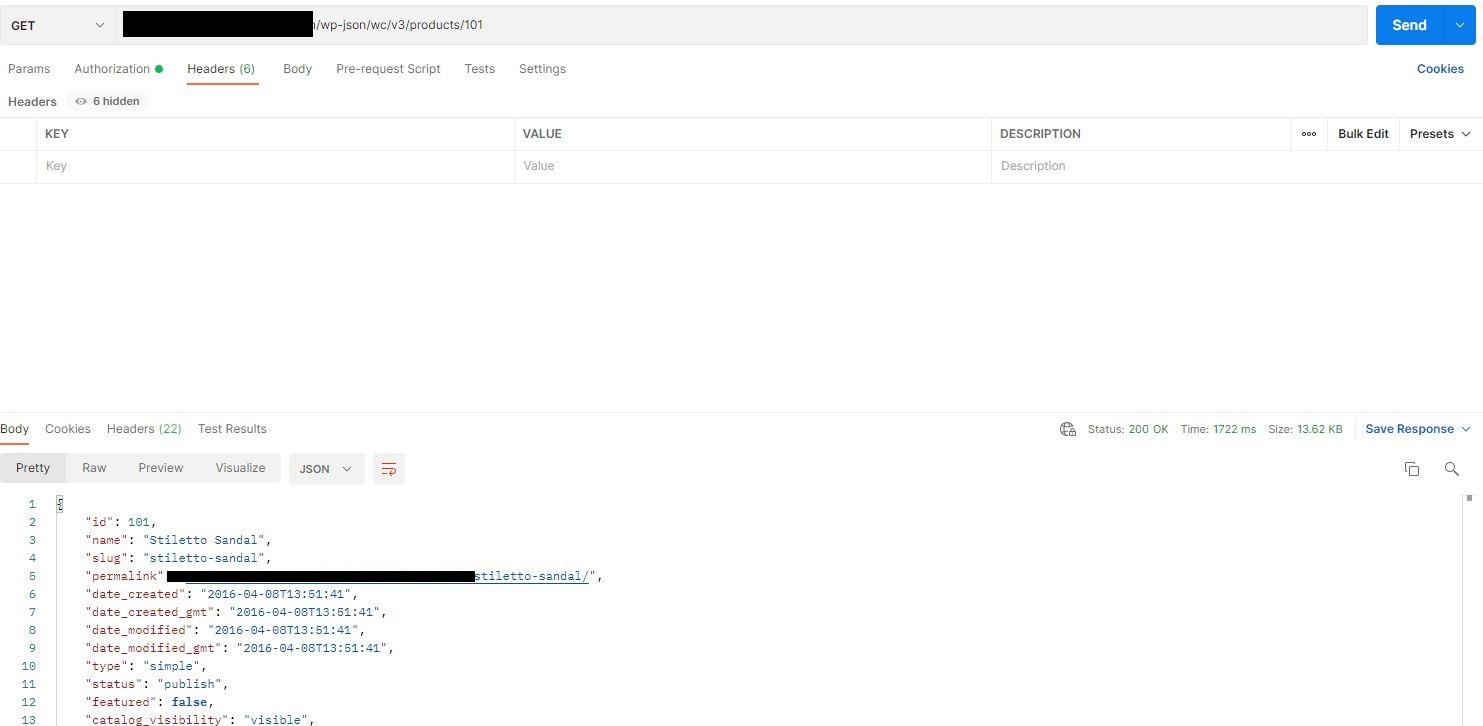
To make the PUT request, click the dropdown menu next to the URL field and select PUT.

Click Body and select raw. Then click the dropdown arrow for text and switch the type to JSON.

After this, you can enter the request. Below is an example of us changing the price for our selected product.
{
"regular_price": "50"
}
Hit send and you should see the changes reflected on your WooCommerce site.
Examples of WooCommerce API requests
Now that we have successfully made both GET and PUT requests, let’s take a look at some of the useful requests you can use to manage your WooCommerce store via the API.
Get requests
GET all orders
https://yoursite.com/wp-json/wc/v3/ordersGET all products
https://yoursite.com/wp-json/wc/v3/products/GET all customers
https://yoursite.com/wp-json/wc/v3/customers/GET all product categories
https://yoursite.com//wp-json/wc/v3/products/categoriesGET a single product
https://yoursite.com/wp-json/wc/v3/products/{product ID}GET a product variation
https://yoursite.com/wp-json/wc/v3/products/{product ID}/variations/{variation ID}GET a single customer
https://yoursite.com/wp-json/wc/v3/customers/{customer ID}Put requests
Update customer’s shipping address
{
"shipping": {
"first_name": "Jane",
"last_name": "Doe",
"company": "Jane Doe Co",
"address_1": "361 Outside Rd",
"address_2": "Suite 101",
"city": "Las Vegas",
"state": "NV",
"postcode": "89102",
"country": "US"
}
}
Update product price and stock quantity with a single request
{
"regular_price": "50",
"stock_quantity": 30
}
Update product attributes such as color
{
"id": 1,
"name": "Color",
"slug": "pa_color",
"type": "select",
"order_by": "name",
"has_archives": true,
"_links": {
"self": [
{
"href": "https://example.com/wp-json/wc/v3/products/attributes/6"
}
],
"collection": [
{
"href": "https://example.com/wp-json/wc/v3/products/attributes"
}
]
}
}
Update price of product variant
To update a product or product variant’s “price” or “regular_price”, here is a example PUT request:
{
"regular_price": "81"
}
Update customer’s first and last name
{
"first_name": "John",
"last_name": "Doe"
}
Update a five-star product review
{
"id": 20,
"date_created": "2018-09-08T21:47:19",
"date_created_gmt": "2018-09-09T00:47:19",
"product_id": 31,
"status": "approved",
"reviewer": "Claudio Sanches",
"reviewer_email": "john.doe@example.com",
"review": "Now works just fine.",
"rating": 5,
"verified": true,
"reviewer_avatar_urls": {
"24": "https://secure.gravatar.com/avatar/908480753c07509e76322dc17d305c8b?s=24&d=mm&r=g",
"48": "https://secure.gravatar.com/avatar/908480753c07509e76322dc17d305c8b?s=48&d=mm&r=g",
"96": "https://secure.gravatar.com/avatar/908480753c07509e76322dc17d305c8b?s=96&d=mm&r=g"
},
"_links": {
"self": [
{
"href": "https://example.com/wp-json/wc/v3/products/reviews/20"
}
],
"collection": [
{
"href": "https://example.com/wp-json/wc/v3/products/reviews"
}
],
"up": [
{
"href": "https://example.com/wp-json/wc/v3/products/31"
}
],
"reviewer": [
{
"embeddable": true,
"href": "https://example.com/wp-json/wp/v2/users/1"
}
]
}
}
Resolving issues
While using the WooCommerce API is relatively straightforward, complications with your technical setup and the other solutions that you use may cause some issues. Below are some of the common problems people face when using the API.
User-agent blocking
The default User Agent for the core HTTP request methods such as wp_remote_get() uses the following format;
WordPress/<>; <>.Depending on your host or other security services that you use, any requests that reference the WordPress user agent may be blocked. While intended to protect your WordPress site from malicious attacks, it could be affecting the API’s ability to function properly.
Authentication headers not passed in CGI Mode
Another common issue occurs when the Basic Authentication header your site receives in a request doesn’t populate the PHP server variable needed for WooCommerce to complete basic authentication. When this happens, you will see a 401 error with the message “Unauthorized” or “Consumer secret is invalid.
There are a couple of ways to address this issue. If you use an Apache server, the first thing to try is adding the following modification to your .htaccess file.
# BEGIN WordPress

RewriteEngine On
RewriteBase /
RewriteRule ^index\.php$ - [E=HTTP_AUTHORIZATION:%{HTTP:Authorization},L]
RewriteCond %{REQUEST_FILENAME} !-f
RewriteCond %{REQUEST_FILENAME} !-d
RewriteRule . /index.php [L]

# END WordPress
Conclusion
This post has scratched the surface of what you can do with the WooCommerce API. If you’re looking for a flexible and powerful tool to take your store to the next level, try it out to see how positive of an impact it can have on your store.


