One of the shiny new objects in the WordPress toy box is something you don't have to go very far to get. It's WordPress that’s right within your browser, which does not need a web server to run on.
That sounds impossible but it's true.
The first time you see WordPress Playground you’ll say to yourself, “What’s going on here?”
WordPress Playground leverages a combination of some very cutting-edge technologies, namely WebAssembly, SQLite, and the ServiceWorker and Worker Threads API to produce a fresh WordPress install that lives within the browser.
How can you get WordPress Playground?
That's as easy as child's play.
Point any web browser to playground.wordpress.net and there it is — In a nanosecond, your browser will load the current version of WordPress with the default theme installed.
It can't get any easier than that.
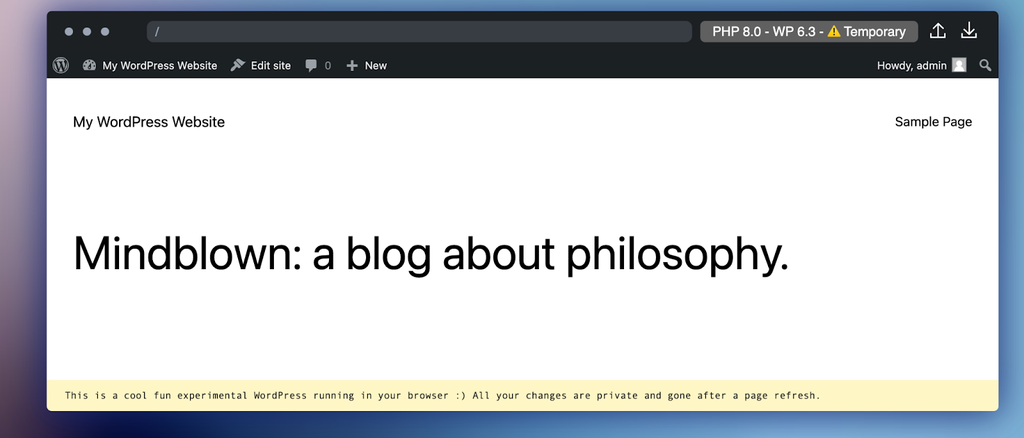
You will automatically be logged in. Access the WP Admin as you would any WordPress site. Since this installation is only within your browser, privacy and security are not issues, hence the username = admin and password = password.
You can install any theme or plugin but you will be advised to upload the corresponding zip file because Playground does not support a connection to the theme and plugin repositories at wordpress.org.
Why use WordPress Playground?
Why bother with Playground when you can almost as easily use services that spin up WP in an instant or you can run it on a local server?
WordPress Playground is certainly a fun place to quickly try things out but its purpose is more productive than its name implies.
WordPress Playground works not just in web browsers. It's good for environments such as Node.js, mobile apps, and many Integrated Development Environments.
Here are just a few use cases:
- Plugin and theme testing with any easy way to downgrade PHP and/or WordPress versions.
- Set up and demo a WooCommerce store.
- You can use WordPress Playground to populate a WooCommerce shop and then test its operation.
- Mobile Apps. For example, WordPress Playground is being used to develop a note-taking application for mobile devices. Read about how the Blockbase app for iPhone is using WordPress Playground.
- Work in Node.js. Use WordPress Playground to build server-side applications that interact with WP.
- Use Playground for a learning environment
Without the need for instructors, anyone who wants to learn or experiment with WordPress can use Playground, as it removes the time to install and set up a WordPress site.
This is convenient for people who want to try WordPress without delay.
This was, in fact, creator Adam Zielinski’s primary reason for building WordPress Playground when he started in 2022.
Plus, WordPress Playground is ideal for WordCamp workshops, virtual meetups, or even KidsCamps.
What are some of WordPress Playground's features?
WordPress playground offers a raft of cool functionality. Let’s walk through a few of its must-see features.
1. Change PHP and/or WordPress Versions
If you are developing a theme or plugin no doubt you’ll want to test your build in legacy PHP and WordPress versions.
One of the handiest things to do is change the PHP version in WordPress Playground, which currently supports versions 5.6 to 8.2. It is equally simple to roll back WordPress to 5.9. This is a most efficient way of testing plugins and themes.

The above outlines where to change the PHP and/or WordPress versions.
And here is what you will see after you select the button.

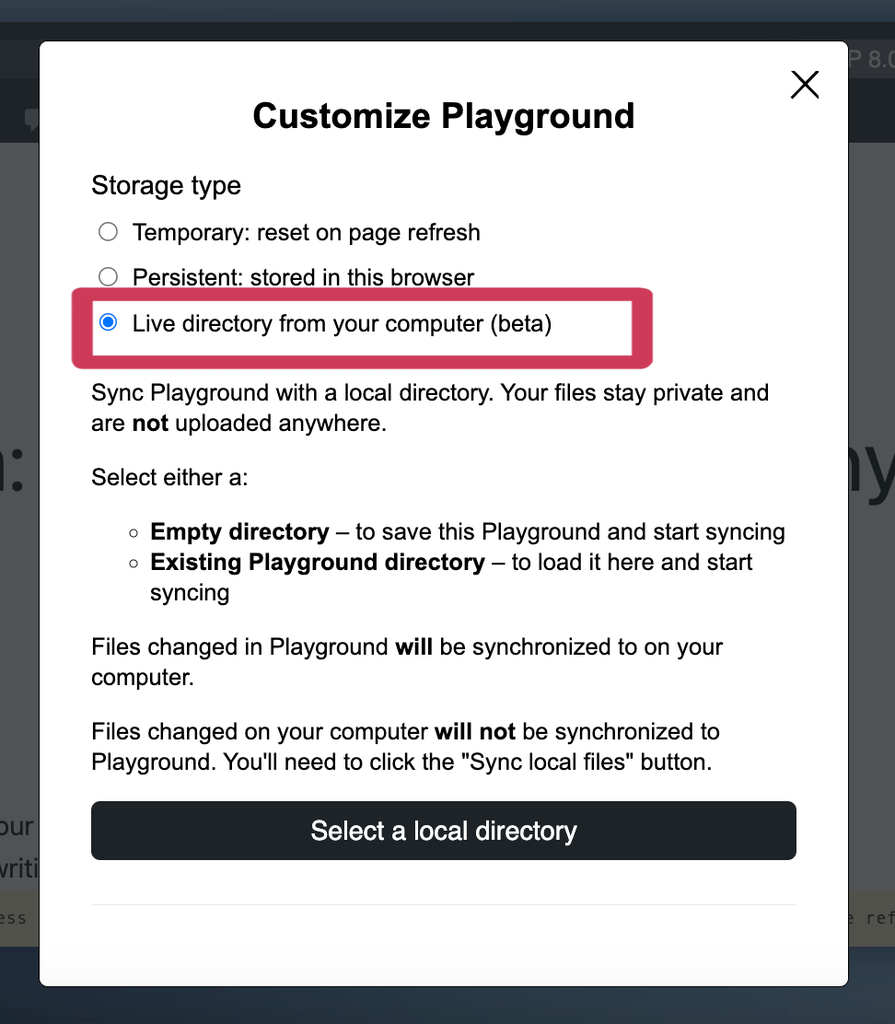
2. Storage Types
Currently, Playground supports three ways to store (save) your site. It is pivotal to understand the differences between all three.
- Temporary — This is the default setting. If you reload your browser your site will disappear and a new instance of WordPress Playground will reload.
- Persistent — This option provides the ability to retain changes to your site even after reloading or closing your session. There also is an option to delete all stored data to start over.
- Live directory from your computer (beta) — Save your Playground to a folder on your computer.
Building your website
You shouldn't be surprised to see that you can build your WP site as you would any other site. Use any theme or plugins and add your content as you normally would.
The key is how you save your site once you begin should you wish to do that. The two ways to do that (Persistent Storage and Store To Local Directory) were discussed above.
Migration
But what happens if you build a site in Playground and you’d like to move it to another installation? There are two ways to do that.
As of now, a WordPress install made with WordPress Playground is easy to migrate to another site that is also made using WordPress Playground.
When you’re ready, choose the export function, and a wordpress-playground.zip file will be downloaded.
Use this file as the import file to a new WordPress Playground installation. You can just open a new tab, navigate to playground.wordpress.net, and perform your import. That’s right. You can have two or more tabs open to test and build WordPress Playground sites.

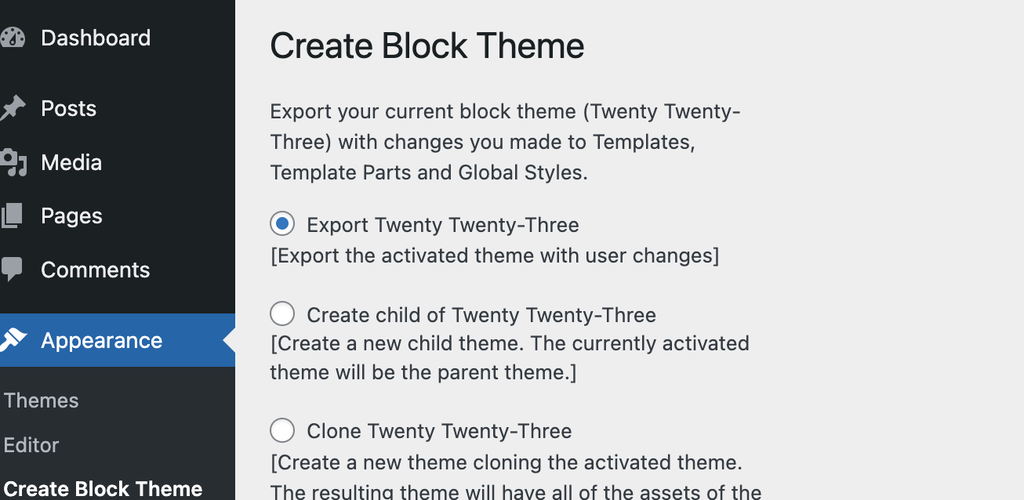
If you’re interested, open the .zip file and you’ll see the familiar set of WP files. But where is the .sql file for migration? There is none!
This is where migrating to a hosted site (local or remote) becomes another matter due to the differences between SQLite and MySQL. To do this follow these steps once you are ready to migrate:
Step 1: Install the Create Block Theme plugin (if you are using a Block Theme). Generate the .zip file. All custom changes made to your theme in the Style Editor will be preserved for transfer.
Step 2: Export your site’s content using Tools > Export. Download the .xml file.
Step 3: Create a fresh install for the hosted clone of your Playground site.
Step 4: Run the WordPress Importer from Tools > Importer (choose WordPress) and upload the .xml file.
Step 5: Upload the theme (.zip file) from Appearance > Themes as you would any theme.
You’re all set. Finish your migration by manually installing the plugins you are using for the Playground site to the hosted site.
But what if you’re migrating a site that does not use a block theme?
Copy the Theme folder (abd Child Theme folder if applicable) from the Playground site then paste it to the Themes directory of the hosted WP installation.
In this instance, changes made in the Customizer will NOT transfer to the hosted site as those changes are saved in the SQLite database. Those customizations will need to be manually re-created for the hosted site.
You will also need to move your content using the export/import process as noted in Steps 2 and 4 above.
While this may seem like a lot of work it is straightforward and requires no knowledge of code or how to manually migrate a WP site.
A few cool and useful things you can do with WordPress Playground
WordPress Playground has three custom APIs that let you improve your workflow and bring some magic inside your browser.
Working with the Query API you can append various strings to playground.wordpress.net to automatically install and activate plugins and/or a theme.
Some examples are:
- htt[s://playground.wordpress.net?theme=go
- https://playground.wordpress.net/?plugin=coblocks&plugin=sucuri-scanner
- https://playground.wordpress.net/?theme=go&plugin=coblocks
Use the slug of any theme or plugin from worpdress.org as in the above examples.
You can also query earlier versions of PHP and WordPress core as in the following:
- https://playground.wordpress.net?php=5.6
- https://playground.wordpress.net?wp=5.9
A URL that strings all of these queries together, as in the following, is permitted:
- https://playground.wordpress.net?wp=nightly&frost&elementor&seo-by-rank-mat&php=8.0
Using the Query API in your browser’s address bar will certainly speed up the process of setting up a WordPress Playground site to fit your needs.
WordPress Playground also has a Javascript API and a Blueprints API, the latter making it easy to use a JSON file to set up a WordPress Playground instance.
How about running Playground within a WordPress site to demonstrate a theme or plugin in development? Use the following <iframe> and append the URL with any query as mentioned. Here the Go theme will be installed and activated.
<iframe src="https://playground.wordpress.net/?theme=go" style="border:20px red solid; width:100%;height:400px"></iframe>
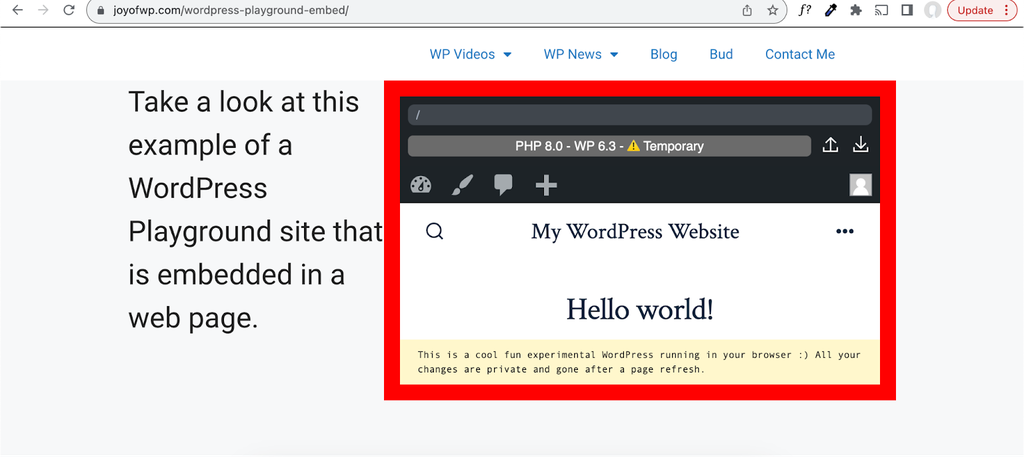
This is the embedded <iframe> on a web page.
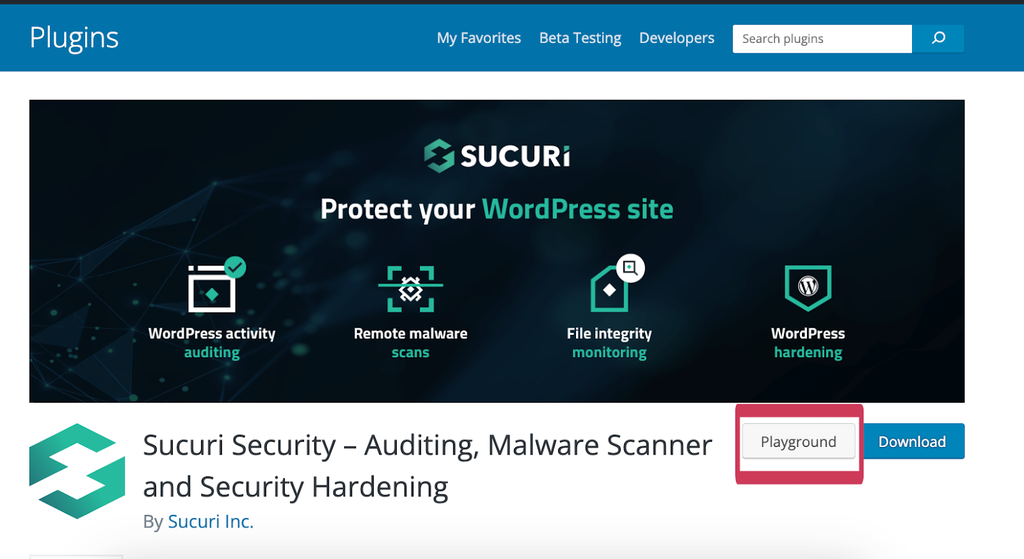
Finally, there is a WordPress Playground extension for Chrome browsers which displays a Playground button on any theme or plugin page on wordpress.org which makes a one-click installation possible.
Summing Up
WordPress Playground is an astonishing innovation leveraging cutting-edge browser technologies. Expect it to only improve over time as it has so much potential.
It has a wide range of features that allow people to use WordPress for the first time providing an environment for seasoned developers to build custom applications. While it is considered a developer environment there are plenty of uses for non-devs.