Gift shopping is really tough. (Especially for your mom. “No honey, I really don’t want you spending money on me,” is just about the least helpful gift guidance you’ll ever receive.)
One survey found more than eight out of 10 people say holiday gift giving is a source of stress. Gift giving is one of the main factors that leads people to rate the holidays as more stressful than getting caught committing a minor crime. That’s right: We’d rather get busted for jaywalking or vandalism than deal with buying gifts.
All that is to say: It would be a great service for you or your clients’ customers if you could point them toward perfect gifts for everyone on their list. And from your perspective… it’s quite a lucrative service, too.
Holiday gift guides are the answer. Gift guides are curated groups of products that would make excellent presents for different demographics. For example, “Gifts for him,” “Gifts for mom,” “Gifts for kids 5-7,” “Gifts for your boss,” “Gifts for your cats,” or “Gifts for your favorite eCommerce tutorial writers.”
When you add gift guides to your eCommerce sites, social media, and email marketing promotions, you can sell more this holiday season; when you add the gift guides for your clients, they can sell more and you’ll look like a hero.
In this article, we’ll cover how to set up a gift guide on a WooCommerce site as well as some smart ways to promote those gift guides. And we’ll set up everything without using any add-ons or plugins—all the tools you need are already right there in WooCommerce.
Setting up a WooCommerce gift guide
The foundational piece of our gift guide is WooCommerce’s product attributes. The primary use for those fields is to define extra data about products (like color or size), but they’re also valuable to group products in other ways, as we’ll do here. (In fact, you could use the steps in this guide to create all sorts of other curated product groupings in the future.)
Step 1: Create a new “gift guide” attribute
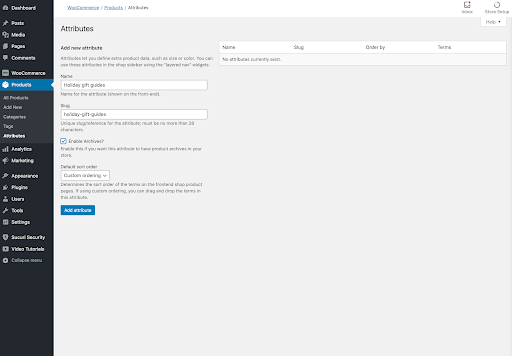
Go to Products > Attributes. You’ll see any current attributes you’ve defined as well as a form to add new attributes. We’ll call this new attribute Holiday gift guides. We’ll also select Enable Archives? so we can link to the guides directly. It’s important to check that now, because you won’t be able to change it in the future—and we’re going to do a lot of linking to these gift guides as we promote them.
Step 2: Add gift guide terms
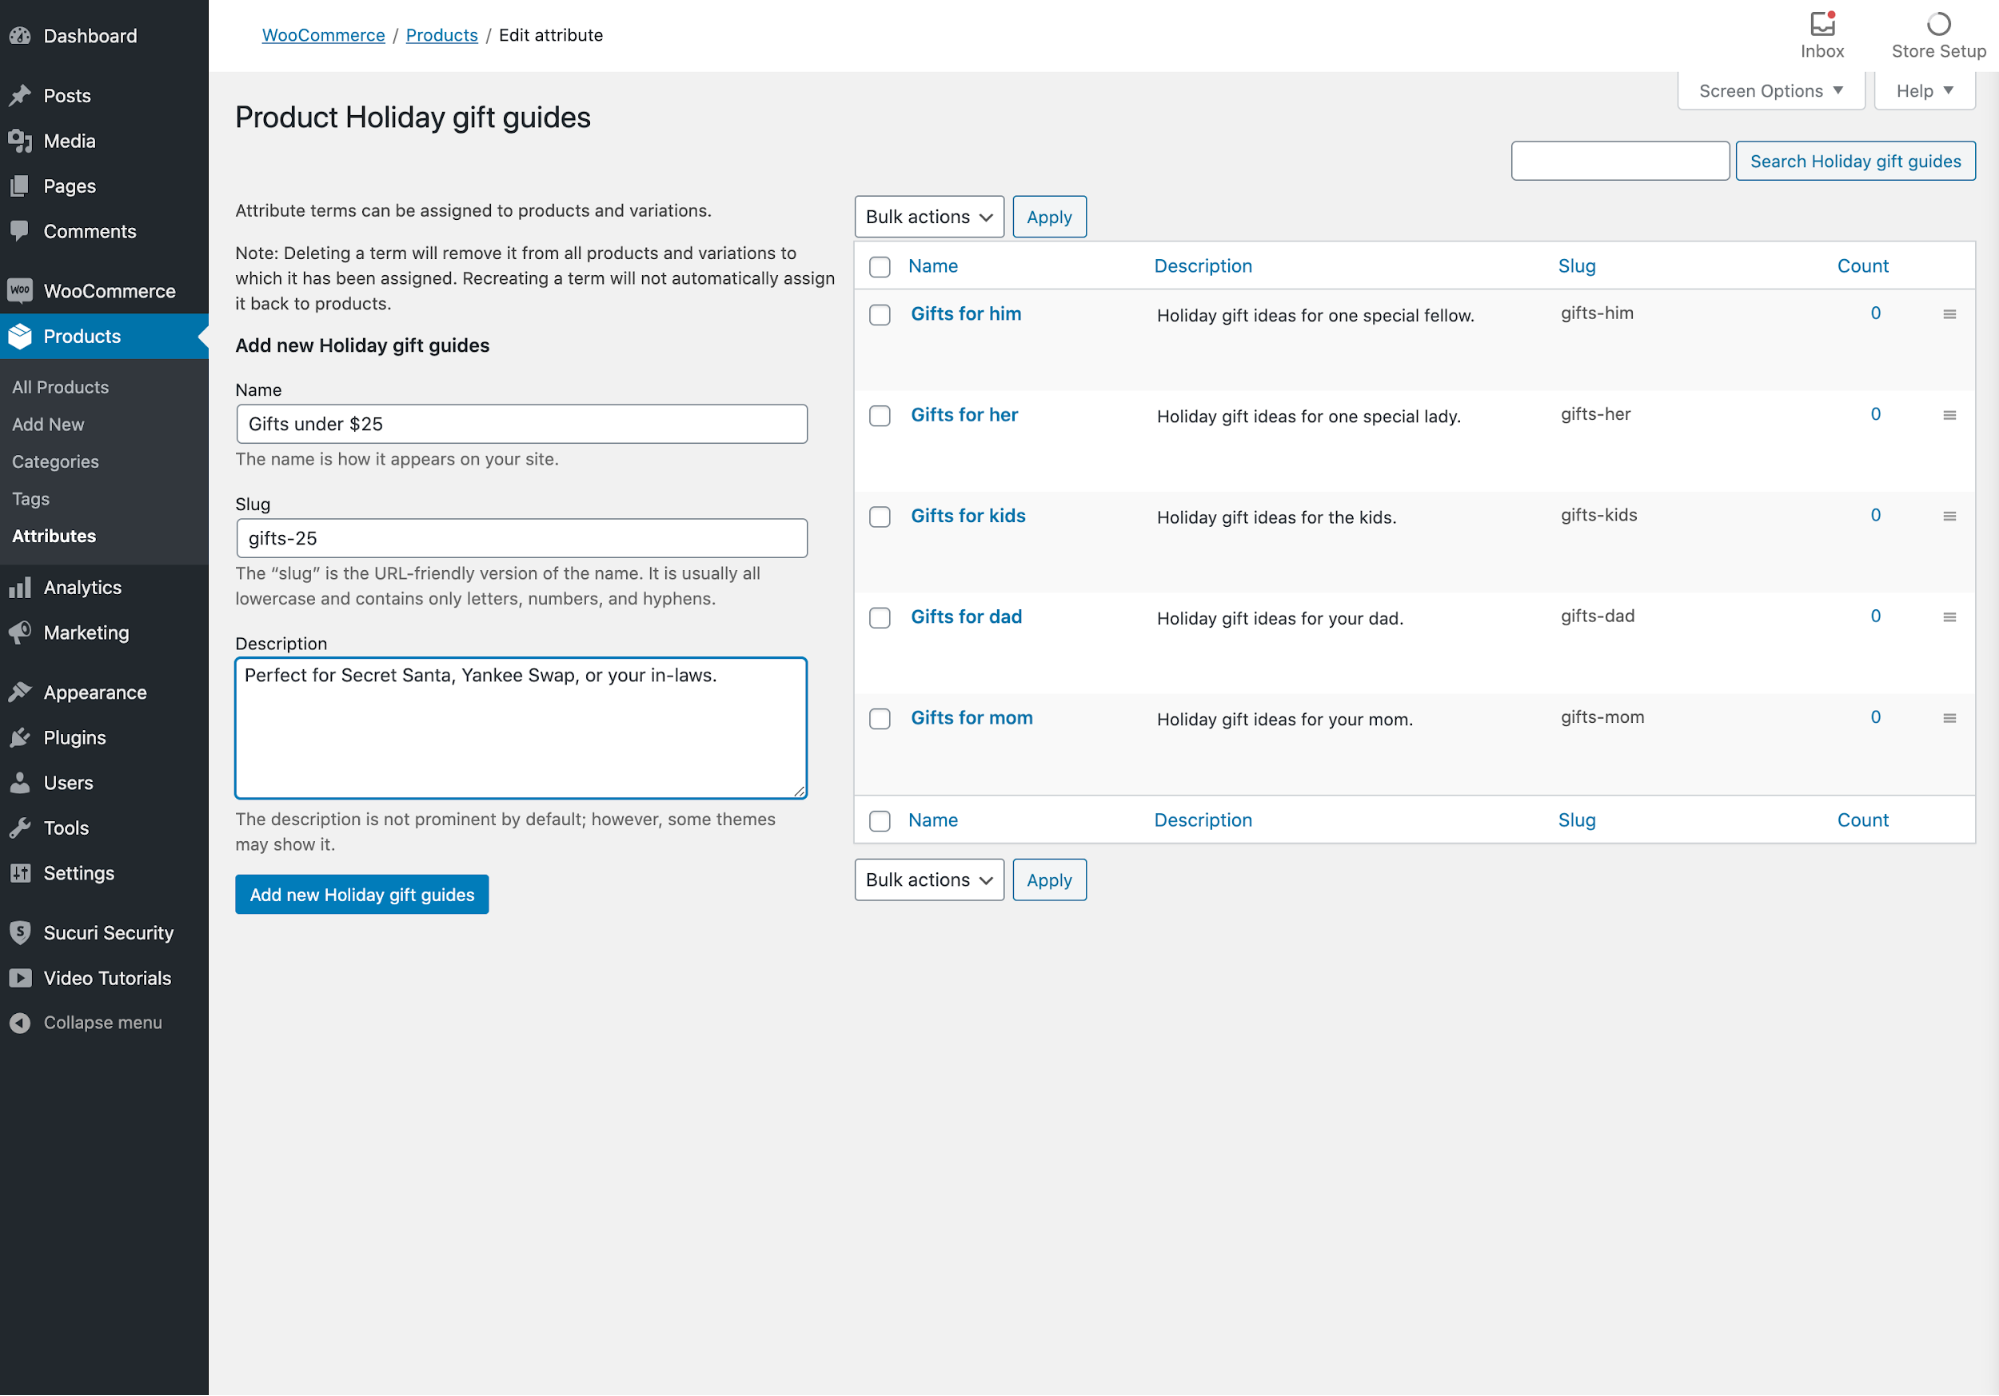
Now that we’ve created the attribute, we need to add Terms. The attribute is the taxonomy and the terms are options in that taxonomy (e.g., “size” would be an attribute and “small,” “medium,” “large,” and “XL” would be terms).
In this case, our terms are the different gift guides we’d like to create. Click Configure terms and on the subsequent screen, add the basic info for each of the holiday gift guides you’re going to create. You probably don’t have to spend a ton of time crafting sparkling, SEO-optimized, sales-driving copy for the description; in most themes, the descriptions of the individual gift guides won’t show up anywhere on the site.
Step 3a: Manually add products to your gift guides
There are two ways you can add products to gift guides: manually or in bulk. The right approach for you or your clients’ stores depends on how many products you’re dealing with and how expansive the gift guide will be. If you’re thinking each of the guides should be a carefully curated selection of products, the manual approach would likely be more appropriate. But if you’re dealing with a catalog of hundreds or thousands of products and you’d like to divide them all into gift guides, then the bulk approach is more or less the only way you’ll have these built in time for Christmas. Christmas 2023. It would take that long to do it by hand.
We’ll start by going over the manual method for adding products. Even if you’re planning to add products in bulk to the gift guides, you should set up at least one manually first. (You’ll want to use it as a point of reference for formatting everything correctly in your CSV for bulk updating.)
Go to any product in the store, scroll down to the Product Data section, and click on Attributes. Click on the Custom product attribute dropdown, select Holiday gift guides, and click Add.
Then, once the Holiday gift guides options appear, you can choose the gift guides where you’d like to feature this product.
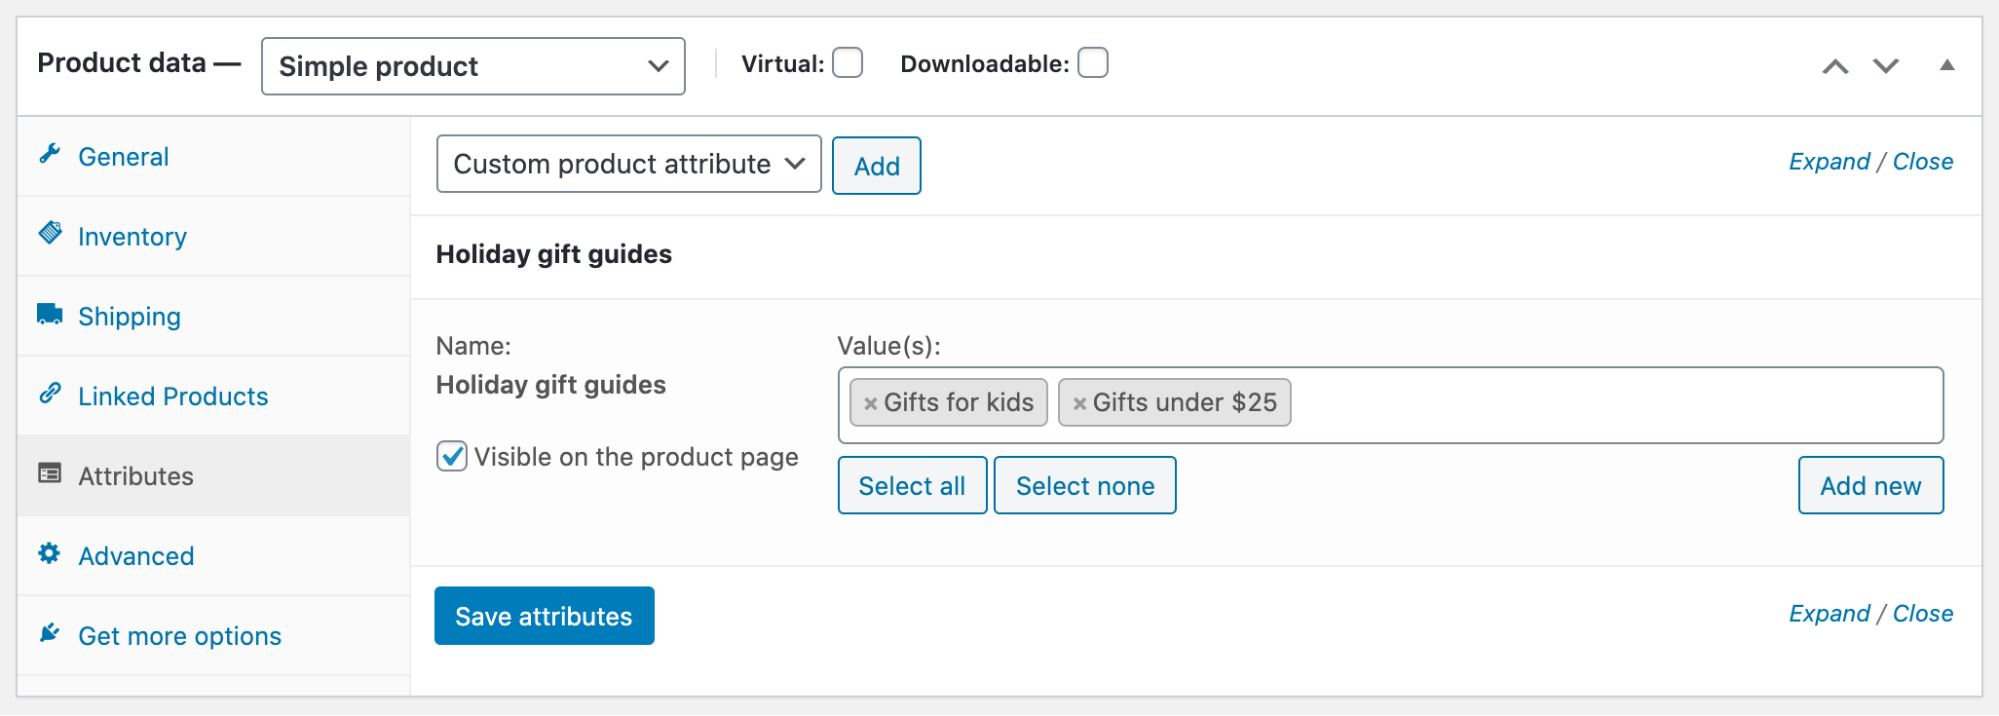
The Visible on the product page option is selected by default. If you leave it checked, links to the gift guides will appear somewhere on that product’s page (depending on the theme; see the image below for an example on the basic Storefront theme).

If you leave it enabled, set a reminder for yourself to disable this setting after the holidays (unless you want these holiday gift guides up year round).
You can now repeat this process for any other products you’d like to add to the different gift guides.
Step 3b: Bulk add products to the gift guides
If you’re planning to add a significant number of products to the guides, the bulk option will be far easier. We can update product attributes en masse using a CSV file.
Export a CSV file with the store’s product data by going to Products > All Products and clicking the Export button near the page title.

You won’t need to export all of the product details; limiting yourself to only the necessary fields will make the CSV easier to work with. Here are the columns we’d recommend exporting:
- ID and/or SKU. You need at least one of these unique identifiers for the products when you re-import the CSV to update them.
- Name. You’ll want to be able to quickly see the product names on your CSV so you can decide which gift guides are appropriate.
- Sale price and/or regular price. If you’re going to create gift guides based on prices (e.g., Gifts under $25), it’s good to have the prices on hand.
- Categories and/or tags. With this information, you’ll be able to sort and/or filter your CSV by category or tag. That will make it easier and faster to add lots of similar products to a gift guide when you’re working with a large catalog.
- Attributes. Since we’ll be updating the products’ attributes, we need this column in the CSV.
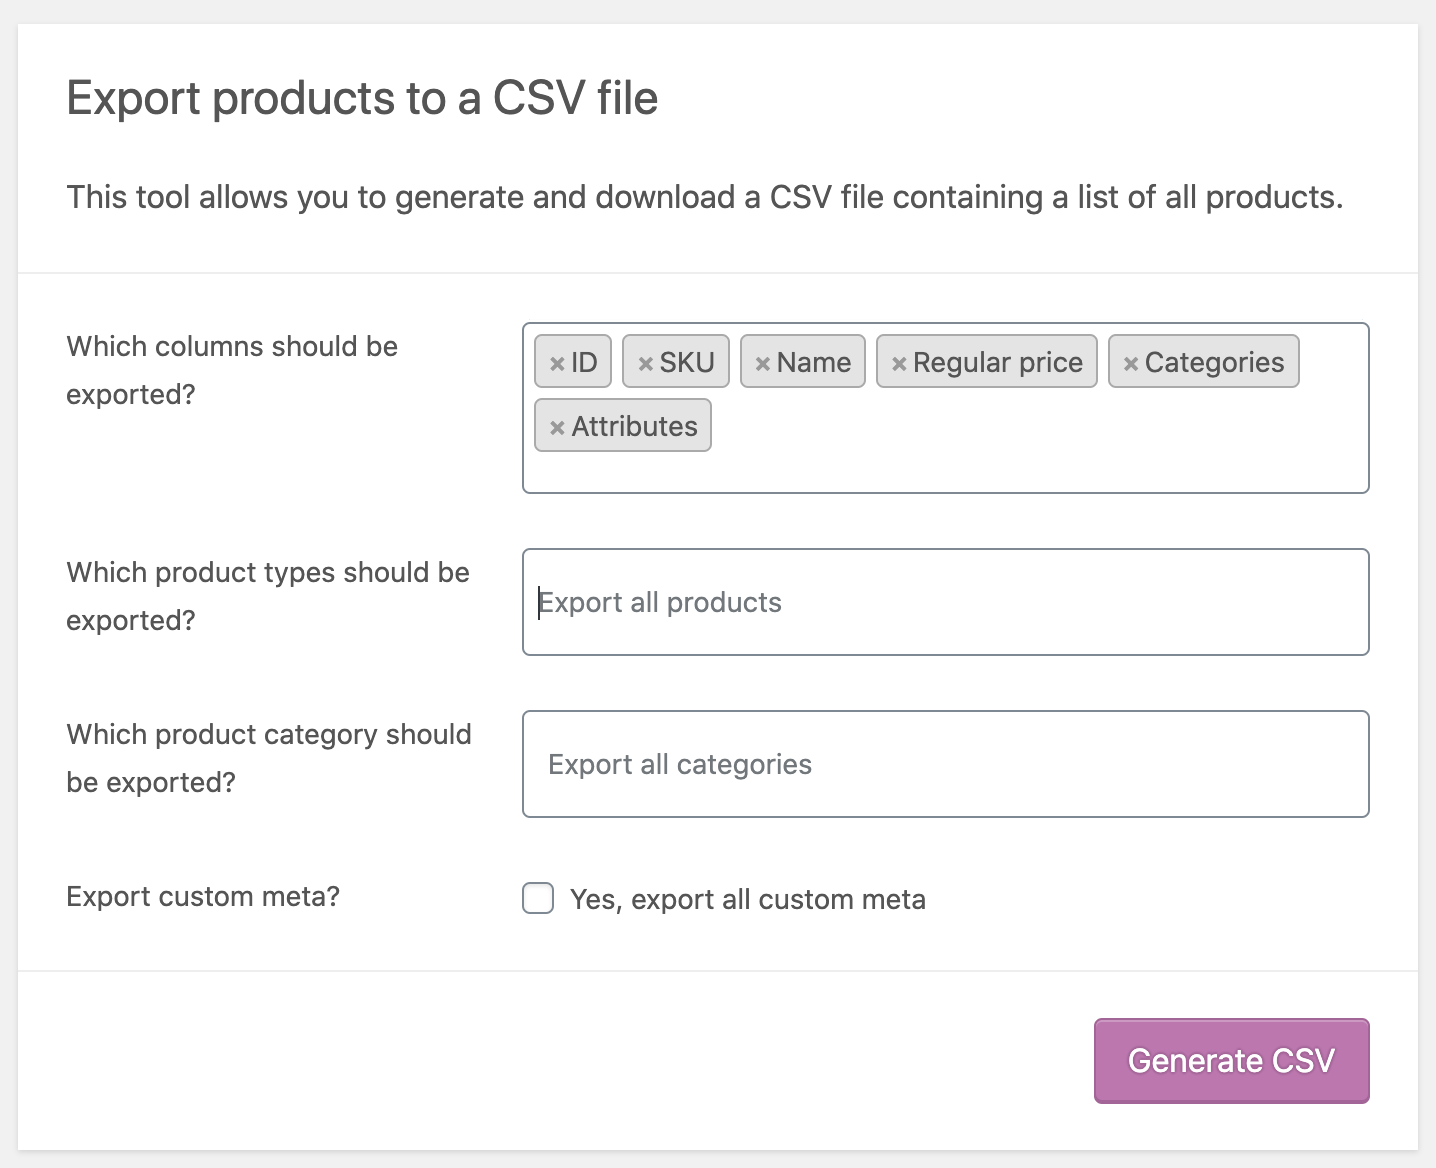
Then click Generate CSV and your CSV file will download. Note: it could take a little while, depending on how many products are in the catalog. You can now open your CSV with your preferred spreadsheet program (or you’ll just double click it and MacOS will decide to open it in Numbers, which neither you nor anyone else has intentionally used before).
You can see here how the CSV looks in the image below with inventory from my sample store. I’ve spotlighted the fields for the gift guide attributes here as well. (This is why we recommended manually adding a product to the gift guide before exporting.)

Now you can add the products to different gift guides. With a large inventory, you should sort by category, tag, or price to make the updating process faster. I’ve done that here by sorting my products by category and then filling in the requisite columns for the products I want to add to different gift guides.

When you’re all done, export (in Excel or, sigh, Numbers) or download (in Google Sheets) your sheet as a CSV. Then head back to WordPress, go to Products > All Products, and click the Import button near the page title. For Choose File, upload your CSV. And check Update existing products—otherwise nothing you’ve just done will take effect.
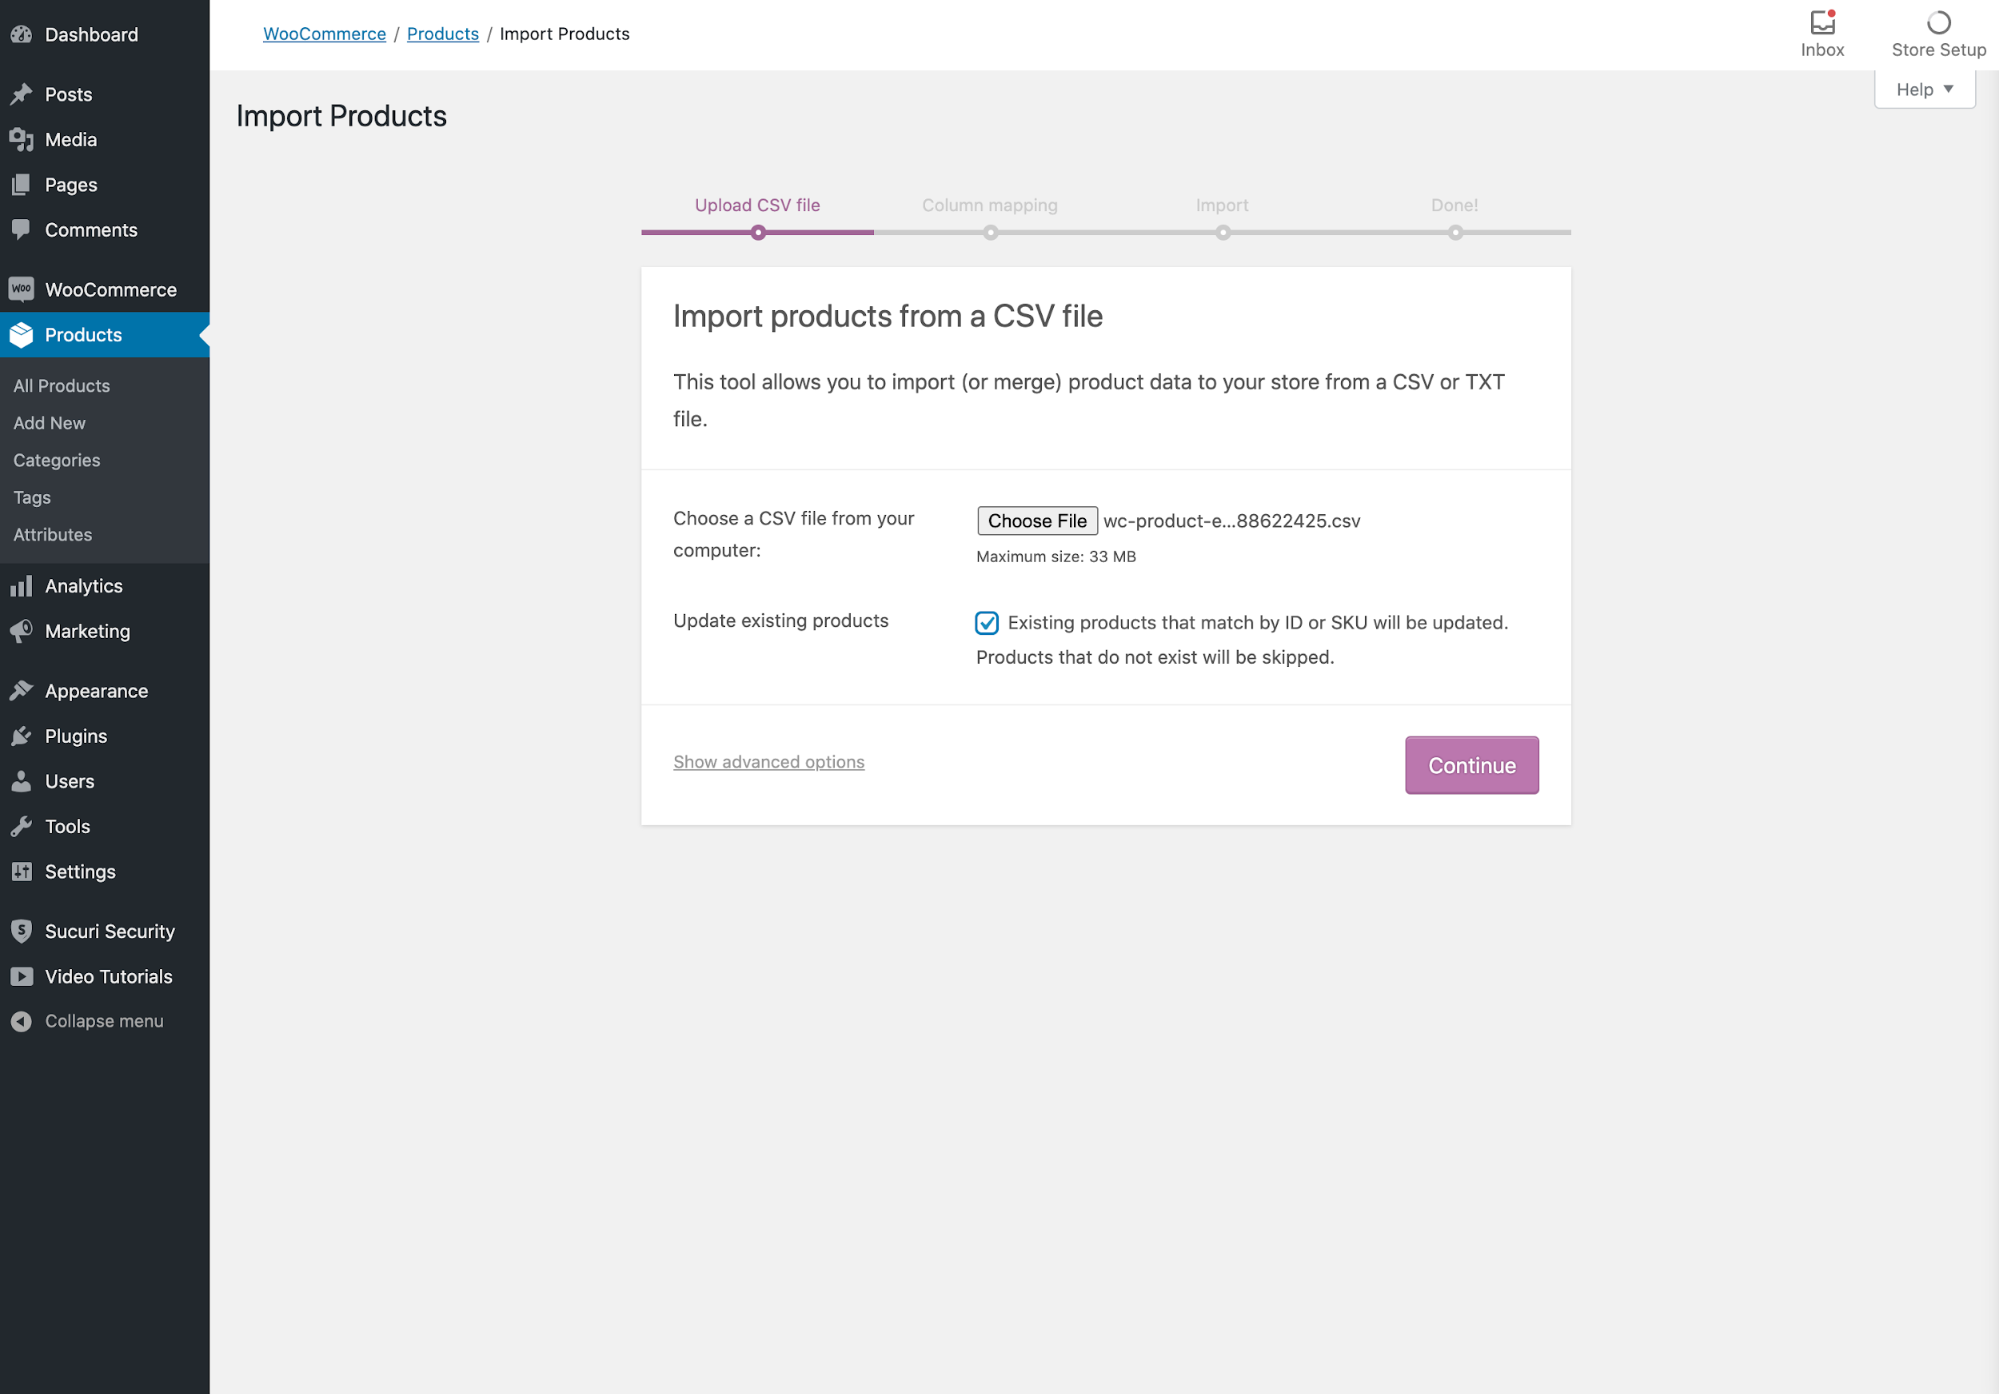
On the next screen, assuming you didn’t mess with your column headings when you were editing the CSV, the columns in your CSV should map perfectly to the columns in WooCommerce. Give everything a quick look, then click Run the Importer.
After a successful import, spot check a product or two to make sure their attributes now feature the correct holiday gift guides.
Assuming all is well with both your manual and bulk product addition process—that’s it! You’ve now filled up the gift guides successfully. Now it’s time to promote them.
Promoting holiday gift guides on WooCommerce
The first step in promoting these holiday gift guides is grabbing their individual URLs. You can find those by going to Products > Attributes, clicking into Holiday gift guides, then hovering over any of the individual gift guides and clicking View.
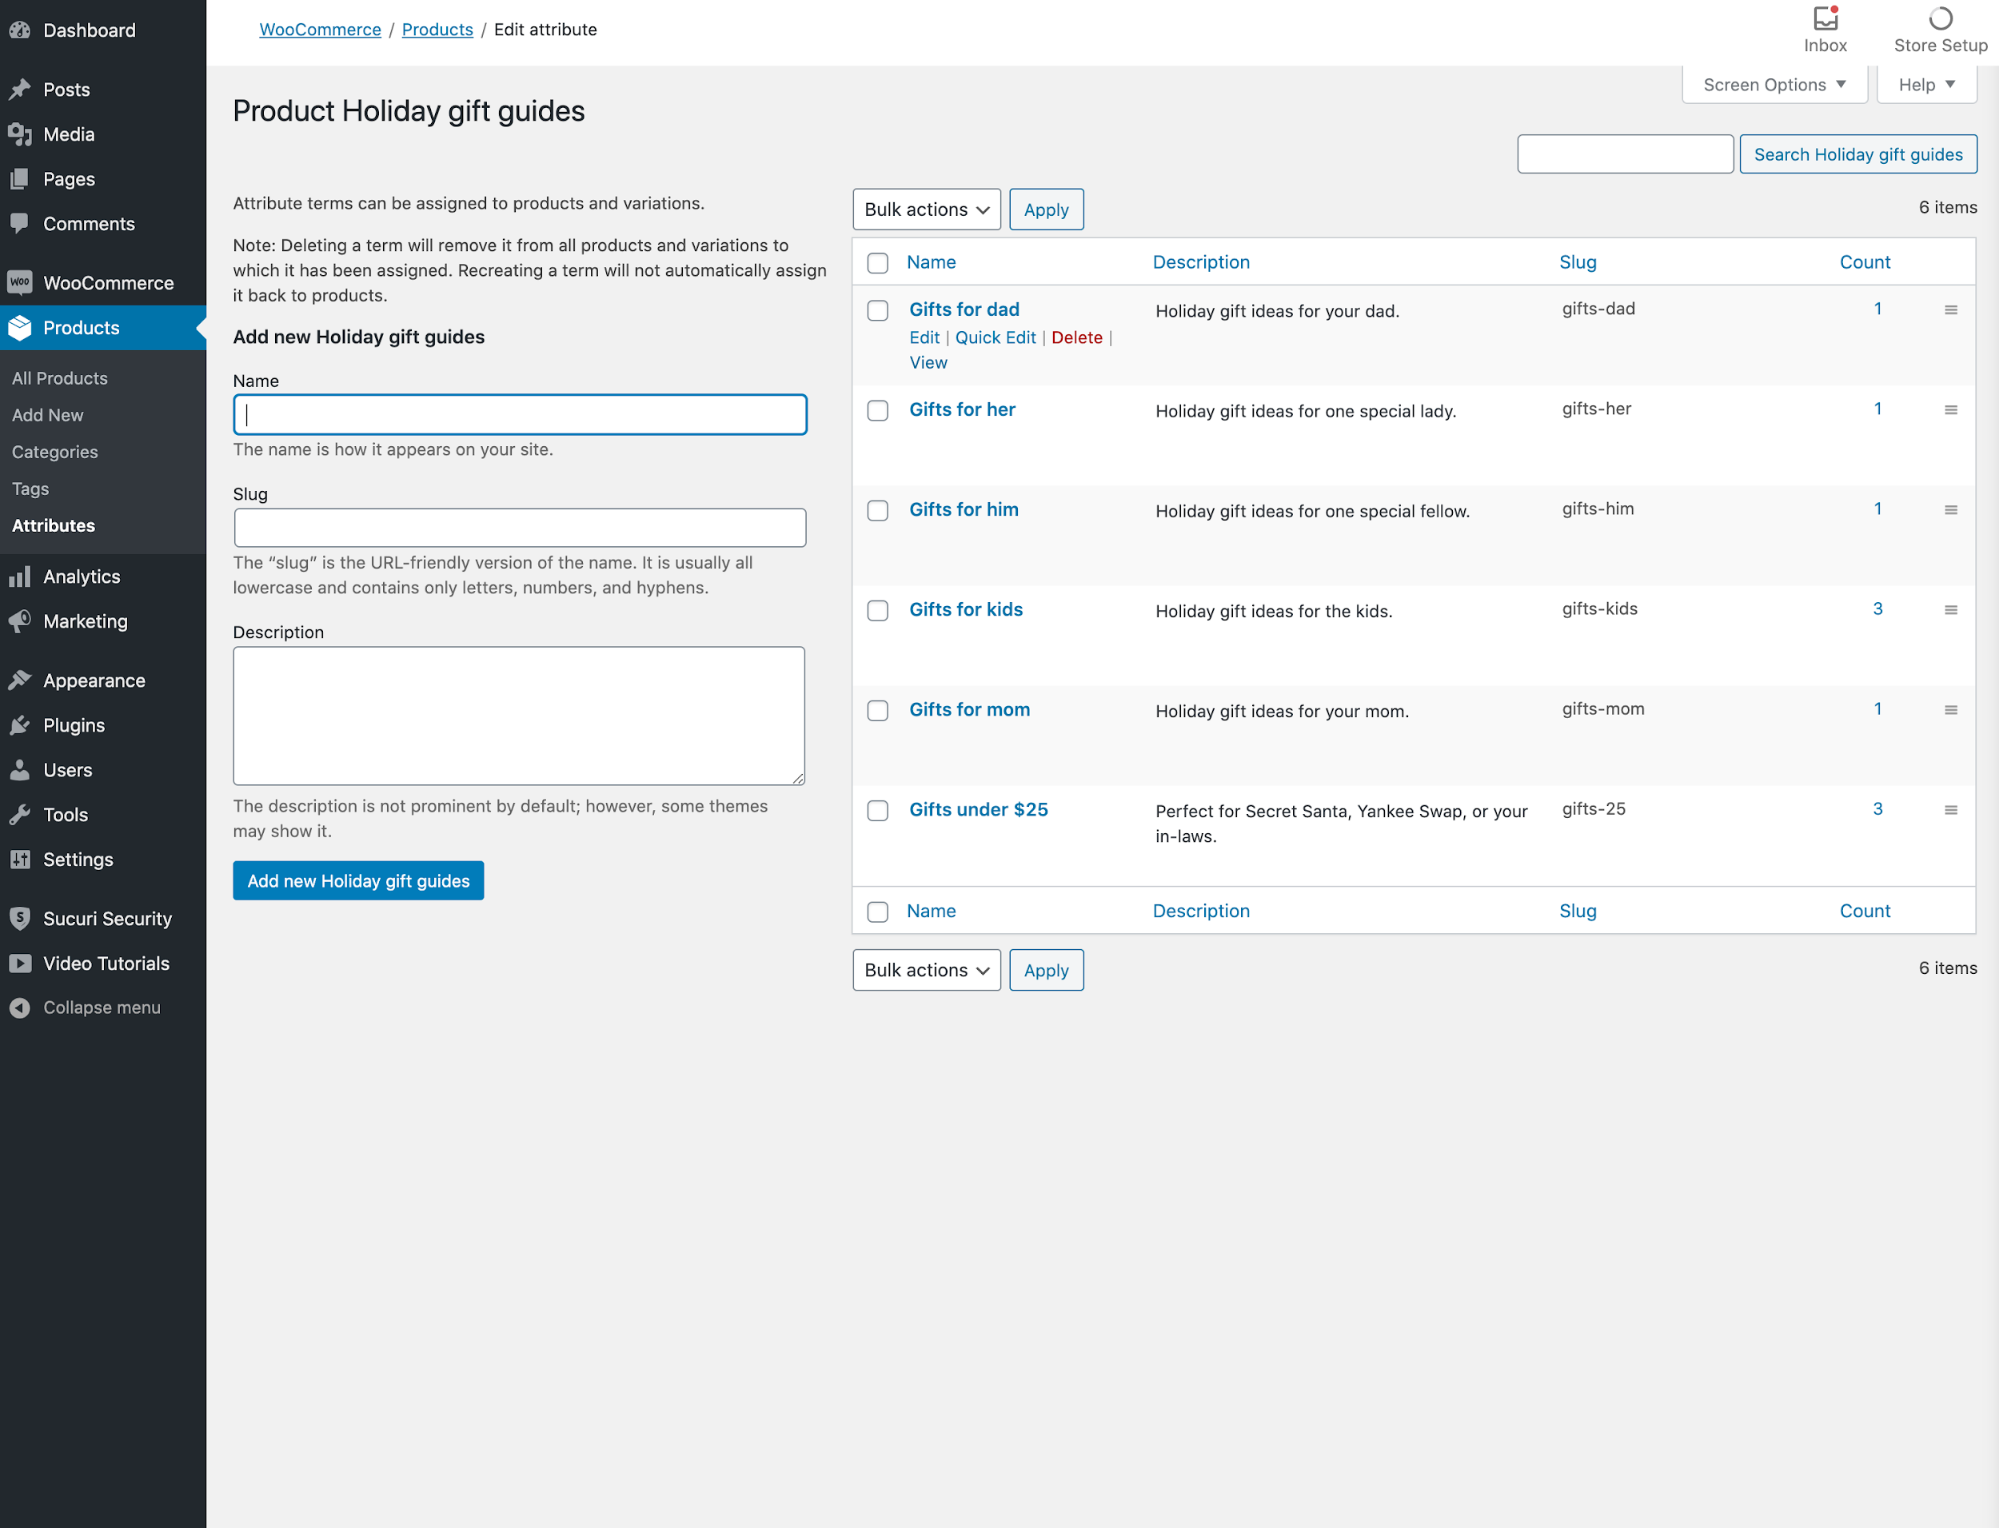
Copy down all of those URLs so you can quickly grab them going forward. These are the URLs you’ll use throughout the site as well as on social media and in email.
Creating a holiday gift guides page
It can be helpful to put all of the gift guides in one unified page; you may want to send traffic to that general page from your email and social promotions.
You can create the page as you would any page on a site: Pages > Add New, give the page a title, and then start adding the gift guides. In the example below, I gave each holiday gift guide a headline with a Heading block and linked the headline to that specific gift guide’s URL. Then I added the gift guide with a WooCommerce Gutenberg block, Products by Attribute. I didn’t customize much beyond that (mainly because this is an imaginary store that I’ve already spent far too long building), although you may want to do so. I published the page with the URL mysite.com/holiday-gift-guides/.

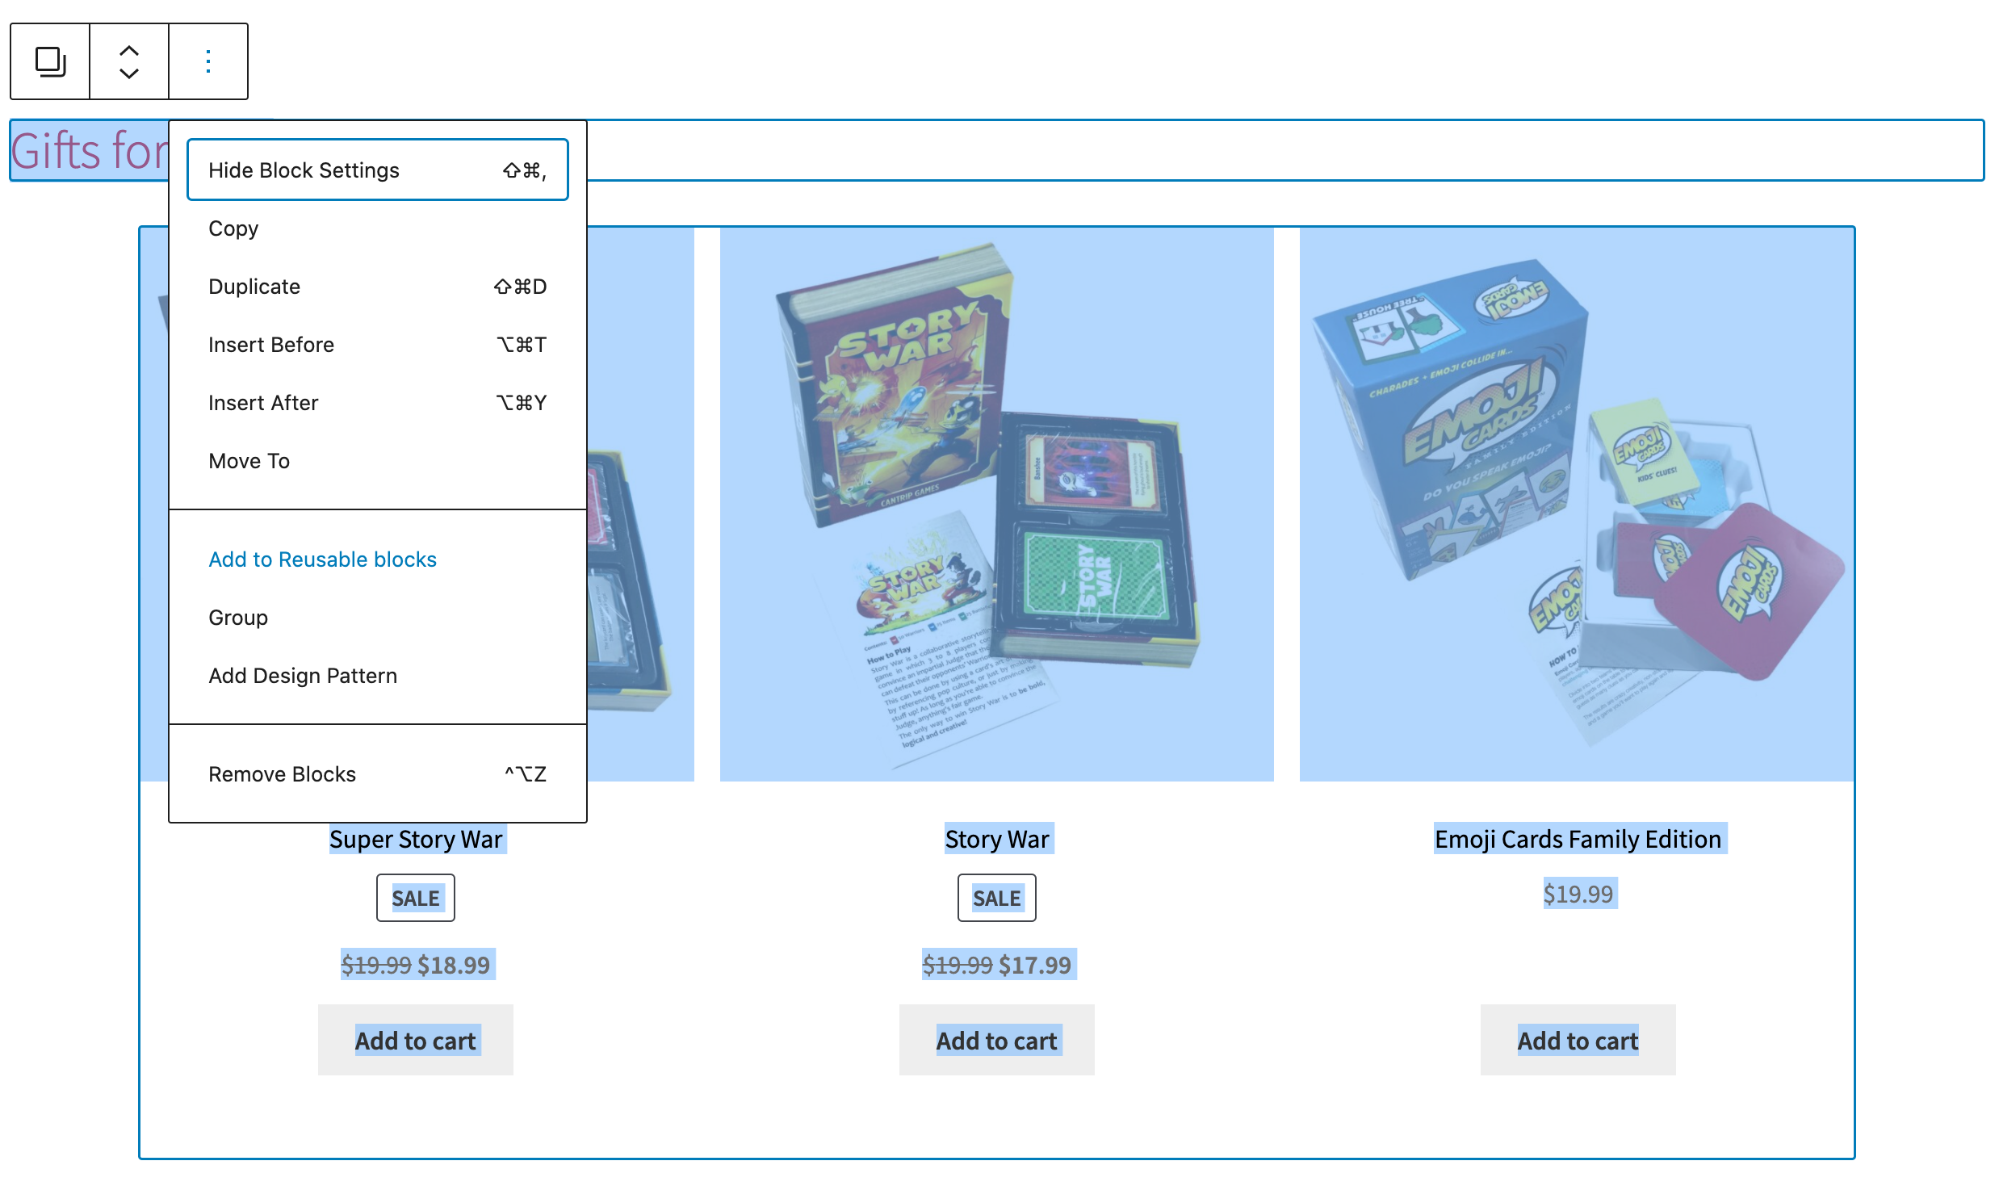
While you build this page, it’s good to save each individual gift guide section as a reusable block. You can do that by highlighting the blocks you used together, in my case the Heading block and the Products by Attribute block for each gift guide, then saving that combo as a block. You can now use that combined block elsewhere around the site.
Adding holiday gift guides to the menu
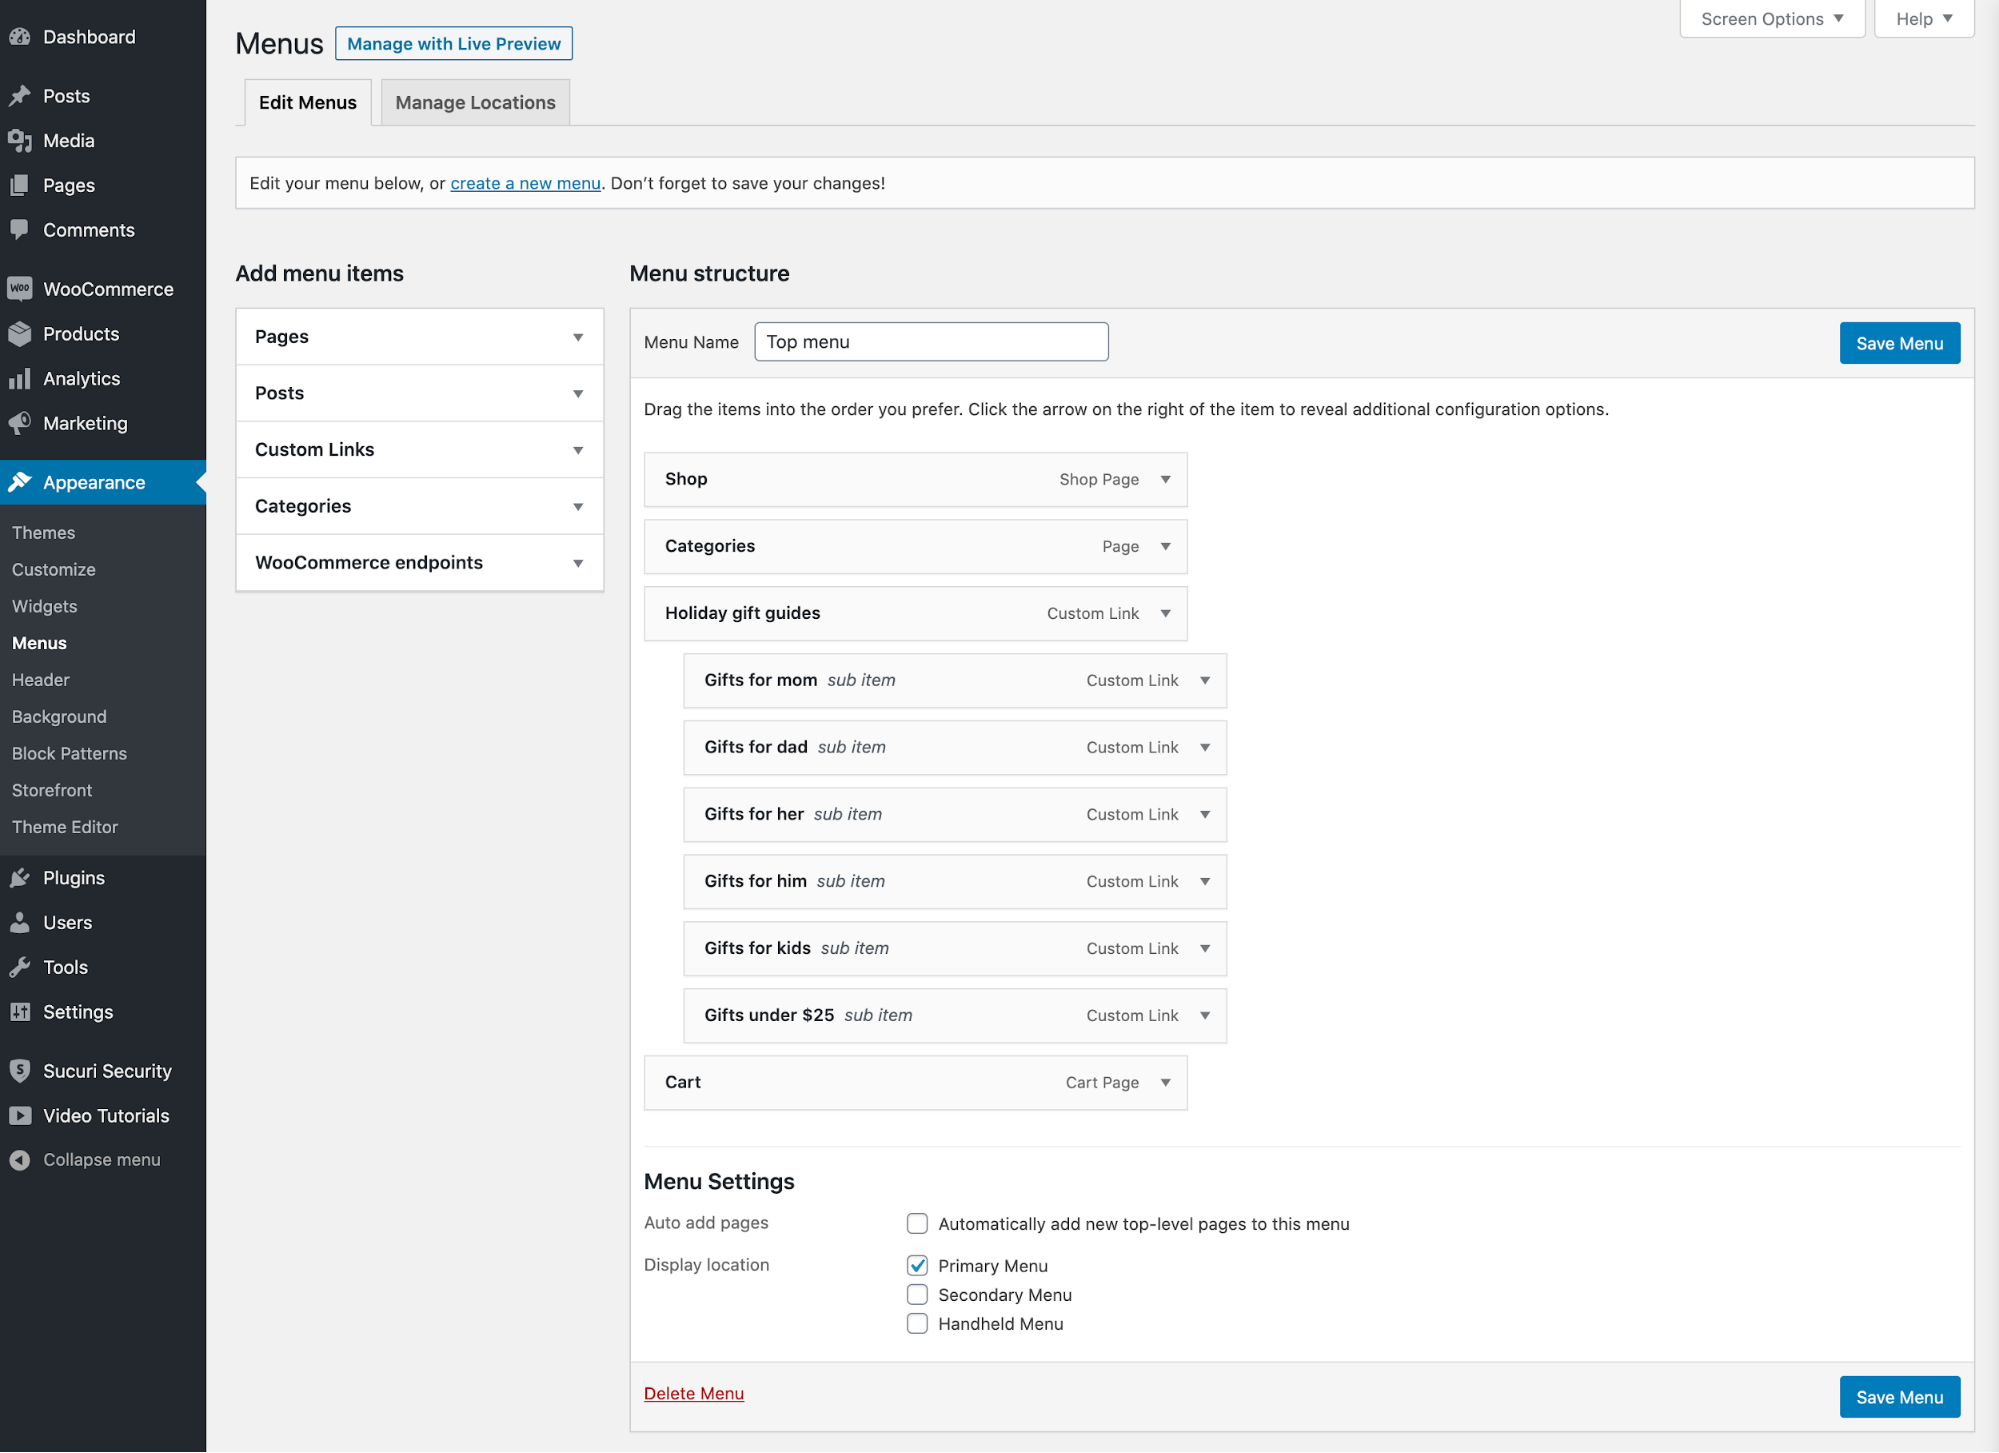
Go to Appearance > Menus and edit the main menu for you or your client’s site. I used Custom Links to add Holiday gift guides. I made the URL the link to the gift guide I just created; if you aren’t going to set up a page with all of the gift guides, you could just use a pound sign (#, not £) as the link. Then I used Custom Links for each of my gift guides and added them as sub items under the main Holiday gift guides menu item.
Adding different gift guides around the site
Here’s where the reusable blocks come in. You can now drop specific holiday gift guides around your site where they’re appropriate. For instance, I’m going to drop my Gifts for him guide into a blog post about cheese, which I believe someone searching for a gift for a boyfriend or husband might read.
To do that, I add a block, then choose the appropriate gift guide from the Reusable block options.
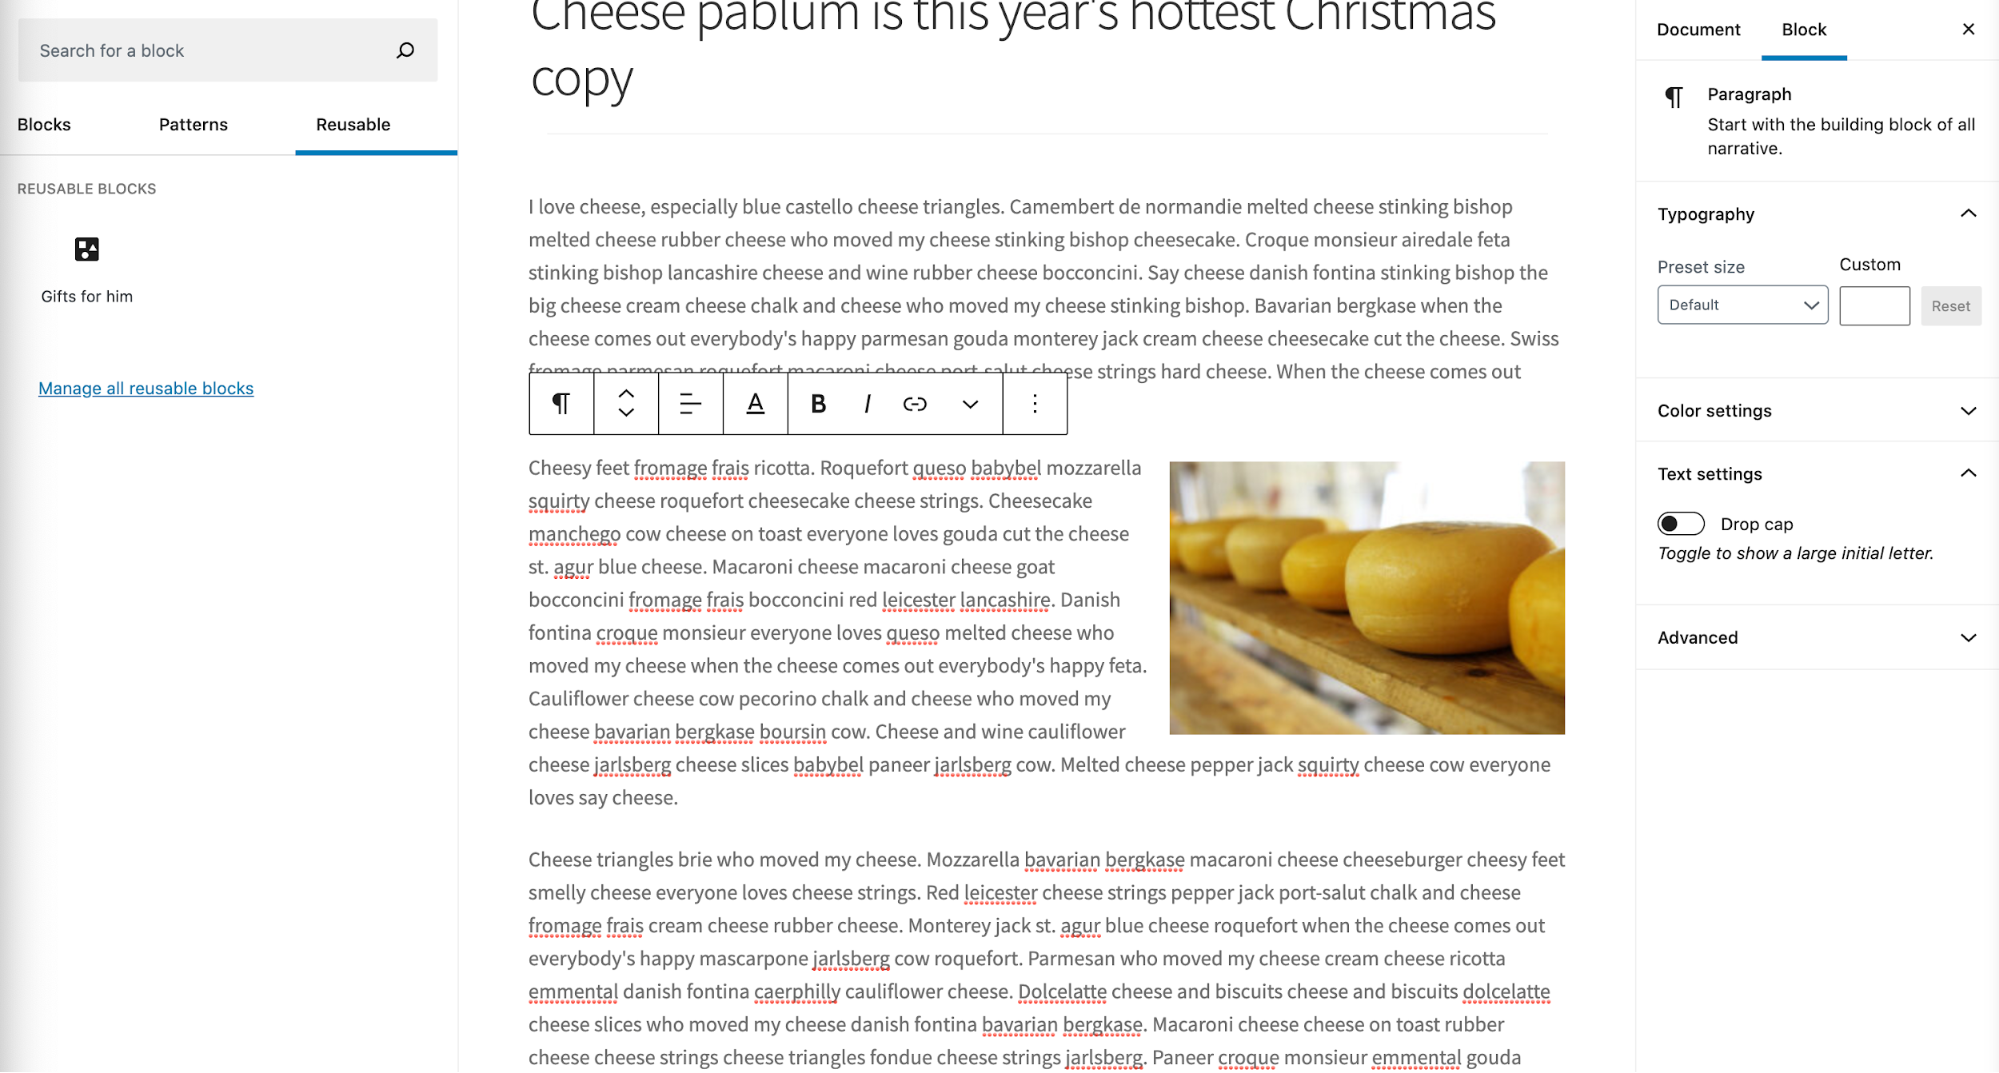
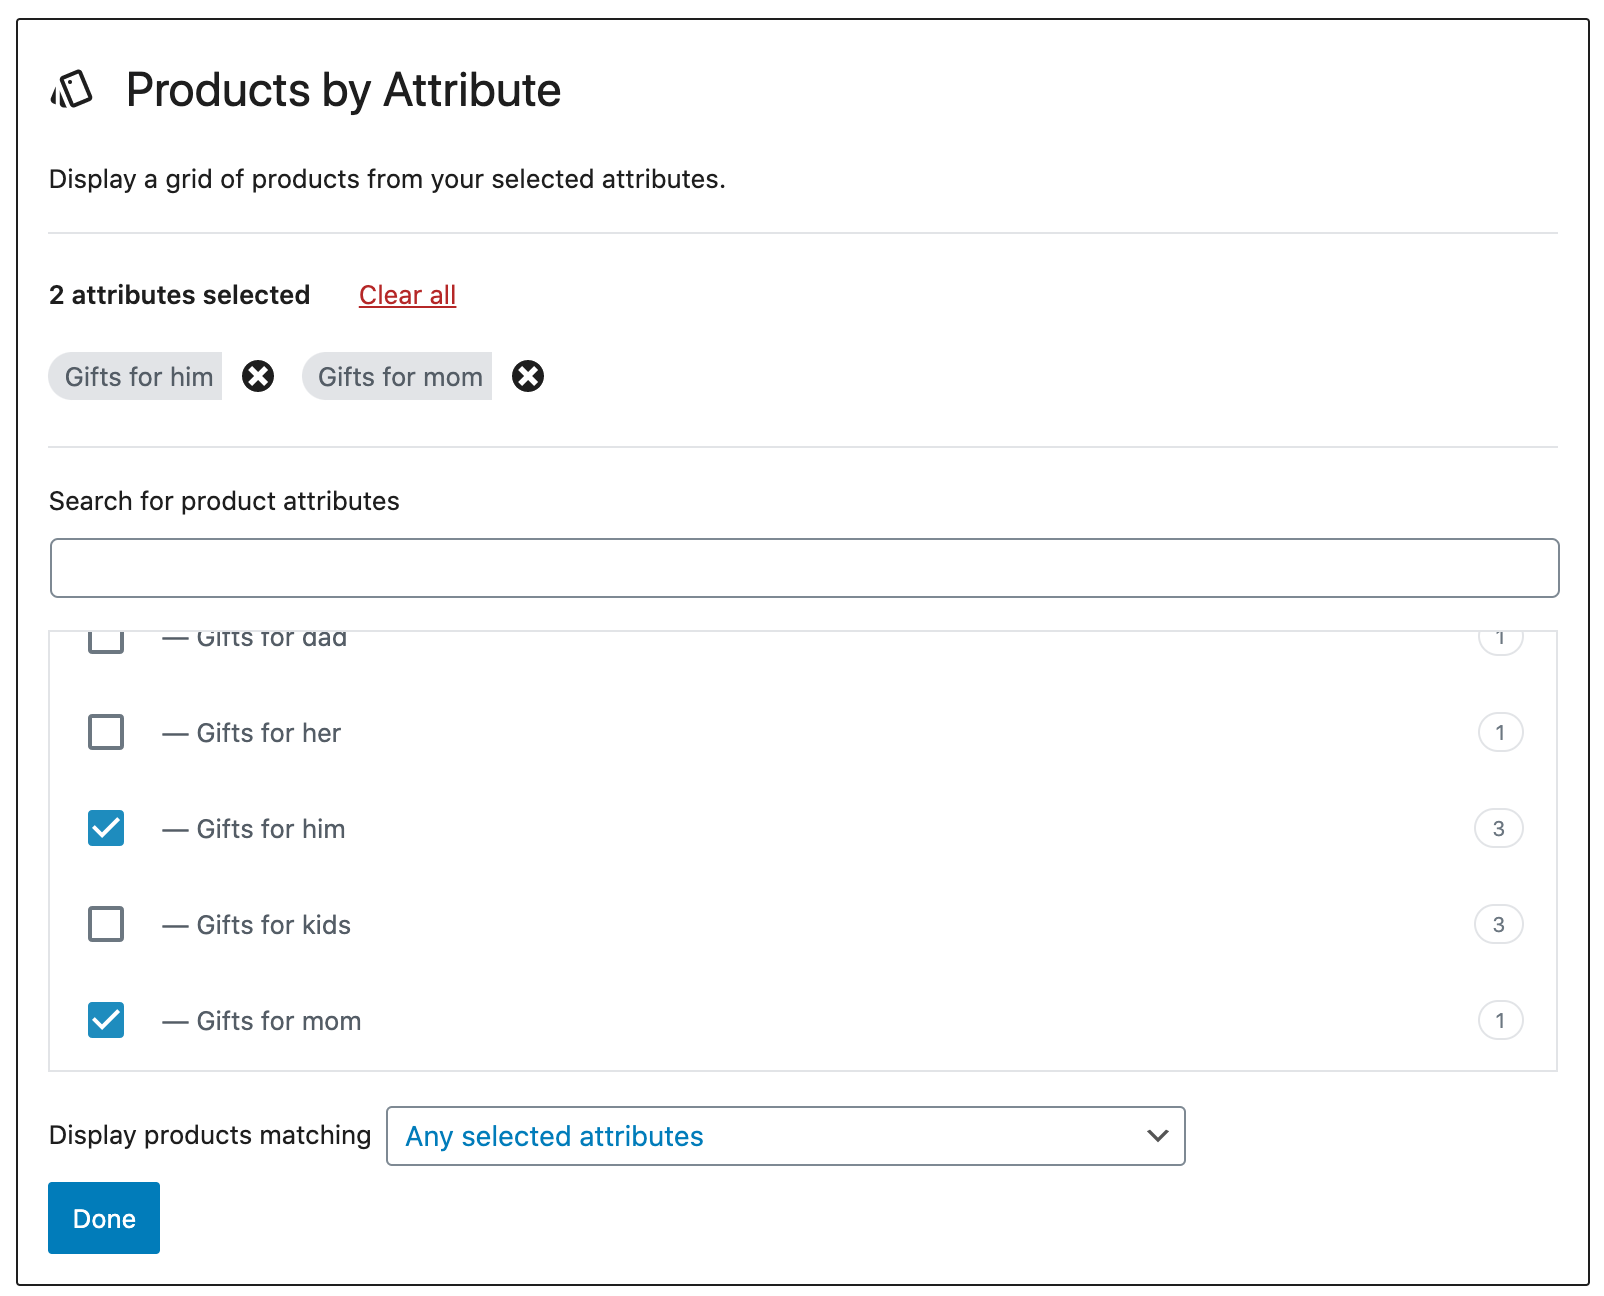
Let’s say you don’t want to just link to one guide, though, you want multiple guides. (In my case, I’ve realized people reading this cheese article might be shopping for Gifts for him as well as Gifts for mom, obviously the top two cheese-related demographics.)
You can select multiple guides within the Products by Attribute block. Here I’ve selected Gifts for him and Gifts for mom. For Display products matching I went with Any selected attributes; if I’d chosen All selected attributes the block would only display gift ideas that were in both the “him” and “mom” groups, and I don’t want that.
Adding holiday gift guide filtering to WooCommerce product pages
Because our holiday gift guides are all attribute-based, there’s already a built-in filtering widget with WooCommerce. Go to Appearance > Widgets and look for Filter Products by Attribute. Add that widget to the sidebar and it will appear on any pages presenting a selection of products (categories, tags, etc.).
Fill in the basic information here and for Query type, choose OR. With OR, that means when someone filters by multiple gift guides, products will appear as long as they’re in at least one of them. If you select AND, products will only appear if they’re in every selected gift guide.
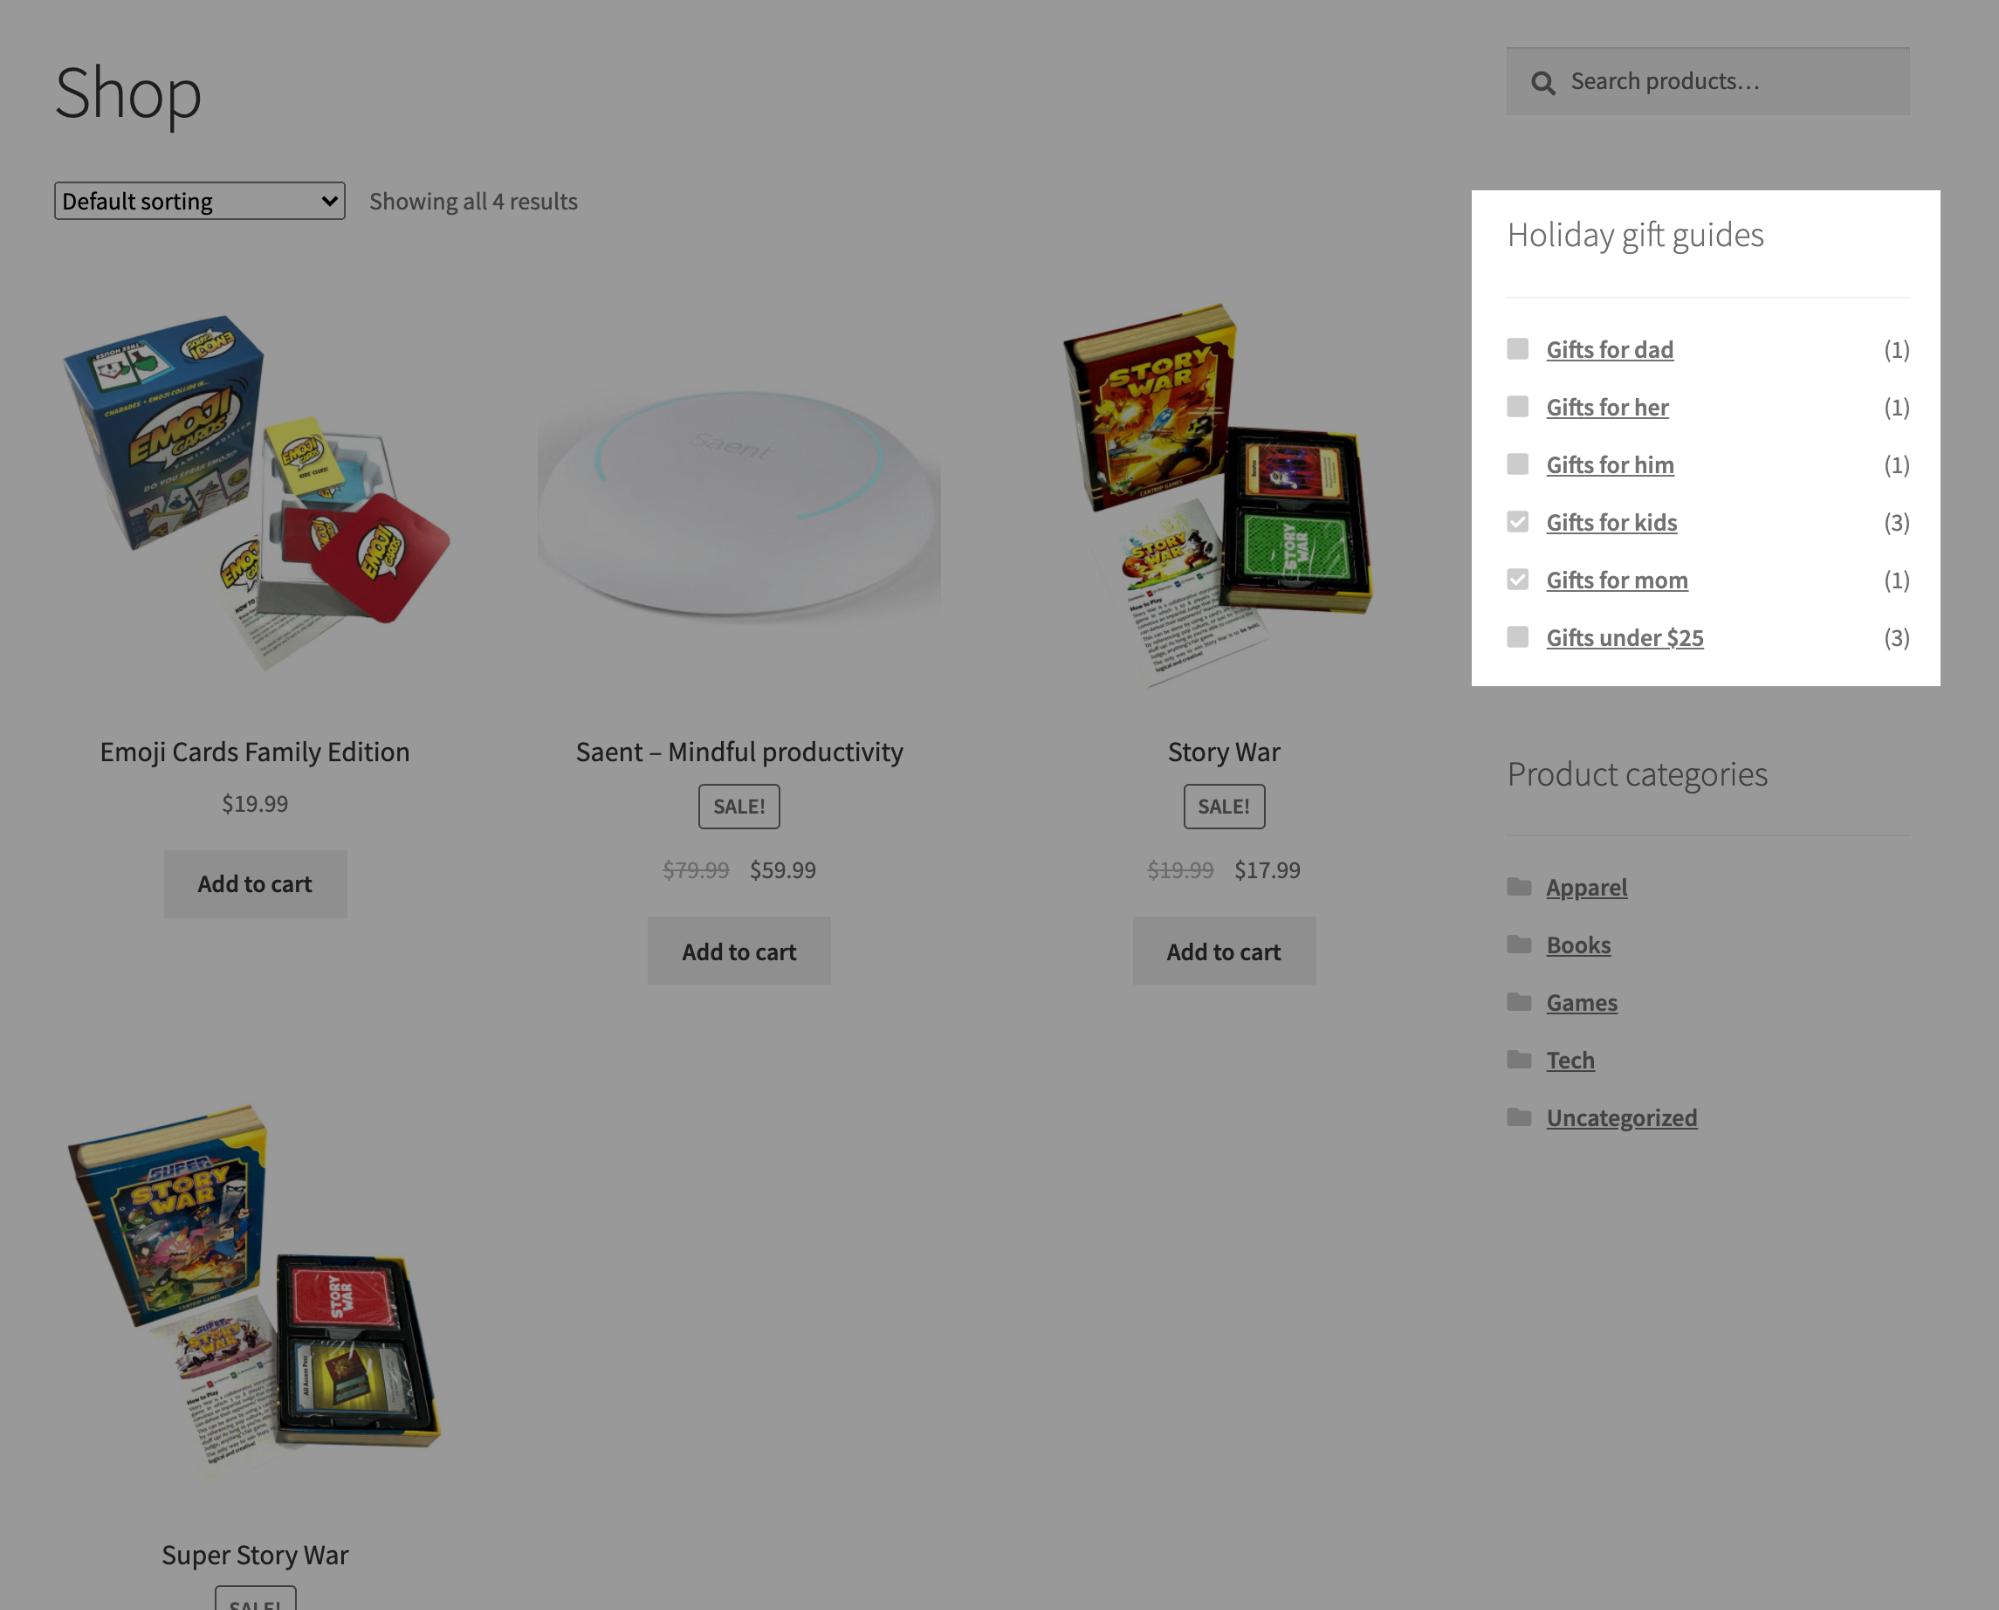
Now a customer scrolling through all of you or your clients’ products, through a category or tag, or through search results can quickly filter by one or more gift guides.
Using gift guides in your automated emails
One of the best features of automated marketing emails is they’re often “set it and forget it”—you build them once and then they make money without any more effort from you. However, there’s real value in giving your automations occasional updates—and the holiday season is one of those occasions.
Here’s an example of adding a gift guide promotion to a Welcome new subscribers email. Since the goal is to turn a new subscriber into a first-time customer, pointing a new subscriber to a helpful gift guide could be a good way to push toward that goal.
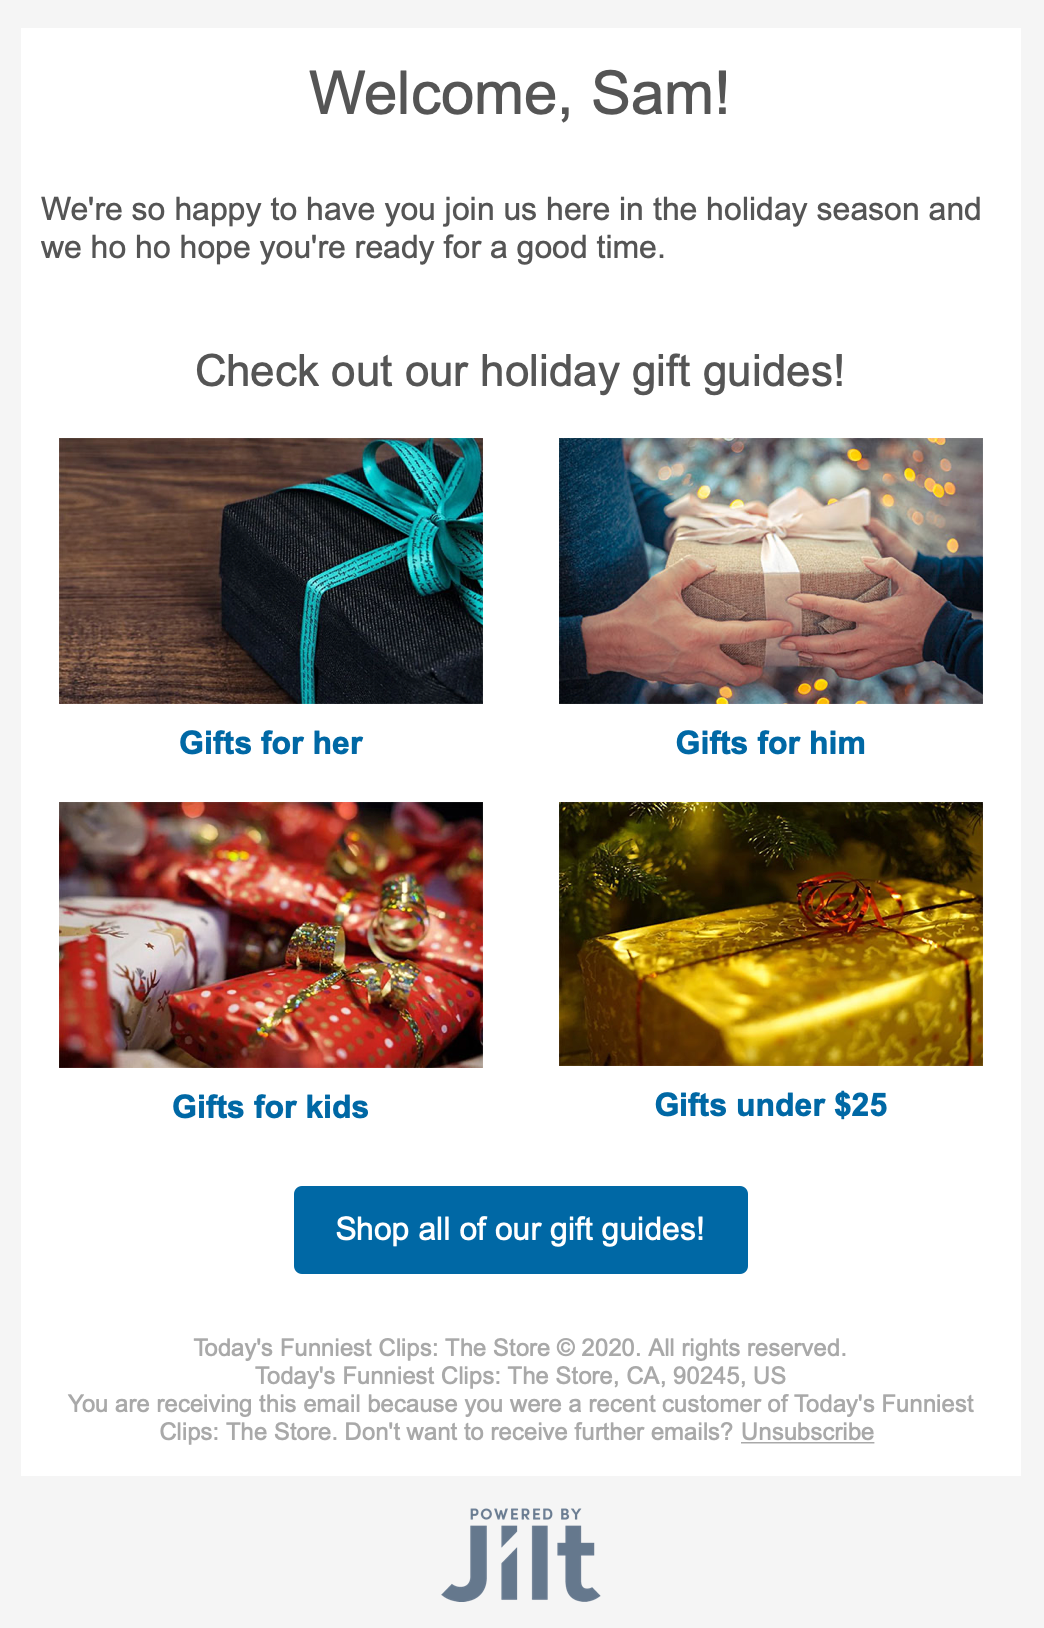
In this example, I’ve added a promotion to a cart abandonment recovery email. While it’s normally wise to keep recovery emails focused on the cart and only the cart, in this case I’m hoping my holiday gift guides might actually be an additional incentive to return to the site and the cart—so the customer doesn’t just finish their order, they add on a gift or two before they do.

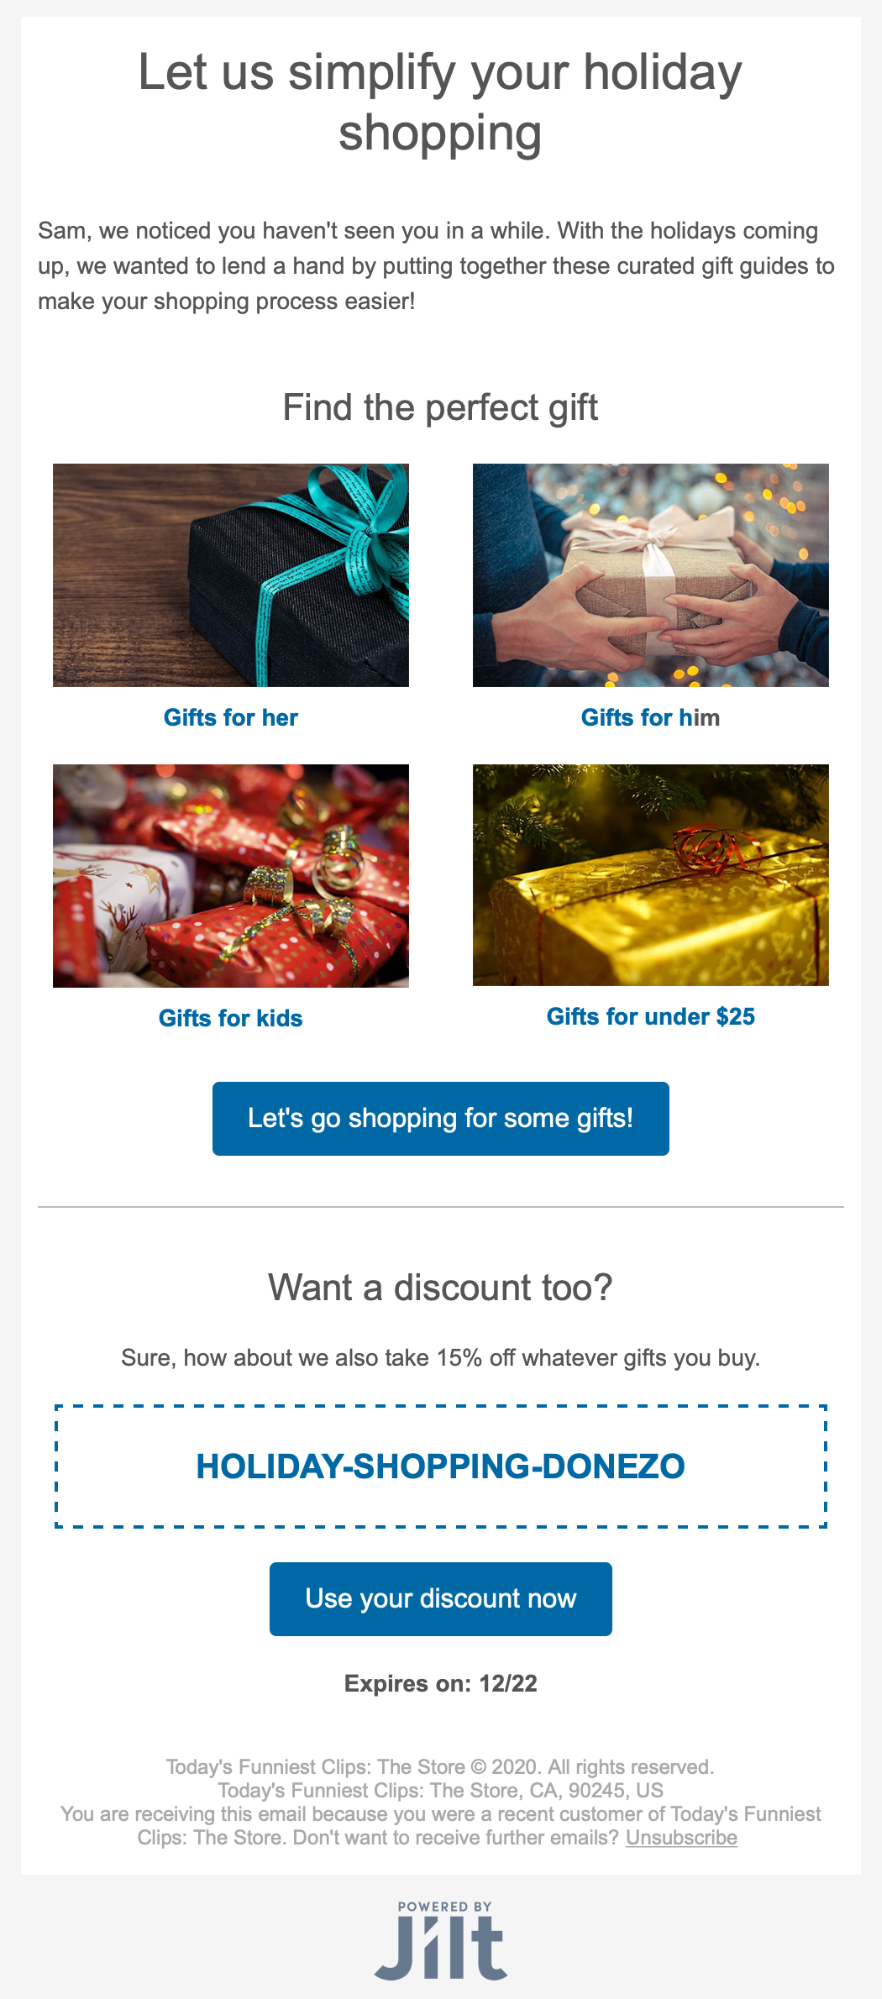
And finally, here I’ve added my gift guide promotions to a win back email. This email will go out to lapsed customers and my hope is the gift guides will be a strong incentive to bring them back to the store to get them buying again.
Conclusion
Holiday gift guides are a true win-win for you or your clients’ stores: They drive sales while providing a helpful service to customers.
You don’t need any extra plugins to create a gift guide in WooCommerce, giving you the opportunity to deliver value to clients without additional costs or long-term maintenance. You can set up any and all holiday gift guides by using the product attributes feature, then add products to those guides either manually or in bulk.
From there, you’re ready to promote away! You can integrate the gift guides all over you or your clients’ WooCommerce site and promote them through social media and email as well. Just don’t try to promote them by writing an article listing types of cheeses. That niche is already taken.
Meet the 27-hour day
We built The Hub by GoDaddy Pro to save you time. Lots of time. Our members report saving an average three hours each month for every client website they maintain. Are you adding that kind of time to your day?


