
For the purposes of this article, we’ll assume you have a domain name from GoDaddy and have purchased hosting at an amazing deal as well. Your domain is connected to your new hosting.
But now what?
You want to set up a WordPress website, but you’re confused.
Where do you begin?
While you can get GoDaddy Managed WordPress Hosting for pre-installed and configured WordPress, it doesn’t come pre-packaged and pre-installed for other types of hosting services, especially unmanaged hosting services.
However, there are many tools within cPanel (a popular web hosting control panel used on GoDaddy’s servers) that make it fast and simple to install and manage WordPress.
We’ll explore how easy it is to use and manage WordPress on cPanel.
What is cPanel?
Glad you asked! cPanel is a user-friendly, graphical interface for managing web servers that eliminates the need for command-line expertise or access to Linux utilities.
It is widely used by many web hosts to allow their customers to manage hosting. While its appearance has evolved over time, cPanel remains a reliable tool:
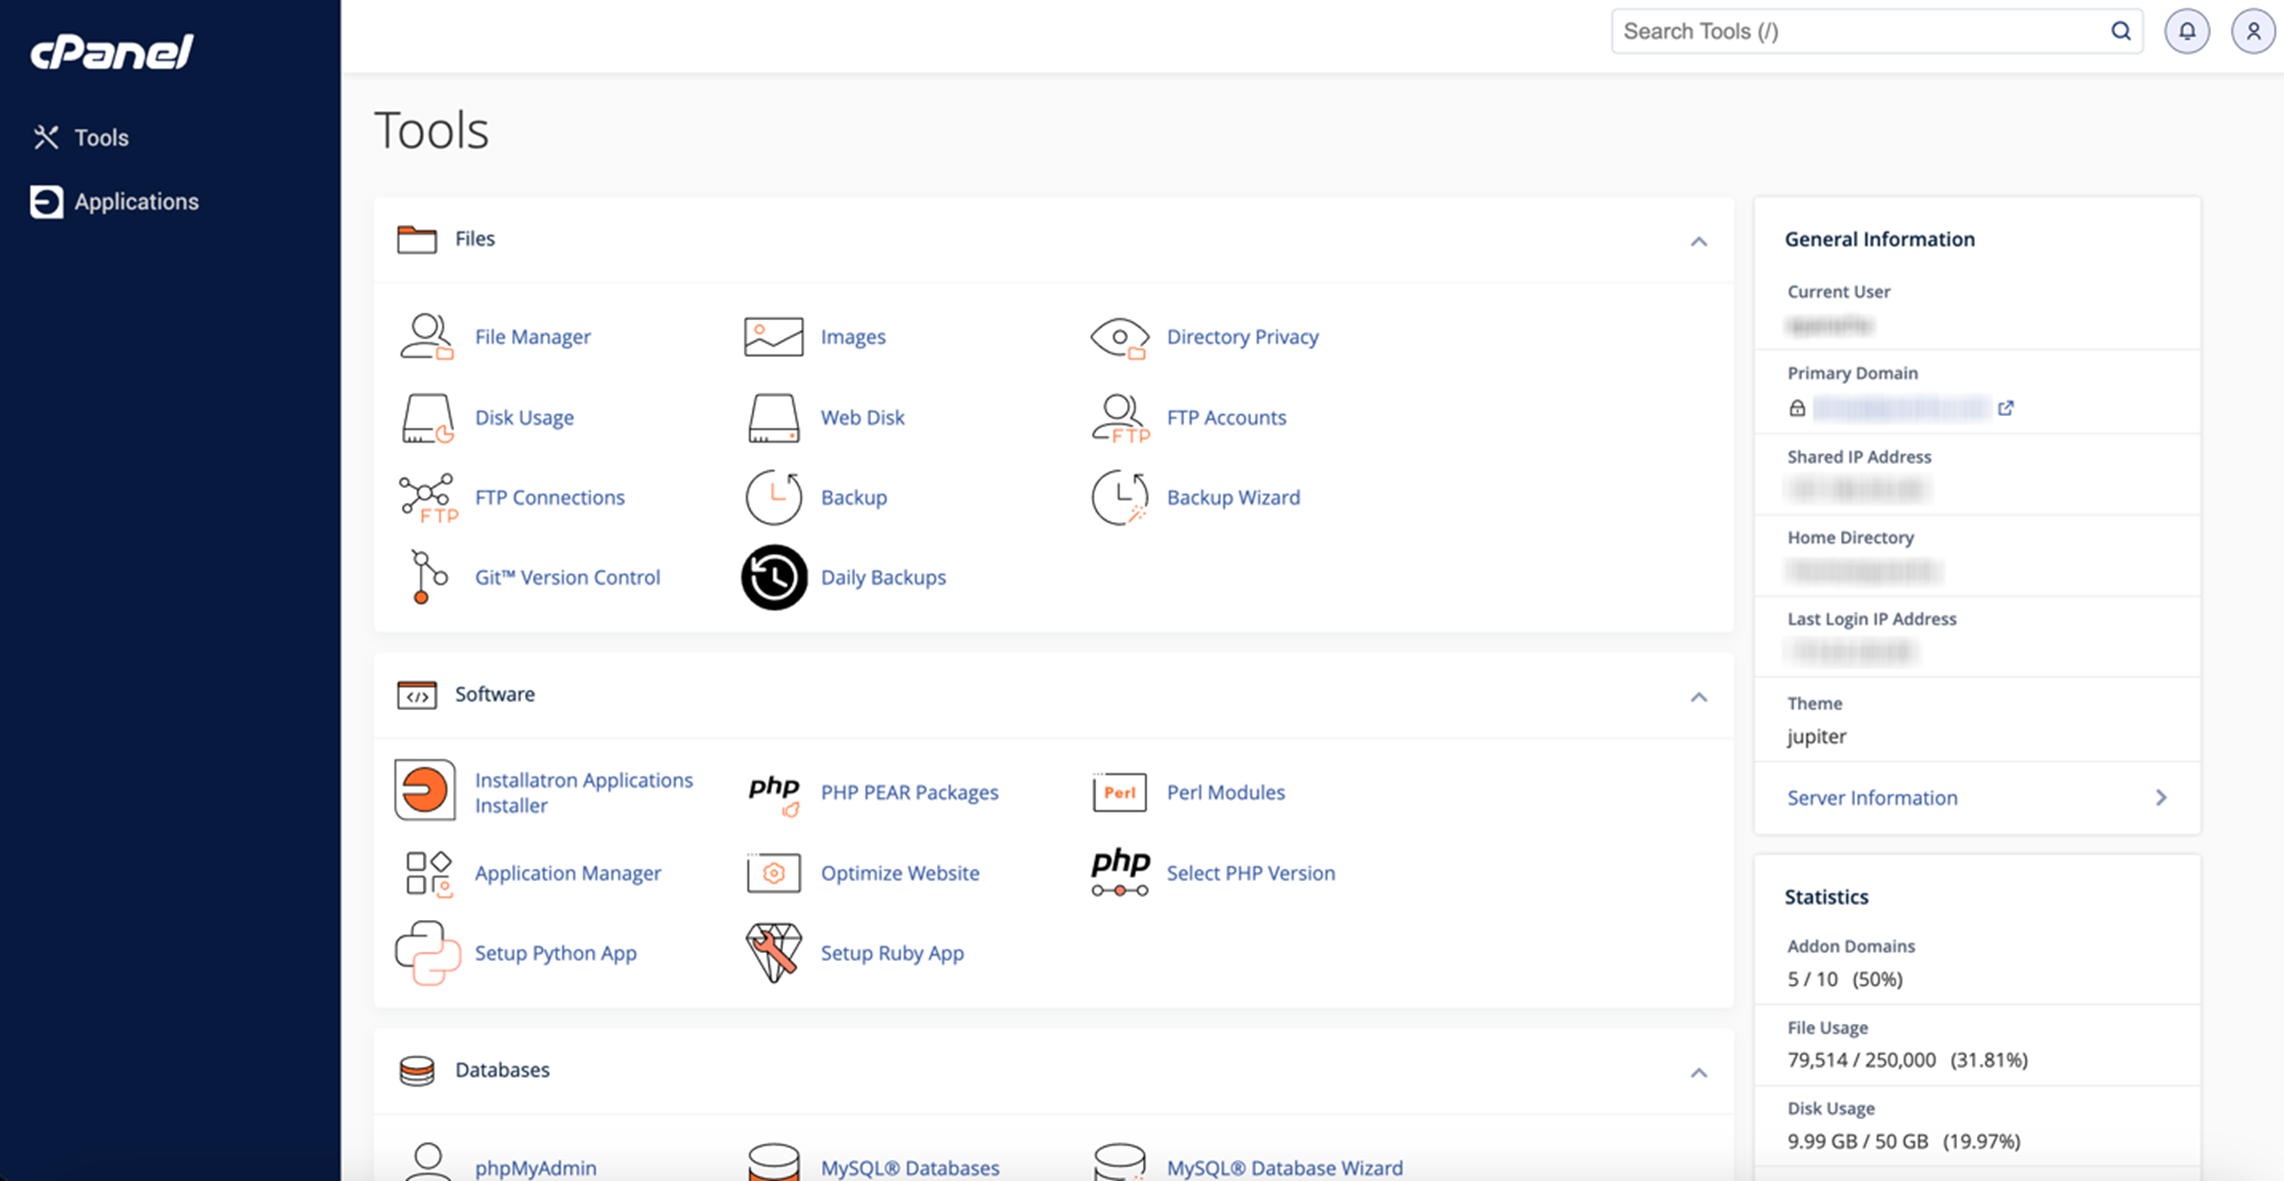
cPanel helps automate several tasks, from installing applications like WordPress and SSL certificates to viewing and editing website files through a graphical interface.
Additionally, cPanel allows you to manage critical aspects of your hosting environment, including domain management, email account setup, and database connections, all without requiring extensive technical knowledge.
It is particularly useful for managing WordPress websites, and we’ll dive deeper into that.
cPanel offers two interfaces: the standard cPanel for website management and the Web Host Manager (WHM) for server administration. This dual-interface approach provides enhanced flexibility and control, allowing users to efficiently manage both individual websites and server-level settings.
Moreover, cPanel supports multiple languages, allowing users to change the interface language directly from the login screen. This feature caters to GoDaddy’s diverse user base, enhancing user experience by providing a familiar language environment.
Robust security features of cPanel
With a plan from GoDaddy, cPanel provides robust security features to protect your WordPress site. These include private access to the control panel, ensuring that only authorized users can manage your hosting environment.
Regular security updates are applied to cPanel, safeguarding your server against the latest threats.
Using strong, unique passwords is crucial to protect access to both cPanel and your WordPress installation. Avoid using default usernames like `admin` for WordPress and database users to reduce the risk of unauthorized access.
Additionally, implementing security measures for malware protection is highly recommended. SiteLock will block malicious actors, automatically remove malware, defend against attacks, and more, ensuring your website remains secure.
Always ensure you are installing the latest version of WordPress. Keeping WordPress up to date is a best practice that prevents vulnerabilities and enhances the security of your website.
How to access cPanel
Before you use WordPress with cPanel, you need to know how to access the hosting platform.
There are three main ways to do it:
- Email link: Look for a link to cPanel in your email from your web hosting provider.
- Direct access: Go to your browser and append the appropriate port to your domain:
- For HTTP sites, append `:2082` (e.g., http://mydomain.com:2082)
- For HTTPS sites, append `:2083` (e.g., https://mydomain.com:2083)
- Alias: Some hosting providers set up an alias for easy access (e.g., https://mydomain.com/cpanel)
For quicker and easier future access, consider bookmarking your cPanel login page, especially when accessing via IP address or customized URLs. This convenience enhances your efficiency in managing your hosting services.
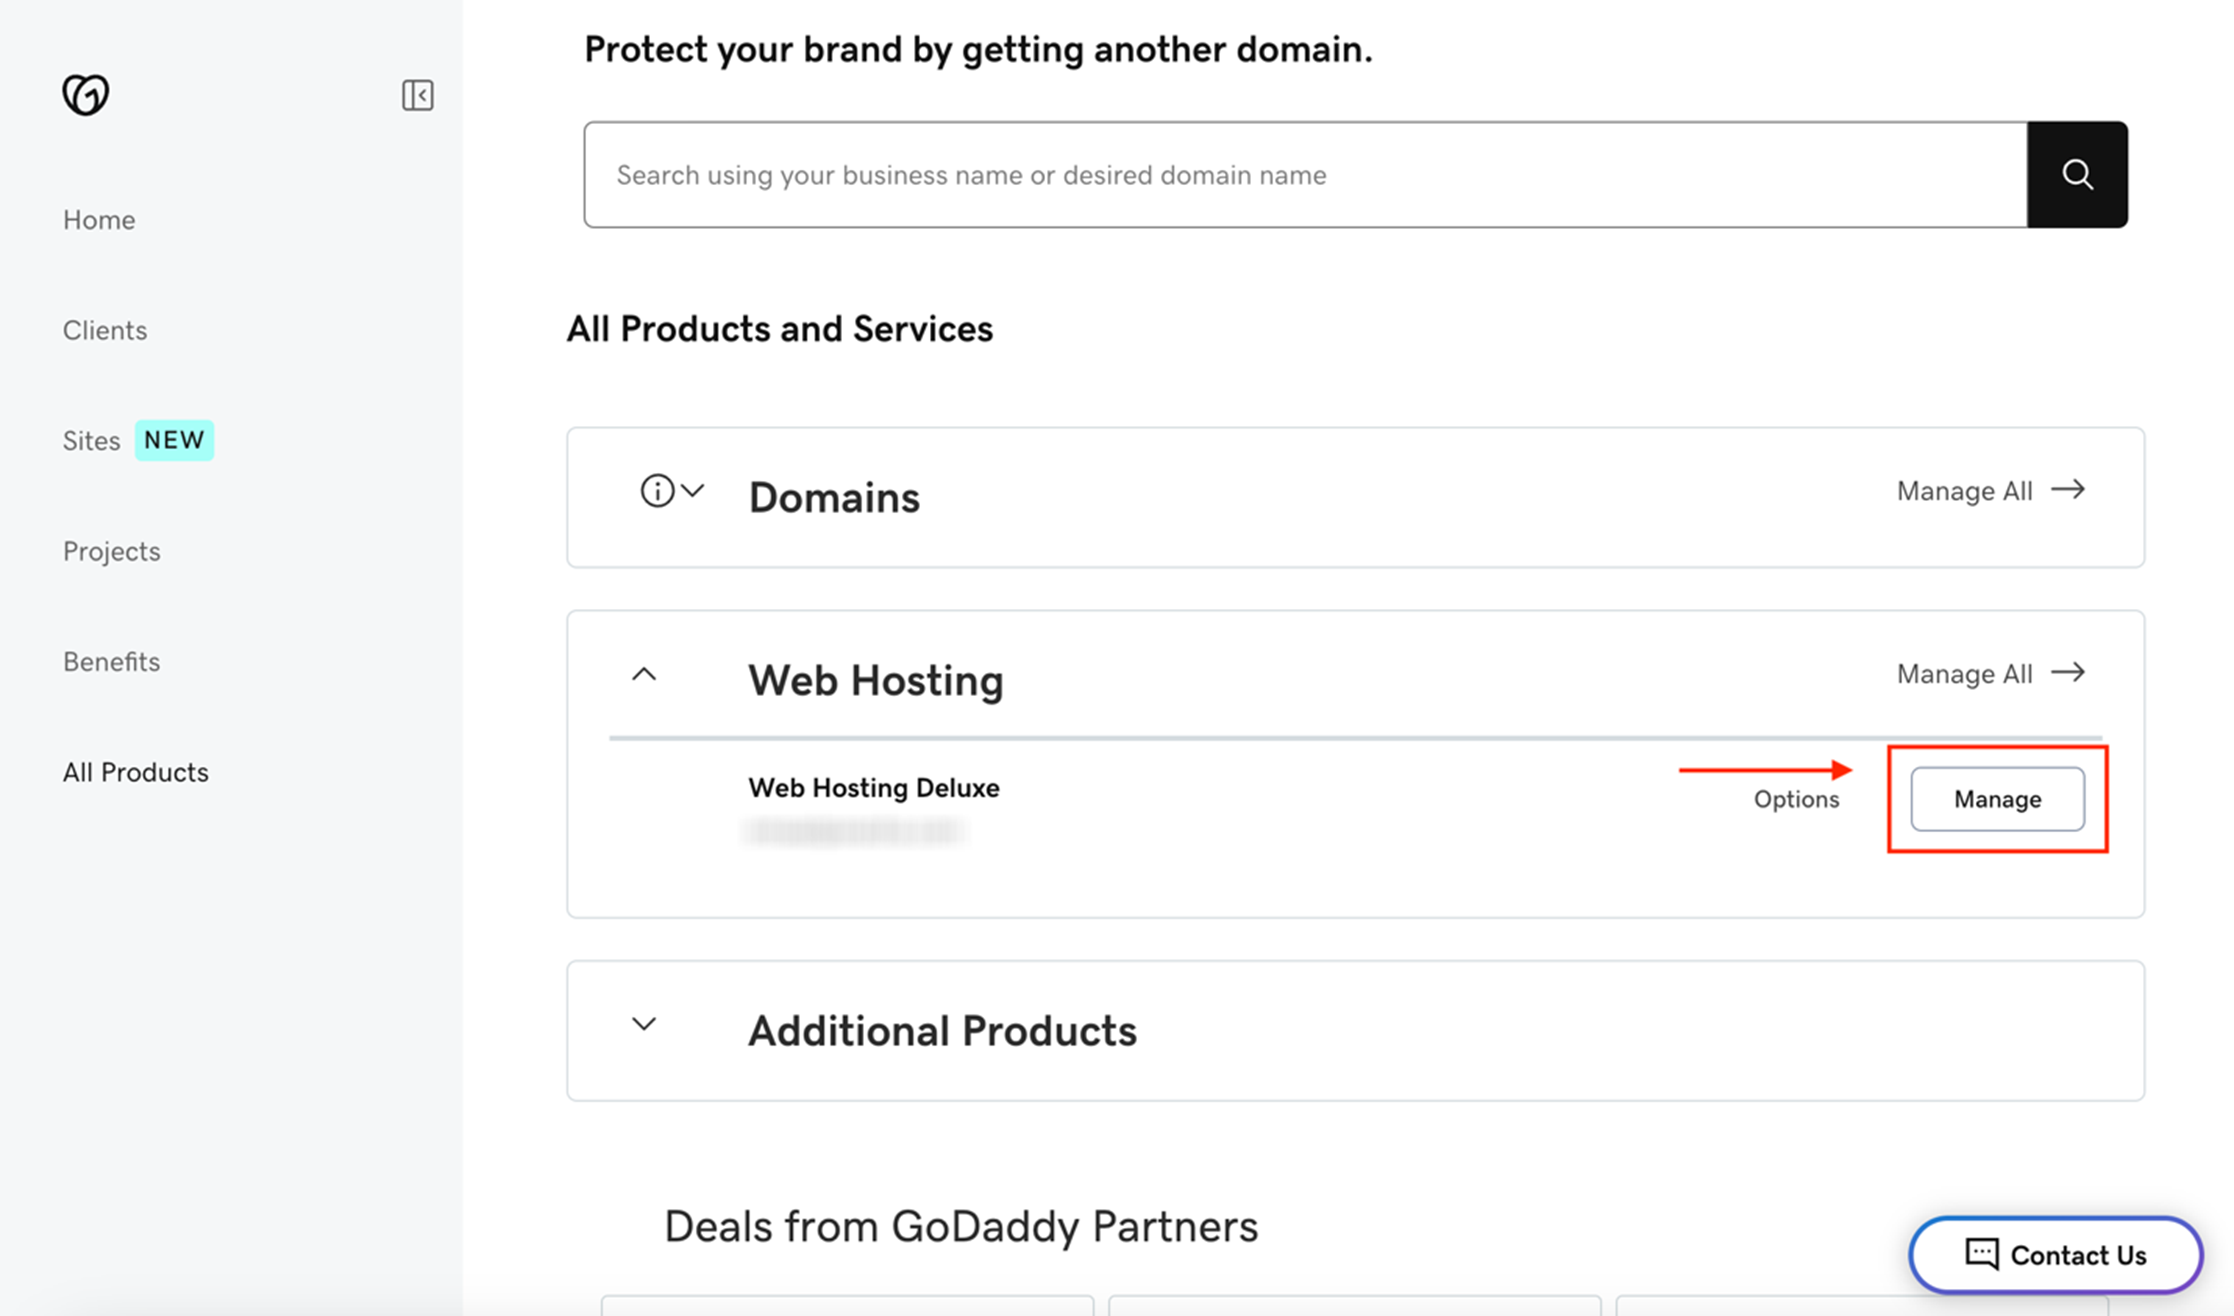
If you have a plan from GoDaddy, you can also access cPanel directly from your GoDaddy account.
To do so, log in to your GoDaddy account and go to My Products.
Scroll down to Web Hosting and click Manage for the hosting you want to access.
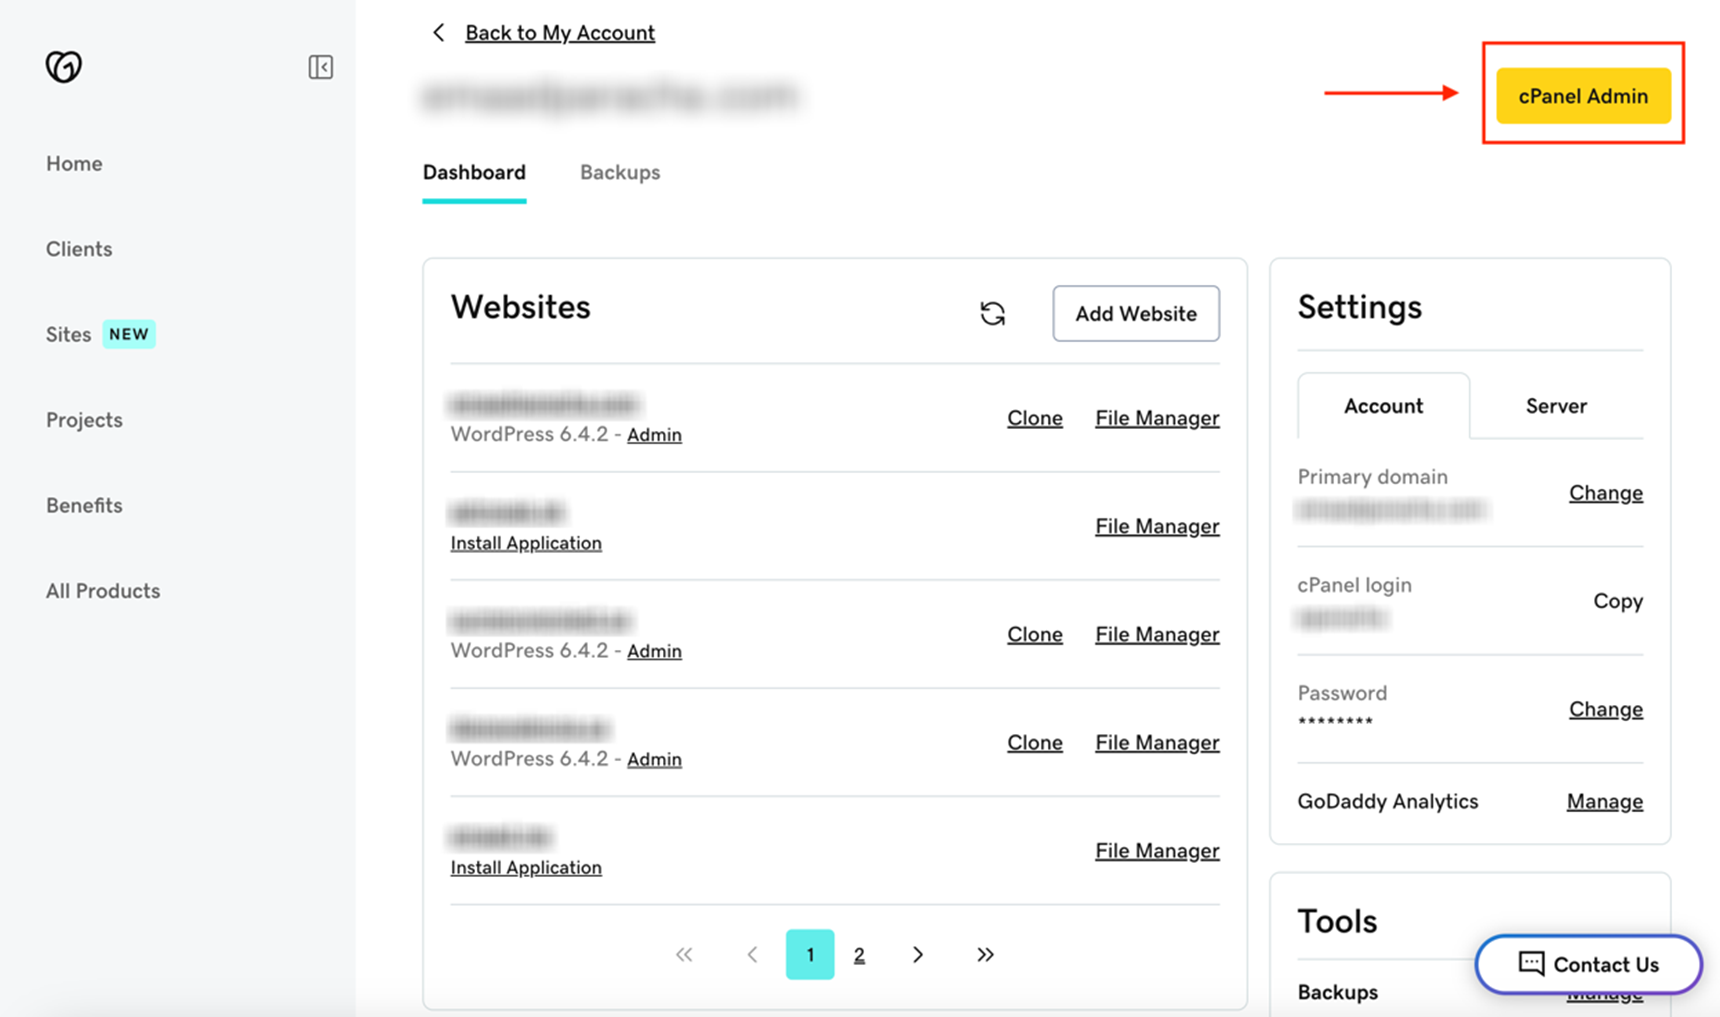
Once there, you can edit your cPanel username and password. To access cPanel, click the yellow “cPanel Admin” button on the top right.
Ensure you know your cPanel username and password, use strong and unique passwords, and keep them secure.
Auto-installing WordPress with cPanel
Most web hosting services, including GoDaddy, make it easy to install WordPress using applications like Softaculous and Installatron from your cPanel dashboard.
Comparing Softaculous and Installatron for WordPress installation
Softaculous and Installatron are both powerful application installers available in cPanel that simplify the WordPress installation process.
- Ease of use for beginners: Both installers offer intuitive, user-friendly interfaces that allow beginners to install WordPress with just a few clicks. Softaculous provides a vast library of applications and straightforward installation prompts, making it ideal for users new to website management.
- Advanced options for experienced users: Installatron caters to more experienced users by offering advanced features such as multi-site management, detailed configuration settings, and enhanced backup options. This allows developers and those with specific needs to customize their WordPress installations extensively.
By understanding the strengths of each installer, you can choose the one that best aligns with your technical expertise and project requirements, ensuring a smooth and efficient WordPress setup.
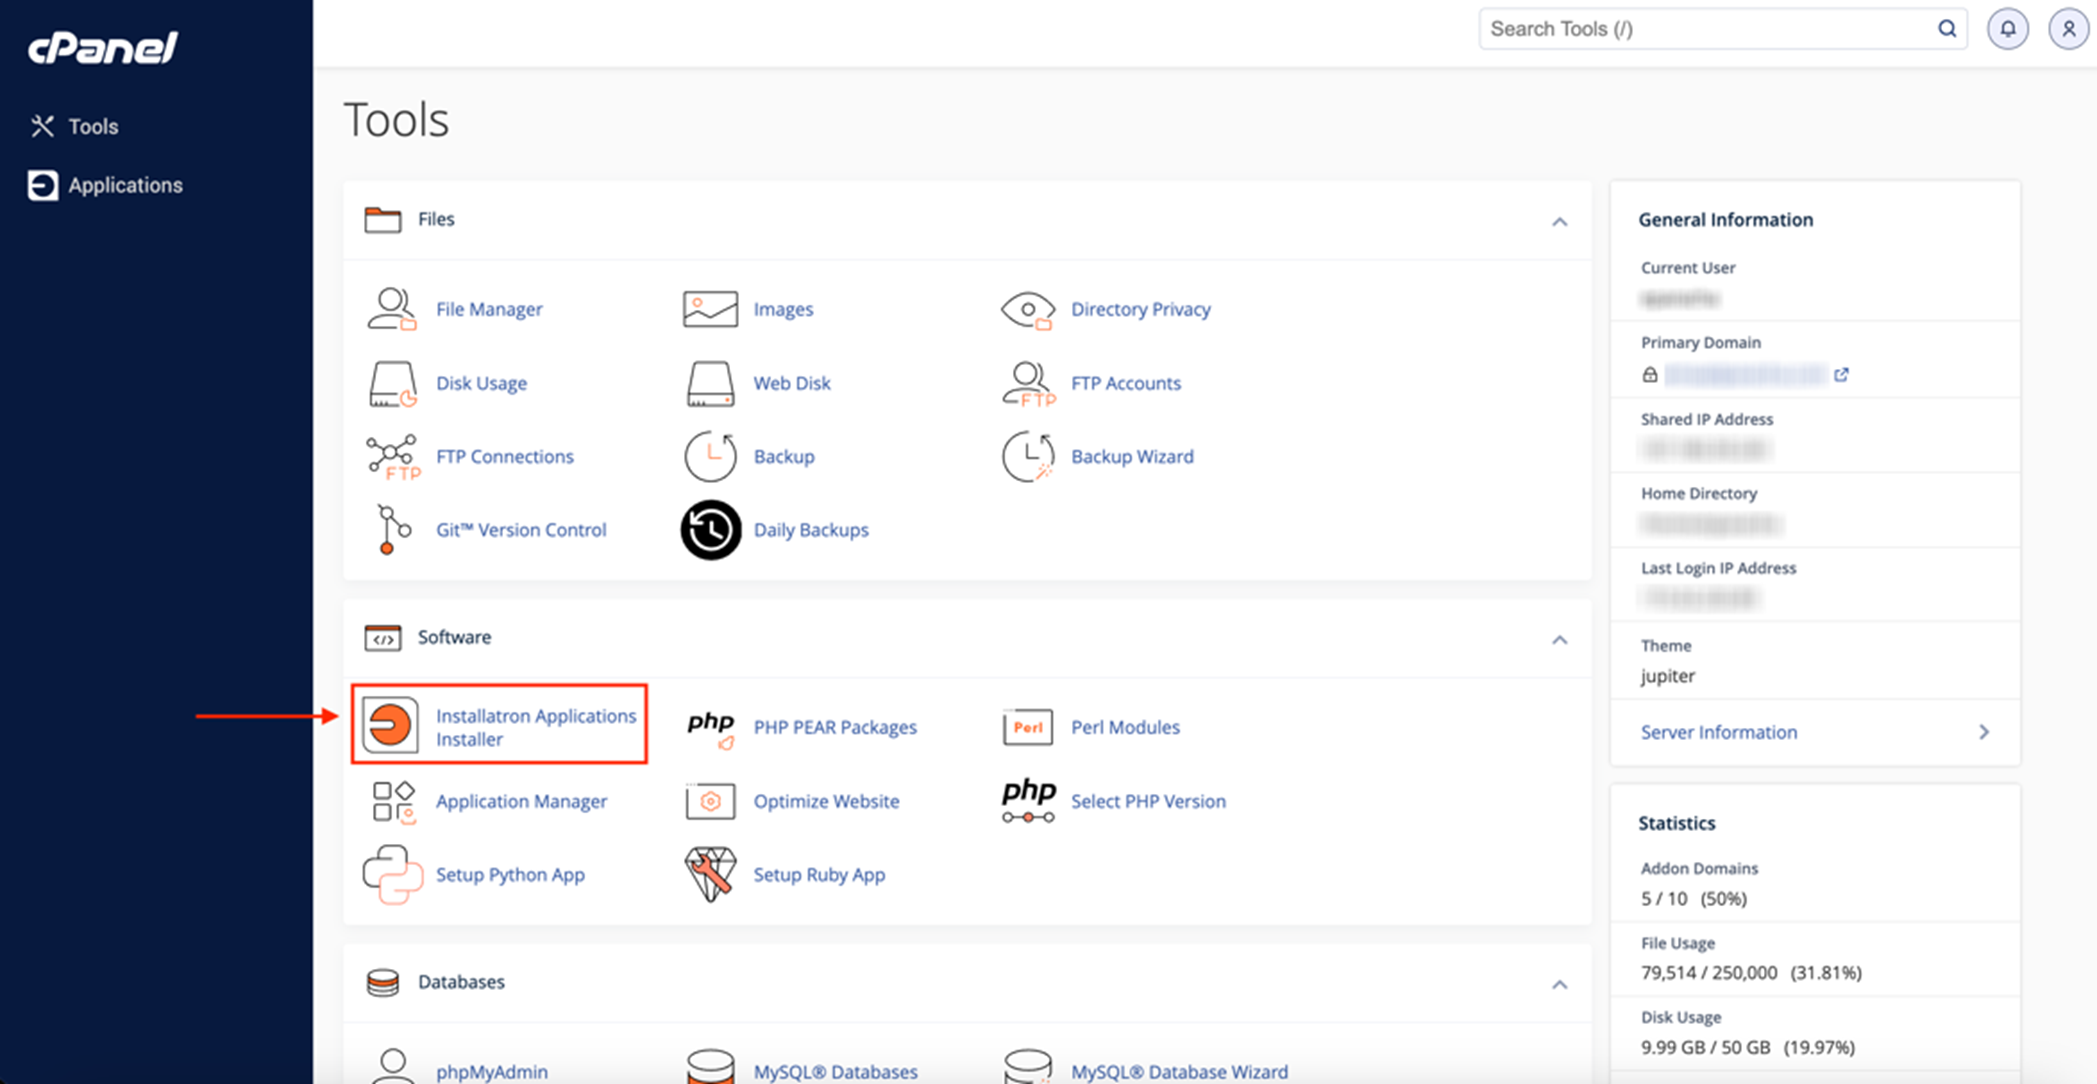
Here are the steps for an easy install with an application installer like Softaculous or Installatron:
1. Log in to cPanel
Refer to the above instructions to log in using your preferred method.
2. Launch the Installer
Search for “Installer” or navigate to the Software section in the cPanel dashboard. Click on the “Application Installer” app. On GoDaddy servers, this could be either Softaculous or Installatron depending on your hosting plan.
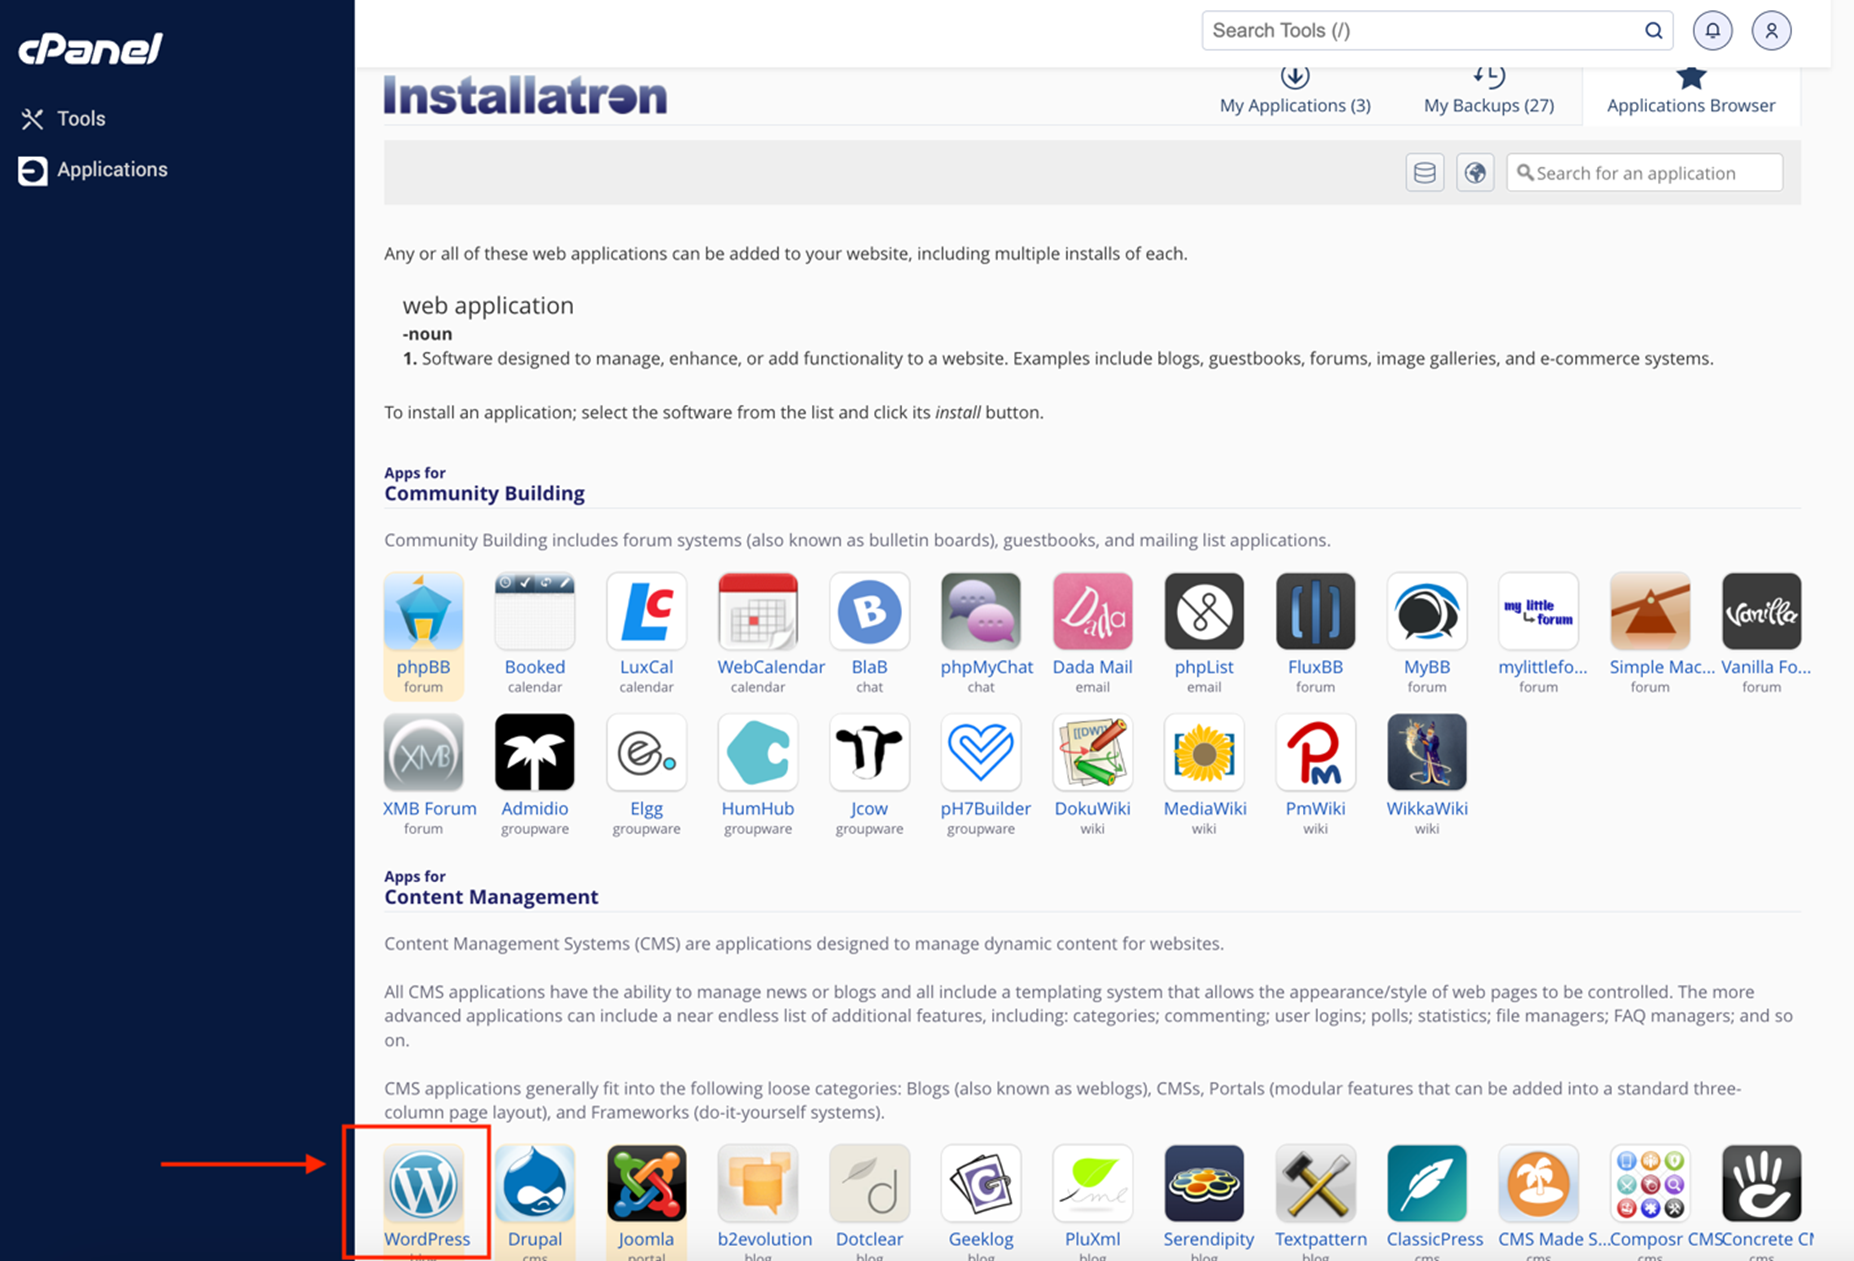
3. Select WordPress
Once the installer loads, either click the Applications Browser tab or search for WordPress and click on the WordPress icon.
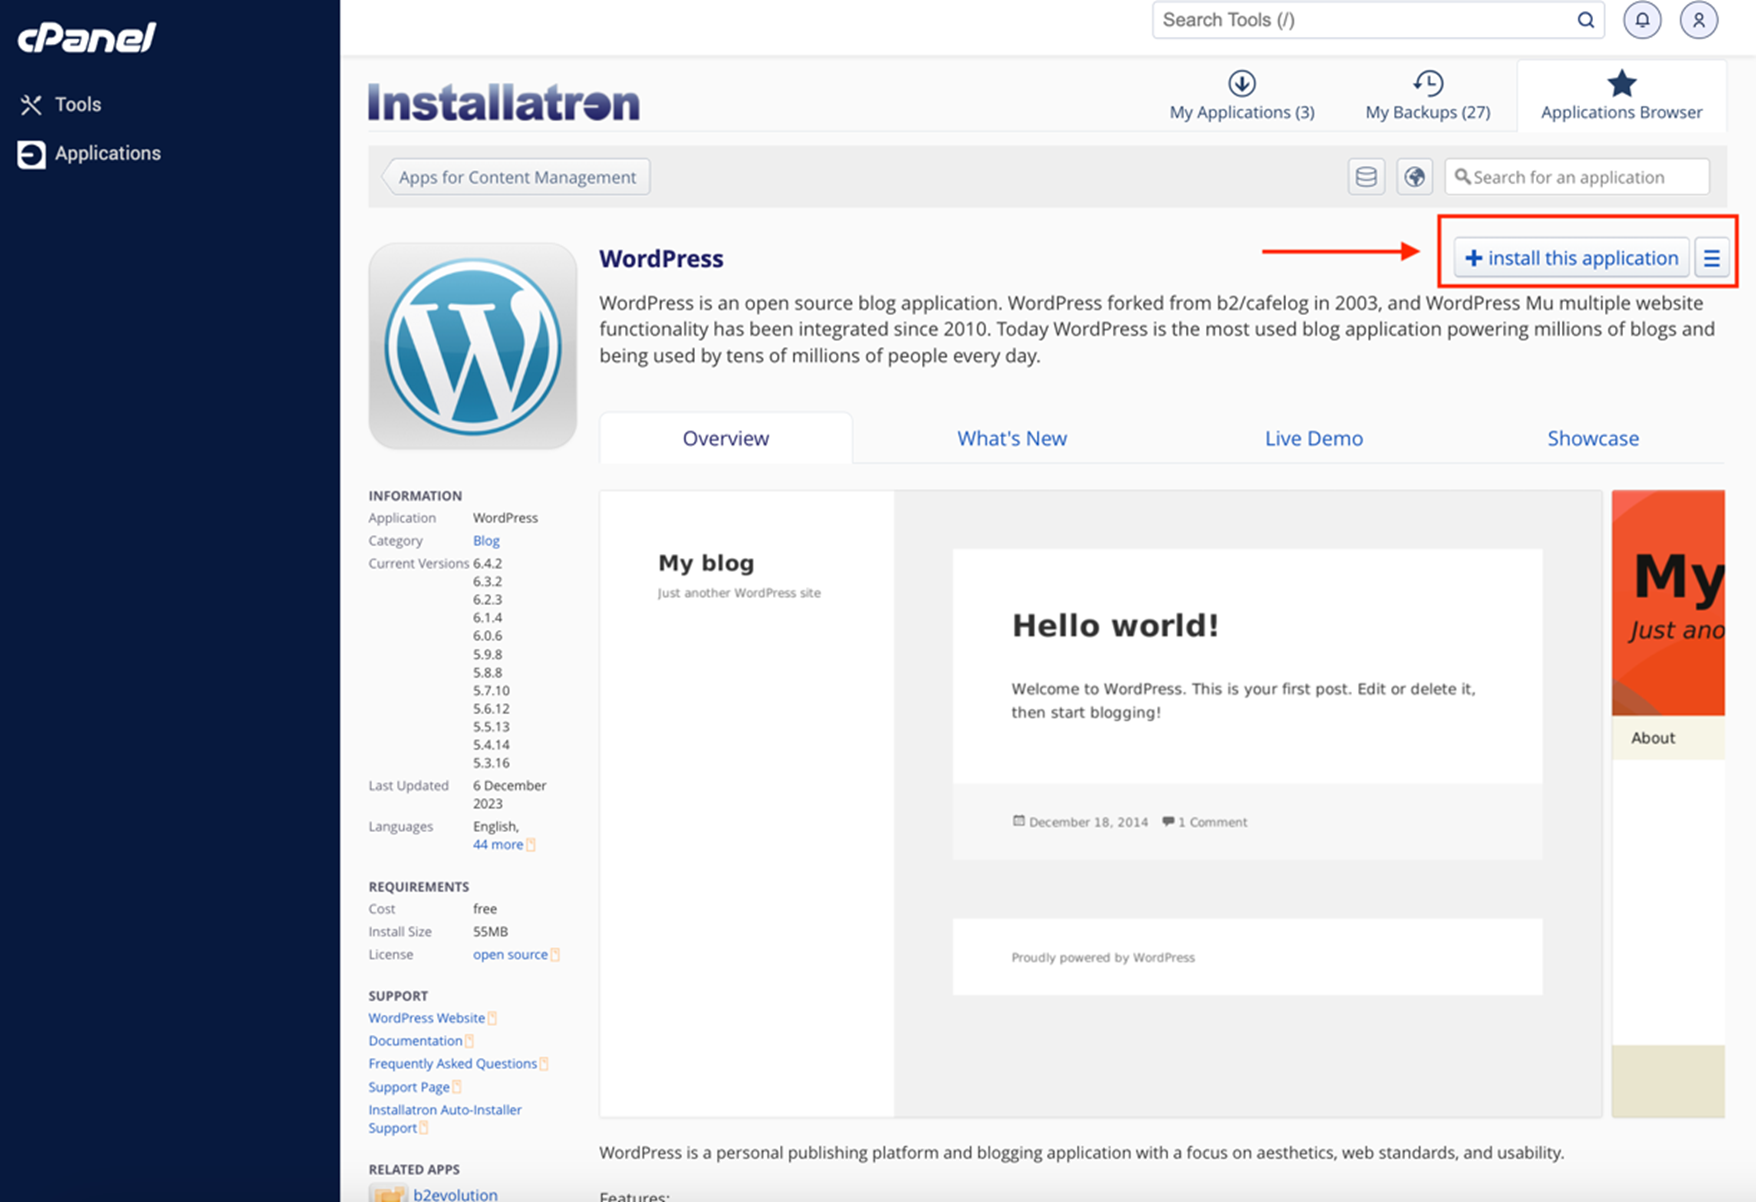
4. Confirm install options
On the WordPress application page, verify the version and size. Confirm it’s the version you want to install (usually the latest) and click “Install This Application.”
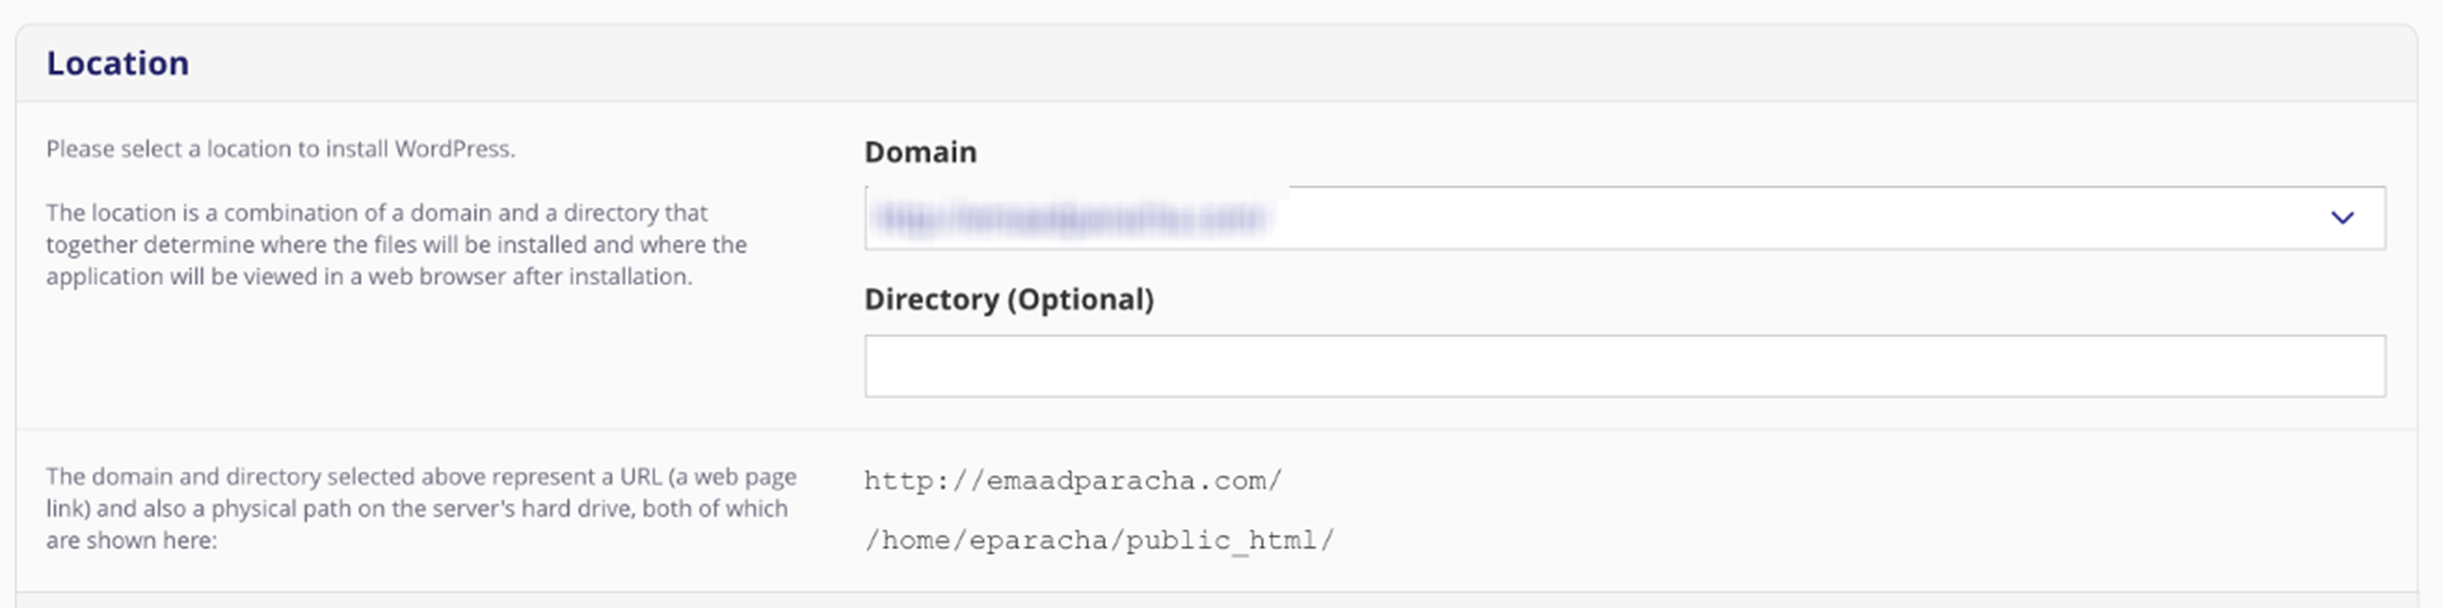
5. Adjust default settings for installation
Configure the following settings for WordPress installation on your server:
a. Location: Choose the domain and directory for WordPress. Leave it blank for the root directory.
b. Version: Select the desired version. It’s recommended to install the latest version for optimal security. You can also enable automatic updates for WordPress and plugins.
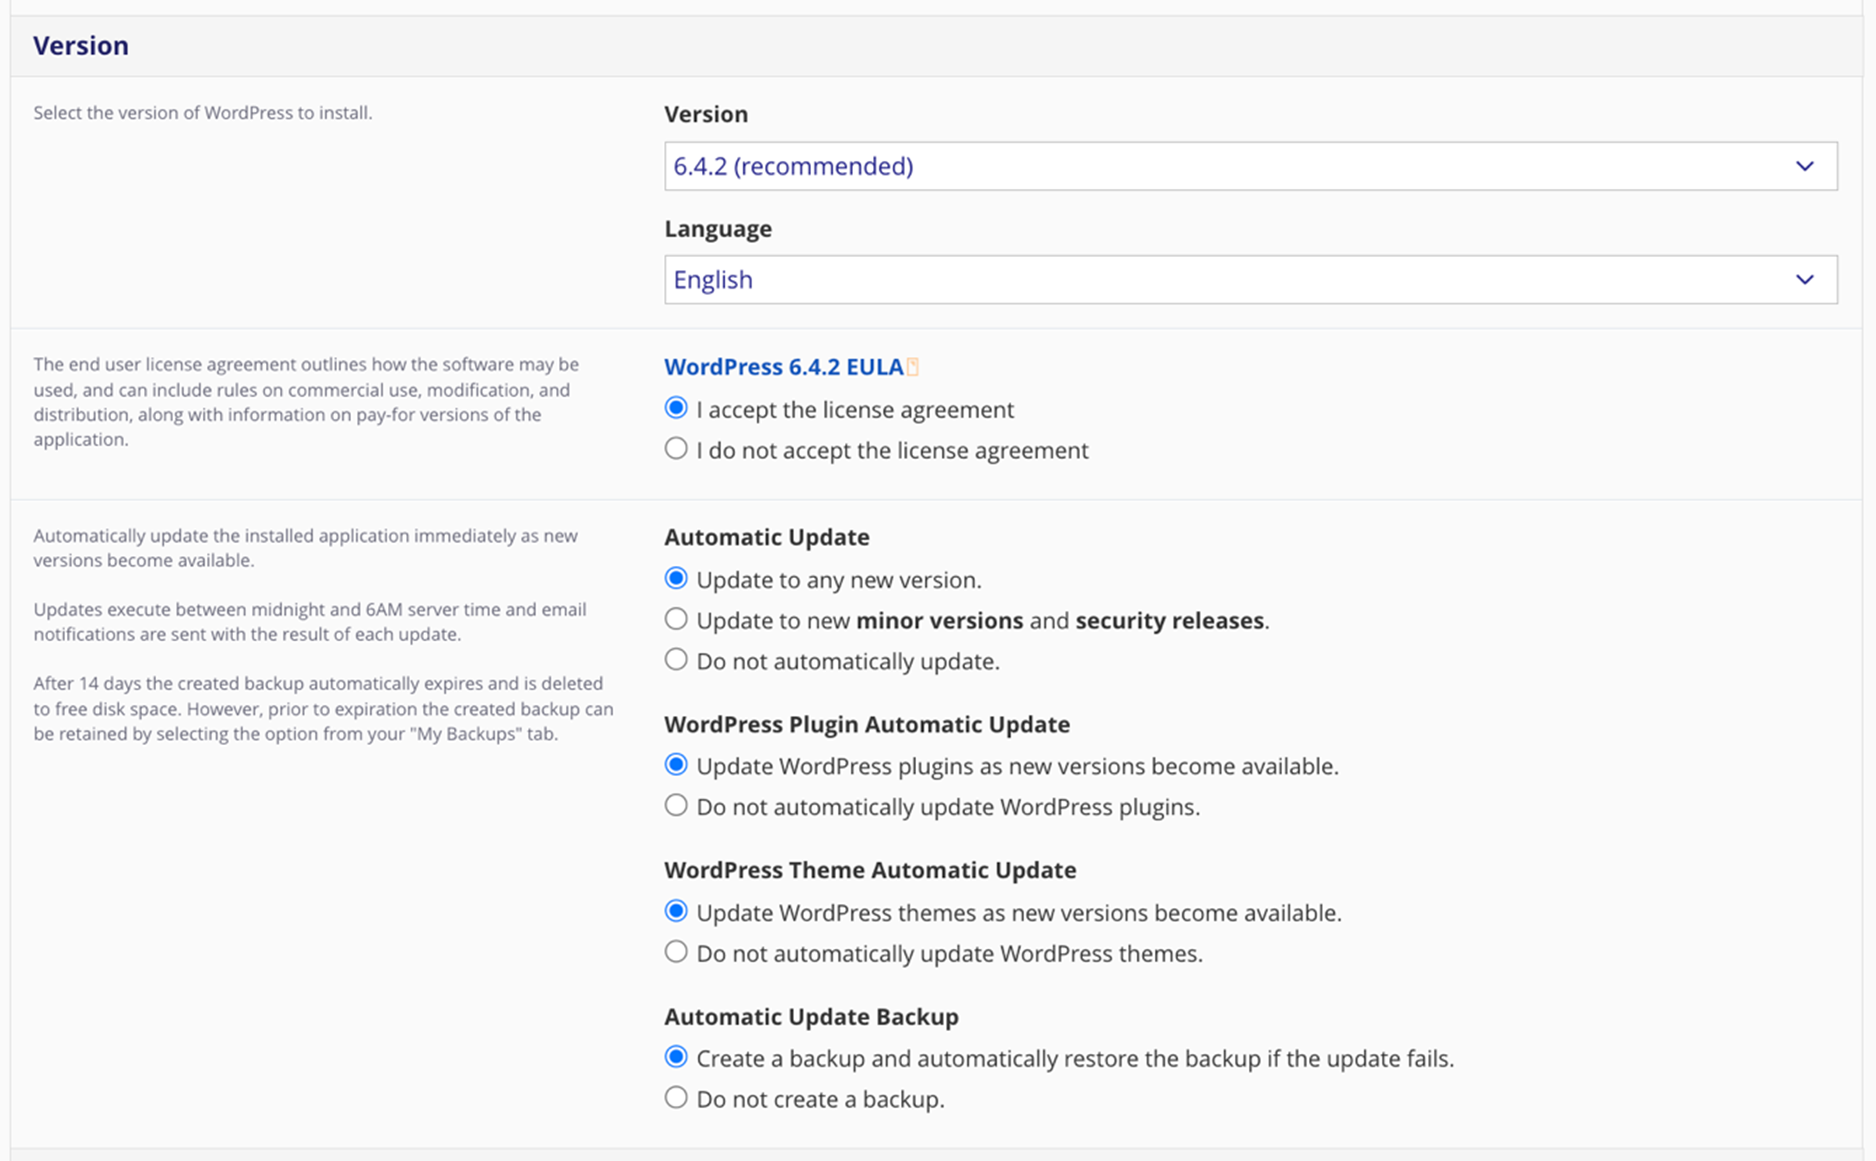
c. Settings: Set the Administrator username, password, email, website title, and tagline. Ensure you use a strong, unique password and a username other than `admin` to enhance security.

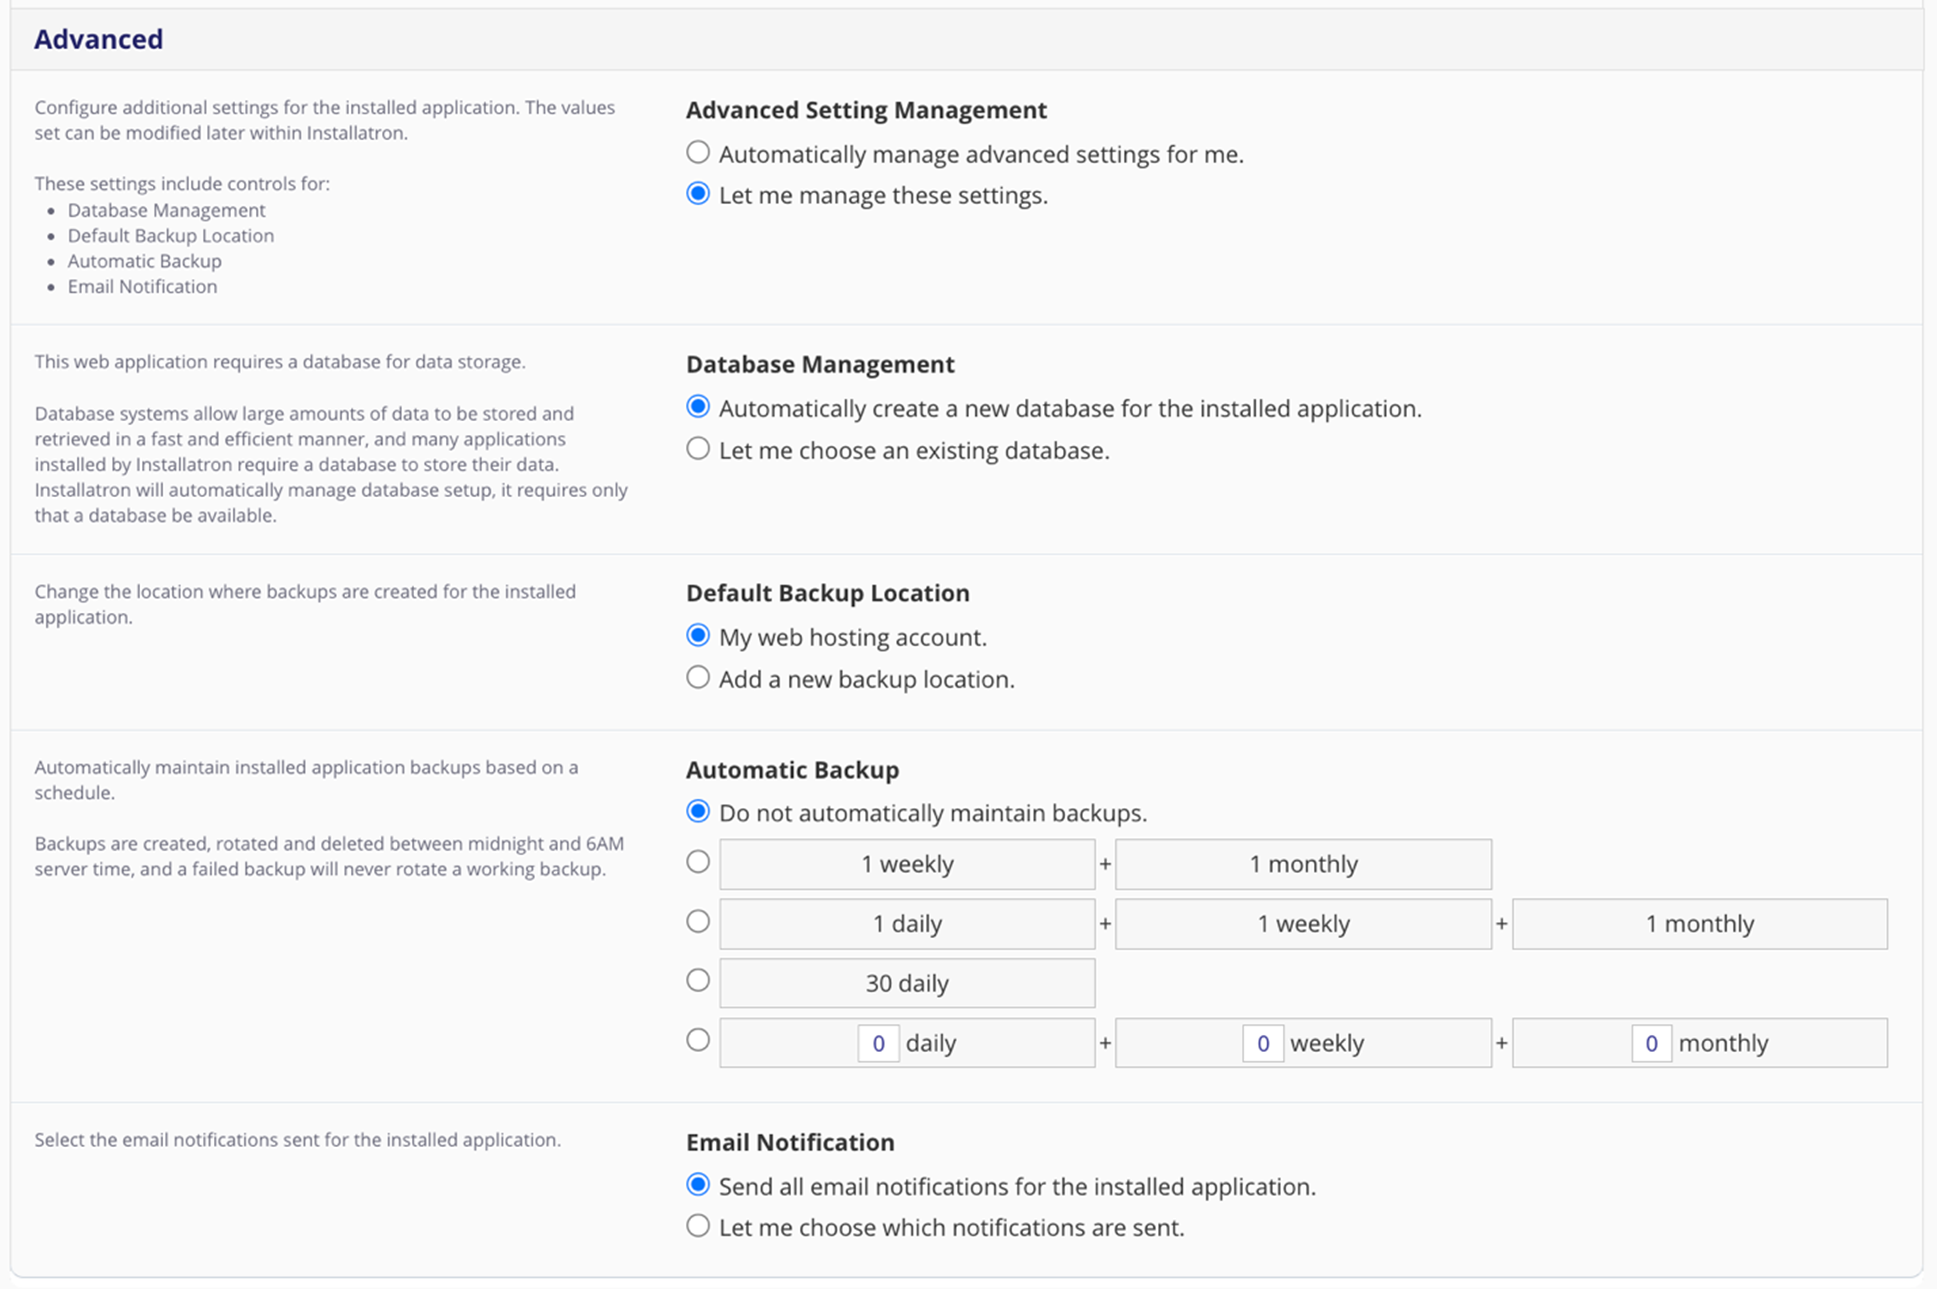
d. Advanced: Opt to keep default settings or manage your own database, backups, and email notification settings.
Once reviewed, click “Install” and wait for WordPress to install. While installing, you’ll see a progress screen.

After installation, refresh the page if necessary.
Click the link ending with `/wp-admin` to access your WordPress site and log in with the credentials you set.

It’s that simple!
But what if you want to manually install WordPress?
Manually installing WordPress with cPanel
If your web host doesn’t have an installer capable of installing WordPress, or you want to install a specific WordPress version not available in the installer, you can do it manually.
This process is more technical but entirely doable! Follow these steps:
1. Get WordPress files
Download the latest copy of WordPress (or a specific version) from https://wordpress.org/download/ to your computer.
2. Upload the files
Upload the WordPress files using the cPanel File Manager, an FTP program like FileZilla, or via SSH.

- Uploading via cPanel File Manager: Go to your cPanel dashboard, click on File Manager, and navigate to the desired directory (root or subdirectory). Upload the WordPress zip file, extract it, move the contents to the target directory, and delete the unnecessary folders and zip file.
- Uploading via FTP: Follow a guide on FTP to upload items to your server.
- Uploading via SSH: Use SSH for secure, command-line file management.
Setting Secure File Permissions: After uploading, set secure file permissions to enhance security. In cPanel’s File Manager, select all WordPress files, right-click, choose File Permissions, and set directories to `755` and files to `644`.
3. Create a MySQL database and user
Go back to cPanel and click the MySQL Database Wizard icon in the Databases section.
Follow the wizard to create a new database and user:
- Create a Database – Enter a database name and click Next Step.
- Create Database Users – Enter a username and password, then click Create User.
- Add User to the Database – Select All Privileges while unchecking the Drop privilege to prevent accidental database deletion and maintain database integrity. Then, click Next Step.
Creating a separate MySQL database for each WordPress installation is crucial for enhancing security and efficient data management. Isolated databases prevent cross-contamination between different sites and simplify database administration. Make a note of the database name, username, and password for the next step.
Using a Custom Database Prefix: For enhanced security, use a custom table prefix instead of the default `wp_`. In the `wp-config.php` file, locate the `$table_prefix` variable and change it to something unique like `wpabc_`.
Ensure there are no spaces before or after your database name, username, and password to prevent connection errors.
4. Configure wp-config.php
The `wp-config-sample.php` file contains the database information needed by WordPress.
To configure it:
- Navigate to the public_html folder in File Manager.
- Click Settings, check “Show Hidden Files (dotfiles)”, and click Save.
- Locate `wp-config-sample.php`, right-click, and select Rename to `wp-config.php`.
- Right-click the new `wp-config.php` file and select Edit.
- Replace `database_name_here`, `username_here`, and `password_here` with your database details.
Setting Secure File Permissions in wp-config.php: Additionally, set secure file permissions for `wp-config.php` by setting its permissions to `440` or `400` to prevent unauthorized access.
Enhancing WordPress security during configuration
To further secure your WordPress installation, make sure to use strong, unique passwords for both your WordPress admin account and the database user. Avoid using default usernames like `admin`, as they are common targets for malicious attacks.
Implementing security measures such as enabling two-factor authentication (2FA) through GoDaddy’s security features can add an extra layer of protection to your site.
5. Run the installation
Open a new browser window and enter your domain to run the installation script.
Depending on where you installed WordPress, you’ll be redirected to one of the following URLs:
- If installed in the root folder: https://example.com/wp-admin/install.php
- If installed in a subfolder: https://example.com/yoursubfolder/wp-admin/install.php
Replace `example.com` with your actual domain name.
6. Complete the installation
Once you access the correct WordPress URL, you’ll see the setup page. Select your preferred language and click Continue.
On the welcome page, fill out the following fields:
- Site Title – This can be changed later.
- Username – Choose an admin username other than `admin` for security reasons.
- Password – Use a strong, unique password. The strength indicator will show its security level.
- Your Email – Enter an email address where login information will be sent.
- Search Engine Visibility – Leave unchecked to allow your site to appear in search results. Check this box if you don’t want your site indexed before it’s ready.
Tips for setting your site title and tagline for better branding and SEO
Let’s look at a few ways to make sure your site grabs the attention it deserves:
- Choose a unique and memorable site title: Your site title should reflect your brand and be easily recognizable to your audience.
- Incorporate relevant keywords: Including keywords related to your business can improve your site’s search engine ranking and make it easier for potential visitors to find you.
- Craft a clear and descriptive tagline: Your tagline should succinctly describe what your site or business does, aiding both branding and SEO.
- Keep it concise: Both your site title and tagline should be concise and to the point, ensuring they are easily readable and impactful.
Once you’re done, click the Install WordPress button, and you’ll see the final screen confirming the installation.
It will display the username you chose and a placeholder for your password.
Click the Log In button to access the WordPress Admin Dashboard and start building your site!
Implementing regular security measures
After installation, it’s super-important to regularly update WordPress to the latest version to protect against vulnerabilities. GoDaddy’s hosting environment supports automatic updates, but it’s good practice to verify that your site is always running the latest software.
Choosing a WordPress installation method
Automated installers in cPanel provide a quick and user-friendly setup, ideal for beginners seeking simplicity and efficiency.
They save time and minimize the risk of errors.
On the other hand, manual installations offer advanced users and developers greater customization and control, accommodating specific configurations, security settings, and handling special or beta versions.
While more involved, manual installations cater to users with specific project needs.
Choose the method that best fits your requirements, though automated installers typically suffice for most users.
Troubleshooting WordPress issues in cPanel
It happens to all of us: You create a new website, make a few changes, add a new plugin, refresh the site, and suddenly your site is down.
You might encounter the White Screen of Death (WSOD) or an Internal Server Error.
Don’t panic – chances are it’s something you can fix easily.
With some troubleshooting knowledge, you can resolve common WordPress errors using cPanel.
Here are some of the most common WordPress errors and how to fix them using cPanel.
Restore a site backup via cPanel
If recent changes have caused issues on your website, restoring a backup can quickly revert your site to a previous working state. Follow these steps to restore a site backup using cPanel:
- Log into cPanel: Use your preferred method to access cPanel as described above.
- Navigate to the backup section: In the cPanel dashboard, locate the Files section and click on the Backup or Backup Wizard icon.
- Initiate the restoration process: In the Backup section, choose the Restore option.
- Select the backup type: You can restore a full website backup or specific components like the home directory, databases, or email accounts. For restoring your website, select Home Directory and/or MySQL Databases depending on what was backed up.
- Upload the backup file: If your backup is stored locally, use the Upload option to select and upload the backup file from your computer. If the backup is already on the server, choose it from the available backups listed.
- Confirm the restoration: Follow the on-screen prompts to confirm and start the restoration process. This may overwrite existing files and databases, so ensure you have the correct backup selected.
- Wait for completion: The restoration process may take a few minutes. Once completed, you will receive a notification confirming the successful restoration.
- Verify your website: After restoring, visit your website to ensure that it is functioning correctly and that the issues have been resolved.
Note: Always ensure you have the latest backup before making significant changes to your website. Regular backups are crucial for quick recovery in case of errors or issues.
Using cPanel to enable debugging in WordPress
Enabling debugging in WordPress creates logs with detailed messages to help pinpoint errors.
To enable debugging via cPanel, follow these steps:
- Log into cPanel.
- Click on File Manager.
- Navigate to your website’s home folder.
- Select the `wp-config.php` file and click Edit.
- Locate the line `define("WP_DEBUG", false);`.
- Change it to `define("WP_DEBUG", true);`.
- Save your changes.
- Reload your website in the browser.
Debugging messages should now be visible on your site.
Remember, not all debugging messages are equal. There’s a difference between error messages and warning messages.
Learn more about debugging in WordPress in the official WordPress Codex article.
Troubleshooting site and cPanel access issues
If you’re experiencing issues accessing your website or cPanel, follow these troubleshooting steps to identify and resolve the problem.
Verify your internet connection
Before assuming the issue lies with your website or hosting, ensure your device is connected to the internet.
- Check connectivity: Open a web browser and visit other websites to confirm your internet connection is active.
- Restart your router: If you’re experiencing connectivity issues, try restarting your router or modem.
Examine DNS records
Incorrect DNS settings can lead to access problems with your website. Here’s a few things that can help get past any issues:
- Access DNS management: Log in to your cPanel and navigate to the DNS Management section.
- Verify DNS records: Ensure that your domain’s DNS records, such as A records and CNAME records, are correctly configured and point to the right server IP addresses.
- Update DNS settings: If necessary, make corrections to your DNS records to restore proper access.
Test firewall or security software
Security settings can sometimes block legitimate access to your website or cPanel. Here are a few things you can check:
- Disable firewall temporarily: Temporarily disable any firewall or security software on your computer to determine if it’s causing the access issue.
- Whitelist necessary URLs: Add your website’s URL and cPanel login URL to your firewall’s whitelist to prevent future access blocks.
Internal server error
The “500 Internal Server Error” message indicates a server-side problem without specific details. Common causes on a WordPress site include a corrupted .htaccess file or PHP memory limit issues.
To resolve these issues:
- Rename the .htaccess File: Follow the steps above to rename the `.htaccess` file.
- Increase PHP Memory Limit: If renaming `.htaccess` doesn’t help, increase the PHP memory limit.
If neither resolves the issue, the problem may be due to a plugin or theme malfunction. Follow the troubleshooting steps for WordPress Plugin Problems and WordPress Theme Problems.
As a last resort, ensure you have regular backups (configurable in Installatron) to restore your site to a working state and identify what went wrong.
Internal PHP memory limit
WordPress installations may encounter memory issues, leading to errors like "Fatal error: Allowed memory size exhausted." To increase the PHP memory limit via cPanel:
- Log into cPanel.
- Click on File Manager.
- Navigate to your website’s home folder.
- Select the `wp-config.php` file and click Edit.
- Locate the line `/* That`s all, stop editing! Happy blogging. */`.
- Add the following line just before it: `define("WP_MEMORY_LIMIT", "256M");`.
- Save your changes.
Reload your website to see if the error is resolved.
Note that increasing the memory limit may not fix the underlying issue, such as a memory-intensive plugin or theme function.
Review your server logs to identify the cause.
Increase WordPress file upload size
If you encounter the "Exceeds maximum upload size for this site" message while uploading large files, you can increase the upload size limit through cPanel:
- Log into cPanel.
- Scroll to the Software section and click on Select PHP Version.
- Click the link to Switch to PHP Options.
- Modify the following settings:
- post_max_size` – Must be larger than `upload_max_filesize`.
- `upload_max_filesize` – Set to the desired maximum upload size.
- ‘memory_limit` – Should be larger than `post_max_size`.
- Save your changes.
Alternatively, you can adjust these settings by creating or editing a `php.ini` or `.user.ini` file, but using cPanel is simpler.
The bottom line
cPanel is a robust hosting control panel with numerous features.
While it’s too extensive to cover everything in this article, you can explore more about cPanel on their official YouTube channel or consult the cPanel documentation.
For further assistance, visit GoDaddy Hosting Help.
cPanel and WordPress work seamlessly together—use them independently or in tandem to enhance your website management experience.