
Let’s talk about how to create great-looking pages that highlight products and sales on a WooCommerce website — barebones, no artificial flavor, color or preservatives. We’ll only be using Wordpress, WooCommerce, the WooCommerce Storefront theme and its default widgets.
And yes, it can certainly be made to be beautiful.
Let’s go!
All the stuff you need to create beautiful WooCommerce pages
Your clients may have different kinds of sales throughout the year where they want to highlight specific items. Holidays, industry-specific events, random sales, you name it. They may also want to have a dedicated page where items are always on sale for their customers to find the best bargains all year round.
Pages may need to be created specifically for certain types of email or newsletter campaigns. And let’s not forget the all-important homepage.
Before we begin you’re going to need at the very minimum a WordPress website with WooCommerce installed. You’ll also need a few products ready to display. When you get a moment check out my post Top 4 WooCommerce tips & tricks for better product visibility, which will help you organize and optimize products for specific presentations.
Pro Tip: GoDaddy’s Managed Hosting for WooCommerce comes with more than 40 premium WooCommerce extensions. Many of them I’ve used for real clients who paid an annual subscription of up to $60 or more — per extension. Save your ecommerce clients some money and give yourself more tools to work with for just the cost of hosting!
Aim high for inspiration
When visualizing an online WooCommerce store’s appearance, you might look to sites like Amazon or Ebay for inspiration. There’s absolutely nothing wrong with this. Inspiration, that is — not to be confused with plagiarism, just to clarify (insert smiley emoji).
These are examples of some of the largest shopping sites on the planet, after all.
Not to mention, they pay a pretty penny for a team of developers (or multiple teams) to not only make their sites look great, but to optimize them to convert new and returning customers into buyers. I don’t have that kind of budget, and you probably don’t either. We can, however, get very close (appearance, not budget) though!
The way they do it isn’t as much about design as it is about content. They show customers products based on categories, features, attributes, and more — just like we’re going to do!
Think about the different ways visitors might shop when trying to find the perfect product. What’s important? Size? Color? Brand? Features? Put it out there for them. Make it low-hanging fruit. By doing so, you not only make the page’s presentation more interesting, you make it more compelling and useful.
Look on Amazon. Look on Ebay. Get inspired. Not by the fancy design or animations, but by the content.
The StoreFront theme
There are a multitude of free and premium WordPress themes available online, even in the WordPress themes repository. In the spirit of keeping with a more vanilla approach, I’ll be using the free theme from WooCommerce, called Storefront, which is developed by the team behind WooCommerce.
With Storefront, you have the option to purchase the Storefront Extensions Bundle if more features are needed, though the Storefront theme itself is free. We’ll be using the theme without the paid bundled extensions here.
The Gutenberg editor
One could use a number of popular page-building plugins, but I’ll be using the WordPress Gutenberg block editor to create my WooCommer pages. The Gutenberg editor is the default built into WordPress. Gutenberg is a block-based editor, and it is completely free, though there are paid third-party add-ons available that will extend features.
Everything is trending block-based. A quick search online will show you this is “what’s next.” Getting familiar with Gutnberg now is going to give you an edge down the line. And hey, why not? It's free.
Why Gutenberg and Storefront?
The reason I’ve chosen Gutenburg and Storefront for our examples is there is no price barrier to start building. I also want to demonstrate that you can create great-looking WooCommerce pages without spending a lot of money.
Because Gutenburg is developed by WordPress and Storefront is developed by WooCommerce, they’ll both receive ongoing updates for quite some time to support the latest versions of WordPress.
When building for clients you can use this method to avoid paying for or charging for premium plugins. This really simplifies the relationship. If more features are needed, third-party plugins are available to enhance Gutenberg, and premium theme extensions can be purchased for Storefront.
The important thing to note here is that you can “wow” your clients “out-of-the-box,” so to speak.
Your clients will let you know if more features are needed, so don’t worry about cramming in everything you can out of the gate. Not to mention, if additional features are needed later, that’s more work you have an opportunity to do for them. If they don’t require more features you’re saving them money they don’t need to spend.
Everybody wins.
Basic layouts for creating WooCommerce pages
In the example below, I’m using WooCommerce’s free Storefront theme. I’ve imported a few products into a demo website. Under the WordPress reading settings, I’ve selected the WooCommerce default/shop page as the homepage for the demo site. I just want to show what the default layout for product listings in their purest form might look like.
Not very exciting, is it? So, how do we add some allure to our product layouts? Keep reading to find out!

A picture is worth a thousand words
Having the right-size product image is important! Getting the product images right from the start will go a long way in making your presentations look great. It only requires a little bit of tweaking before you create your WooCommerce pages.
If you’re working on an existing website you may have your work cut out for you if there are a lot of different-sized product images. You might even be stuck with deciding on a crop size in the WooCommerce product image settings. I’m not going to get into that here, as it would be too lengthy and the majority of people reading this are probably starting new projects.
Before going any further, you want to decide what size the majority of product images should be and try to keep them all the same or at least in perspective to the dimensions.
If the product image sizes don’t match the theme’s product image display, you could end up with strangely cropped or blurry images which kind of defeats the purpose of what we’re trying to accomplish here. You also don’t want a grid of lopsided products because some images are taller than others. Do you?
To ensure a nice looking grid of product images you can check the product page’s image container size. Start by creating a temporary product that does not have an image. Preview or view the product and mouse over the product image placeholder and click “inspect element” in Firefox or “inspect” in Microsoft Edge and Chrome. You should now see an indicator telling you the dimensions of that container.

Try to use multiples of that size. Personally, I tend to use multiples of three. So if the container is 300x300, your full-size product images might be 900x900 (300x3). The product page will show the scaled down image to fit the product image container by default. The full-size image is what people will see when clicking on or mousing over (zoom/magnifying) the product image to view it. By multiplying the product image size up based on the size of the image container, you ensure the image scales both up and down gracefully.
For most themes, it will also ensure the product thumbnails downscale gracefully for archive pages as well.
You could use rectangular images if you like. Just multiply your image to three times the size of the container, the same as you would a square image. For example, if the container is 300x300 but you want 300x450 you would want a full-size image of 900x1350.
Controlling product image display
Even if all of the product image sizes are the sam,e there’s still one more thing you can do to make sure WooCommerce isn’t cropping where it shouldn’t, and that your images look the way you envision them.
- From the WordPress admin dashboard, mouse over Appearance in the left menu, and then click Customize.
- In the left-hand menu, click WooCommerce.
- In the left-hand menu, click Product Images.
- Select Uncropped.
- Click Publish.
The steps above help especially if you want rectangle-shaped product images. It ensures important parts of the image aren’t being cropped out just to make them fit in the image container.
I know that was a lot to talk about concerning images, but we want things nice and uniform for our layouts.
Right? Now let’s get to the fun stuff.
Starting with the home page
There are so many things that can be done using Storefront and Gutenburg. Ultimately you’re the designer, so I’ll leave those bits to you. What I’m going to talk about here is how to use the features built into WordPress, Gutenberg and Storefront to curate great-looking store pages.
I will, of course, provide examples that should help get you started. What you do with them though is completely up to you. Don’t be afraid to experiment.
The first thing you’ll need to do is create a page and set it as the home page. I imagine most of you know how to do this already, but for the sake of completeness and for those of you who haven’t done this before, here’s a quick how-to.
- From the WordPress admin dashboard mouse over Pages, and then click Add New.
- Give your page a title where it says Add Title.
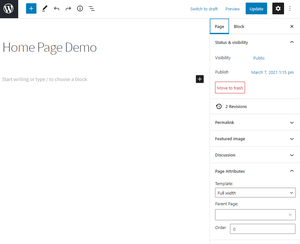
- With the Storefront theme you’ll probably want to select Full-width under Page attributes, which you’ll find in the right sidebar under the Page tab of said sidebar.
- Click the Publish button which you’ll find at the top of the right-hand sidebar.
- Click the black WordPress icon which you’ll find in the top-left corner to return to the main WordPress dashboard.
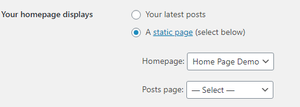
- In the left menu mouse over Settings, and then click Reading.
- In the section titled Your homepage displays, make sure A static page (select below) is selected.
- In the Homepage: dropdown box, select the title of the page you just created.
- Scroll to the bottom of that page and click the Save Changes button.
To make sure the page you just created is now actually set as the homepage you can just visit your domain. You should see the homepage with simply the title you created.
Now we’ll start editing that page. To do that just mouse over Pages in the left menu of the WordPress admin area and click All Pages. From there just mouse over the title of the page you just created and click Edit to begin editing the page.
One of the first things you might notice when viewing the homepage is the default sidebar on the right side of the page.
Every page you create in Storefront is going to have that sidebar if you haven’t changed the page attributes in the Gutenberg editor. While editing a page you’ll see a sidebar on the right with two tabs on the top — one that says Page and one that says Block.
So that we can remove the sidebar on the home page, make sure the Page tab is selected, and then toward the bottom of that sidebar you’ll see Page Attributes. In the Template: dropdown box select Full width then click the Update button in the top of the sidebar. We now have a blank canvas with which to work with.
Adding blocks
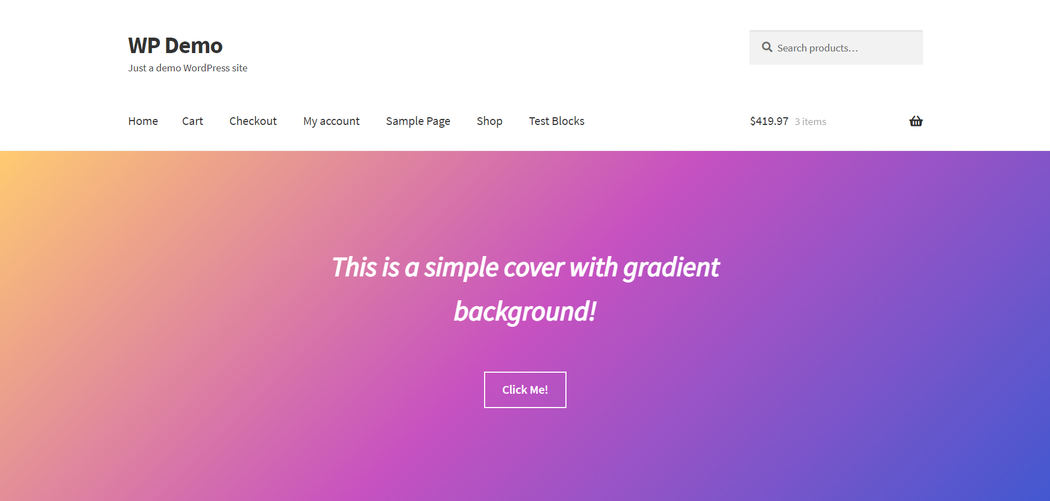
Now that we have a page to work with, it is time to start adding different elements to bring it to life. It is common to find large hero images and image sliders on the homepage of a shopping website, and Gutenburg makes this fairly simple with the Cover widget. The cover widget lets you create a section with some text, a background image, and other things.
Here’s how to add it:
- On the line that says Start writing or type / to choose a block, click the icon which you’ll see to the far-right side of this text.
- If Columns does not appear in the menu, just type Columns in the search box at the top of the menu, and then select Columns.
- Select the 100 box (100 represents 100% width).
- Click the + sign inside the rectangle (block) that was just placed on the page.
- Click the black Browse all button.
- In the sidebar that appears on the left, you’ll see the Blocks and Patterns tabs at the top. Click Blocks (if it isn’t already selected).
- Scroll down to the Media section and select Cover.
- You’ll now be greeted with a few default settings. If you want your cover to be full-width you’ll need to click the Change alignment icon in the block menu that appears in the top-right, and then select Full width.
- Choose a color or add an image via Upload or Media Library. Note the right sidebar that just opened with more options.
- Your cursor will autofocus to a Paragraph block. Type any text you want in here. Note the right sidebar that just opened with more options.
You can add a button (or other elements) to your cover. To add a button mouse over the bottom of the text you just created and click the Add block icon, type Buttons in the search box and select Buttons. Note the right sidebar that just opened with more options. This is where you’ll add the URL for your button and adjust the style of the button.
You’ve now created a Cover heading on the page using a full width column with two elements (blocks) — the Paragraph block and a button. Click Preview on the far-right side of the page (above the right sidebar) to see how it will look on the homepage.
To change settings for any block, just click on the block you want to edit. A block menu bar will appear on the top left of that block. Click the More Options icon located on the right side of the block menu bar.
Note that the right sidebar changes depending on the element you’re currently editing.
Having created the cover header you should have a good understanding of how to add columns and blocks to your page and how to adjust their settings.
There is a caveat here. The Storefront theme has a large gutter (spacing) just below the main menu. You can leave it as is if you like, but to get rid of it on the homepage we’ll need to add a bit of CSS. For those who want to remove this spacing you can copy the below CSS code and add it to WordPress > Appearance > Customize > Additional CSS.
.home.blog .site-header, .home.page:not(.page-template-template-homepage) .site-header, .home.post-type-archive-product .site-header {
margin-bottom: 0;
}
- From the WordPress Admin dashboard, mouse over Appearance in the left menu, and then click Customize.
- From the left sidebar, scroll down to Additional CSS and click it.
- Paste the CSS code you just copied into the code box.
- Click Publish
- Click the X on the top left of the left sidebar to exit the customizer.
So now that we have a header it’s time to add some products. This is where it gets fun.
Adding product sections
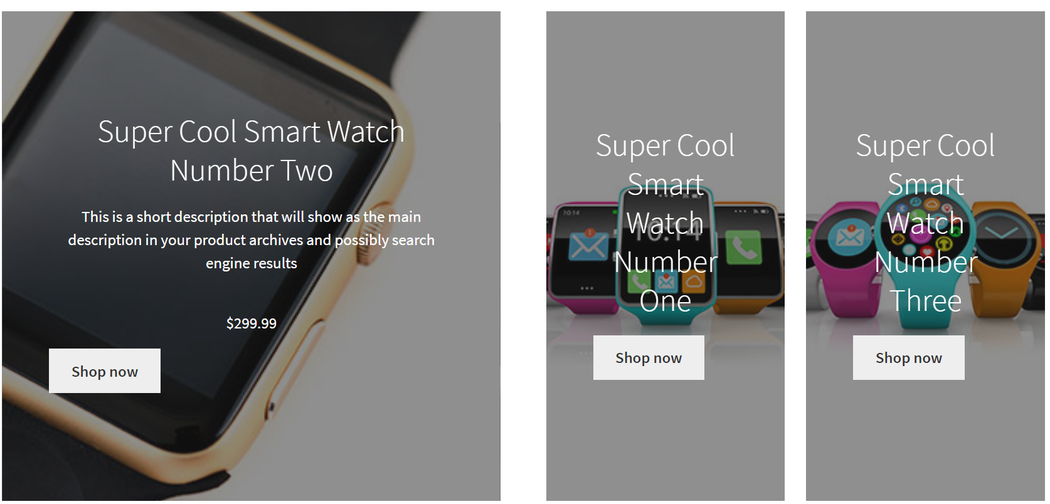
The Storefront theme comes with a few useful widgets you can use to place products from your store on any page. You could just use the All Products widget, but you wouldn’t have much control over which products show up in which sections of your pages.
Storefront’s widgets go a little deeper with some generically curated widgets like the Products by Category, Best Selling Products, Top Rated Products, and Newest Products.
To demonstrate how to add these sections to a page, I’ll use the Newest Products widget. The process of adding the widgets are the same for all widgets. If you know how to add one you know how to add them all. It is only their functions and settings that are different.
In the Newest Products widget, I only want to show the newest smartphones for the section I’m creating. By default, this widget will show nine of the newest products from all categories. I only want to show four products in one row. Here’s how.
- From the page you are editing, click the icon, which will open a menu.
- At the bottom of the menu, click the Browse All button.
- The Blocks and Patterns sidebar should now be open on the left. Scroll down until you reach the WooCommerce section, and then click Newest Products.
- You should now see the widget on your page populated with products from all categories. You can place that widget above or below other blocks you’ve added to the page (our cover widget for example) by clicking the icon located in the block menu bar located in the top left section of the block you’re editing. Click up or down to move the block above or below other blocks on the page.
- In the same block menu bar, click the More options icon on the right side of the menu, and then click Show More Settings.
- The Page and Block sidebar should now be open on the right. In the blocks tab, you can change the number of columns, rows and select categories you want to display.
- To select the category/categories, scroll to the bottom of the right sidebar, and then click Filter Products by Category.
- Put a checkmark in each category you want to display products from.
- Make sure to toggle Align Last Block on to avoid lopsided products.
- Click the Update or Publish button just above the right sidebar after making your changes.
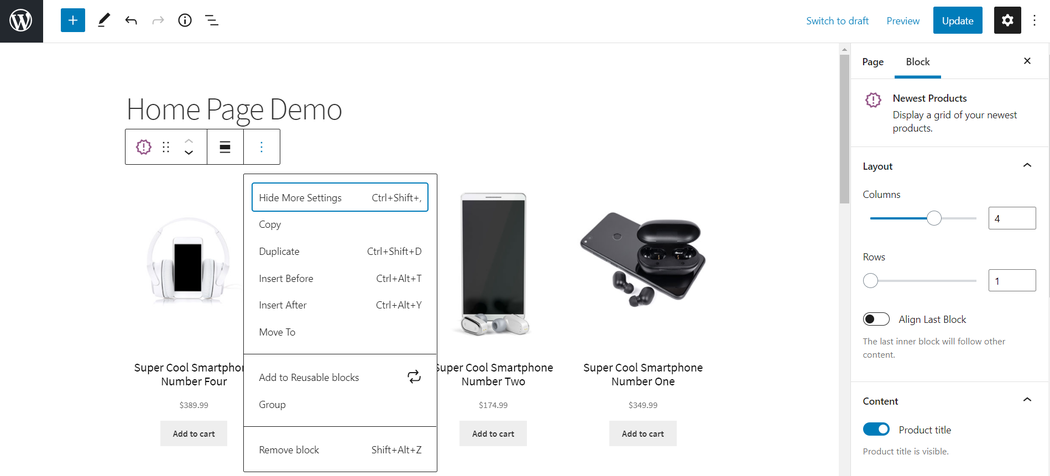
In my example, I’ve chosen four columns on a single row. This way, I could display different categories of new products on different sections of the page by simply adding a new block, adding the Newest Products widget again, and configuring the settings to add a different category this time.
We can take things a step further by creating a banner that links to the category we’re displaying new products for.
There are several ways one could do this, but I’m just going to use the cover widget again. Instead of simply adding a widget to the page, I’m going to add columns this time. I’ll add my Cover widget on the left column which will be set at 30% of the full width of the page and I’ll add the Newest Products to the right column which will be set at 70%. It will look something like the image below.
Adding columns
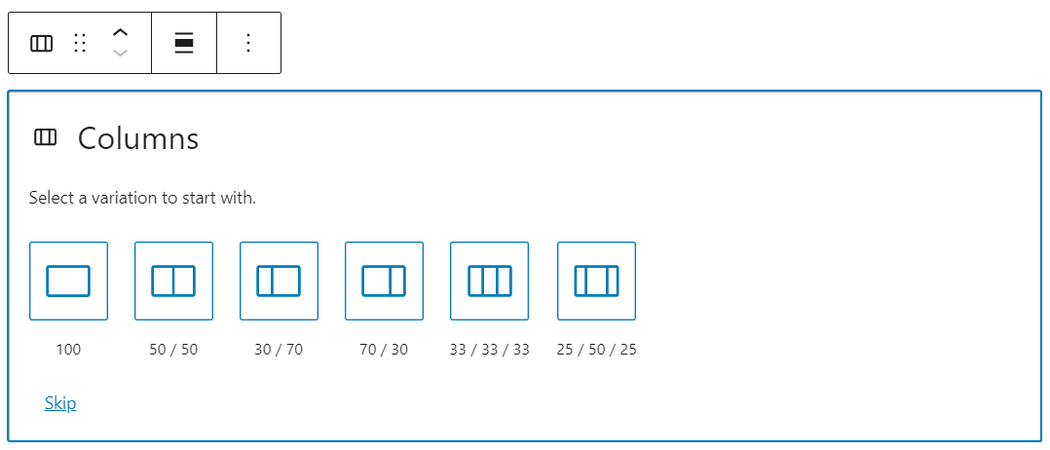
- In the editor for the page you’re creating, click the Add block icon.
- Type Columns in the search box that appears in the menu.
- Click the Columns icon.
- Select the column layout you want — 30/70 for this example.
Add a banner to the left column
- Click anywhere inside the left column to Add block.
- Search for Cover in the search box that appears, and then click Cover.
- Choose a color, upload an image, or select an image from your media library.
Link the banner to a category
Currently, there is no way to make an entire Cover block clickable by adding a link using the settings provided in Gutenberg. The issue has been raised in Github and other places, so this could change in the future.
We can still link to text and buttons within the block. Here’s how to do that.
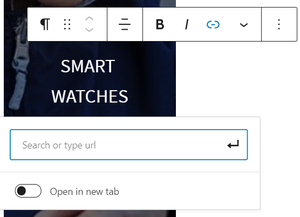
- After selecting a color or background image you’ll see the text Write title… in the center of the cover block. Click that and write your title.
- Left-click and hold your mouse to drag the cursor across the title you just created. Make sure all of the text you want to be linked is highlighted.
- In the menu that appears above the title you just created click the Link icon.
- Enter the URL of the category you want to link to and click the Submit icon.
Add a button after the Cover text
- Click the title you just created.
- When the block menu appears, click the More options icon.
- Click Insert After.
- You’ll now see the Add block icon. Click it.
- In the search box that appears type button and click Buttons.
- You should now see a box with your cursor flashing inside. Type the text for your button.
- Add a link the same way you added a link for the title.
In the right-side column, you can click inside the column to add a block. Just add the Newest Products widget the same way we did earlier, and then select the category you want to be displayed in this section.
In this example, I made it 4 columns and 1 row. I also added a title to this example by clicking the More Options icon in the Newest Products block menu, clicking Insert Before, then adding the Heading widget. Easy!
As mentioned before, you can edit any element you added to the page by clicking on it then adjusting the settings in the right sidebar under the blocks tab. Once you have a layout and design you’re happy with in that section you can save the entire block and reuse it.
This way, your next category on the page is as easy as inserting the saved blocks and adjusting the settings. These saved blocks can also be used when you create special sale pages which we’ll get into shortly.
Creating reusable blocks
You can create a custom block just by selecting a block you’ve created while editing a page, and then clicking the More options icon. From here you simply click Add to Reusable block and give your block a name.
In our example, we used columns with three blocks. The Cover block, the Newest Products widget block, and a Heading block. We can create a single block using all of the elements in the columns section we created. Here’s how:
- Mouse over the top of the Columns block until you see the blue Add block icon. Don’t click this. Instead, click just below the thin blue line to bring up the block menu.
- Click the More options icon.
- Click Add to Reusable blocks.
- Give your block a title.
I’ve named the one created for this demo Category Section Block. I suggest giving it a name that represents its function. Now you can reuse it over and over. We’ll be using similar techniques for more specific product types later on.
Everything you’ve learned up to this point should help you in creating your own layouts using Columns, Covers, Headings, and WooCommerce widgets in Blocks. Experiment to come up with appealing layouts of your own to make products stand out and give shoppers an awesome experience.
It is important to note that you can place reusable blocks on any WordPress post or page, but be careful. If you edit a reusable block it will update everywhere, including the original and any pages you have that block on.
In previous versions of WordPress you would have to click the More options icon and select Convert to Regular Block. You can still convert reusable blocks to regular blocks but the option is now in the menu bar instead of the more options list.
After placing your reusable block, just click the Convert to regular blocks icon located in the block menu bar. Now you can safely edit the converted block.

As of WordPress 5.7, the Reusable blocks manager page does not have an Admin dashboard left menu link, and can only be accessed by clicking the Add block icon while editing a page, and then clicking the Reusable blocks tab from the left sidebar. From there clicking Manage all reusable blocks takes you to a page where you can create reusable blocks without first having to create a page. I recommend bookmarking this page for now if you want quick access to creating and managing custom reusable blocks.
The Products by Category, Best Selling Products, Top Rated Products, and Newest Products widgets are all included for free with the Storefront theme.
The way these widgets are added to pages are pretty much the same as the Newest Products widget used in these examples. There’s really no reason to explain how to add each one to your pages at this point. If you know how to add one widget/block you know how to add them all. Experiment and have fun.
Getting granular
The On Sale Products, Products by Tag, Products by Attribute, Featured Products, and Hand Picked Products widgets are all a bit more granular than the previously mentioned widgets. They allow us to select products regardless of category yet group products by their widget’s namesake.
You’ll need to mark some products as featured (not for StoreFront), and you’ll need to set a sale price on some.
You’ll also need to create tags and attributes for some of the products. Hopefully, you’ve read the article I mentioned at the beginning of this article and will have some attributes and tags all ready to go for your products.
Featured Products widget
Marking a product as featured doesn’t do much in and of itself. Many themes and page builders offer widgets that let you list products that are marked as featured. Storefront handles this a bit differently.
Instead of listing all of the featured products, you can select any product you want to have featured on any page, and they don’t have to be marked as featured in the WooCommerce back-end.
This widget doesn’t provide a grid like the others, but it does have one unique feature. The product image is used as a cover background. It can also be displayed filling in a full width or wide-width column. This is very useful for banners, highlights and interesting-looking sale pages!
If you want to use them in a grid you can use columns to create the grid then add a Featured Product widget to each column block. They’re added and customized the same way you add the widgets that have already been mentioned.
On Sale Products widget
The On Sale Products widget does as the name suggests. It lets you display products that are currently marked down for sale. Just like with the Newest Products widget, you have options to set the number of columns and rows.
In the example below, I toggled off the Product title, price, rating, and Add to Cart button for an Amazon-style approach. Then I added a two-column row with text on the left and a button that leads to my sales page on the right with a gradient background.
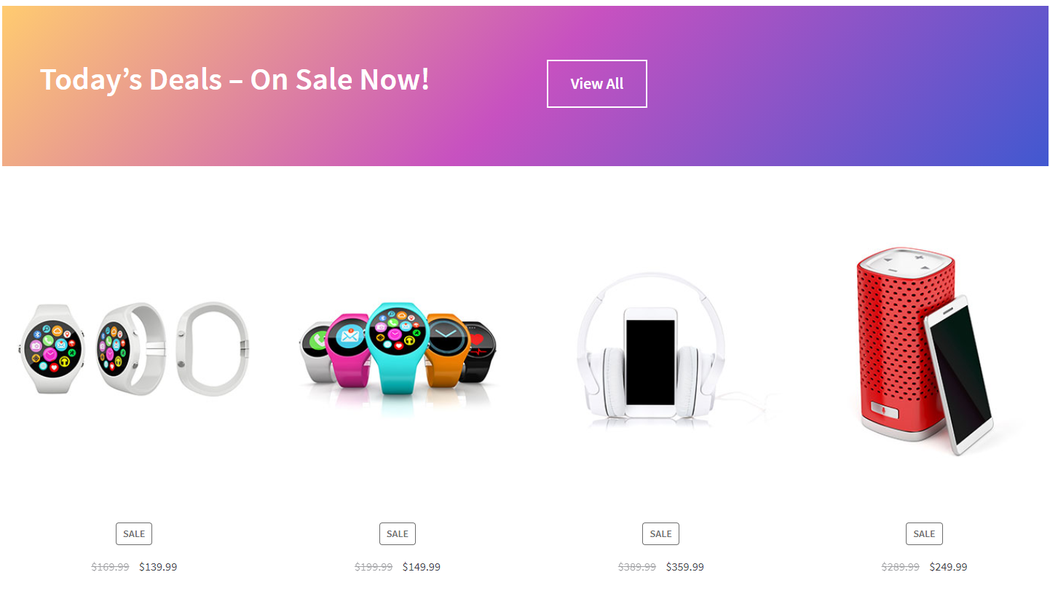
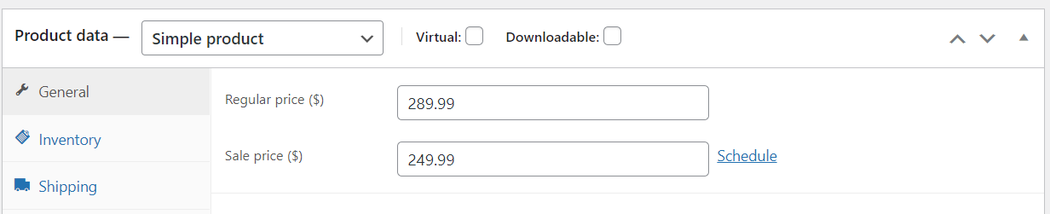
For the On Sale Products widget to populate products you’ll need to have products that show a sale price. The sale price can be set when creating a new product or by editing an existing product.
I hate to break the flow, but since I’ve mentioned banners this might be a good place to point out that banners are a nice way to break up sections of your product displays and also add links to important sections of the site. Using the Cover widget it is fairly easy to come up with some interesting effects and layouts.
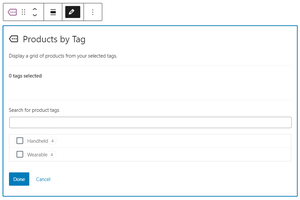
Products by Tag & Attribute
Tags and attributes work in much the same way. The main difference is that attributes can be used for product variations such as color, where tags cannot. In Storefront, attributes are displayed in the Additional information tab of the product’s page. Tags are generally displayed near the product add to cart button along with the SKU and category data.

You can add the Products by Tag and Products by Attribute widgets to pages the same way the other WooCommerce widgets were added. Just select the tags or attributes you want to use and configure the layout settings in the right sidebar.
A good example would be if you want to highlight products that share the same product tag but spans multiple categories. The product tag “wearables” for example could span the categories of watches, earbuds, headphones, etc.
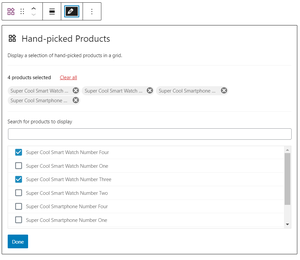
Hand-picked Products
You can add randomly selected products to any page using the Hand-picked Products widget. After placing the widget on the page you can select products from the list or use the search box to place products you want displayed in that section of the page.
The Storefront theme has plenty of built-in widgets for building amazing-looking online shops and stores without a lot of heavy code to slow the website down. Once you create a page this way, your client doesn’t really have to do much. Products will update as they add new products making their pages, including the homepage quite dynamic.
As long as they continue to add new products, and mark products on sale their customers will always have something new to see when they visit.
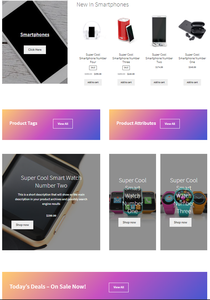
Below is a screenshot of what the home page for the demos I just used looks like. There are literally only eight products, and two categories. There weren’t even customizations made to the theme outside of the CSS we needed to remove the spacing above our cover header. Imagine what you could do with a full production site and a little creativity.
It looks good on mobile, too, in case you’re wondering.
Creating sales pages
Once you’ve put together a proper home page, creating sales pages should be a breeze. By this point, you probably have plenty of reusable widgets all ready to go. You just create the sale page and set it up the same way we did the home page but specific to the products in the sale.
I have just a few more tips and tricks for you though.
There are third-party plugins for WooCommerce that one could use for different types of sales. With a little creativity and not a whole lot of effort, sale pages can be created with a next to vanilla install of WordPress using the WooCommerce Storefront theme.
Private sales
One of the most popular SEO plugins is Yoast SEO, which you may already be familiar with. If you’ve never heard of it, you’ll find it by going to the Wordpress admin left menu, mousing over Plugins, clicking Add New and typing Yoast SEO into the search bar.
This plugin can help keep sales pages that you or your client don’t want indexed by search engines from appearing in search engine results. The sale page can be deleted later without adversely affecting SEO or the rest of your site.
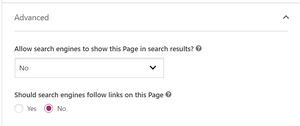
A good example of this kind of sale page might be a sale only available to users who subscribe to the website’s newsletter, or other subscriptions. To make sure the private sale page does not get indexed by search engines you’ll just need to:
- Scroll the bottom of the page you’re editing where you’ll see the Yoast SEO settings, and then click Advanced.
- Under Allow search engines to show this Page in search results select No from the drop-down menu.
- Under Should search engines follow links on this Page select No.
- Click Publish or Update in the top right of the page.
That’s it! This page should not be indexed by search engines.
Holiday sales
Unlike the private sales previously mentioned, your clients may want to have their holiday and similar sales indexed by the search engines. People do search for Christmas sales, Black Friday events, and the like for their favorite products, stores, and brands.
That being said, your clients may not want products showing up on those pages year round.
One could mark products in a Christmas sale, for example, as private so it wouldn’t be viewable by those users who don’t have permission in WordPress. There’s a cleaner method though.
Using attributes to populate a sale page
If we created an attribute called Christmas, we could assign that attribute to all products that will be on sale during Christmas. Create a Christmas Sale page and add the Products by Attribute widget.
You could add covers and banners to give it a nice Christmassy feel (is that a word?) and break the products up into categories to add substance (using multiple instances of the widget).
The only problem is the Christmas attribute is going to show up on the product page along with any other holiday attributes you’ve created all year long. To make matters worse, if the holiday attribute archives are enabled those archives could be indexed by search engines. Here’s how to fix that:
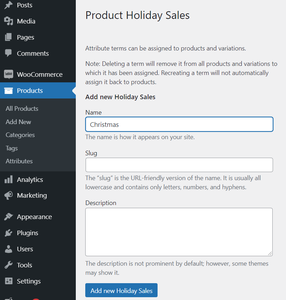
- Create an attribute called Holiday Sales from WordPress admin left menu > Products > Attributes.
- Ensure Enable Archives is NOT checked.
- Click Add attribute.
Now that you have a holiday attribute that isn’t archived you need to add terms like Black Friday, Christmas, New Year’s etc.
- The Holiday Sales attribute that was just created will now be in the right-side panel. Click Configure terms on the far right-side of the attribute.
- Type the name of the holiday in the Name field.
- Click Add new Holiday Sales.
Now we just need to add the attribute to all of the products that will be sold during Christmas or whatever holiday sale we’re working on.
- From the WordPress admin left menu, mouse over Products, and then click All Products.
- Mouse over the product you want to edit, and then click Edit.
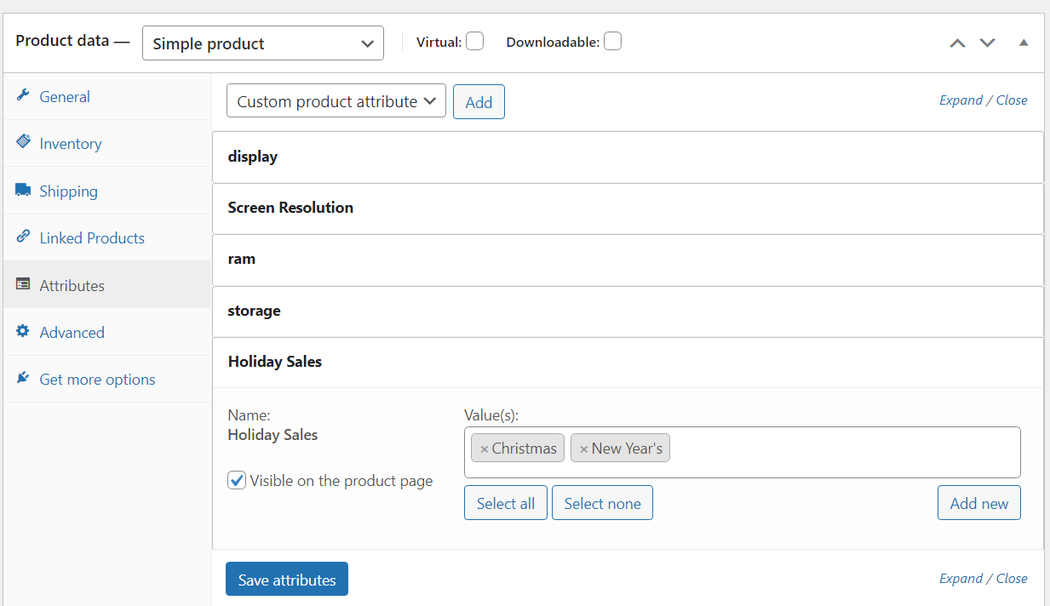
- Scroll down to the Product data section, and then click Attributes in the vertical tabs menu.
- Select Holiday Sales from the dropdown menu, and then click Add.
- Next to the Holiday Sales attribute that was just added, start typing the name of the holiday and select it. You can add multiple attributes by repeating this step for other terms you’ve created.
- Click Save attributes.
When the holiday sale ends you can simply remove any widgets you’ve created for the holiday sale from the page which will just result in a blank page should someone find it when the sale is not active.
If you’ve created Reusable blocks during this process it will make setting up future sales much easier for you or your clients.
Currently, there is no way to bulk edit attributes in WooCommerce, though there are third-party plugins that will help with this. The good news is once the attributes are in place they’re ready to go when you are. For sites that are just starting out this probably isn’t going to be an issue. Upgrade when it is time to upgrade.
General sale page
Your client may want a page that their customers can easily find that has products available for sale all year round. This is a page that you’ll likely want to link to from a prominent area of the website, like the main menu.
Everything we’ve talked about to this point should help you create a great-looking page from which to present ongoing sales.
Breaking up the content with nice banners using the Cover widget, highlighting must have products with the Featured Products widget, and of course the Products On Sale widget are your friends here. Be creative. Go wild.
Link from strategic areas of the website, e.g. banners on the homepage and a link in the main menu. Just don’t forget to add a holiday or special event sale banner to the general sale page when those sales are active.
Closing thoughts on creating WooCommerce pages
While the widgets and interfaces may differ, the concepts mentioned here all apply when working with premium page builders and themes. I’ve done many of the same things using Elementor and WPBakery page builders. While those plugins are great they’re code heavy. It takes a lot of work to get them optimized to make websites run faster.
Not to mention, if you switch from one page builder to another you’re going to put in a lot of work converting over.
For the most part when you choose a page builder plugin you’re kind of stuck with it. This is the very reason “Vanilla” is a thing. Looking at you stock Android users. Same concept.
I know we are missing sliders and carousels, fancy flip cards, and other flashy widgets. That’s kind of the point — and it’s OK! This is a very minimalist approach. Having all of that code out of the way can enhance the speed and performance of the website as a whole. Faster loading times may also help to boost the website’s ability to rank better in search.
I’m not saying you won’t have to do some optimizing, you will, but keeping it simple will make your job easier too.
As mentioned before there’s the added bonus of ongoing free updates, and the ability to upgrade and add on if needed. Let’s not forget it also eliminates the financial barriers to entry.
And to be frank, when your client sees how well you’ve curated their products in the layouts you’ve come up with, the chances they’re going to be concerned with fancy animations are near zero.
Your client’s customers will be able to peruse the store with multiple opportunities for products to capture their attention rather than scanning a grid of randomly placed items (boring!).
Having plenty of variety will delight your client’s customers, which will make your clients delighted in you! And it’s all done using categories, tags, attributes, on sale products, featured products, and hand-picked products, with just WordPress, WooCommerce, and the free Storefront theme. Beautifully.