If you’re reading these words, then I’ll assume that you’ve dove headfirst into the wonderful world of video marketing for your small business. Whether you shot a selfie video on your smartphone or worked with a world-class video production team to create a Hollywood masterpiece, now comes the important part: how to post a video on YouTube.
Before we get started with the steps to upload a video on YouTube, I want to tackle a few frequently asked questions about the second-largest search engine in the world.
What does it mean to be a YouTube creator?
By posting a video on YouTube, you officially become a YouTube creator. Before you can add your video content, you will need to create a YouTube channel.
What kinds of videos can I upload to YouTube?
The beauty of being a YouTube creator is that you have options. You can play to viewers’ diminishing attention spans by posting a YouTube Short, which is a vertical video that runs 60 seconds or less, or a longer-form video that can run for minutes or even hours. If you want to use YouTube to grow your sales, you might consider one of the following video formats:
- Your origin story
- Customer testimonials
- Product highlight videos
- Entertaining or humorous videos
- Behind the scenes
If you can’t seem to come up with YouTube video ideas, try using keyword research tools like Google Trends as a thought starter.
How can I improve my video quality before I post to YouTube?
Thinking back to my first foray into video marketing, I was a mess. I had clammy hands, sweat soaking through my shirt collar, and I felt so uncomfortable staring into the small pinhole of the camera. If you’re using video to increase sales, then here are four video best practices to improve your YouTube video quality:
Double-check your background
Before you hit record, be sure to think visually. Is there anything behind you that could distract the viewer from hearing and absorbing your message? I always like to do a quick five-second test film, so I can review the background and make any adjustments.
Invest in your lighting
If you have a large window or can record outside, be sure to face the sun (aka your source of light) so you don’t have shadows covering your face. If you don’t have access to natural light, consider investing in a ring light or some LED studio lamps.
Listen to your audio
I’ll never forget the time I recorded a 20-minute video in one take. I was proud and elated to have accomplished such a feat. My jubilation quickly morphed into disgust as I played back the video and realized the microphone had never caught a single syllable. Whenever you’re starting a recording session, be sure to record yourself for more than 15 seconds and listen to the audio to make sure your microphone is working properly.
Breathe and smile
Recording videos is nerve-wracking and takes you out of your comfort zone. Before you press record, be sure to take a deep breath to steady your nerves. Remind yourself that absolutely no one knows what you are going to say in the video, so you can’t mess up. As you record the video, be sure to smile. Smiling throughout the video is associated with sociability, sincerity and competence and will make a lasting positive impression on your audience.
Embrace editing
Remember how I mentioned my first YouTube video? It was a holiday greeting to our clients, and it was a giant snoozefest that failed upon launch because I didn’t understand video editing best practices. But as they say, “One person’s trash is another person’s treasure.” Even though I can’t “take back” that first YouTube video, I did a bit of editing to show you how even the most boring video can be jazzed up to engage and provide value to your viewers.
How to upload a video on YouTube
I’ll assume you’ve already followed the steps to create a YouTube channel, so now it’s time to upload your video to YouTube.
What’s the difference between uploading a video to YouTube and publishing your video?
Simply put, when you upload a video, the video file is imported to YouTube. When you publish a video, the video is made available for anyone to watch.
What are the steps to upload a video on YouTube?
For a quick walk-through of the steps to upload a video to YouTube from your laptop or desktop computer, you can check out this video tutorial from the official YouTube creators channel. If you are uploading from your smartphone or tablet, here is a mobile-specific video tutorial. After uploading hundreds of videos to YouTube over the years, I can confidently say that it’s significantly easier to use a laptop or desktop computer, so I’ll be sharing that process below:
- Sign in to YouTube Studio
- In the top-right corner, click CREATE and then Upload Video
- Select the file you’d like to upload from your computer
Adding video details
Now, you’ll have the option to close the upload window by clicking the “X” in the top right of the pop-up or continue to add details to your video. If you close the window, your video will continue to upload and process and will eventually be saved in draft format until you publish it (more on publishing options below.)
Assuming you want to optimize your YouTube video to get it in front of more potential viewers, you’ll begin entering your video details:
- Title (Required). You have up to 100 characters to capture viewers’ attention and convince them to watch your video
- Description (Highly Recommended). You have up to 5,000 characters to provide info about your video including focal keywords, links to your web properties and any other content you’d like your viewers to read while watching your video.
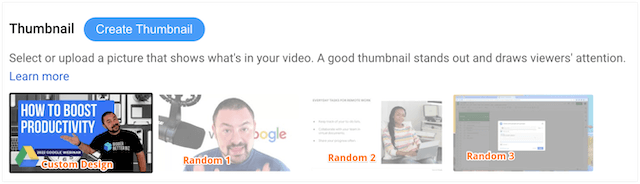
- Thumbnail (Highly Recommended). YouTube provides you with three random still clips from your video as thumbnail options, or you can upload your own.
- Playlist (Highly Recommended). As a best practice, you will want to add your video to at least one playlist that contains other videos with similar themes or topics.
- Audience (Required). To comply with the Children’s Online Privacy Protection Act (COPPA), you’re required to tell YouTube whether your videos are made for kids.
- Age Restriction (Optional). If your video contains explicit content and/or more mature subject matter, you can denote that by setting an age restriction. Parents like me truly appreciate this.
Why is a custom thumbnail important?
When we work with our video marketing clients to create YouTube channels or optimize a selection of videos, we always create custom thumbnails. Although YouTube makes it easy by suggesting three random still frames from your video as thumbnails, you want to take the extra time to create a custom thumbnail because your thumbnail is what helps your video stand apart from other creators in the YouTube search results and suggested videos section.
For example, look at the three random still frames YouTube chooses and compare them to the custom thumbnail I created for this recent Grow with Google webinar. Which one would make you want to click? Viewers make split-second viewing decisions based on your visuals, so put in the extra effort to convince them that your content is the best.
When you put that added effort into your video thumbnails, it creates an inviting experience for viewers perusing your channel.
Additional video attributes
Scroll down past Age Restriction and click on Show More to see the following video attributes:
- Paid Promotion. By checking this box, you let viewers and YouTube know that your video has paid promotional messaging or product placement.
- Automatic Chapters. YouTube can automatically create video chapters for your longer videos to make it easier for viewers to navigate your content. You can also create your own video chapters.
- Tags. This is where you add descriptive keywords to inform YouTube what your video is about. Tags have been played down quite a bit over the years, but you still want to maximize your number of tags and be sure to include your focal keywords at the top of your tag list.
- Language and caption certification. Choose your video language and caption certification.
- Recording date and location. Enter the date the video was recorded (doesn’t have to be exact) and the location where your video was filmed.
- License and distribution. Here you’ll select if your video can be embedded on a different website or landing page. You can also indicate if you’d like to send notifications to your YouTube channel subscribers for your new video.
- Shorts sampling. Check this box if you’d like to allow other YouTube creators to create Shorts using audio from your video. You will not be penalized if you opt-out of this setting.
- Category. Select the category of your video. Most of the time, small business owners will choose People & Blogs or How To & Style but feel free to peruse and find a category that best fits your video.
- Comments and ratings. Choose whether your viewers can leave comments on the video and if they can see how many likes are on your video.
Since this is a basic walk-through, I won’t get into YouTube monetization (aka how you can make money from your videos) but you can learn more about the YouTube Partner Program to see if your channel qualifies.
Next, you’ll have the ability to add elements to your video:
- Subtitles and captions enable you to translate your video into different languages while making sure that your video is accessible to those with hearing impairments. YouTube usually creates subtitles for your videos, but you also have the option to upload your own subtitles file.
- End screens add a visual element to the end of your videos such as a subscription CTA or a suggested video or playlist. Your video must be over 25 seconds long to add an end screen.
- Cards add interactive content to your videos such as a suggested video or playlist and can help to keep those with waning attention spans engaged with your video because they “pop” on the screen.
How do I publish my video on YouTube?
Once you’ve gone through the above steps, you’re not done yet. You now have several options when it comes to the visibility of your video.
- Save or publish:
- A private setting makes your video private to your channel or any specific email addresses you choose. In the past, I’ve used this setting when providing video coaching to corporate sales teams because the video was so company-specific.
- The unlisted setting makes your video available to anyone with the YouTube link, but no one will be able to find the video through a YouTube search. I usually upload our videos with this setting, so I can properly optimize the video before publishing.
- The public is just as it sounds. Once you check the box and hit “Publish” your video is live for the world to find and watch on YouTube.
- The schedule allows you to choose a date and time on which you want your video to be published. This is a huge time-saver if you’re uploading and optimizing multiple videos at once, but remember that when you schedule a video, your video will be set to “Private” until it is published.
- A scheduled premiere allows you to add a fun countdown to your video, so you can share the link and create buzz. This is helpful if you’re making a big announcement about your business or showcasing a new product, but everything in moderation here. If you use the premiere feature too much, it loses its luster.
What can I do with a published YouTube video?
The process of filming, editing, uploading, optimizing and publishing your video is time-consuming, to say the least. For all of the time you invested in the process, you want to make sure you get the most mileage out of your video, so consider the following distribution ideas we share with our video marketing clients:
Embed your YouTube video on your website or landing page
One way we get the most out of your YouTube videos is by creating landing pages around the topic of the video. For instance, we recently built a page about creating a YouTube channel and embedded one of my recent uploads to drive more value to our page visitors.
Embed your YouTube video in a blog post
Whether you host a blog on your website or use a platform like LinkedIn or Medium, you can spice up your blog content by including your new YouTube video. Here’s an example of how I recorded a reaction video to Google’s name change from “Google My Business” to “Google Business Profile” and embedded it on a LinkedIn Pulse blog post.
Share your YouTube video on social media
The beauty of hosting your video on YouTube is that you can share that permalink anywhere you want including on social media channels like Facebook, Twitter and LinkedIn. It’s as simple as writing a few words about your video and pasting your YouTube link before publishing your post.
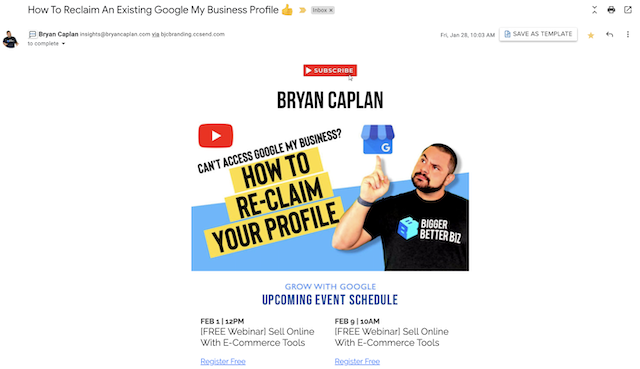
Share your YouTube video in your email marketing campaigns
A great way to spread your message and get more views on your video is to include it in your email marketing campaigns. Currently, technology doesn’t allow you to send the actual video in your email campaign, but most email marketing platforms will automatically create a clickable thumbnail image when you paste your YouTube video’s link. For instance, adding this video about reclaiming Google Business Profiles was a great way to change up the content in your email campaigns to make it more interactive for your subscribers.
Putting it all together
Taking that first step in filming a video for your business is a huge milestone, but what good is it if you don’t post it to YouTube for new customers to watch? To become an official YouTube creator, you’ll want to build a YouTube channel. Once your channel is fully customized, follow the steps above to upload and publish your video for the world to find on the second largest search engine. And be sure to share your video on landing pages, blog posts, social media and email campaigns to get more mileage out of your hard work.