In a world of trending audios and 24-hour content cycles, Pinterest is a port in the digital storm. It’s a powerhouse that’s not like other social media platforms because it’s not a social media platform. It’s a search engine. Pins made years ago can still drive website traffic, bring in followers, and expand your audience. Yet many entrepreneurs haven’t tapped into the potential of Pinterest marketing to grow their ventures.
That ends today.
Entrepreneurs’ guide to Pinterest marketing
What is Pinterest marketing?
Is Pinterest right for your brand?
Ingredients of an effective Pinterest account
How to set up your Pinterest account
- Get a Pinterest business account
- Add your name
- Add your bio
- Select your pronouns
- Take some technical steps
- Set an account cover photo
- Choose a profile picture
- Create Pinterest boards
- Upload your first pin
How often should you publish on Pinterest?
How to get your first Pinterest followers
Basic Pinterest marketing set-up checklist
Next steps
Let’s get started!
Related: How to make it as an entrepreneur in 2025
What is Pinterest marketing?
Pinterest marketing is the act of reaching new audiences with your content on the platform via pins that you publish from your account. “Pins” are just images or videos that act as a book cover for a specific link.
Every image you see on Pinterest is a pin.
You can (and should) create many pins for the same link to be published over time, which stretches the lifespan of your already-made content over months or years. That’s one reason why any business that engages in online content marketing is leaving money on the table by ignoring Pinterest.
The templates, examples and checklists below are going to help you set up your Pinterest account correctly today so you can stop having FOMO over the hundreds of millions of monthly Pinterest users who are finding other creators’ content instead of yours.
But before you run off into the sunset with Pinterest, let’s make sure it’s worth your time. Pinterest isn’t the right investment for every brand. Here’s how to tell if basic Pinterest marketing is right for you.
Is Pinterest right for your brand?
At the heart of every Pinterest account is links. Sure, creativity, passion and branding should be on your ingredient list, but links are the cake.
Get out some paper and tally up how many unique content links your brand has. Think of:
- Email opt-ins
- Blog posts
- Products
- Services pages
- Categories pages for your blog
- Categories pages for your shop
- Webinars
- Memberships
- Ebooks
- Podcast episodes
Not all links are treated equally on Pinterest. There are some links you should ignore:
- Your homepage. Uploading pins pointing back to your homepage can get you suspended from Pinterest.
- Links from your content on social media. Pinterest has been rolling back the ability to claim social accounts, and the reach on these pins for many accounts is extremely low.
- Your content on other websites, such as Medium or media outlets you write for. You can save pins directing back to this content, but you shouldn’t be creating and uploading pins for them.
- Location-dependent content. Pinterest casts a broad net, and it’s not the right investment for driving traffic to “locals only” content.
If your website has more than 30 links, you have enough content to launch a basic Pinterest marketing strategy.
Even if your brand isn’t going to invest in a basic Pinterest marketing strategy right now, take the time to set up your account this week. You’re missing out if you don’t. Users save content from all over the web to their Pinterest boards using the Google Chrome Pinterest button. It’s possible (even likely, if you’ve been around for a while) that your content is already on Pinterest, whether you’ve uploaded it yourself or not.
By setting up your account, you connect those organic saves to your website and passively make use of the platform.
But for this to work, you have to set up your account properly.
Ingredients of an effective Pinterest account
Whether you’re converting a personal Pinterest account to a branded one or starting over with a fresh account, you want to arrive at the same finishing point: an account that’s complete, optimized, and funneling for you 24/7.
Here’s what an effective Pinterest account looks like:
- It’s cleaned up for the pinner’s eye. Your account shouldn’t be about you; it should be about the pinner. Design your account cover, name, description and boards to help viewers understand what you offer so they can decide whether or not your brand can help them.
- It’s optimized. Place keywords in specific places on your Pinterest account to help the algorithm and users understand your content (examples and checklist coming in a minute).
- It’s complete. Missing little details like claiming your website seriously holds an account back on Pinterest. Pins are not distributed as widely when they’re from a website that Pinterest can’t confirm you have rights to.
You don’t have to hire a whole team, sell your soul, or learn a dance. You just have to start here.
How to set up your Pinterest account
The fundamental task of basic Pinterest marketing is setting up your account correctly. Even if you set up your account in the past and you’re here to dust it off, you should still revisit this checklist because Pinterest has added new features in the past year that you might not be using.
Step 1: Get a Pinterest business account
Every creator on Pinterest needs a business account. You have two choices:
- Start a new account from scratch.
- Convert your existing personal account to a business account (for those who already have a personal Pinterest account).
Every account, whether it’s brand new or recently converted, will need to go through all of the steps we’re going to discuss.
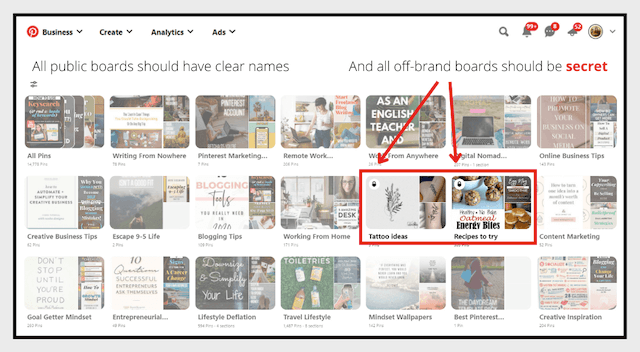
If you’re converting a personal account to a business account, just pay special attention to these areas:
- All off-brand boards need to be toggled to “secret.”
- All remaining boards need clear, coherent names.
- Don’t cling to your bio. I’ll give you a template to create a keyword-rich bio instead.
After using Pinterest as a pinner for any length of time, it inevitably becomes a vault of recipes you’ll never make and haircuts your face shape can’t pull off. You don’t need to throw away those precious memories; just clean your account up for guests.
When a pinner arrives at their account, they only see your public boards. This is what secret boards look like from the inside of an account:
Clean it up and make sure it looks like your brand instead of your slambook.
Step 2: Add your name
Contrary to common sense, this is not a section for your name. In this section, you should include your brand name and your primary keywords.
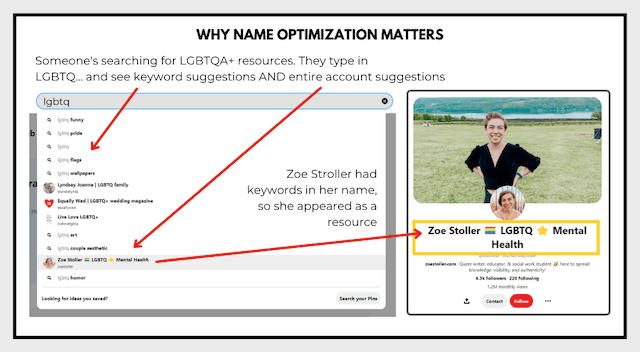
By adding keywords to your name section, your entire account (not just your individual pins) can be displayed in search results.
Imagine a Pinterest user wants to learn about going vegan and, instead of sifting through pins from thousands of creators, they’re sent straight to you. How amazing is that real estate?! That’s what optimizing your name can lead to.
You can see the example here with Zoe Stoller:
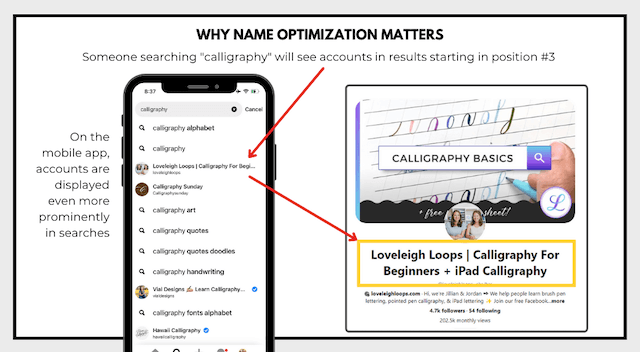
The opportunity on mobile is even greater. You can see below that Pinterest puts creator accounts as high as spots three and four in search results on the app. That’s major exposure for those accounts.
Here’s an example with Loveleigh Loops:
Try this convention for your name: Your Brand Name | #1 Keyword + #2 Keyword
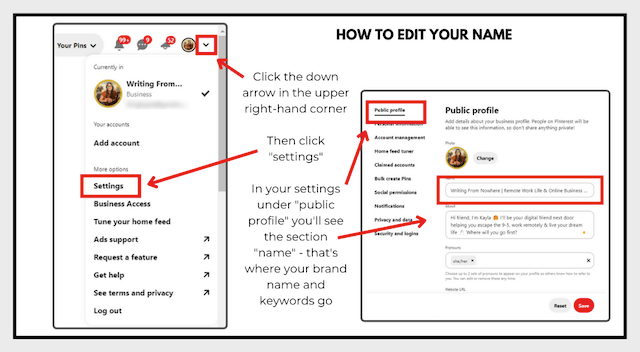
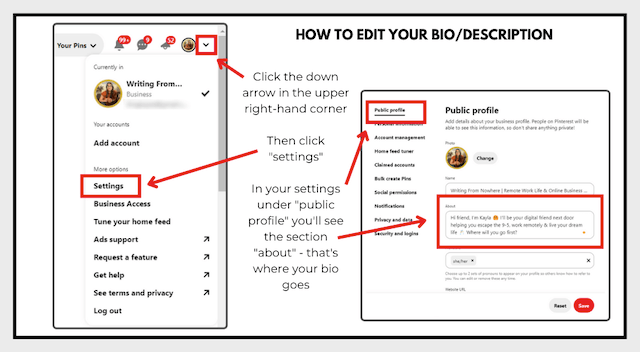
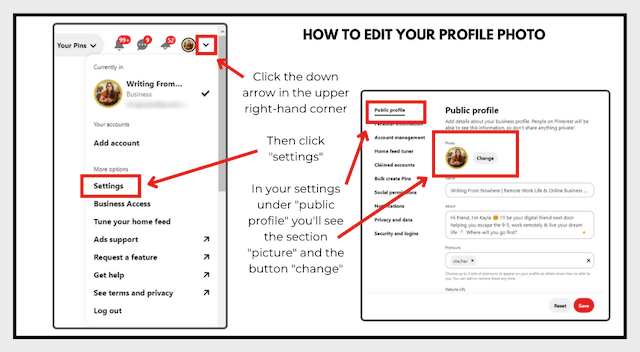
Edit your name by going to the down arrow in the upper right-hand corner of your Pinterest account, selecting “Settings” and then finding the “Name” section under the default “Public profile.”
Authors, public speakers, influencers or anyone else with name recognition are exceptions to this rule. Use common sense to evaluate how someone is most likely to search for your legal name versus your brand name.
Step 3: Add your bio
Pinterest is a friendly, personal place. Just like no one wants to read a press release or other corporate-clad communication on Facebook and Instagram, pinners will likewise scroll on in a hot second if you give them your elevator pitch in your bio.
Individuals can follow this convention:
Hi, I’m [first name]! I help [target audience] get [results] with [topic] [deliverables: tips, hacks & tutorials]. Follow for [new content frequency] [deliverable].
In human language, that can sound like (keywords are bolded):
Hi, I’m Kayla! I help online business owners get more bang for their buck from their content marketing with SEO and Pinterest tips. Follow for entrepreneurial inspiration daily!
Other “follow for” variations can include:
- [topic] inspiration
- [topic] tips/hacks
- [topic] tutorials
Tips, hacks, tutorials and inspiration are all big keywords and this is an easy way to include them, while also showing off what you have to offer.
Communicate your value to the pinner by asking yourself: When someone brand new looks at my account, what’s in it for them?
You can’t leave it up to them to guess — tell them explicitly.
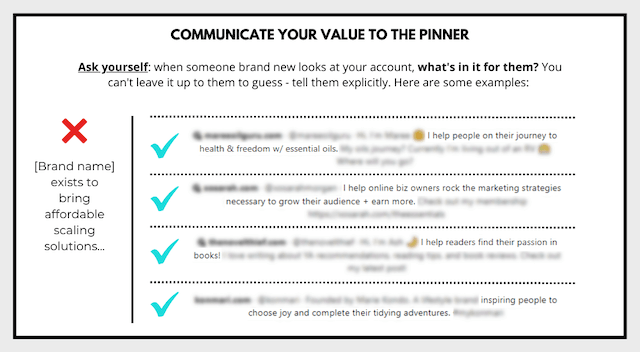
Find your answer and make it clear.
To edit your Pinterest bio, click the down arrow in the upper right-hand corner of Pinterest, then select “Settings.” This will open to the default “Public profile” section. Then scroll to “About” and add your bio there.
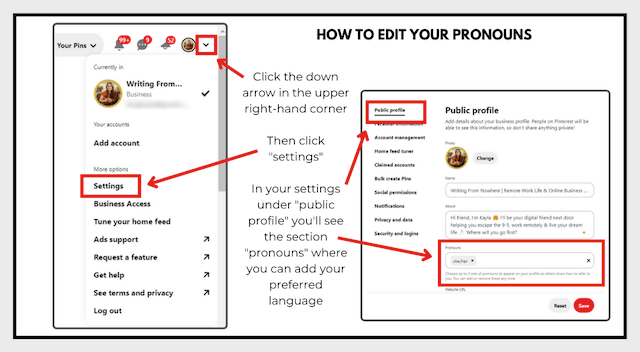
Step 4: Select your pronouns
Pinterest, like most social sharing platforms, has added a pronouns section to accounts. Even if your knee-jerk reaction to this step is “but I don’t need pronouns,” don’t just scroll past this step.
Take the time to add them anyway. You can learn more about the function of pronouns in this guide to gender identity terms.
Pinterest has been making changes to promote an inclusive environment for all pinners and creators, and adding pronouns to our accounts is an easy step we can all take.
To edit your pronouns, click the down arrow in the right-hand corner of your Pinterest account. Click on “Settings” and look for “Pronouns” under your Public profile settings.
Step 5: Take some technical steps
Most of these basic Pinterest marketing steps are on the softer side, but there are two technical steps that you must take to get your account set up.
- Claim your website. This step varies from platform to platform, but you can find steps for each one on Pinterest’s help page.
- Enable rich pins. This is another little back-end task that you’ll do once and forget it even happened. Pinterest will walk you through the steps specific to your website.
Pro tip: if you’re doing all of the steps but your website is still not showing up as claimed, put in a help ticket with Pinterest. This just happens sometimes and might be a glitch and no fault of your own.
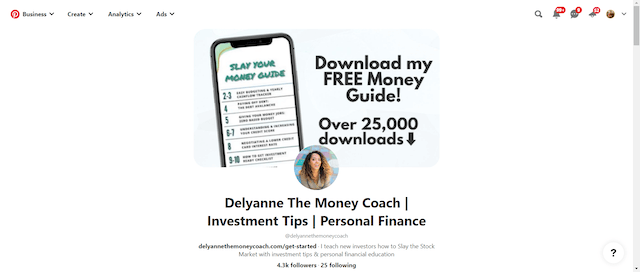
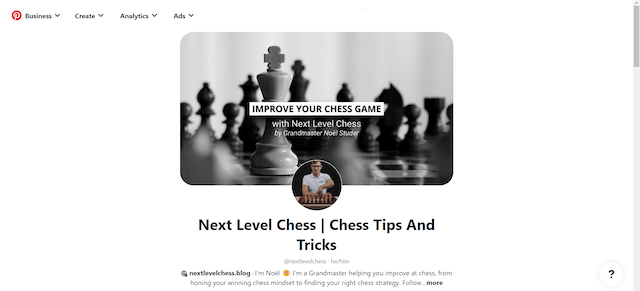
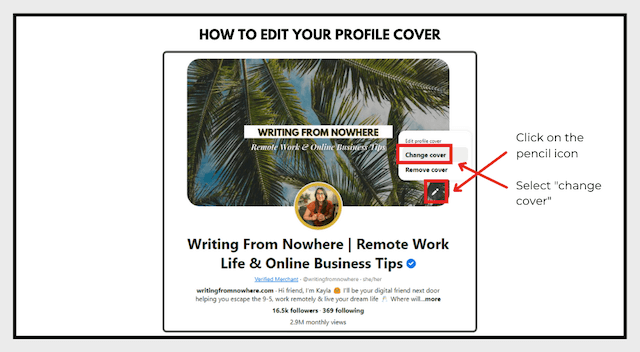
Step 6: Set an account cover photo
Just like every other section on your Pinterest profile, your profile cover should welcome viewers so they can quickly understand whether or not your brand can help them.
There’s no single “best” account cover type, and you have some different options to consider.
You can use an account photo that prompts an opt-in, like Delyanne The Money Coach:
If you have name recognition within your industry like Noël Studer, Switzerland’s youngest-ever chess grandmaster, consider advertising that on your cover:
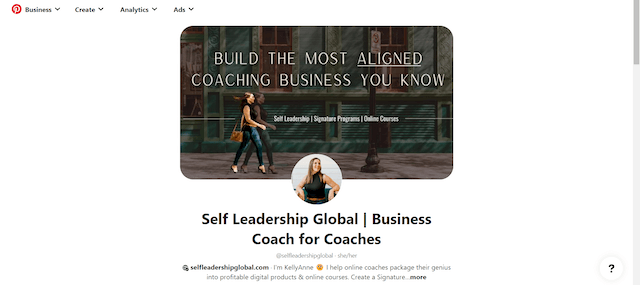
Creators looking to make an instant emotional connection can lead with their big-picture offer, like Self Leadership Global:
Whatever option you choose, just make sure it adds clarity.
If you’re starting from scratch using a design app or Photoshop, set your canvas to 1600 x 900 pixels.
To edit your profile cover, click on the pencil icon in the space above your profile picture and drag and drop your file.
If you’re uploading straight photographs and the files are too big, you’ll get a message that your cover changes can’t be saved. Shrink them with TinyPNG and that should fix it!
Editor’s note: GoDaddy Studio makes it easier to create images that will help your brand stand out on Pinterest.
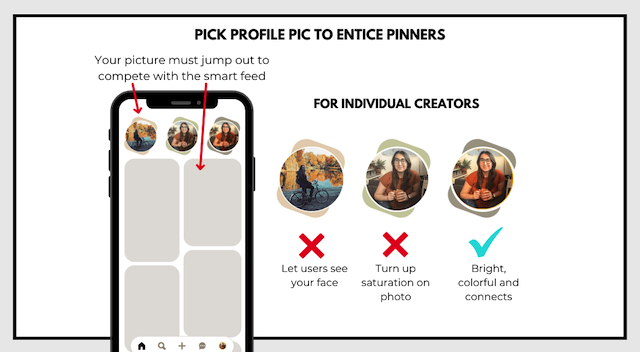
Step 7: Choose a profile picture
Pinterest is a visual search engine, but most users think of it as a social media platform. Lean into the misunderstanding by using a picture of you (if applicable) instead of your logo.
Individual creators should choose a photo where viewers can see their faces. This adds value in a few ways.
Beyond just connecting with viewers, the profile photo must compete with the smart feed and other profile pictures on the mobile app.
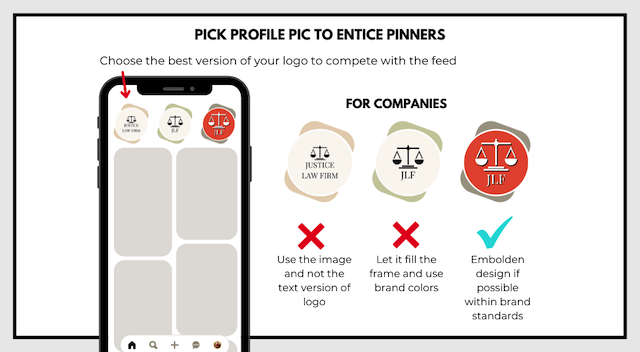
Businesses with multiple versions of their logo also can make a more informed decision with their profile photo choice. Choose the boldest version of your logo that you have.
To edit your profile picture, click on the small down arrow in the upper right-hand corner of your account. Click on “Settings” and look for “Photo” under the Public profile tab.
Step 8: Create Pinterest boards
Boards create a structure for your Pinterest account. They also are an optimization factor for your pins!
When you save a tofurkey recipe to the board “Thanksgiving Dinner Ideas,” Pinterest learns that this pin is relevant to Thanksgiving. When a pinner saves it to a board “Vegetarian Thanksgiving,” they learn that this is a vegetarian recipe.
See how this snowballs? Pinterest learns more and more about a URL with every board that it’s saved to, both yours and pinners’.
Boards turn your pins into pieces of glass that are getting shaped with every turn of the wave.
Just make sure you name your boards correctly.
Naming your boards
Board names are not a place to be cute, witty or creative. They’re a place to use the keywords that describe your content.
| Bad board names | Keyword-rich board names |
| ❌ Turkey Time | ✅ Thanksgiving Recipes |
| ❌ What They Really Really Want | ✅ Gift Ideas For Entrepreneurs |
| ❌ S U N D A Y ~ S E L F D A Y | ✅ Sunday Self Care Tips |
| ❌ Where 🌎 To 🌎 NEXT? | ✅ Travel Guides And Destinations |
| ❌ Mama-Approved Sippies | ✅ Non-Alcoholic Party Drinks |
Think about what things your target audience is searching for, and what buckets your content fits into.
Important: After you name your board, add a description to optimize it for search.
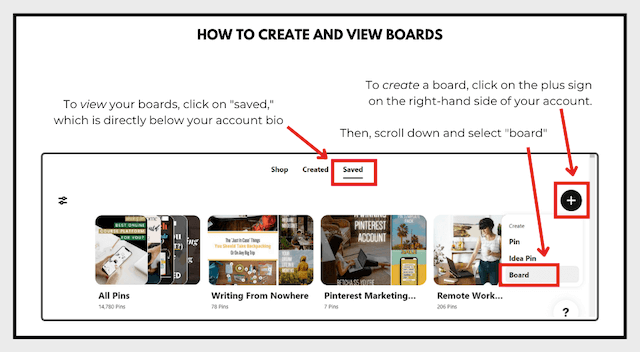
To edit a board’s description, go to the “Saved” tab on your profile and then click on the pencil icon. Two editable fields will appear:
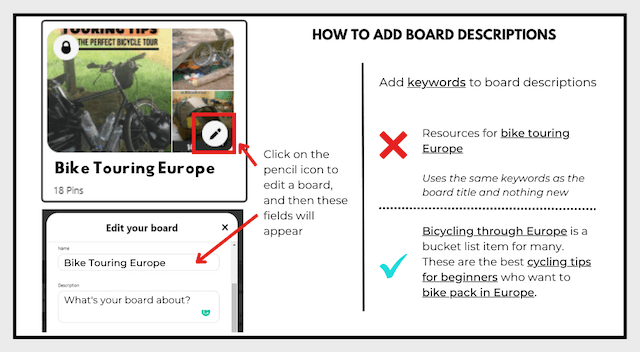
Need some guidance on writing your board descriptions? Here’s an example for a board titled “TikTok Marketing” with the keywords in brackets:
Are you trying to learn how to use TikTok for your social media strategy? I teach people an easy social media strategy for TikTok! Let me share the best TikTok marketing tips from [your brand name] to improve your social media content marketing today.
Here’s another example for a board on bullet journals:
Are you trying to stay organized with a bullet journal? I teach people how to use a bullet journal! Enjoy these tips on the best bullet journal hacks from [your brand name] to be more organized today.
Here’s a template for you. Simply copy and paste this description and replace the text in brackets:
Are you trying to learn/get/be [results] with [topic]? I teach people how to [topic]! Enjoy these tips on the best [topic] tips from [your brand name] to [results] today.
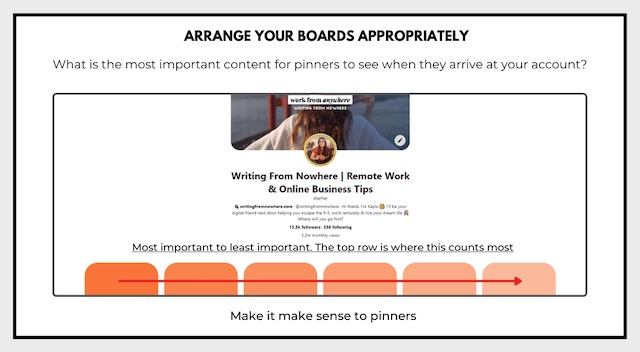
Then, order the boards from most important to least important on your profile.
Is anyone else still thinking about how good some tofurkey would be right now?
Step 9: Upload your first pin
The essence of basic Pinterest marketing is that creators upload attractive pins directing back to value-based content that is optimized for searches.
I know what you’re thinking: If that’s the essence of basic Pinterest marketing, why did it take so long to get to this revelation?
Because anyone who skips the steps of setting up their account isn’t setting themselves up for any real success on the platform.
- Your pins won’t be distributed on Pinterest as widely if you skip setting up your account.
- Fewer users will find them.
- The users who do click on your account will be confused instead of funneled.
And, the cherry on top:
- If you start publishing pins willy-nilly, your account might be caught in the Pinterest spam blocker, which silently blacklists accounts so no one sees the content they share.
I know you want to do things right on Pinterest! We could spend the next 24 hours straight talking about pin design, uploading, strategy and seasonal content. There’s so much to say about publishing strategies for Pinterest. The most basic approach?
- Create pins that are 1000 x 1500 pixels.
- Have them communicate the content they’re leading back to (use templates to get a jumpstart on design).
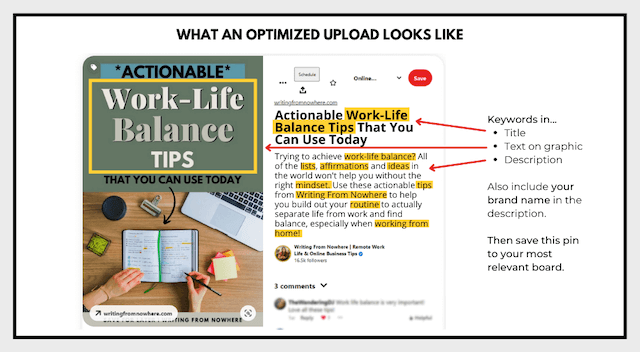
- Upload them to Pinterest with keywords in the description, title, and on the image itself.
Here’s what that looks like in practice. The highlighted words are keywords:
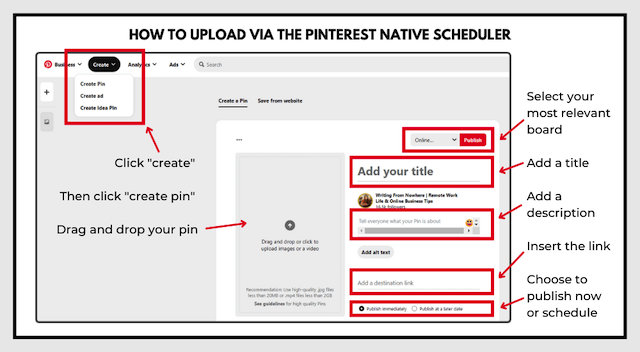
This pin was uploaded directly via the native Pinterest scheduler. You’ll see a lot of recommendations for schedulers like Sprout Social and Tailwind, and you can play around with a free trial before committing, but know that you don’t need a scheduler to publish pins at a later date.
You can schedule pins right within the platform natively.
To do so, click on the “Create” button and select “Create pin.” Then drag and drop your pin (either an image or a video) into the gray field. Add:
- A title
- A description
- The time you want it to go live (either immediately or scheduled for later)
- Which board it should be saved to
How often should you publish on Pinterest?
There are many opinions, strategies and philosophies in the Pinterest marketing world about how often you should publish.
The easy answer is: Do whatever you can sustain. I see accounts grow that are only publishing three pins per week (Monday/Wednesday/Friday).
I also see accounts flatline that tries to publish five times per day, can’t sustain it, and walk away.
A word to the wise: This conversation is a basic Pinterest marketing overview and can’t dive into all of the nuances of strategy and ever-evolving best practices. We’d be here all day! Before you start publishing heavily, invest in some sturdy research or a Pinterest marketing course. (I recommend “Pinterest Popular” by Nadalie Bardo.)
At a glance, these are the publishing landmines that new users should avoid (and this list is not exhaustive):
- Don’t upload a pin (the same design) more than once.
- Don’t upload pins leading back to the same URL over and over again without putting space between them.
- Avoid publishing pins that look extremely similar. The same pin with a slight filter applied to one photo might not register to Pinterest’s visual reader as truly different.
- Don’t use templates without personalizing them. Pinterest templates are a wonderful starting point for design apps, but change the colors and font so that they don’t look like rip-offs of other people who uploaded that pin template first.
- Never forget that you’re writing for humans and must use complete sentences. Keyword stuffing isn’t an effective way to get more website traffic | get more website traffic from Pinterest | basic Pinterest marketing | Pinterest tips. See what I did there? That’s spam behavior. As are hashtags #thislookslikespam.
How to get your first Pinterest followers
Once you’ve covered basic Pinterest marketing, it’s time to start marketing Pinterest to your audience.
Translation? Invite your existing audience to join you on Pinterest, and build up a system to passively funnel Pinterest-active viewers to your account.
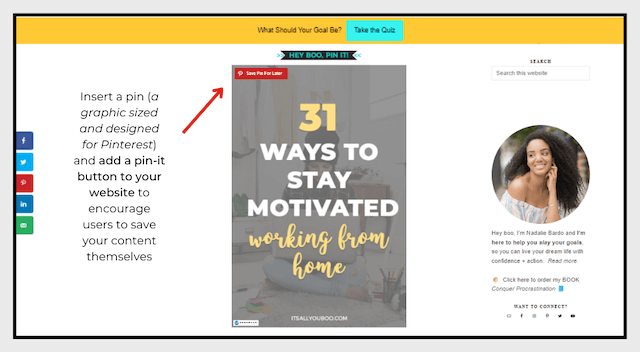
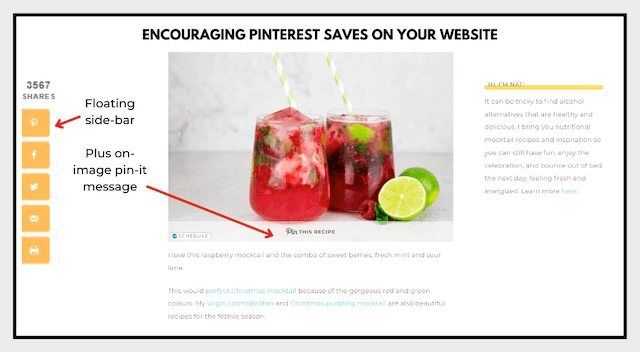
First and foremost, add a Pinterest share button to your content to make it easy for users to save. These save buttons can come in a variety of sizes, and plant the seed for users to save.
A quick note about Pinterest followers: Your reach isn’t determined by follower count, but people who do follow you are more likely to be shown your content in the future.
Next, add your Pinterest account to your email footer, website “about” page, YouTube channel cover, etc. to passively gain followers.
Those are passive steps, and you should also try to inspire action.
Invite your existing audience to follow you with this script:
Who’s on Pinterest?! Let’s connect! I’ll be sharing new content there exclusively for Pinterest users and would love to connect there. [your account link]
Share in/on:
- Instagram stories
- A LinkedIn post
- Your newsletter
- Snapchat
Related: How to get more Twitter followers for your business
Basic Pinterest marketing set-up checklist
Let’s recap the basic steps to get started with Pinterest marketing. Check each item off the list when you complete it.
- Business account set up
- Off-brand boards moved to secret
- Name with keywords to help you appear in search results
- An “about” section (aka bio or description)
- Pronouns added
- The website claimed and rich pins enabled
- On-brand cover photo
- Profile picture
- Boards created (start with five)
- Upload your first pin (to be done whenever everything else is complete)
Is your head spinning? This was a lot at once, but basic Pinterest marketing becomes intuitive to navigate once you’re not new on the block anymore. Keep your momentum going with these next steps.
Next steps
Right now, someone might be on your website saving your content to Pinterest.
If your account is set up correctly, your monthly impressions will grow as a result. And that person will be more likely to see your other content in the future, having already shown interest in what you offer.
Step one of successfully using Pinterest is checking off the fundamentals, which is what we’ve talked about today.
This was heavy on the fundamentals because an account cannot thrive on Pinterest without them. There’s a lot to be said about Pinterest ads, Pinterest analytics, group boards, idea pins, and publishing schedules, and I hope you’ll dive deeper into those!
However, if these steps are the only ones you take for your Pinterest account, you’re still doing yourself a favor by capturing those passive saves.
For free Pinterest education, subscribe to newsletters, podcasts and YouTube channels that focus on Pinterest.
If you’re ready to explore beyond the basics, don’t just copy-paste a social media marketing strategy onto Pinterest. Commit to a pinning strategy for a year and see what reach, new fans, and opportunity are waiting for you on Pinterest.