Have you ever wondered what exactly is going on under the hood of a WordPress block?
This may seem a little overwhelming but it’s not nearly as difficult as you might think. It certainly might be easier than learning how a car works.
Understanding the fundamentals of any WordPress block is not as difficult as mastering PHP as you would have back in the pre-Gutenberg era.
If you have some knowledge of hypertext markup language (HTML) and cascading style sheets (CSS) you’ll see that the code for a block sets up in a way that will look familiar. And if you don’t, no worries. I’ve got your back.
Aside from curiosity, a little knowledge about how a block is coded may come in handy if you ever need to troubleshoot or fix a custom block.
This article gives you an overview of WordPress block grammar. It is especially useful if you are looking at it for the first time. It's your entrance to more complex examples since this is a primer.
The big picture
Let’s begin with learning how WordPress uses blocks, templates, and patterns to build any website.
As the name implies, a block is the atom of any WordPress page. It is the single unit of content paralleling HTML. Each block is a visual representation of an HTML element (tag).
“Think of a paragraph, a heading, a list item or a button. Each one of those is a single block.”
In some instances, a block will be (visually and in code) found within another block. These are nested blocks. An example is a single list item within an entire list.
Currently, there are about 98 blocks that come with WordPress out of the box which are known as “core blocks.” Many plugins add their blocks and are therefore not part of WordPress core.
Templates & patterns
While all WordPress themes (Classic and Block) use templates (and can use patterns), for this article I am referring only to Block themes. (Themes that allow site developers to use blocks for every element of their site.)
While both are different they share the common characteristic of being collections of organized blocks.
Every web page in WordPress of any kind is created (or powered by if you prefer) one — and only one — template.
For example, all pages use a template typically called “Pages.” A Post usually uses a template named “Single Post.
Patterns are pre-fabbed designs that can be used anywhere on a website. Typically, patterns will be organized into categories such as Calls to Action, Galleries, Portfolios and others for each of use.
Templates and Patterns, being composed solely with Blocks can be modified, without code knowledge.
Keys to understanding block grammar
You were probably taught to separate structure from style keeping HTML and CSS apart back in the day.
While that principle is still valid block markup will take some time for you to be comfortable with it especially in cases where styling information is mixed with the structure of the page.
Before I go further, here are the essentials to understanding block markup. You will see that it bears a similarity to HTML and CSS. The core concepts are:
- Blocks have opening and closing tags
- Some blocks are self-closing
- Blocks can be nested within otter blocks
The tags always begin with <!-- and end with -->. Don't let that confuse you since standard HTML uses a comment tag that hides everything within <!-- and -->.
The Key and Value pairing is similar to CSS’s Property and Value pairing. You might see {"align":"center"} which is in CSS grammar.
One of the main aspects of block grammar is that any block can have Attributes and Supports.
Attributes are unique properties of a block. For instance, the Audio Block has built-in autoplay and loop functions which would not, logically, be properties of, for example, the Paragraph Block.
In contrast, Supports are properties that are used in many blocks. Here are some examples:
align
color
color.background
3 examples of code used in WordPress blocks
Let’s have a look at some blocks to get a clear understanding of how block markup works. In these cases, the block grammar is deliberately simple to help you understand the core concepts.
The Site Title Block
<!-- wp:site-title /-->This is a self-contained block just like how an <img /> tag works in HTML. It is also a dynamic block in that the result (what is seen on a web page) will always be information — the site’s title — pulled from the database.
The Paragraph Block
<!-- wp:paragraph -->

<p>Here is a paragraph.</p>

<!-- /wp:paragraph -->
Here a Paragraph Block starts with <!-- wp:paragraph --> and ends with the close, <!-- /wp:paragraph -->. Sandwiched in between is the HTML for a paragraph.
Remember, don’t get confused with the <!-- and --> as these are not comment tags that hide code as they do in HTML.
The Columns Block
<!-- wp:columns -->

<div class="wp-block-columns">

<!-- wp:column -->

<div class="wp-block-column">

<!-- wp:paragraph -->

<p>Left</p>

<!-- /wp:paragraph -->

</div>

<!-- /wp:column -->

<div class="wp-block-column">

<!-- wp:paragraph -->

<p>Right</p>

<!-- /wp:paragraph -->

</div>

<!-- /wp:column -->

<div>

<!-- /wp:columns -->
Here is an example of nesting blocks. Two column blocks (<!-- wp:column -->) are within the <!-- wp:columns --> block. The HTML is always within the block markup itself.
For every opening tag - be it block markup or HTML - there is always a closing tag.
How does styling information fit into the picture?
Here is where things get very interesting.
Blocks have default styling details in the grammar but those defaults can be changed based on the desires of whoever is working on the site.
When blocks are used, changes are frequently made to the default settings.
This happens when the toolbar or block settings (in the right sidebar) are changed. For example, when a background color is added to the heading using the block settings.
While the code looks more complicated it isn’t. Below you will see the styling details highlighted. These are the Key and Value pairings added to the block markup.
Cover Block Example
This is a typical cover block arrangement.
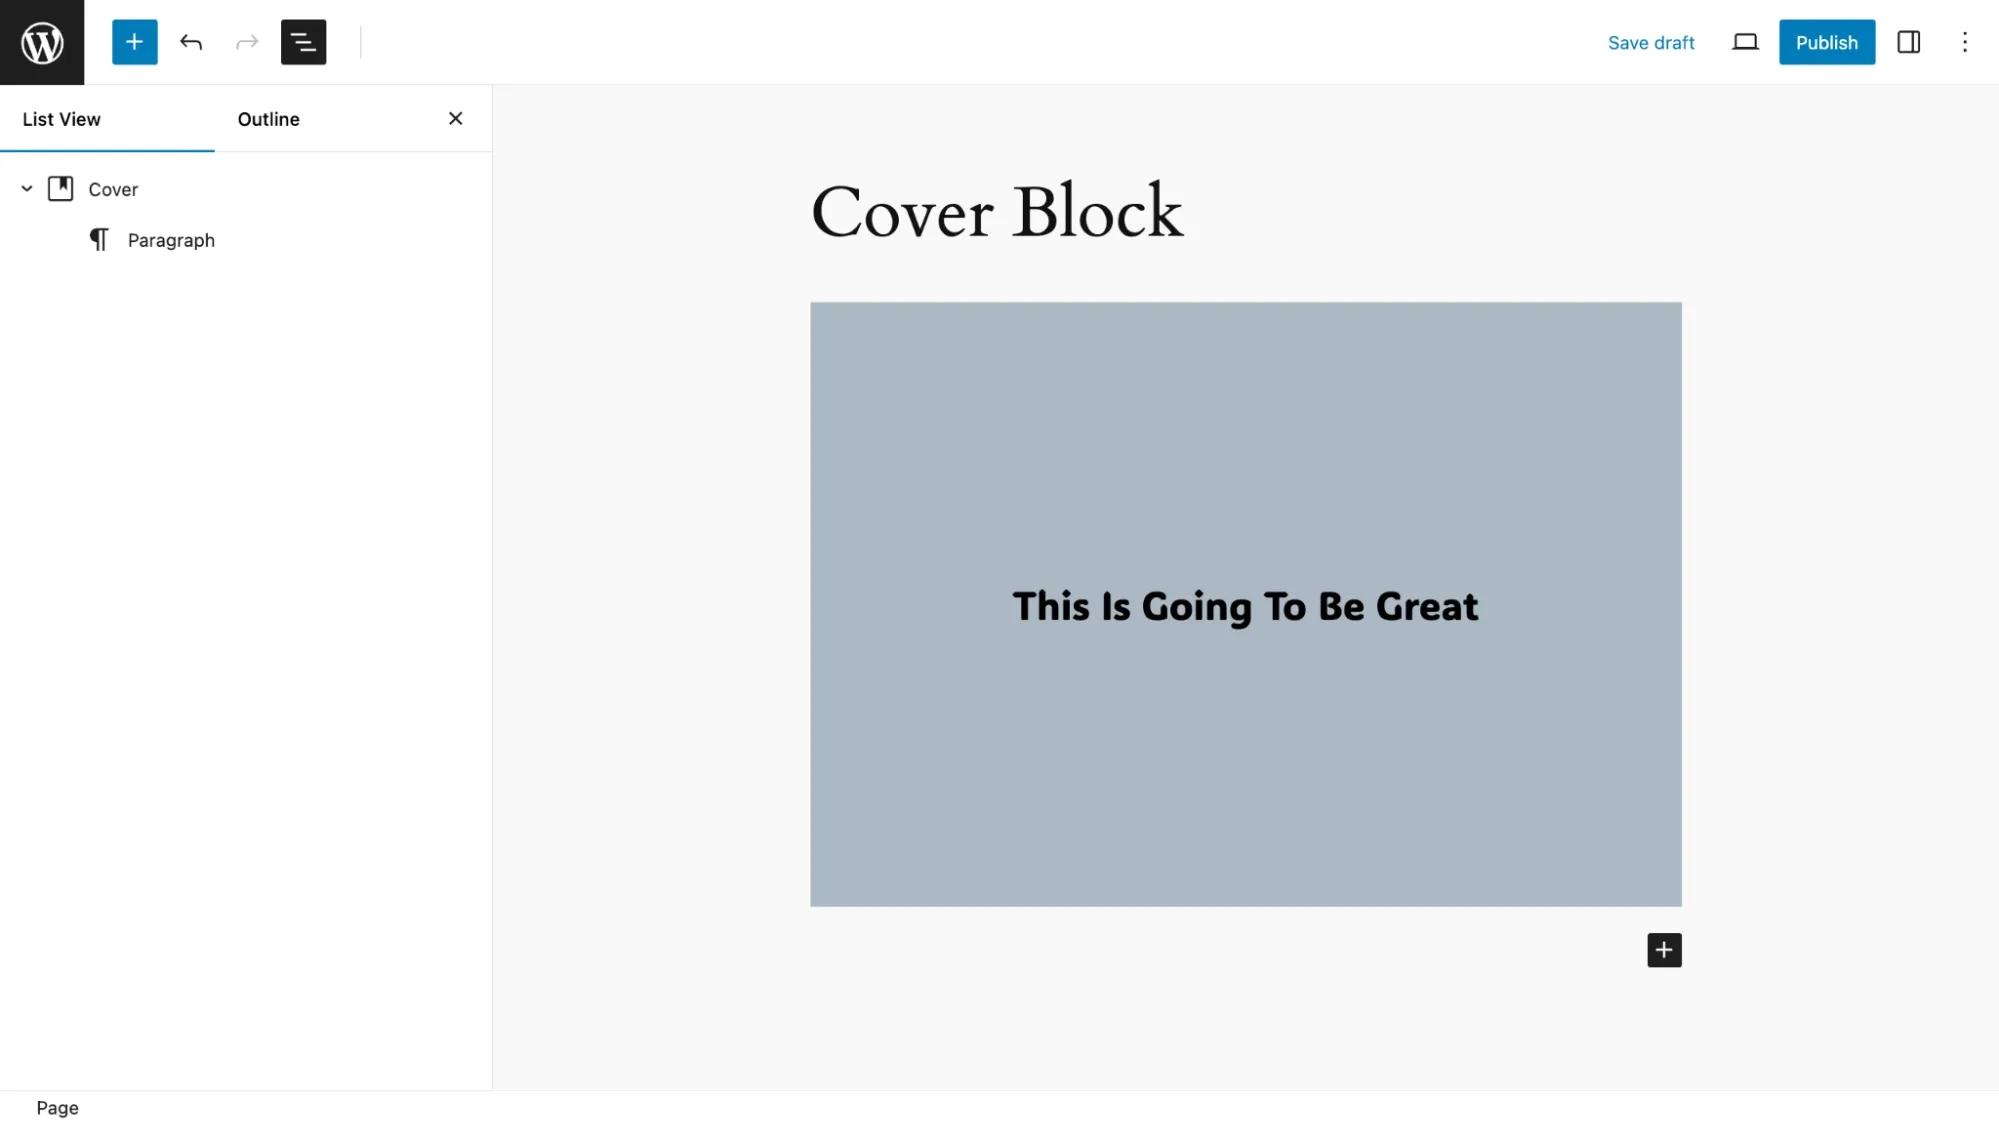
Highlighted is the styling information that applies for the overlay color of the cover block and the three settings that apply to the paragraph block. This is what is inserted into code when a user adds or makes changes to a block’s appearance.
<!-- wp:cover {"overlayColor":"cyan-bluish-gray","isUserOverlayColor":true,"isDark":false,"layout":{"type":"constrained"}} -->

<div class="wp-block-cover is-light"><span aria-hidden="true" class="wp-block-cover__background has-cyan-bluish-gray-background-color has-background-dim-100 has-background-dim"></span>

<div class="wp-block-cover__inner-container">

<!-- wp:paragraph {"align":"center","placeholder":"Write title…","fontSize":"large"} -->

<p class="has-text-align-center has-large-font-size">This Is Going To Be Great</p>

<!-- /wp:paragraph -->

</div>

</div>

<!-- /wp:cover →
Group Block Example
Let’s take a deeper look with a “before and after” example so you can get a clear picture of how styling details are added to block grammar as you work with blocks.
First, I created a simple group block containing a heading and paragraph block.
It looks like this.
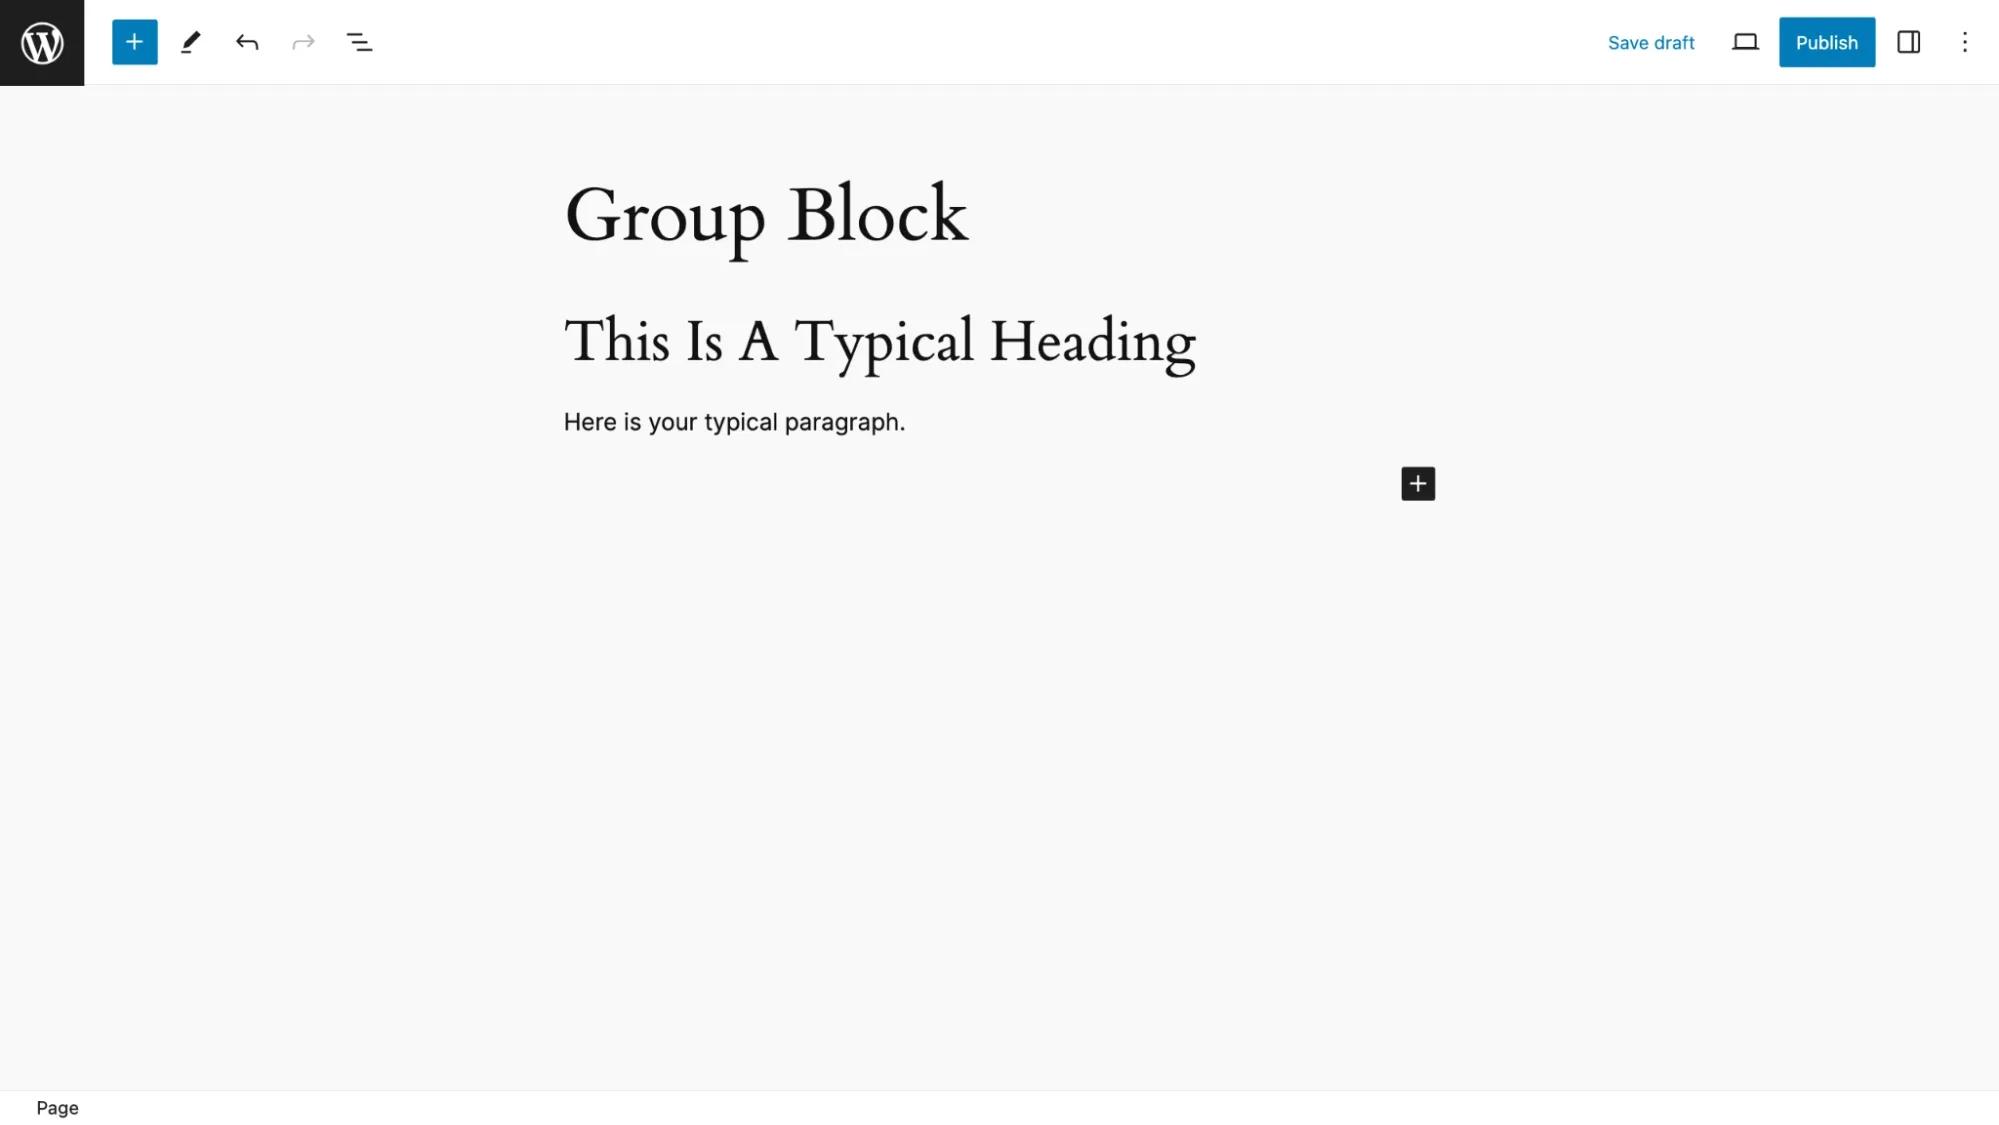
This is the code it generated.
<!-- wp:group {"layout":{"type":"constrained"}} -->

<div class="wp-block-group">

<!-- wp:heading -->

<h2 class="wp-block-heading">This Is A Typical Heading</h2>

<!-- /wp:heading -->

<!-- wp:paragraph -->

<p>Here is your typical paragraph.</p>

<!-- /wp:paragraph -->

</div>

<!-- /wp:group -->
Then I made the following changes:
- Group Block - added a background and padding to all four sides
- Paragraph and Heading Blocks - changed text color to white
This is how it looks.
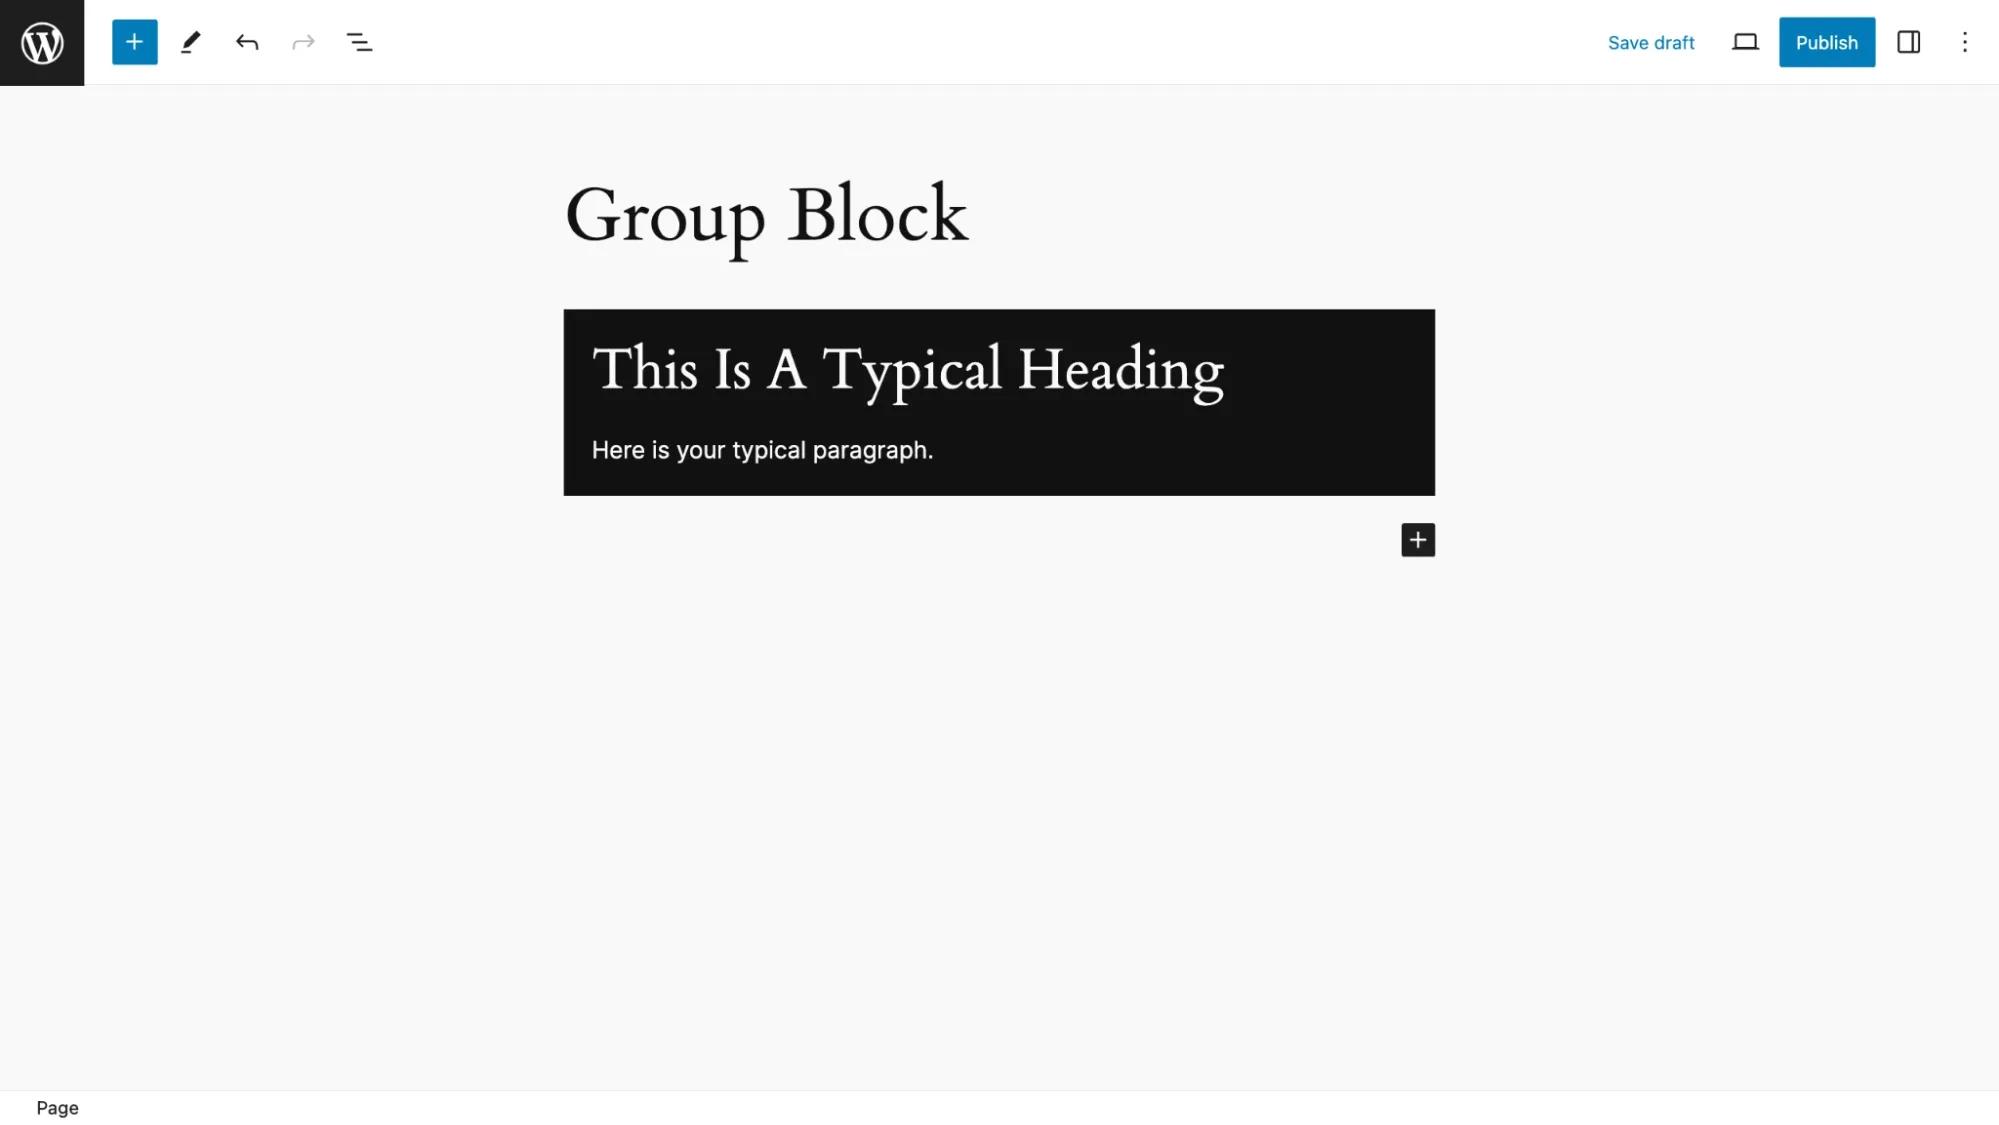
And here is the resulting generated code. Note the highlighted changes which are the result of the styles I applied.
<!-- wp:group {"style":{"spacing":{"padding":{"top":"20px","bottom":"20px","left":"20px","right":"20px"}}},"backgroundColor":"contrast","layout":{"type":"constrained"}} -->

<div class="wp-block-group has-contrast-background-color has-background" style="padding-top:20px;padding-right:20px;padding-bottom:20px;padding-left:20px">

<!-- wp:heading {"style":{"elements":{"link":{"color":{"text":"var:preset|color|base-2"}}}},"textColor":"base-2"} -->

<h2 class="wp-block-heading has-base-2-color has-text-color has-link-color">This is a Typical HEading</h2>

<!-- /wp:heading -->

<!-- wp:paragraph {"style":{"elements":{"link":{"color":{"text":"var:preset|color|base"}}}},"textColor":"base"} -->

<p class="has-base-color has-text-color has-link-color">Here is a typical paragraph.</p>

<!-- /wp:paragraph -->

</div>

<!-- /wp:group →
I know what you must be thinking so let me answer some questions.
1. The order in which you apply styles using the block settings or the toolbar will impact how the code is generated. For example, there is a difference in the code if you apply text color to the group block first rather than applying it to both the heading and paragraph blocks. The latter is what I did for the above example. Regardless of the approach taken this will NOT affect the visual appearance of your design.
2. Where is information, such as classes and .json notation (stay with me - that's code like "layout":{"type":"constrained"}}) stored? Like any data which changes as the site changes, this information is stored in your website's database.
3. Why do many elements have both classes that refer to styles and .json notation that may also refer to the same styling? That’s a bit beyond this primer but it is the Gutenberg way.
How to see block code
A great way to learn block grammar is to have a look while keeping the principles outlined above in mind.
Here are two really quick ways to see block code.
For a single block
Select the block for which you’d like to see code from the List View and choose the Copy option as seen here.
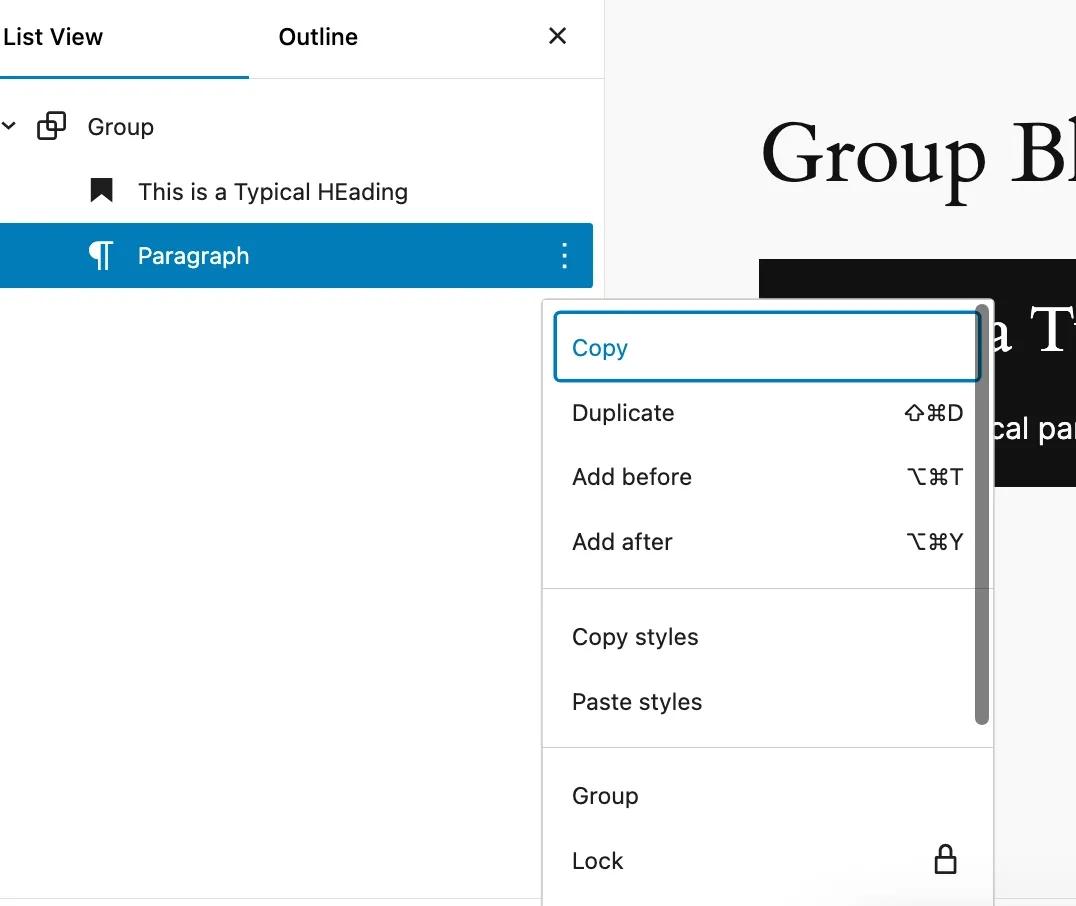
Then paste the Paragraph block grammar into a plain text document.
You can also use this method to see Group, Cover, Columns, Column, Buttons, Buttons, or any other block container.
For an entire page, template, templars part, or pattern
Use the 3 cots option in the upper right-hand corner of any Page, Post or Site Editor. Then choose Code Editor. You will see something like this.
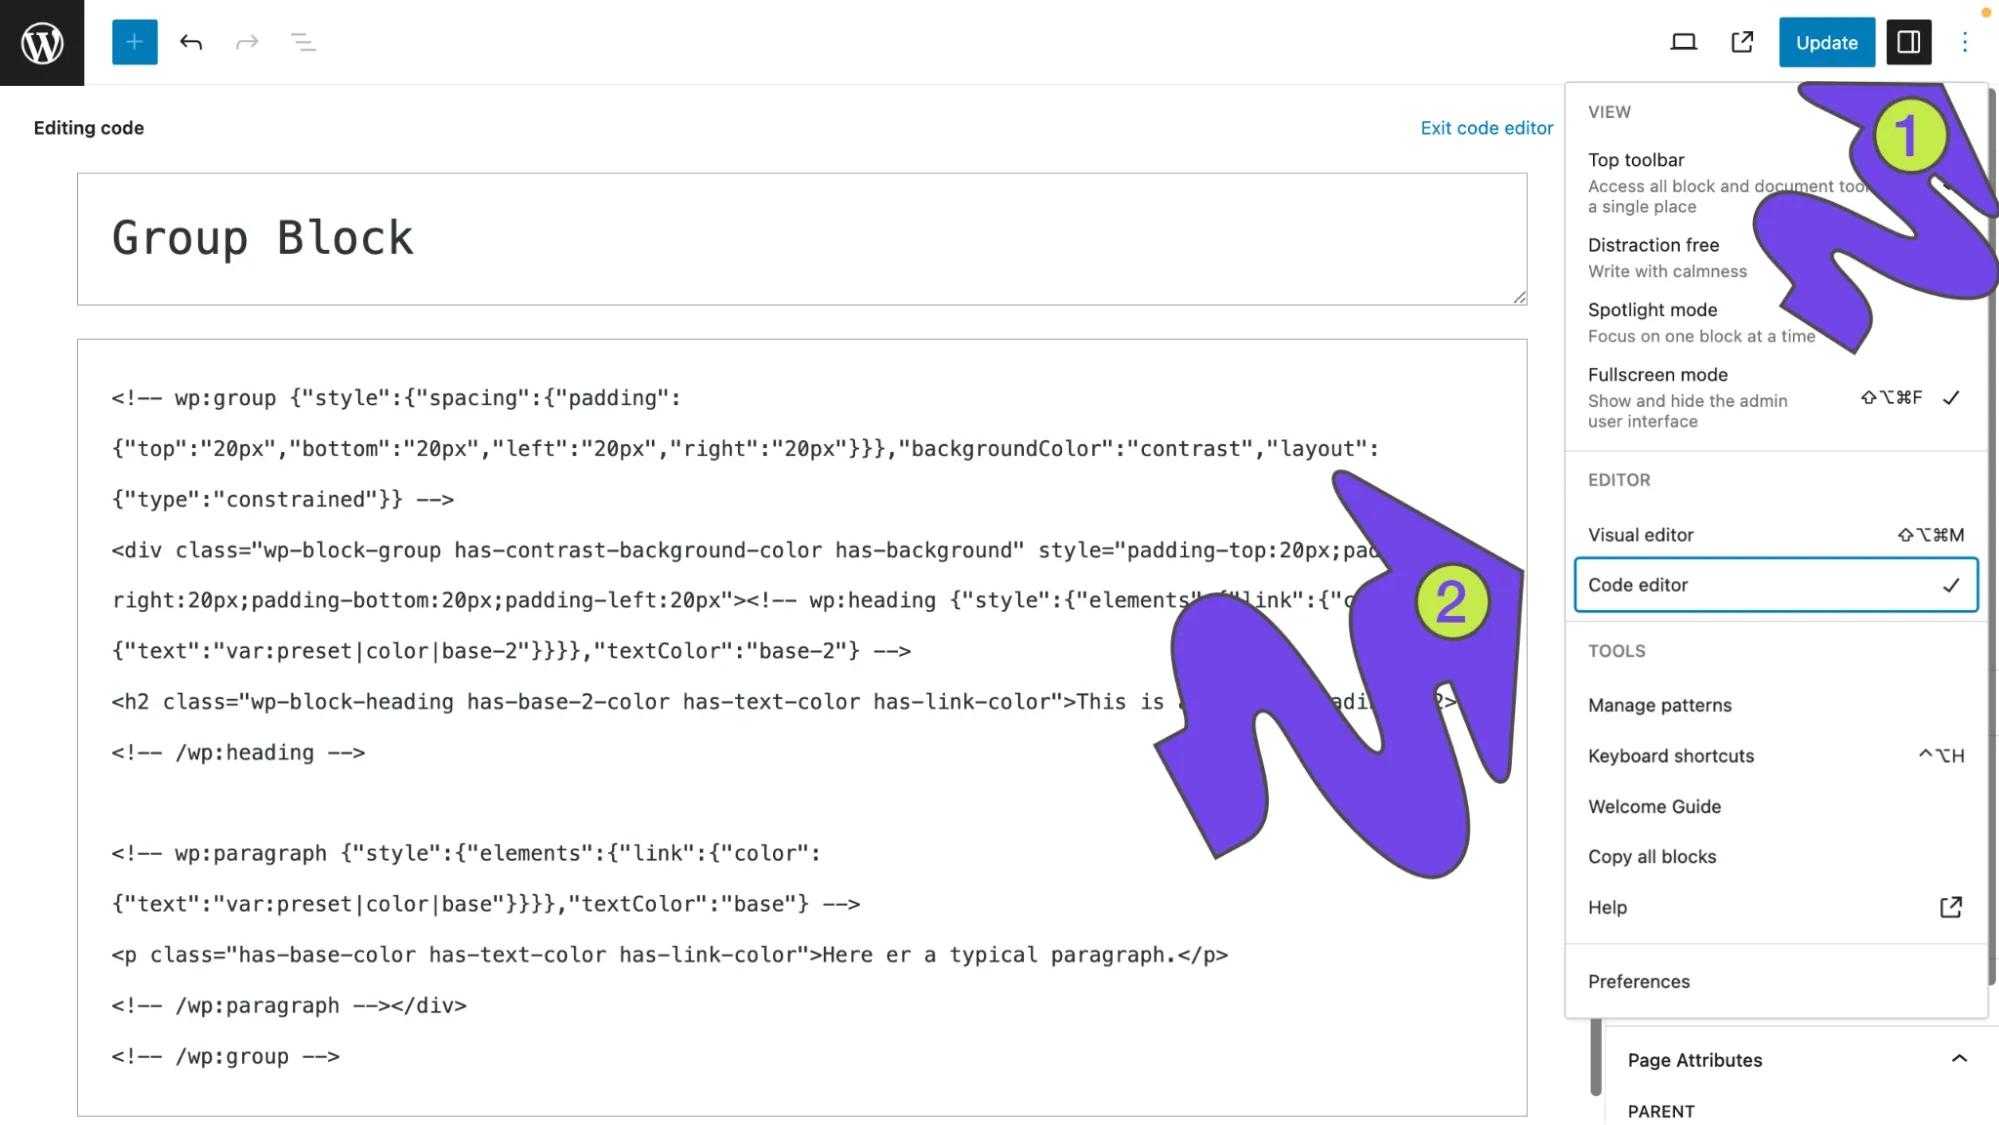
Select the Visual Editor option to return to how you normally work with the Block Editor
Summing Up
Understanding the markup that makes up any WordPress block is not as difficult as it might seem. Like HTML and CSS it has a pattern. Once you break the code down, you will see that it is predictable and understandable.
While this primer won’t make you a theme developer you should now feel comfortable when you see block grammar. It may even start you on your journey to more advanced knowledge.
