
Managing a small business website is a team effort. WordPress is a popular platform that allows each person to fulfill a specific role in maintaining the site. These levels of access are called WordPress user roles.
By understanding and implementing user roles, companies can manage website operations without compromising site security.
“Contrary to popular belief, not every user accessing your WordPress instance needs to be categorized under the administrator role. Assign people to the appropriate roles and you’ll greatly reduce your security risk.”
— Michiel Heijmans, partner at Yoast
During the fast pace of day-to-day small business operations, it can be tempting to share website passwords with coworkers as a shortcut for completing tasks quickly.
However, a more secure and manageable approach is to discourage password sharing and instead assign WordPress user roles based on specific job responsibilities.
Types of WordPress user roles

The first step is to understand the different user roles and capabilities, and how they relate to business functions. Although it is possible to customize WordPress user roles with code adjustments or plugins, these are the five default user roles for a single WordPress site.
1. Administrator
The WordPress Administrator has full access and control over the WordPress dashboard. The administrator can install plugins, adjust themes, add users, manage widgets and publish posts and pages.
The administrator can do everything related to creating, managing, and deleting the WordPress site.
Critically, the Administrator is also responsible for implementing security measures such as enabling auto-updates, configuring two-factor authentication, installing SSL certificates, and monitoring security logs, tasks that can be simplified with managed WordPress hosting.
In instances when there are multiple WordPress sites, there is a role for a Super Administrator who has control over the entire network.
Ideally, a WordPress Administrator is a web developer with knowledge of WordPress plugins and potential plugin conflicts. They also know what the marketing and editorial departments need in terms of site menus and sidebars, since managing the menus and sidebars are administrative functions by default.
2. Editor
The WordPress Editor is the site content manager. They can set up categories, assign authors, and publish posts and pages. They also have the ability to delete content.
3. Author
WordPress Authors can write and publish their own content, including files and images, but cannot publish anyone else’s content. Authors can also delete posts, but only their own. Authors can moderate comments on their own articles, but they can’t do this with publications created by other users.
4. Contributor
WordPress Contributors can write their own content and edit it before submission, but cannot publish to the site. Contributors cannot upload files or images.
Once content is submitted, contributors cannot delete or edit their contributions — these must be managed by Editors or Administrators.
This role is most useful for working with first-time contributors to your site, guest bloggers, or authors who add content infrequently and need editorial oversight before publication.
5. Subscriber
Subscribers are the most limited out of all user roles. Aside from being able to manage their own user profile, the rest of their access to the site is read-only.
Quick reference: WordPress user role capabilities
This table provides a quick overview to help you decide which role is appropriate for each team member.
| Capability | Subscriber | Contributor | Author | Editor | Administrator |
|---|---|---|---|---|---|
| Read content | ✓ | ✓ | ✓ | ✓ | ✓ |
| Edit own profile | ✓ | ✓ | ✓ | ✓ | ✓ |
| Write posts | ✗ | ✓ | ✓ | ✓ | ✓ |
| Publish own posts | ✗ | ✗ | ✓ | ✓ | ✓ |
| Upload files/images | ✗ | ✗ | ✓ | ✓ | ✓ |
| Publish others’ posts | ✗ | ✗ | ✗ | ✓ | ✓ |
| Delete posts | ✗ | ✗ | Own only | ✓ | ✓ |
| Manage categories | ✗ | ✗ | ✗ | ✓ | ✓ |
| Install plugins | ✗ | ✗ | ✗ | ✗ | ✓ |
| Manage themes | ✗ | ✗ | ✗ | ✗ | ✓ |
| Manage users | ✗ | ✗ | ✗ | ✗ | ✓ |
How to create custom WordPress user roles
Your team’s needs may not perfectly fit one of the standard roles. Additional user roles can be added with custom sets of permissions based on your unique workflow. There are three main approaches:
Option 1: Use plugins that include specific user roles
Some well-established plugins come with additional user roles included to support the features they offer. For example:
- Ecommerce plugins: Add Customer roles (similar to Subscriber but can view past purchases and order status) and Shop Manager roles (can manage products and orders without full admin access).
- Forum plugins: Add roles like Moderator, Participant, and Spectator.
- Membership plugins: Include various member tier roles with different access levels.
To make use of these roles, you don’t have to do anything other than install the plugin. The new roles will automatically appear in your user role dropdown.
Option 2: Use role management plugins to create your own roles
If you’re working on a custom feature for your site, you may need to set up your own fully custom user roles. Role management plugins make this easy by allowing administrators to:
- Change the permissions: For any of the default WordPress user roles. For example, you could allow Contributors to add media to their posts, or allow Authors to create pages as well as posts.
- Add a new user role: Assign specific permissions to it. A new role can begin as a copy of any existing role, or you can start from scratch.
- Delete user roles: When they’re no longer needed.
- Restore the WordPress default user roles: To their factory install state if you’ve made changes you want to undo.
These plugins give you control over a wide range of permissions with a simple set of checkboxes. All you need to do is select the specific tasks you want the new role to access.
You can also allow default or new user roles to only view certain widgets or menu items, access specific forms, or work with custom post types.
Option 3: Add custom PHP code
If you’re a developer, you can create new custom user roles by modifying your theme’s functions.php file. You can add a new role using the WordPress add_role() function, or add new capabilities to an existing user role with the add_cap() function.
This method requires comfort with editing theme files and understanding WordPress functions. Always back up your functions.php file before making any changes to avoid breaking your site.
Setting up new users in WordPress
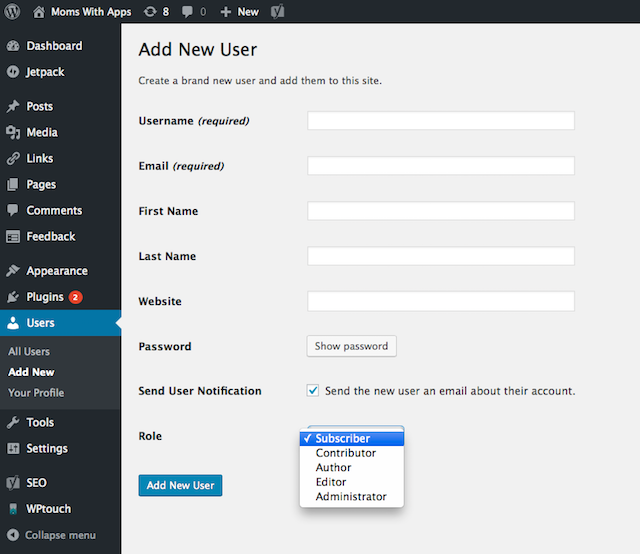
From the WordPress Dashboard, site administrators can select Users > Add New, and then assign the appropriate user role.
Best practices when adding new users
When you’re setting up new WordPress users, follow these security best practices:
- Require strong passwords: WordPress has built-in password strength indicators. Ensure new users create passwords that meet strong security standards.
- Use unique usernames: Avoid using Admin or predictable usernames that make accounts easier to target.
- Assign the minimum necessary role: Always start with the lowest permission level needed for the user’s job function. You can always upgrade their role later if needed.
- Provide role-specific training: Make sure new users understand what they can and cannot do with their assigned role to prevent accidental changes or deletions.
How to change user roles in WordPress
As teams grow and responsibilities shift, it’s normal to promote (or limit) access. Changing a user’s role is one of the quickest ways to adjust what they can do in WordPress — without creating a new account.
Change a single user’s role
If you need to update the capabilities of a single user, the process is straightforward.
- Log in as an Administrator. Only Administrators (and Super Admins on multisite) can reliably manage other users, which helps prevent permission mistakes.
- Go to Users > All Users. This view lists every account on your site and is the fastest place to make role changes.
- Find the user and click their username (or Edit). Opening the user profile ensures you’re changing the correct account — especially if multiple users have similar names.
- Scroll to Role and choose the new role from the dropdown. Pick the lowest role that still lets them do their job (for example, Contributor vs. Author) to reduce security risk.
- Click Update User. WordPress won’t apply the change until you save. Once updated, the user’s permissions take effect immediately.
Change roles in bulk (multiple users at once)
If you’re onboarding a group of writers or restructuring permissions, bulk updates are faster.
- Go to Users > All Users.
- Select the checkboxes next to the accounts you want to change.
- Choose Change role to… from the Bulk Actions dropdown.
- Select the role, then click Change.
Quick recommendations for assigning roles
Not sure which role to assign? Here are the most common scenarios:
- Administrator (only for you): Solo site owner
- Author: Blog writer who publishes their own posts
- Contributor: Writer who submits drafts for review
- Editor: Editor who manages all content and comments
- Subscriber: Visitor who needs account access
Advantages of assigning user roles
Assigning user roles helps limit access to only what each person needs, reducing the risk of accidental changes or WordPress security issues.
Avoid plugin conflicts by having a single WordPress Administrator
Many features on a WordPress site are built out by installing plugins. Plugins are self-contained software modules that perform specific functions on a WordPress site. Sometimes, if two plugins are installed that perform the same task, conflicts can occur.
This could happen when multiple people have access to the admin password and install plugins without coordinating with each other.
Having a single WordPress Administrator with a global view of the site’s functionality can minimize plugin conflicts and maximize site security.
Keep content secure by having only the necessary number of experienced Editors
Two user roles with the ability to delete content are Administrator and Editor. Too many people with the ability to delete content could lead to security holes, whether intentional or not.
Consider limiting the number of Editors to only an essential number for getting the site work done, and make sure every Editor is experienced with the WordPress dashboard.
In an ideal world, only one Editor per site who worked closely with the Administrator. This way, security of the site’s content could be centralized with two trustworthy and experienced people.
If they are a good team that communicates regularly, the Editor can also enlist the Administrator’s help in arranging menus and sidebars based on the site’s most current content needs.
Keep generating new content
Creating new content for a single site means lots of writing and publishing, especially if new content is being created on a daily basis.
By having a team of writers in the form of Authors or Contributors, companies can generate volumes of new content directly into WordPress without risk to the rest of the website.
Authors and Contributors could be the largest number of users on the site, powering new posts, while the Administrator and Editor can focus on site development and overall content strategy.
Closing thoughts on WordPress user roles
WordPress user roles are one of the simplest ways to strengthen site security without slowing your team down. When each person has the right level of access for their job — rather than a shared password or unnecessary admin privileges — you reduce the chances of slip-ups.
As a next step, take a quick inventory of who currently has access to your WordPress dashboard and what they actually need to do.
Start by trimming Administrator accounts to the minimum, assign Editors only where publishing and deletion rights are truly required, and use Authors or Contributors to keep content moving through a clear review-and-publish workflow.
If your process is more complex, role management plugins or custom roles can fine-tune permissions without giving away the keys to the whole site.
With the right roles in place, you’ll have a safer website, cleaner accountability, and a setup that scales as your business grows — so your team can focus on creating and improving your site, not fixing preventable mistakes.