Key takeaways
- Secure Shell (SSH) tunneling is a security method that creates an encrypted connection for transmitting data, adding protection to applications that don't have built-in encryption capabilities.
- The primary purpose of SSH tunneling is to protect data traffic over unsecured networks by creating an encrypted channel between a local machine (SSH client) and a remote machine (SSH server).
- SSH tunneling has multiple practical applications, including secure access to remote web services, protected database connections, VPN-like functionality, and securing legacy applications without modifying their code.

There’s lots of articles on SSH tunneling, and plenty that cover how to create a tunnel with PuTTY, so why write another one?
Because I spent longer than I should have trying to get this working the other day, and failing due to a simple order of operations issue.
So I decided to spell it out for people like me who need that extra little bit of help. We’ll start with some background information to help understand SSH tunneling, and then walk through the process of setting up an SSH tunnel with PuTTY.
Your business needs a website.
Understanding SSH tunneling
Before diving into the steps for creating an SSH tunnel with PuTTY, it's important to understand what SSH tunneling is and how it secures data traffic over untrusted networks.
What is SSH tunneling?
Secure Shell (SSH) tunneling, also known as SSH port forwarding, is a method of transporting network data through an encrypted connection.
It allows you to redirect the network traffic of any TCP/IP port through a secure channel, effectively adding encryption to applications that don't natively support it.
This keeps bad actors from eavesdropping or intercepting data while it's in transit, ensuring a higher level of security when accessing services over untrusted networks.
Purpose of SSH tunneling
The primary purpose of SSH tunneling is to protect application data traffic over networks that may not be secure.
By keeping data within an encrypted SSH connection, you ensure confidentiality and integrity between the communicating parties.
This is particularly useful for adding security to legacy applications without modifying them or altering end-user workflows.
How SSH tunneling secures data traffic
When you establish an SSH tunnel, you create a secure connection between an SSH client (your local machine) and an SSH server (the remote machine you're connecting to).
The application on your local machine sends data to a local port that the SSH client listens on.
The SSH client then encrypts this data and forwards it through the SSH tunnel to the SSH server, which decrypts it and forwards it to the intended destination.
This process secures the communication without the need to modify the application itself.
Common use cases for SSH tunneling
SSH tunneling is a versatile tool that can be used in various scenarios to enhance security and accessibility. Some common use cases include:
Accessing remote web services
By creating an SSH tunnel, you can securely access web services hosted on remote servers that might not be directly accessible due to network restrictions.
This is particularly useful when you need to manage web applications or administrative interfaces over an unsecured network.
Connecting to databases
SSH tunneling allows you to securely connect to remote databases.
Instead of exposing your database servers to the internet, you can keep them behind a firewall and use SSH tunneling to securely forward database connections, ensuring that sensitive data is protected during transit.
Implementing VPNs
SSH tunneling can be used to create a secure VPN-like connection between your local machine and a remote network.
This enables you to access network resources as if you were connected locally, which is useful for accessing intranet services or internal applications.
Creating reverse tunnels
Reverse SSH tunneling allows you to initiate a connection from a remote machine back to your local machine.
This is useful when the remote machine is behind a firewall or NAT and cannot accept incoming connections.
By establishing a reverse tunnel, you can remotely access services running on the remote machine.
Securing legacy applications
Many legacy applications do not support encryption natively.
SSH tunneling can add a layer of security to these applications without modifying them, by forwarding their traffic through encrypted tunnels.
Step-by-step guide to creating an SSH tunnel with PuTTY
Setting up an SSH tunnel with PuTTY can sometimes be confusing due to the order of operations.
To help, here is a straightforward, step-by-step guide.
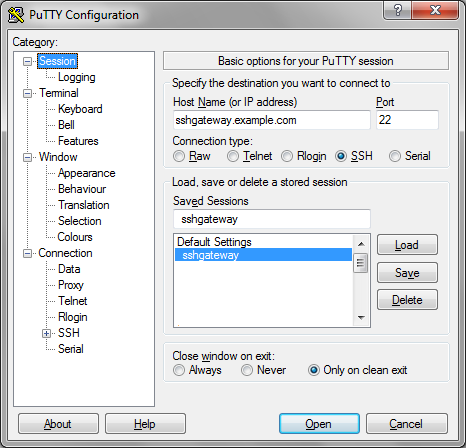
1. Load the gateway
First, if you have not already done so, create and save the SSH gateway server as you would any other. Next, select it from the Saved Sessions list and click Load, as shown below:
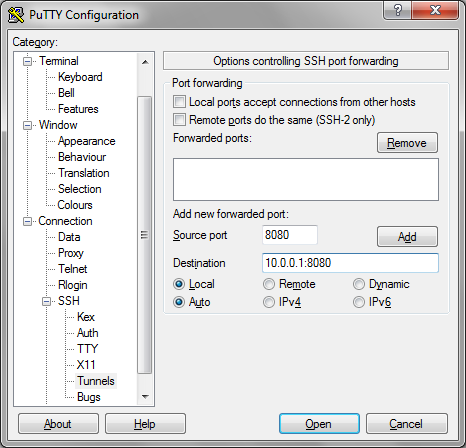
2. Configure the tunnel
In the left-hand side nav tree, click Connection > SSH > Tunnels. Enter the port that you want to connect to locally under Source port.
Then supply the destination address (the server that is available from your SSH gateway, but not from your local machine) as “Destination” as shown in the following image:
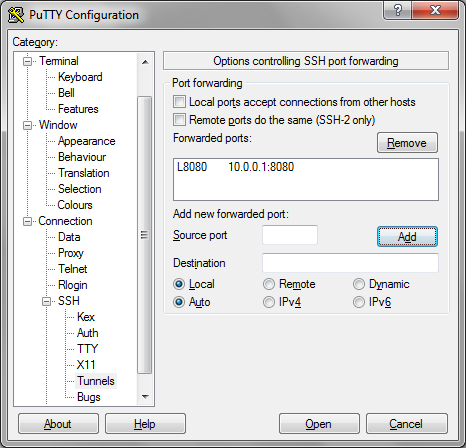
3. Open the tunnel
Click Add, which will set the configuration as shown:
Next, click Open to connect to your gateway. Log in as usual.
Now, as long as you leave that SSH terminal window open, all traffic to the Source Port on your localhost will be forwarded on to the Destination.
If the destination port provides a web service, you can open a browser tab and visit http://127.0.0.1:8080 in this example, and you should see the service from the destination server.