
You know the feeling. You’ve set up a sharp-looking WordPress website that’s sure to wow visitors, but there’s one problem — it just isn’t loading fast enough. Will visitors wait for your client’s lovely page to render? Probably not. Fortunately, you have the power to speed up WordPress and get those pages up on the visitor’s screen post haste.
Related: How to use WordPress with cPanel
Here’s what we’re going to cover in this post:
- Why website speed is important.
- How fast should a WordPress site load?
- Test your client’s WordPress page speed
- What makes WordPress slow?
- Optimize your WordPress performance with The Hub by GoDaddy Pro
- How to speed up your client’s WordPress site
- Get quality hosting.
- Enable GZIP.
- Add expires headers.
- Configure ETags.
- Always use the latest version of PHP.
- Minimize plugins.
- Use a fast theme and remove unneeded ones.
- Choose fonts wisely.
- Disable hotlinking.
- Add page caching.
- Crunch images and lazy load them.
- Embed videos with a third-party platform.
- Minify JS and CSS.
- Optimize your MySQL database tables.
- Consider CDN.
- Monitor performance overtime.
- Making an action plan to improve the speed of your client’s WordPress site.
Let’s get started!
Why website speed is important
Web surfers are an impatient lot. Pages with a longer load time tend to have higher bounce rates, meaning people just bounce off to another site rather than engaging with your client’s.
How long before they do that?
Studies suggest a mere 5 seconds is all it takes to launch your bounce rate up to 38%.
Note that some bounces are not necessarily due to page load speed as some users hit the next button as soon as one second after arriving on a site.
Also very important: Google loves faster sites. You could garner an extra boost in rankings simply by speeding up your WordPress site.
Related: Beginner’s SEO guide: Search engine optimization for small business websites
How fast should a WordPress site load?
The ideal number is 2 seconds. However, many WordPress sites cannot achieve this lofty goal. It was set years ago before pages became larger and more graphically oriented. So aim for it, but don’t be crushed if you don’t quite get there. With Google’s Core Web Vitals update, your client’s WordPress site is considered “good” if 75% of the website loads in 2.5 seconds or less.
Test your client’s WordPress page speed
Before learning how to improve the speed of the WordPress site you’re working on, determine if you even need to do so.
First things first: conduct a WordPress page speed test to see how fast the site is currently loading. Using either Pingdom or Google PageSpeed Insights, paste in your the site’s URL, and then press Go.
Be prepared to get a bit flooded with information. Some of the key bits to focus on include: Overall site score, load time, and anything listed under “Improve page performance.”
Depending on which tool you choose to test your client’s page speed, you may get slightly different results. This can be due to what they’re checking, what server they’re checking from (think North America vs Japan), and other factors. To accurately track own the site’s progress, pick one and stick to it. If you’re given a choice of “Test from” locations, pick one that represents the location of the bulk of your client’s traffic and stick with that as well.
What makes WordPress slow?
You’ve run the tests and determined your client’s WordPress page speed needs some optimization. But before you start tweaking, you should know the most common offenders that slow down WordPress. WordPress delivers many valuable features, but speed can be hampered by this bounty.
Factors that can put the brakes on performance include:
- Poor hosting environment
- Web server configuration
- WordPress configuration
- Large images
- Poorly coded plugins
- External scripts
- Network latency - i.e. how long it takes content to travel from server to browser.
The good news is that you have control over all of these things, at least to some extent.
Optimize your client’s WordPress website performance with The Hub by GoDaddy Pro
Back to top
Before you begin any modification of your client’s WordPress site, especially performance optimization, it is important to have a full backup of the site’s WordPress installation. With The Hub by GoDaddy Pro, you can create one manually or sign up for automatic daily backups.
The Hub monitors page speed performance and lets you compare past and current metrics, giving you the tools you need to track the success of your WordPress speed optimization efforts. Hub users also receive 24/7, prioritized support tickets from specialized Guides. The Hub makes managing one or more websites a breeze.
How to speed up your client’s WordPress site
Get quality hosting
Speed enhancements can come from two places: The server and its configuration, or WordPress and its optimization. Since the server can have a major impact, it’s an ideal place to start.
Quality of hosting is one of the most important factors for WordPress page speed. You can only tweak up to your server’s limits, which can be affected by many factors – memory allocated connection type and speed, how many sites are on the same server, and other factors.
Some web hosts are now catering to WordPress users. That includes GoDaddy, which offers specialized managed Hosting for WordPress that’s configured for performance and enhanced security right out of the box.
Related: How to choose the best Hosting for WordPress plan
Enable GZIP
Now we’re going to get into some geeky stuff. GZIP is an algorithm used for file compression and decompression.
By enabling this, your server can send out smaller, compressed versions of many files, which browsers know how to decompress. This speeds up the data transfer rate.
To enable GZIP, you’ll need to modify your .htaccess file. This is a control file that’s located in the root of your client’s WordPress website.
Be sure to make a backup of this file before changing it, because a little typo here can bring your client’s whole site down.
To set up GZIP, open your .htaccess file for editing. Look for the line that says #END WordPress. All code from this article should go below that line.
Here’s what to add:
 <IfModule mod_deflate.c>
 # Compress HTML, CSS, JavaScript, Text, XML and fonts
 AddOutputFilterByType DEFLATE application/javascript
 AddOutputFilterByType DEFLATE application/rss+xml
 AddOutputFilterByType DEFLATE application/vnd.ms-fontobject
 AddOutputFilterByType DEFLATE application/x-font
 AddOutputFilterByType DEFLATE application/x-font-opentype
 AddOutputFilterByType DEFLATE application/x-font-otf
 AddOutputFilterByType DEFLATE application/x-font-truetype
 AddOutputFilterByType DEFLATE application/x-font-ttf
 AddOutputFilterByType DEFLATE application/x-javascript
 AddOutputFilterByType DEFLATE application/xhtml+xml
 AddOutputFilterByType DEFLATE application/xml
 AddOutputFilterByType DEFLATE font/opentype
 AddOutputFilterByType DEFLATE font/otf
 AddOutputFilterByType DEFLATE font/ttf
 AddOutputFilterByType DEFLATE image/svg+xml
 AddOutputFilterByType DEFLATE image/x-icon
 AddOutputFilterByType DEFLATE text/css
 AddOutputFilterByType DEFLATE text/html
 AddOutputFilterByType DEFLATE text/javascript
 AddOutputFilterByType DEFLATE text/plain
 AddOutputFilterByType DEFLATE text/xml
 # Remove browser bugs (only needed for really old browsers)
 BrowserMatch ^Mozilla/4 gzip-only-text/html
 BrowserMatch ^Mozilla/4.0[678] no-gzip
 BrowserMatch bMSIE !no-gzip !gzip-only-text/html
 Header append Vary User-Agent
 </IfModule>
Save your changes and check out the site to make sure everything’s still running smoothly. Then you’re ready for the next step.
Related: .htaccess tutorial and cheat sheet
Add expires headers
Expires headers tell a browser whether a resource can be fetched from the browser’s cache or if it must be retrieved from the server. When you set expires headers for certain resources, such as images or CSS files, the browser knows to store those things in its cache.
Once again, the magic takes place in .htaccess. Beneath the code you added for GZIP, add this code to set expires headers:
<IfModule mod_expires.c>
 # Enable expirations
 ExpiresActive On
 # Default directive
 ExpiresDefault "access plus 1 month"
 # My favicon
 ExpiresByType image/x-icon "access plus 1 year"
 # Images
 ExpiresByType image/gif "access plus 1 month"
 ExpiresByType image/png "access plus 1 month"
 ExpiresByType image/jpg "access plus 1 month"
 ExpiresByType image/jpeg "access plus 1 month"
 # CSS
 ExpiresByType text/css "access plus 1 month"
 # Javascript
 ExpiresByType application/javascript "access plus 1 year"
 </IfModule>
Once again, save and then review your client’s site. Then we have one more bit of code to paste in there.
Configure ETags
The ETag, or entity tag, is related to the caching of objects. It’s one of the most commonly reported speed fixes needed for website’s speed optimization.
While ETags do have some advantages, such as better caching and lower bandwidth usage, they can also cause slower load speed and result in the same object ending up cached multiple times. A preferred route for getting rid of this problem on a WordPress site is to simply turn them off.
To do so, append the following to your .htaccess.
#Disable Etags
 <IfModule mod_headers.c>
 Header unset Etag
 Header set Connection keep-alive
 </IfModule>
 FileETag None
Back to top
Always use the latest version of PHP
WordPress is written in PHP, which is a scripting code used to create web pages. When someone visits your client’s site, the PHP code retrieves the site’s information and displays it in the HTML page that website visitors see. Outdated PHP versions may struggle to fetch or display information correctly, causing slowed page speeds and loading times. They also won’t have updated security patches, leaving the site vulnerable to attacks that may further inhibit speed or function.
To boost performance, use PHP 7 or higher on your clients’ sites. It’s significantly faster and more secure than predecessors. You should be able to see which version of PHP you’re running in your hosting control panel. If the WordPress site is running a PHP version below 7, your hosting provider will need to update it.
Minimize plugins
The first and easiest step to speed up a WordPress site is to deactivate and delete any unnecessary plugins.
From there, you can try selectively disabling plugins to see if one of them is significantly affecting site performance. If so, swap it out for a different one or contact the developer for support.
It might be possible for the developer to speed up a WordPress plugin if you point out the problem.
Getting rid of unneeded plugins will not only improve WordPress speed, but save you from a bunch of annoying update notices too.
Use a fast theme and remove unneeded ones
Some themes are coded for glitz and glamour, while others are speed machines. If the theme you’re using has lots of bells and whistles, it’s more likely to be on the slower end. Try swapping out for a known fast theme such as GeneratePress or WP-Astra.
While you’re at it, ditch unused themes, but keep in mind it’s a good idea to have one spare around so you have one to switch to in an emergency.
Choose fonts wisely
Creative fonts can add visual interest to your client’s site and contribute to brand aesthetics. However,if you’re not careful, they can slow the site down. Using numerous fonts or poorly performing fonts will cause the page to lag, as it gives the server more items to process.
Google fonts boost WordPress speed optimization because they’re hosted on a different server and are already optimized for fast loading. Fonts should be preloaded, which forces a visitor’s browser to load them immediately, instead of as a last step. Fonts should also be in WOFF or WOFF2 formats, which are optimized for web use and speed.
Disable hotlinking
Lazy web developers may be tempted to hotlink some of your website assets like images, depleting your site’s server resources. They do this by embedding your assets onto their pages through a direct link. If someone hotlinks an image from your client’s website, you’ll notice poor speeds and loading times.
Disabling hotlinking is a reliable way to protect your clients’ WordPress sites and speed them up. You can use a plugin like All In One WP Security & Firewall, which has an anti-hotlinking feature that prevents other sites from using the image file’s original URL. There are also plugins that disable right-clicking on your client’s site, so no one can copy the URL or even download the image.
Add page caching
Here’s a biggie - page caching. What is it?
Magic.
Well, not exactly, but it can seem that way because it’s one of the quickest and easiest ways to ramp up site load speed. Basically, page caching lets a website store data to use to respond to search requests, which in the case of WordPress, means the pages that result from queries.
Caching tools create static files for each page and post. Servers store them to more quickly deliver content to users who have entered a search. Static files load much more quickly than new pages and posts.
WordPress caching plugins
To get your hands on this mojo, install a caching plugin. WordPress highly recommends W3 Total Cache, WP Super Cache and Cache Enabler as top choices. Note that GoDaddy WordPress Hosting sites do not need this as this service already has an optimized cache.
Related: Speeding up WordPress with memcached and W3 Total Cache
Crunch images and lazy load them
Everyone loves to have crisp, high-quality images on their website. Images can make sites pop — but they also can slow sites down.
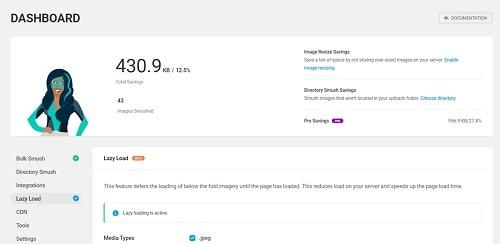
Many WordPress users aren’t aware they can have high-resolution images at reduced image sizes. Use the free plugin Smush to automatically compress images without reducing a lot of quality.
Smush provides another magical power: lazy loading.
What is lazy loading? Lazy loading simply means not loading resources onto a page until the user needs them.
For example, let’s assume you have a landing page-style home page, with many images and even a video or two on one long page. The user doesn’t see the images and videos below the fold when the page first loads, so instead, placeholders are used and the images and videos are only loaded once the user scrolls down and they are actually needed. By loading fewer resources in the initial request, the page loads much more quickly.
If you want to get the best bang for your loading-time buck, though, don’t lazy load text content.
Text is quick to render and critical to SEO rankings. Lazy loading content potentially cost you rank and doesn’t save you much in terms of loading time.
Graphics, photos and videos are a much better choice for lazy loading, as long as you have properly set your client's title and alt tags (which you should be doing anyway!), since these resources also take a great deal longer to load than their text counterparts.
Lazy loading might be enabled by default when you install Smush, but it’s best to double-check.
Embed videos with a third-party platform
Video files contain a vast amount of data, and uploading them directly to your client’s website will gobble up valuable bandwidth. Not only will this slow the site down, but it may exceed the bandwidth limits set by the web hosting service, resulting in fees or service disruption.
Instead of uploading videos, embed them using YouTube or Vimeo. The video will be hosted on their server instead of your client’s, improving speeds. In WordPress, simply paste the video’s URL where you want the video to appear, and it will automatically be embedded. You can then use the toolbar and the settings column to modify its properties like width, alignment, and caption.
Minify JS and CSS
To reduce the size of your code; use a plugin such as Fast Velocity Minify. This and plugins like it compress your CSS files, enabling them to load faster.
They can also compress JavaScript files and combine multiple files into just a few. This combining will help get rid of the “Too Many HTTP Requests” warning delivered by most page speed checkers.
Be careful, though.
It’s usually safe to minify CSS, so start with that.
Minifying JavaScript can sometimes cause site features to fail, so you’ll have to test drive various minification and combination settings until you find what works best for your client's site.
You can also defer the loading of certain resources, such as JavaScript, by moving them to the footer. This is another thing to approach with caution as it might affect page functioning.
Optimize your MySQL database tables
Because WordPress is database-driven, keeping a clean database is vital to keeping your site free of errors and site bloat.
Using the WP Optimize plugin will help to remove a great deal of database build-up with just a few clicks. It will run on an automated basis to perform a multitude of cleaning functions.
In addition to WordPress database optimization, you can schedule the plugin to automatically clean up residual content like post auto-drafts, unapproved/trashed comments, pingbacks, and transient options. This plugin can actually perform some of the tasks mentioned earlier as well, such as page caching and minification, as well as cleaning up your client's WordPress database.
If you don’t want to install a plugin, we have an article that walks you through the manual process of cleaning up a WordPress database here.
Consider a CDN
CDN is short for content delivery network. It’s a service you can sign up for that’s entirely separate from your client’s WordPress site but that works in conjunction with it.
A CDN consists of a network of servers spread around the world. The servers host and deliver copies of your static content, such as CSS, JavaScript, and images. Your client’s content is then seamlessly delivered from the server that’s closest to the visitor so that it gets there faster.
To use a CDN with WordPress you need to do two things:
- Sign up with a CDN provider, such as CloudFlare, Amazon CloudFront or Akamai. Billing might be monthly or by data usage but is usually inexpensive. Most offer free trials so you can check out several.
- Use a WordPress CDN plugin like CD Enabler or WP Rocket to integrate the CDN into your client’s site.
Monitor performance over time
Getting your client’s site up to speed is great. Keeping it there over time is even better. Rather than constantly running URLs through speed checkers, you can employ a performance monitoring tool to keep an eye on things for you. If a slowdown strikes, you’ll receive a timely alert.
With The Hub’s convenient dashboard, you can monitor the speed and performance of all your clients’ websites in one user-friendly place. It provides previous and real-time stats on page speeds and loading times, highlighting trends and sending alerts for drops in performance. The Hub by GoDaddy Pro is also free to try, so you can start tracking your WordPress page speed optimization efforts today.
Making an action plan to improve the speed of your client’s WordPress site
That’s a lot of steps! But don’t stress — you don’t have to do them all at once. While there are quite a few tweaks you can apply to shave off milliseconds here and there, here are four things you can implement to speed up your client’s site right now.
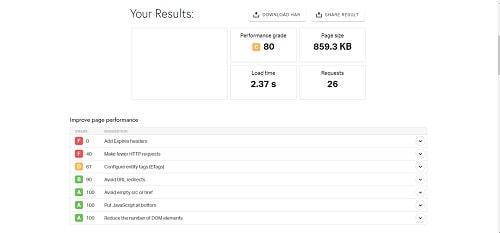
These steps applied to a simple test site raised the Pingdom load speed score from C (80) to A (96) and dropped load time to under two seconds:
- Enable GZIP, add Expires headers, and configure ETags by adding the code listed above to your site’s root .htaccess file. Be sure to back up the file first, just in case something goes awry. This code goes beneath the line that says #END WordPress.
- Install Smush and enable lazy loading of images. Use bulk compress to compress existing images.
- Install and activate a minifier plugin such as Fast Velocity Minify. Stick with the default settings.
- Install Cache Enabler or a similar caching plugin. The default settings are usually helpful as is.
Here’s the Pingdom report before:
And after:
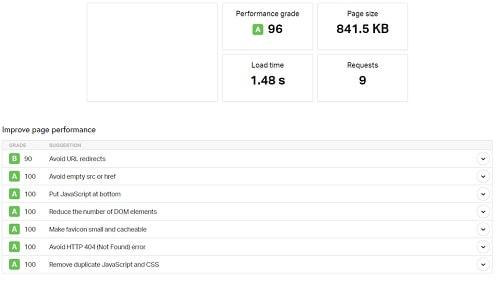
The test site was quite small and simple, so a more complex site would likely benefit even more from these steps, though getting it under two seconds might be tougher.
If you want to optimize further, complete the rest of the items in this article. In no time you’ll have one of the faster loading sites on the web. Speedy page loading = happier visitors = a win for them and for you.
If you’re tired of managing all of the technical aspects of WordPress on your own, try WordPress Hosting from GoDaddy. It’s the perfect solution for anyone who wants the power and simplicity of WordPress without the hassle of constant updates and technical adjustments.
This article includes content originally published on the GoDaddy blog by the following authors: Cody Landefeld, Christopher Carfi, Marcus Couch and Stephani Worts.
Meet the 27-hour day.
We built The Hub by GoDaddy Pro to save you time. Lots of time. Our members report saving an average three hours each month for every client website they maintain. Are you adding that kind of time to your day?