Beginning in July 2018, the Chrome web browser will identify all sites that have not migrated to HTTPS as “not secure”. This obviously is not going to inspire confidence for your users, which is a key reason that many websites are transitioning from HTTP (hypertext transfer protocol) to HTTPS (hypertext transfer protocol secure). It’s also an all-around good idea, because it’s an easy way to protect users who visit your web site. This post offers three quick tips to help you install an SSL certificate on cPanel.
Editor’s note: The Chrome browser has about 60 percent market share at the time of writing.
The difference between http:// and https:// URLs is simple: security.
The “S” tacked onto the end signifies that the server uses encryption when communicating with the user’s browser. That means any attempt to intercept the information exchanged between the browser and the server would only deliver gibberish to the attacker rather than useful information such as user name and password or a credit card number. Without the “S,” information is exchanged in plain text, which means that anyone who intercepts it can read it.
Web browsers such as Chrome, Firefox, Safari, Edge and Internet Explorer display a padlock icon in the browser bar to indicate that a server is using HTTPS. Soon, that icon will be joined by the phrase “not secure” when Chrome detects a connection that doesn’t use HTTPS. The only way to avoid it is to modify your server to employ HTTPS. Equally important, Google is said to favor sites that employ HTTPS in search results.
To make the move to HTTPS, you’ll need to obtain an SSL certificate and install it on your server.
SSL stands for Secure Sockets Layer, which is a standard protocol used to create an encrypted connection. When a user visits your site using an https:// URL, the SSL certificate is sent to their browser. The certificate contains a public key that is necessary for initiating the secure connection along with other details that help ensure that your server can be trusted. The web server uses the public key in conjunction with a second, private key, to securely encrypt communications. This is known as public/private key encryption.
Your business needs a website.
How do you install an SSL certificate on cPanel?
To get the certificate installed on cPanel, you’ll need to go through three steps:
- Obtain an SSL Certificate from a certificate authority.
- Download and install the SSL Certificate files on your server.
- Install the SSL Certificate on the specific site or domain it’s registered for.
Let’s go through each step in detail.
1. Obtain an SSL Certificate
SSL certificates are issued by a certificate authority (CA). The CA verifies the legal identity of the requestor and verifies that the requestor controls the domain listed in the certificate. The certificate issued consists of a couple of small digital files that incorporate details of the issuer, an expiration date, the public key, and other data unique to the requestor.
Buy SSL certificates through hosting providers, such as GoDaddy, and then must be installed on your server.
For GoDaddy customers, once you’ve purchased the certificate, you need to request it for the domain name you want to use it for.
In some cases, you might need to generate a certificate signing request (CSR) to request an SSL certificate.
Note: If you’re using the certificate on the primary domain of a shared GoDaddy hosting account, GoDaddy will take care of the CSR and SSL installation for you when you purchase the certificate. For VPS, dedicated servers, or if your hosting is with another company, follow these steps to generate a CSR.
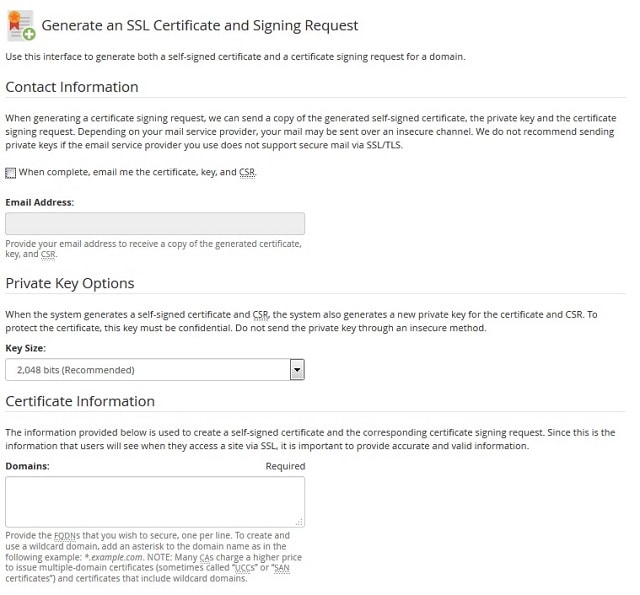
2. Download the SSL Certificate files and install on the server
Next you’ll need to download the SSL Certificate files and install them on your server. If GoDaddy is your certificate provider and your site is hosted through GoDaddy (i.e. the primary domain on a GoDaddy shared hosting account), GoDaddy will take care of the certificate installation for you.
3. Install the SSL Certificate on a specific site
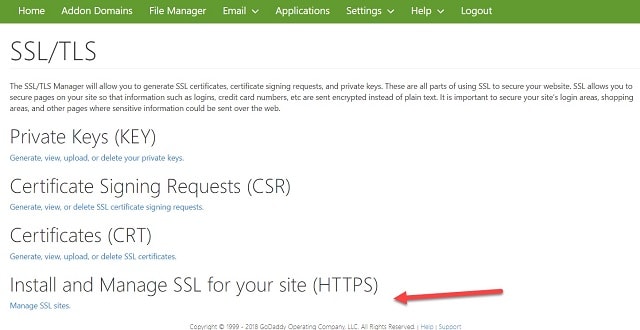
Once the SSL certificate is on your server, you still need to install it on the appropriate site or domain. After logging in to cPanel, look for and click on the SSL/TLS option.

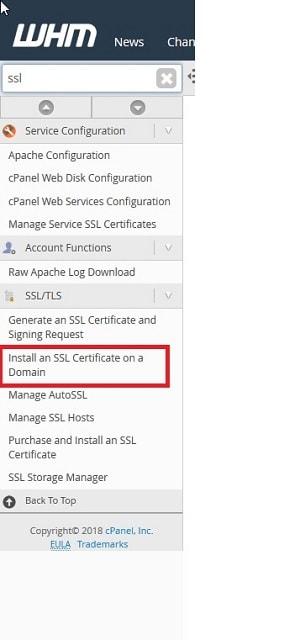
Next, look for “Install and Manage SSL for your site (HTTPS)” or “Install an SSL Certificate on a Domain”, as shown below:
On this screen, there are two ways you can install a certificate. The first is to click Browse Certificates to see what certificates are present on your server. There may be a self-signed certificate, but that is not your new SSL certificate. Select the certificate you wish to install and click Use Certificate. The system will automatically fill in the other text boxes. Then click Install.
The second method, available on the same page, is to select a domain name and let the application autofill the rest. This is often less confusing. Once you select a domain, click Autofill by Domain and the server will attempt to find the associated certificate.
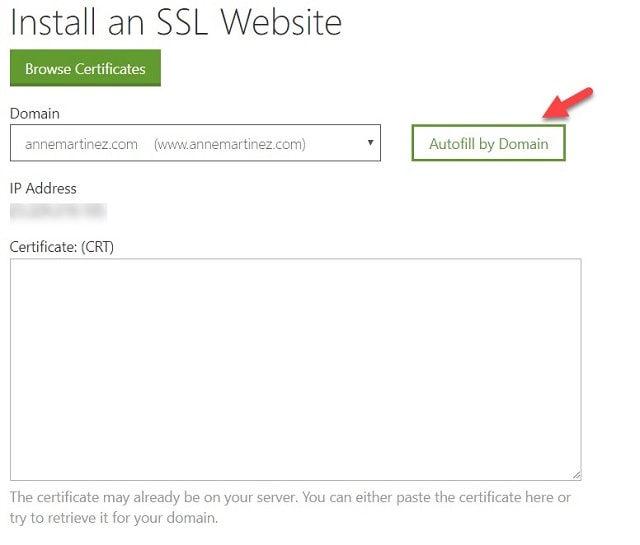
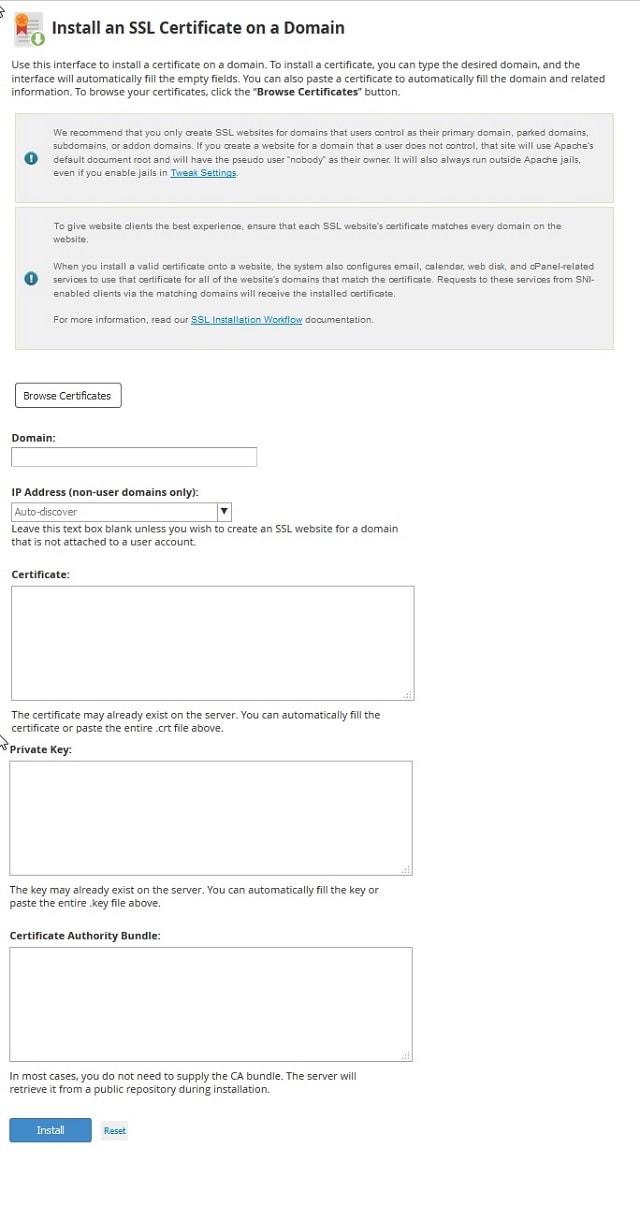
On success, the fields will be filled in with the details from the associated certificate, including the private key. Click Install to complete the installation.
Because it can involve multiple steps, obtaining and installing an SSL certificate can seem daunting at first. However, much of the process is handled automagically if you follow the simple instructions above.
If you run into trouble and are using GoDaddy, GoDaddy’s SSL Certificates Help page can help you sort it out, and of course you can always call GoDaddy technical support at 480-505-8877 for expert advice and assistance. Also, read about GoDaddy's cPanel Hosting options in detail.
Moving from HTTP to HTTPS is worth the effort
Your users will benefit from the peace of mind that little lock icon conveys, and your Google ranking may well get bumped up. With this one change, you can increase your data security and tick up your SEO presence — two goals high on the list of virtually every webmaster.
Start taking back your day.
We built The Hub by GoDaddy Pro to save you time. Lots of time. Our members report saving an average three hours each month for every client website they maintain. Are you ready to take back that kind of time?


