Hey, howdy, hi, and welcome! My name is Allie Nimmons. I’m an overall WordPress and WordCamp enthusiast. I own a small WordPress maintenance business, work for a WordPress plugin company. I also speak at WordCamps through the GoDaddy Pro Ambassador program.
Related: WordCamps and the WordPress community
I got my start in the tech industry through education and motivation I received at a WordCamp. It’s been my goal to pay that forward ever since.
This series is a guide for organizers of any sort of local conference, event, or meetup.
Let’s dive into the third chapter - creating a great website for your event!
How to build the perfect site for your community event
The website is the definitive resource for your community event. It's where your speakers, sponsors and attendees should be able to find everything they need before, during, and after the event.
In this chapter we'll cover:
- Your basic sitemap & pages
- Working with a website team
- Using the website to make an impact on the event
Your basic sitemap & pages
There are pages that most event websites should include. Each page has unique elements and details that are key for communicating vital information to attendees, speakers, sponsors, and volunteers. Creating a sitemap and identifying what info needs to be on each page is your first step.
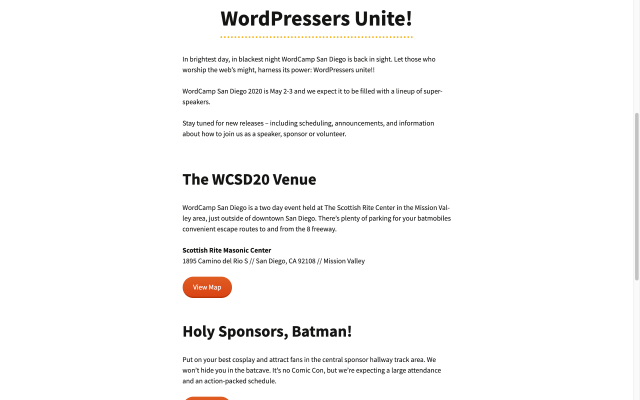
Homepage
As the central hub of the site, all the most essential, need-to-know details about the event should be on the homepage. That includes:
- Date and time
- Location/address
- Links for volunteers to sign up
- Links for sponsors to apply
- Links for attendees to get access/tickets
- Highlight the event sponsors.
The homepage is meant to build buzz and hype for the event. Display the reasons people should want to attend. Answer questions like “Is this event for me?” and “What can I expect to gain from attending?”
Also, consider changing the homepage during the conference. Pre-event information won’t be as important anymore. The homepage should be optimized at this point for attendees and contain certain things front and center like:
- Parking details
- Venue address/directions
- Contact info for organizers
- The event schedule
- The link to your Code of Conduct
Registration
There should always be a designated page for attendees to register on. If you’re selling tickets or admission, the registration page should include a form that can handle these transactions.
If your site is built with WordPress, use a form plugin that allows for transactions and that will send a receipt/ticket via email to the purchaser. If you’re using a 3rd party site or software like Eventbrite or Meetup.com, you should still have a link in the event website’s navigation for registration.
Your registration page should also state your refund policy, how tickets should be presented at the event, and any other important/special details.
Regardless of how people gain access, you need details like their name, email, food allergies, etc. This provides you with an idea of how many people are planning to attend and therefore what kinds of resources you’ll need.
Get Involved
You need unique sign-up pages for any person who wants to be involved in your event. That may include volunteers, speakers, and sponsors. Each page needs to have:
- A form
- Details on role descriptions & requirements
- Benefits included in signing up for this role
- How applications are chosen/approved
- What to expect after applying
For example, a good volunteers page will have an explanation of what tasks volunteers may be asked to do. The speakers page should detail out what kind of talk submissions you’re looking for.
If you’re using WordPress, you can add forms to your site using a plugin like Caldera Forms, Gravity Forms, or WP Forms. If you don’t use WordPress, you can link to a form built in Google Forms, Microsoft Forms, Airtable, Wufoo Forms, etc… Just make sure the fields are easily customizable and the data is sent to a single location.
About the event
Your About page gives new attendees a solid idea of what to expect. New speakers, volunteers, and sponsors can gain an understanding of what kind of messages and goals they are supporting.
It’s a good idea to include an about or history page that explains:
- The story behind the event
- How you got started
- What the goal of the event is
- What to expect
- Some information about the organizers/founder of the event
- Your Code of Conduct
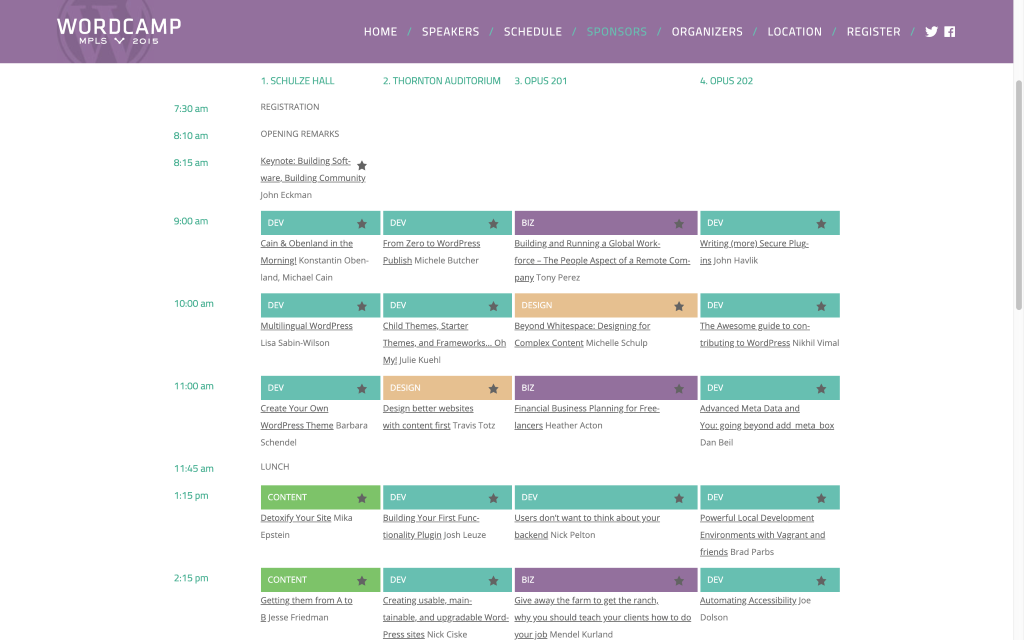
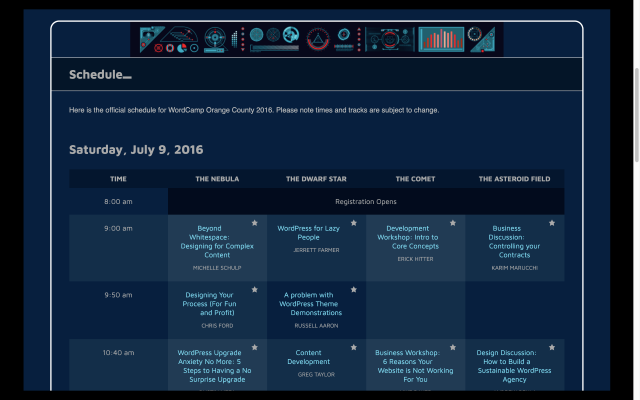
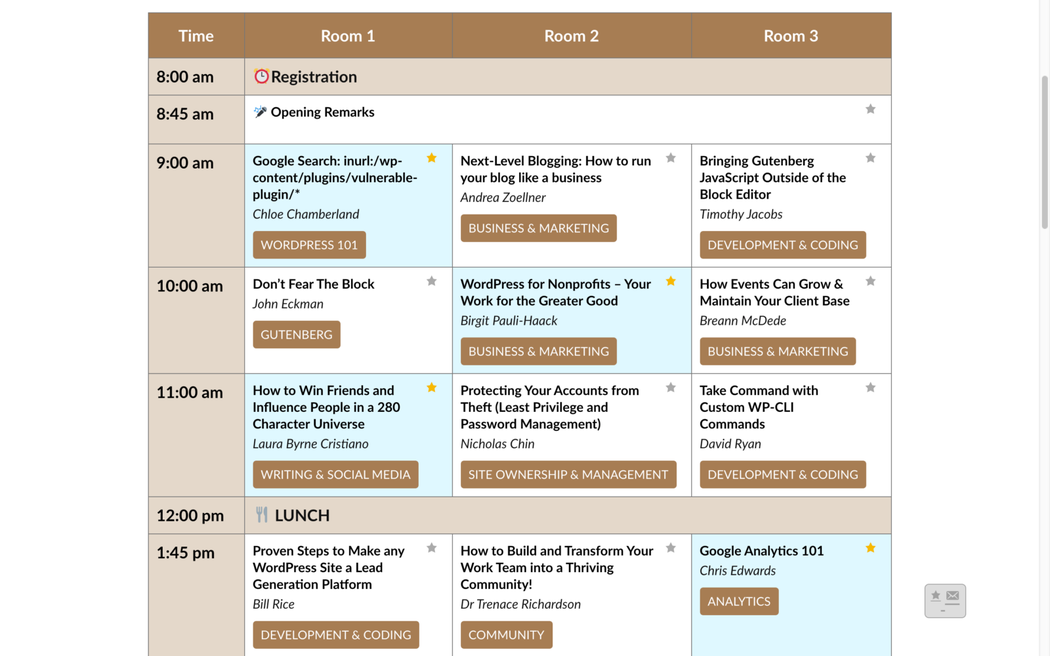
Schedule
As soon as you have your speakers chosen and announced, it’s a good time to put up the schedule. The day(s) of your event, your schedule will probably be the most visited site on your page. So it’s important to get it right!
The schedule should be clear, responsive on mobile devices, and easy to understand at a glance. A simple chart or table is the way to go.
Key details to include are:
- Where each session is (especially if you have multiple talks in multiple rooms simultaneously)
- What time each session starts
- Links to details about each session and speaker
- Details about Registration, Opening Remarks, Breaks, Lunch, etc.

Speakers
Your Speakers page is a great way to show off all the amazing individuals you’ll have presenting at your event. People like to see speakers they can identify with or recognize. So it’s always a good idea to include photos, biographies, the title of the talk they are giving, and links to their social media profiles or websites.
Depending on how many speakers you have, you may want to give each one their own bio page.
Location
If you know you’ll have people traveling to your event from abroad, make sure to have a page about your location. Including an address isn’t enough.
Here are some ideas for things to include on your Location page:
- Details about the event space itself, if there are interesting things to note
- Parking information, like availability and costs
- Accessibility information — are there wheelchair ramps? Elevators? Accessible-friendly restrooms?
- Public transit options for getting to the event venue
- Nearby hotels and accommodations
- Nearby restaurants and cafes
- Interesting attractions
Remember that your location can act as a selling point for your event! You want people to get a full picture of your location. You want them to feel confident and excited when they arrive.
Sponsors
If you’re hosting a sponsored event, it’s important to thank and feature your sponsors on your website. It may even be a clause in your sponsorship agreement.
A Sponsors page gives them the spotlight. Update this page as soon as you start getting sponsors. Potential sponsors will want to see evidence that other companies have already invested in your event.
Contact
Your website visitors should have multiple ways to get in touch with you.
Your Contact page should include details on every method that is available to get in touch with you. For example, a dedicated email address, contact form, social media links, Slack channel, etc.
Depending on your team and the size of your event, choose the right method that is right for you.
No event page is complete without a way to collect emails for further event notices and last-minute updates. The contact page is a good place for a newsletter signup form.
Special extras
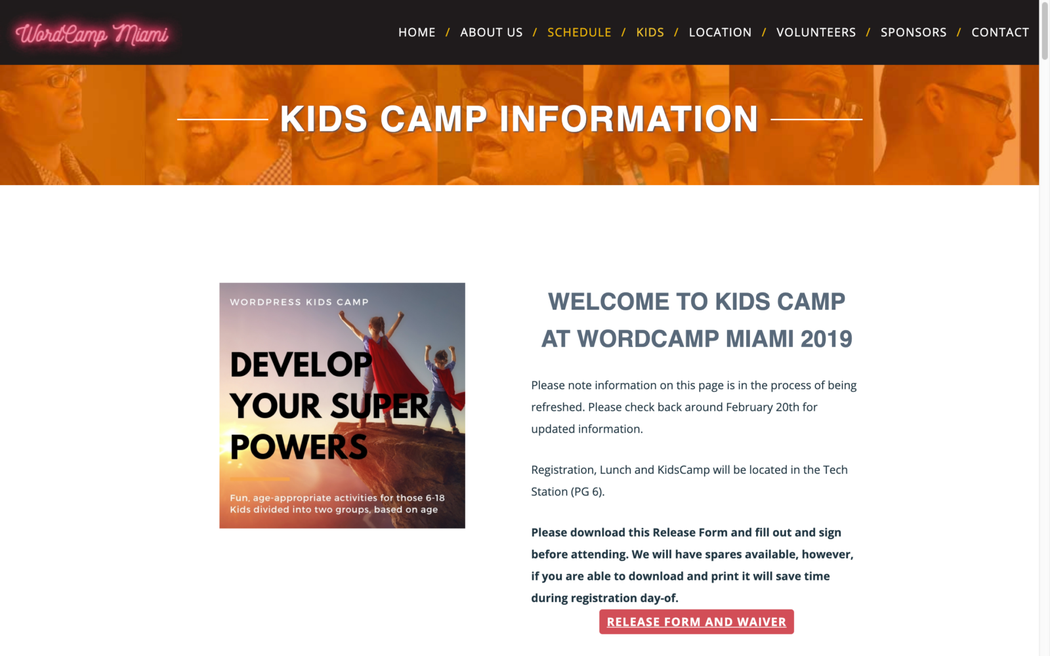
Is there something unique going on at your event? Maybe you have secondary kinds of programming, like kid’s sessions or beginners workshops. Or perhaps you’re hosting some kind of contest or giveaway during the event.
Make sure that the details about your event that are special and unique stand out and have their own areas.
Working with a website team
Hopefully, you’re not building this website all by yourself. Delegate tasks to different people, depending on their strengths. They should all be in contact and communicate with each other, but having a couple of people all working at the same time means the website can go up faster.
Here are some tips for each member of your website team:
Design
Try to use photos and videos from past events. If you need to use stock photography, make certain that the photos accurately reflect your community. The Jopwell Collection is a fantastic site full of free images of diverse groups of people.
Accessible design is incredibly important. Make sure you’re following all of the best practices, even if that means you have to stop and do some research first.
Here are some quick resources for you to dive into accessible design:
- https://www.w3.org/WAI/
- https://www.wuhcag.com/wcag-checklist/
- https://www.thataccessguy.com/blog/
- https://www.abrightclearweb.com/blog/
Having a visual theme is a great idea. It can be wacky and fun; for example, a 90’s theme or circus theme.Or it can be as minimal as a very specific color theme. Either way, the visual design of this theme carries over into social media, t-shirts, swag, etc. Whatever you choose, it’s important to be consistent when it comes to the design elements used.
No matter what design choices you make, the design should complement and not distract from all the important information you’re sharing.
Logo
I won’t go too far into the weeds with logo design here. But it’s worth stating the obvious — a good logo for your event is important. A logo is a visual ambassador for the event and will represent your event wherever you put it. It should be something that easily scales to a small size, something eye-catching, and something that visually represents your goals.
Some events will create a new logo for every year the event takes place. There is a benefit to this, particularly if you change your visual theme or you want this year’s event to be different in some way. Decide for yourself whether it’s worth re-doing the logo every time. If you want to re-do it, it only takes a few minutes with our free logo maker.
Development
Don’t reinvent the wheel when building the site. We recommend WordPress because you‘ll have a ton of great themes, builders, and plugins at your disposal to make building the site quick and easy.
Oftentimes, the WordPress default theme is a good choice to start with. It’s easy to work with and accessible-friendly. We’d be remiss to not recommend GoDaddy’s Go theme as another great option.
Just make sure that whatever theme you choose is customizable, well-reviewed, and well-supported.
If you know you’ll be doing this event again, consider using subdomains or a WordPress Multisite network. This makes it super easy to iterate, and one can always get to the website for the camp they want to find.
For example, the WordCamp URL structure is year.city.wordcamp.org. So WordCamp Miami will use 2020.miami.wordcamp.org this year. Next year will be 2021.miami.wordcamp.org.
Treat your site like a template. Create it in the first year. Iterate and update after that.
Content
Keep your page content short and sweet. Each page should be skimmable, especially on a mobile device.
Subheadings and lists are prime ways to accomplish this. On pages like the speaker application page, it’s a good idea to include more details and information. But make it easy for users to skip it and go straight to the form if they want to.
Your writing should be direct, use an active voice, and be enthusiastic! You can get even more creative with it if your event has a fun theme.
Testing
Test each and every page on as many devices as you can. Test every form and review the form submissions. Iterate and test until you’re sure everything is as perfect as it can be.
It helps to have a few beta testers run through the site, too. A fresh pair of eyes provides a new and unbiased perspective. The people who built the site may miss obvious errors.
Making an impact on the event
Your website is like having another organizer on your team. It shouldn’t be a chore that needs looking after. Instead, your website needs to make things as smooth as possible for your attendees, organizers, volunteers, speakers, and sponsors.
Here are some extra ways your website can make an impact on your event:
Polls and surveys
In the early stages of your design? Need some help developing ideas and making decisions? Bring your community into the process. Use the site to host polls and surveys. Maybe they can vote on speakers/topics? Maybe they can help you decide on a theme or location?
A timeline
We’ve already talked about including an event schedule page. But consider including a timeline on the homepage of all the phases leading up to the event.
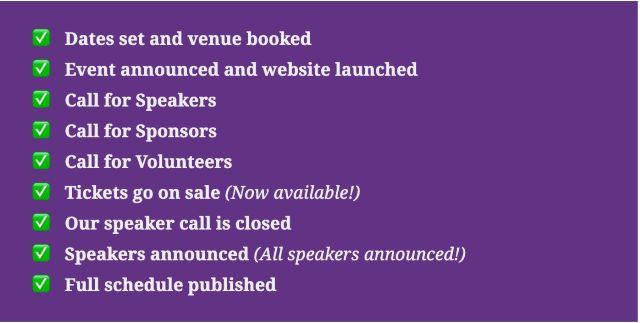
Take the above example from WordCamp Phoenix 2020. It identified where they were in the organizing process. Attendees can check the timeline to see roughly when they event will reach certain milestones.
From Dave Ryan, the Web lead organizer for WordCamp Phoenix 2020:
We found it a great way to reduce pre-event emails like “When will you announce speakers? When will the schedule be posted?” by providing either dates or ETAs while they were still pending.
Another little tip — put in a Reusable Block you can show in multiple places like the Homepage, Schedule, Speaker page, etc. WCASIA had a Start/End status list we got the idea from. [...] We decided from a UX standpoint to use Emoji and I did it as a custom HTML block with assistive text to be a little clearer for screen readers.
Fundraising
If you’re running low on sponsorship dollars, consider crowdfunding in the earlier phases of your event. Or maybe you want to accept donations toward next year's event?
GiveWP is a popular free WordPress plugin that allows you to easily take donations. You don’t need to be a registered nonprofit to use it, and it connects with major payment gateways like Stripe and PayPal. It comes with email receipt and reporting tools, and only takes about 5 minutes to set up on your WordPress website.
If you want to give your attendees a way to say “thank you” to their speakers or organizers, also consider using Buy Me A Coffee. It's a great tool that you can link to on your site that does exactly what it sounds like — allows you to treat someone to a cup of coffee! (It can also be customized to their gift of choice.)
Attendees page
A cool extra page to add to your site is an Attendees page. Basically, it’s a page that lists every single person who has bought a ticket/plans to attend. (Remember to get permission before adding people to this page.)
Social proof is incredibly powerful. As an attendee, it’s useful to see who else is going. It may push someone to buy a ticket if they were on the fence. It gets people excited to see friends or meet people they only know through social media. It helps people connect beforehand.
Plus, no one wants to go to an event that undersold; seeing that a good amount of people have already committed to attending can make you feel confident that the event will be nicely packed.
Social media
Including your event’s social media links is a no-brainer. If you’re active on social (hint: you should be!) you want people to be able to know where to find you.
An even better idea is to include some live feeds of your social profiles on the event website. It shows people see that you’re active on social media. If you’re sharing important updates there, people will be more compelled to follow you.
YouTube is a particularly powerful platform to include on your website. Hopefully, you have video of past sessions uploaded to a YouTube channel for your event. Embed those videos on your site so attendees and potential speakers get an idea of what to expect.
Bookmarking sessions on the schedule
This is one of my favorite features on WordCamp websites. On the schedule, each session is marked with a small icon which can be tapped to “save” or “favorite” that session.
This is a great way for attendees to build a schedule for themselves. During the hustle and bustle of an event, it’s great to see at-a-glance where you should go next.
Need some inspiration?
Check out some of these tech event websites from the past few years! I talked a lot here about WordCamps, but the same principals can be applied to any conference-style event you may be hosting.
If you want an even longer list, check out this list of cool WordCamp site designs from 2015.
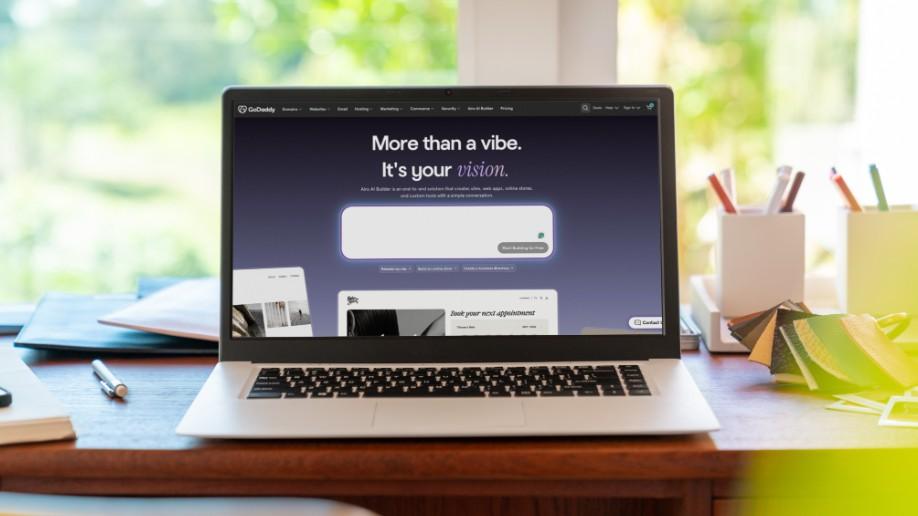
Ready to launch your community event website? Then don't forget to check GoDaddy tool to create a free website in no time.