
Unfortunately, refunds and returns are an inevitable part of ecommerce. Errors can occur, products may not meet buyer expectations, and some people will simply decide they no longer need their order.
After a poor experience, some buyers will naturally hesitate to buy from you again.
However, offering a painless returns experience can help boost brand reputation and ultimately get them to consider buying from your again. In this post, we’ll look at how you can master your WooCommerce store’s returns process to end refunded orders on a positive note.
How ecommerce returns & refunds impact your business
Needless to say, a high number of ecommerce returns and refunds can have a major impact on your bottom line. Beyond the lost cost of used merchandise, each return will incur extra shipping costs, assuming you offer free returns to your customers.
Returns often also lead to wasted time due to inefficient processes.
Many businesses spend extensive time emailing back and forth with customers to communicate return instructions. Then come the hours of reviewing and approving return merchandise authorization (RMA) forms.
All this can quickly add up when you need to process a high number of returns.
Mitigating returns
While reducing returns may seem out of your control, there are some practical steps you can take to mitigate their effect on your business. It goes without saying that the best way to limit your returns is to sell a high-quality product.
If customers are legitimately satisfied with their purchase, they will be less likely to send it back.
It is also critical to provide buyers with complete and accurate descriptions. If you can establish clear expectations, customers won’t get as many surprises when their order arrives.
Another way to reduce returns is to guard against different types of serial returners — for example, the fitting room shopper. This consumer will buy multiple versions of the same product to try them out. They’ll keep the one they like the most and return the rest. Or the wardrober who buys something to wear just once before sending it back.
Issuing refunds in WooCommerce
WooCommerce provides several options for issuing refunds to customers. You can control how much the customer gets back by refunding product costs, taxes, and/or shipping fees.
Because the platform integrates seamlessly with most popular gateways, there are ways for you to process returns, including refunding the payment, automatically. Below, we will look at both the manual and automated methods for issuing refunds in WooCommerce.
Automatic refunds
With automatic refunds, you can process refunds straight from WooCommerce without needing to access the dashboard for your payment gateway. For this type of refund to work, the customer must have paid using a payment gateway that supports instant refunds.
Go to WooCommerce > Orders and select the order that you want to refund. On the Order Details page, scroll until you see the order line items and select Refund.
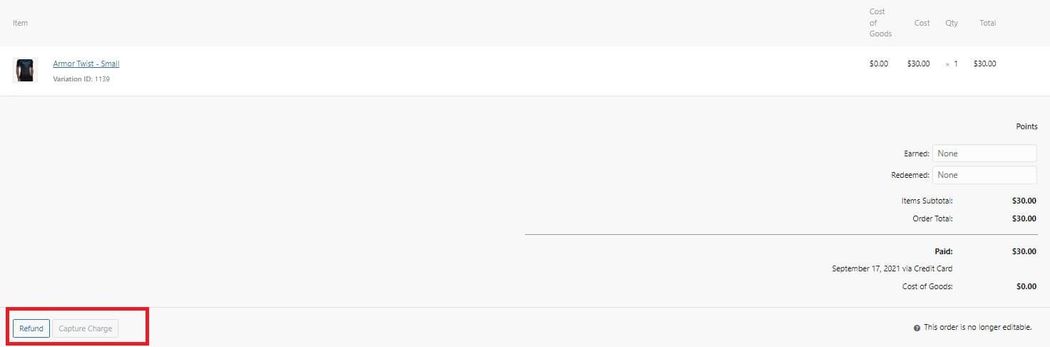
This will open a window for you to enter the details for the refund. If the order contained multiple items, you can select the number of products to include. When you enter a quantity for an item into the box, WooCommerce will automatically calculate the total and apply it to the refund amount.
Below, you’ll see the option to restock the item and you can also manually add a refund amount if it differs from the item price. Here, you’ll also have the option to add a custom note for the buyer.

Assuming the order was placed with a gateway that supports automatic refunds, click Refund $amount via payment gateway. In the image above, you can see the option to instantly issue a refund for an order paid using Authorize.net.
Manual refunds
Manual refunds follow a process similar to those of automatic refunds. You can decide which items to refund and you have the ability to reimburse shipping and tax charges. The only difference is that your payment gateway won’t automatically refund the customer’s payment method.
This means that you need to manually mark the order as Refunded in WooCommerce, and then go to your payment gateway account to send the refund. To initiate the manual refund from the order details page, click Refund manually.

How customers initiate refunds
WooCommerce makes it easy to process a refund once you receive it from a customer. But the process by which customers submit their desire for a refund isn’t as smooth. With the default configuration, an unhappy customer would contact your support team.
This could be through email, chat, phone, or any other communication channel you have set up.
In this communication, the customer will state that they want a refund and provide you with the order details. You or your support team then verify the order details and agree to issue or reject the refund. After that, you go into WooCommerce and/or your payment gateway to complete the process and notify the customer that they have been refunded.
As you can see there is a lot of back-and-forth and manual input required for this approach. If you want to handle returns more efficiently, you’ll need a way to streamline the process.
Streamline the RMA process with Returns and Warranty Requests
WooCommerce Returns and Warranty Requests gives you a simple tool for improving the RMA process. The extension lets customers start refunds directly from their accounts without having to reach out to a support team.
And you, as the store owner, can receive automated email communications during the return process.
The plugin uses what it calls warranties to enable customers to submit a return. These warranties are valid for a specified amount of time and can be applied to products on an individual or global level.
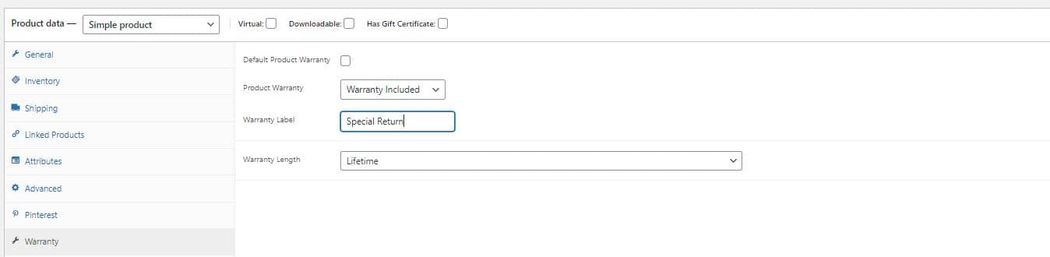
To set up a global warranty for all your products, go to Warranties > Settings > Default Warranty. Enter a label for the warranty and select a type. Your options are No Warranty, Warranty Included, or Warranty as Add-on.
As its name suggests, No Warranty means that customers will not be eligible to submit a request for those products. Warranty Included is the option you’ll want to select if you plan to use the extension to let customers request traditional returns. Warranty as Add-On will require users to purchase the warranty in addition to the product. This is more applicable if you’re looking to offer actual warranties on products.
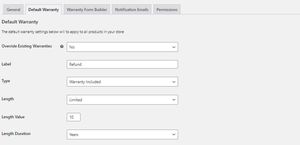
After you select a type, enter the length for which the warranty will apply. This will determine how long customers have to issue refunds. If you want to give buyers an unlimited amount of time to request refunds, set the value for length to Unlimited.
If you want to modify the Default Warranty for specific categories, scroll down to Category Warranties and select a category that you want to edit. Uncheck the box for Default Warranty and enter the new Warranty settings.
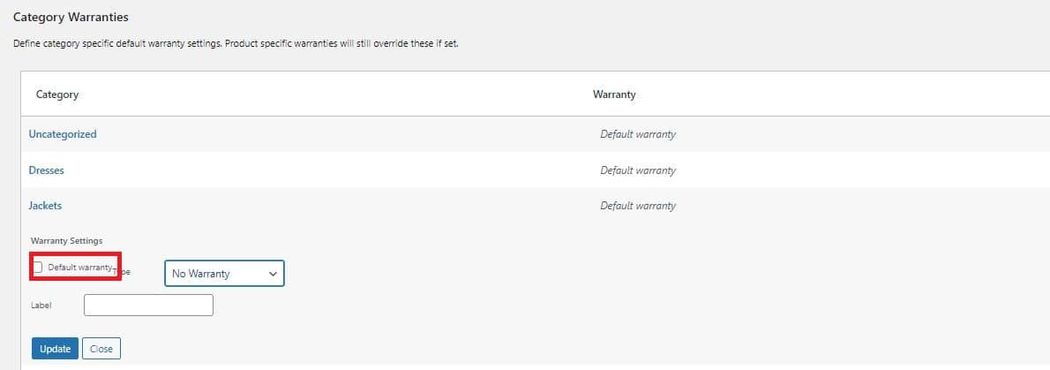
Keep in mind, you can still set individual product warranties when you have the Default Warranty active. Any warranties applied to individual products will override the Default Warranty.
To set a unique warranty for a product, go to its Edit Product page and find the Warranty section in the Product data tab. Uncheck the box for Default Product Warranty, and then create the new warranty.
Display settings
In Warranties > General settings, you’ll find options for formatting how the refund options are displayed to customers. You can use these to change the frontend display to show more generic terminology. For example, you could change the Warranty Button Text to say "Request Refund."
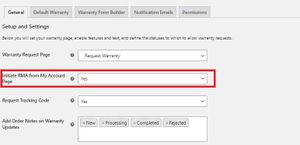
Setting up your RMA management process
The most powerful feature of the plugin is the ability to let customers manage ecommerce returns and refunds from their accounts. Back on the General settings page, make sure the value for Initiate RMA from My Account page is set to Yes. This will allow customers to start the return process directly from their accounts.
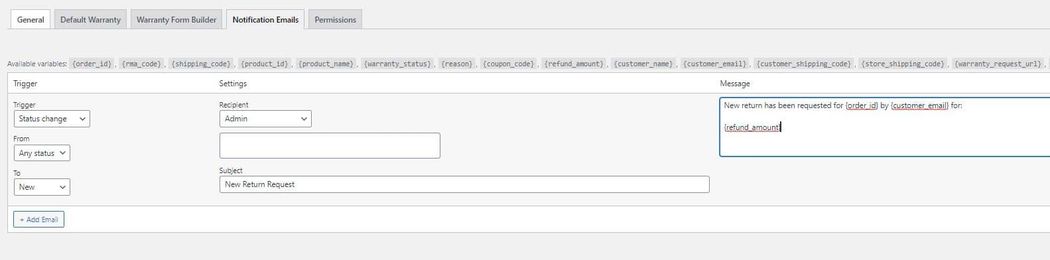
When a customer submits a refund request, you’ll have the option to receive automatic email notifications. If you want to customize the details for these notifications, go to Warranties > Settings > Notification emails.
Change the recipient to Admin and enter the content of the message. There are several variables, such as , , and that you can use to ensure that the email includes all important information.
Returns and Warranty Requests also comes with a dedicated dashboard for managing return requests, located at Warranties > RMA Requests.
The dashboard includes all requests, both open and closed and you can filter these requests based on status to quickly see those that need your attention. The default statuses are New, Processing, Completed, and Rejected. If you want to create custom statuses, you can do so by adding code to your functions.php file:
function warranty_add_custom_statuses() {
if (! function_exists('warranty_get_statuses')) return;

// Statuses to add
$statuses = array('Custom Status 1', 'Custom Status 2');

foreach ( $statuses as $status ) {
$term = get_term_by( 'name', $status, 'shop_warranty_status' );

if (! $term ) {
wp_insert_term( $status, 'shop_warranty_status' );
}
}
}

add_action( 'init', 'warranty_add_custom_statuses', 30 );
To process the returns, you need to move the request through each of your defined statuses. When you move the request out of your first status, it becomes active and you will receive new options for shipment tracking.
You can use these to upload shipping labels that customers can see and use for returning their merchandise. There is also a section for a tracking code, if you decide to ship the customer a replacement item
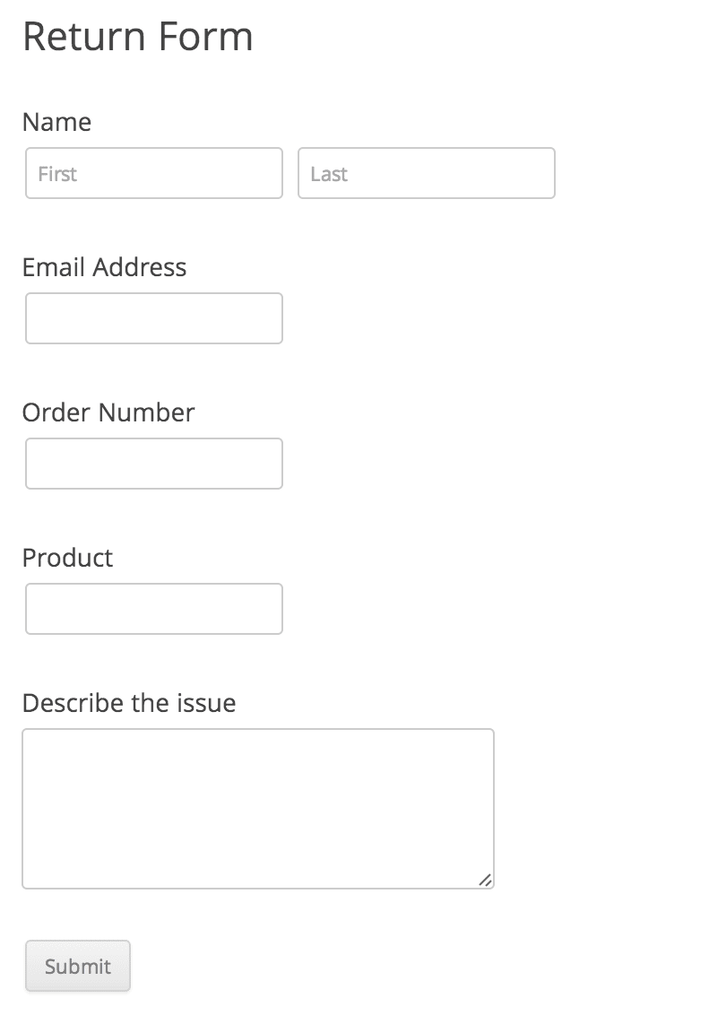
Creating a separate return form
With WooCommerce Warranties, you have the ability to add simple return forms to any of your web pages. Returns submitted through these forms will go to your RMA dashboard but they won’t be tied to a specific product or customer account.
To add the form to a page, all you need to do is add the following shortcode to the page: [warranty_return_form].
Managing ecommerce returns & refunds withWooCommerce Smart Refunder
WooCommerce Smart Refunder is another extension that helps you streamline the return and refunds process. With it, customers can request refunds from their My Account page and you can track any requests from your WooCommerce dashboard.
This helps you to process refunds faster as you’ll have all the order details immediately available.
The default configuration will still require some manual action to finalize each return. However, if you want to automatically approve certain refunds, you can do so using the Auto-approve refunds having order statuses settings.
This allows you to set automatic approvals based on order status. If a refund is automatically approved, customers can instantly receive a cash refund or coupon, depending on your settings and the payment gateway used for the order.
If you want to limit the amount of time that customers have to request a refund, use the Refund Period setting to define the number of days they are able to submit a request. If you leave this value blank, customers will be able to request refunds any time after their purchase.
Refund coupons
Some customers will prefer to receive their refunds in the form of store credit instead of reimbursement to their original payment. By enabling the Offer Coupons setting, buyers will have the option to choose a coupon for their refund. If your site uses WooCommerce Smart Coupons, you’ll have the option to issue store credit instead of coupons.
Managing refund requests
With Smart Refunder enabled for your site, customers will see a new Request Refund button in their accounts next to each order.

By clicking the refund button, a window will open to provide details for the refund. There, they can select whether they want a full or partial refund and if they would like to be refunded via cash or store credit (if the Offer Coupon setting is enabled).
After clicking Send My Request, the customer will receive an email stating that the refund has been issued or is under review. When a customer makes a refund request that isn’t instantly granted, you’ll receive a notification email with details and the options to Refund Now or Manage/Reject Refund.
The extension will also add a new icon to the actions bar on your WooCommerce Orders page. When you click this icon, a window will open below that you can use to manage the refund. The options that appear for managing the refund will mirror those that you’d find when viewing a specific order details page.
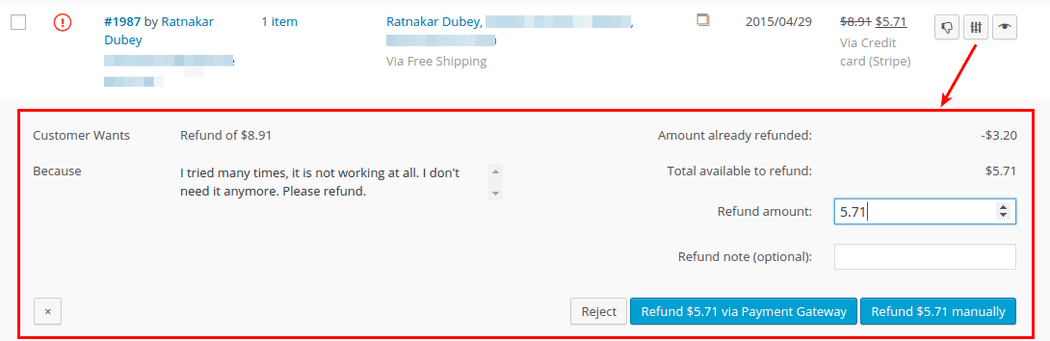
You can see information about the order and the details the customer provided in their refund request. If the customer paid using a gateway that supports automatic refunds, you can instantly issue the reimbursement by clicking Send Refund Now. If the payment gateway is not supported, you’ll need to manually initiate the refund directly from your gateway.
You can check to see if a payment gateway supports instant refunds by going to WooCommerce > Settings > Payments and hovering over the tooltip next to each payment method.
Closing thoughts on ecommerce returns & refunds
When done right, how you handle ecommerce returns and refunds can actually have a positive impact on your business. You can show customers that they mean something by providing a smooth, pain-free experience when they want a refund. Many will appreciate your efforts and will be open to buying from you again.