
Need to document a payment or sale? Whether you're a small business owner, freelancer, or just handling a one-time transaction, knowing how to write a receipt properly can save you and your customers from a lot of confusion later on.
A well-written receipt confirms that a payment was made and creates a paper trail for accounting, taxes, and even dispute resolution. In this guide, you'll learn what a receipt is, how to fill one out correctly, and how it differs from an invoice.
Let’s start with the basics.
What is a payment receipt?
A payment receipt is a document that shows a customer has paid for a product or service. It’s usually provided by the seller once the transaction is complete and includes key information such as the payment date, amount, method of payment, and what was purchased. Whether printed, handwritten, or sent electronically, receipts offer a shared record of the payment for both the buyer and the seller.
How to fill out a receipt of payment
When writing a receipt by hand or using a printable template, include the following details directly on the document:
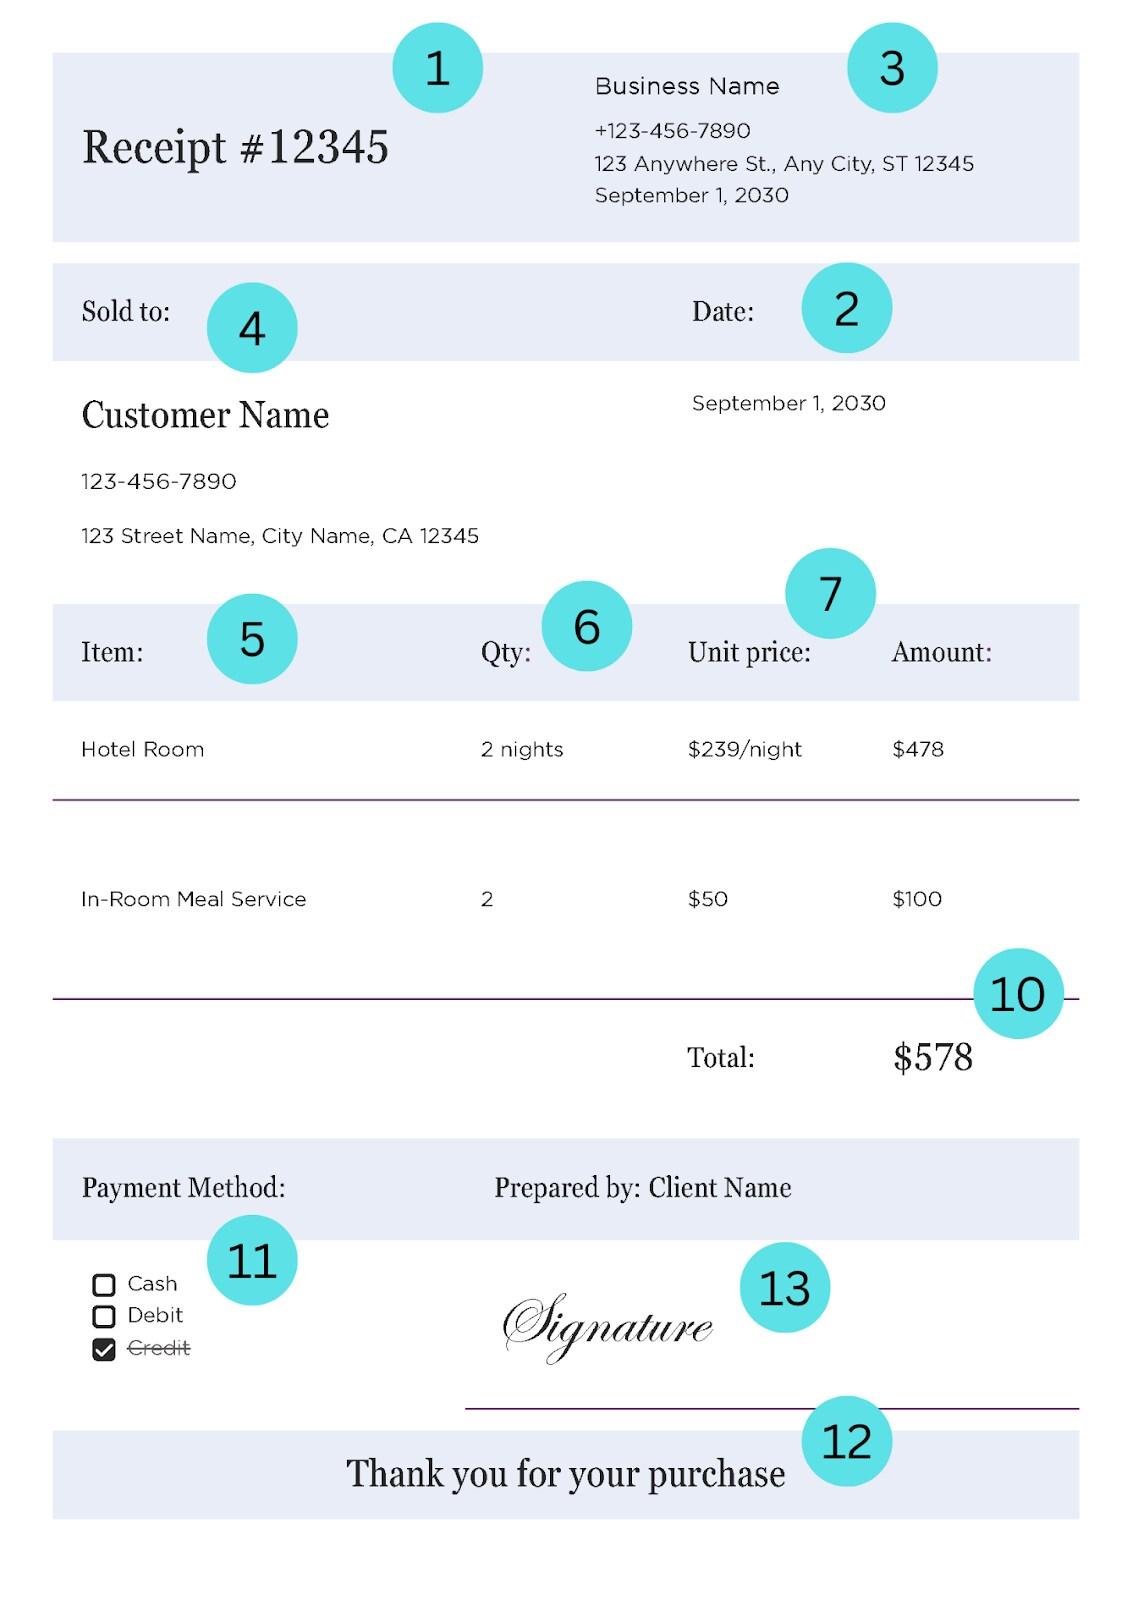
- Receipt number: Assign a unique number to each receipt for tracking purposes.
- Date of payment: Record the exact date the transaction occurred.
- Your business details: Add your name or company name along with contact information like your address, phone number, or email.
- Buyer’s name: Write the full name of the customer or business making the payment.
- Description of goods or services: List the items sold or services provided, including brief descriptions.
- Quantity: Specify how many of each item or service was purchased.
- Unit price: Note the price per unit for each listed item or service.
- Taxes or additional fees (not pictured): Include applicable sales tax or service charges.
- Discounts (if applicable, not pictured): Clearly show any discounts or markdowns applied.
- Total amount paid: Display the final amount after taxes and discounts.
- Payment method: Indicate how the payment was made like with cash, card, check, or other.
- Notes or terms (optional): Add any relevant comments like “paid in full,” refund terms, or even a brief “Thank you!” message.
- Signature or stamp (optional): Include your signature or company stamp for extra credibility.
Receipt versus invoice
While both receipts and invoices are essential business documents, they each play a different role in the payment process.
An invoice is sent before a customer pays, asking for payment for goods or services. A receipt follows, confirming the payment was made and finalizing the transaction.
If you need help creating professional invoices, our invoicing tool, GoDaddy Invoicing offers easy tools for sending, tracking, and managing payments.
Let’s now look at what an invoice is versus what a receipt is, side-by-side:
| Feature | Invoice | Receipt |
| Issued | Before payment | After payment |
| Purpose | Requests payment | Confirms payment received |
| Includes | Amount due, due date, itemized list | Amount paid, payment method |
| Used by | Sellers/service providers | Sellers/service providers |
| Customer role | Expected to pay | Already paid |
Why do you have to write a receipt?
Writing a receipt isn’t just a formality, even if it might feel like one. Rather, a receipt protects you and your customers, acting as a shared record of the transaction. Here are three key reasons to issue a receipt for every transaction:
- Proof of payment: A receipt confirms that the customer paid and that the transaction is complete, helping prevent disputes or misunderstandings.
- Tax and accounting records: Receipts help both parties track expenses and income. They’re also essential for accurate bookkeeping and meeting tax requirements.
- Customer confidence: Providing a receipt shows professionalism and builds trust. It reassures customers that they’re dealing with a legitimate business.
Whether you're running a retail shop, freelancing, or offering other services, issuing receipts creates a reliable paper trail that benefits everyone involved.
Final tips on writing a receipt
To keep your receipts clear, professional, and useful for future reference, here are a few helpful tips:
- Use a receipt template: Save time and reduce errors by using a preformatted receipt template from a site like Canva or even within Google Docs.
- Customize with your branding: Add your logo, business name, and contact details to create a polished, trustworthy impression.
- Be specific with item descriptions: List exactly what was sold or delivered to avoid any possible confusion.
- Use ink or print clearly: For handwritten receipts, always use ink and write legibly. For digital ones, double-check formatting for clarity and accuracy.
- Keep both physical and digital copies: Store paper copies in a safe place and back up digital receipts for easy access during tax season or audits.
- Number your receipts sequentially: This makes it easier to organize and locate receipts when you need them.
Taking a few extra minutes to create a clear, complete receipt helps you stay organized, look professional, and avoid issues later. In short, learning how to write a receipt is well worth the effort.