If you look carefully at the websites you visit, you will notice that most of them have some sort of feedback feature that allows you to share your thoughts and feelings about the experience. Among many different ways of collecting feedback, a client feedback form is one of the most valuable ways to gather candid customer feedback.
But having a working feedback mechanism on a website involves a lot more than just designing a web page with a client feedback form. Without proper guidance, collecting customer feedback can be extremely challenging.
In this article, I’ll provide a step-by-step guide for creating a client feedback form for a WordPress website.
5 things to remember when creating a client feedback form
The process of creating a feedback mechanism might look straightforward, but crafting an effective client feedback form isn’t a simple task. The process starts way before you open the WordPress dashboard. In this section, we’ll review things that impact the success and completion rate of your form.
-
Define your goal.
-
Know where to put your client feedback form.
-
Reduce user effort.
-
Offer an incentive.
-
Don’t forget about accessibility.
Let’s look at what you need to consider before you start creating your feedback form.

1. Define your goal
Before you begin collecting any feedback from clients, you need to have a clear understanding why you need that feedback in the first place. Without having a clear answer on “why?” the feedback you collect won’t improve your understanding of your customers.
Answer these important questions to help define your goal:
- What part of the customer flow do you want to improve? (What sort of insights you want to collect.)
- What will you do with the data you collect? (There’s no point in gathering client feedback if you don’t plan to act upon it.)
2. Know where to put your client feedback form
There are two methods of asking for feedback — passive and active. A passive feedback method is user-initiated feedback (e.g., user triggers the feedback form manually by clicking on a button/widget that might have a label “Send feedback”). Active feedback is an auto-triggered feedback form; it’s a natural part of user flow that appears at the time when users reach a particular destination (e.g., after clients review a proposal or design mockup).
Active feedback is more targeted, so it has an opportunity to deliver more specific customer responses.
Depending on the nature of your client feedback form, you want to choose passive or active feedback methods — perhaps even both types of feedback.
Passive method: Provide a feedback widget on every page
Make it easy for clients to provide feedback — add a link to your feedback form or incorporate a subtle form widget on every page.
Active method: Find a right moment to ask for feedback
If you want to collect useful customer feedback, it’s essential not only to ask the right questions to the right people, but also to do it at the right time. When it comes to asking your clients for their feedback, you should know exactly when to trigger a feedback form. For example, you can send a link to your feedback form after you’ve launched the client’s website.
3. Reduce user effort
The trick of a good feedback form is to keep things as simple as possible. Trim all the fat. Limit the number of questions you ask.
Simplicity stimulates clients to submit feedback, whereas longer forms are more likely to discourage clients as they take more time to read/answer.
The fewer fields your feedback form have, the higher your conversions will be.
Also, don’t waste your clients’ time and energy asking for information that you already have. Remember that the most useful feedback helps you learn something you don't know.
And don’t force clients to fill out all fields in your form — allow partial input. If they don’t want to answer some questions, don’t stop them from submitting the form. Make it possible to provide even small amounts of feedback.
4. Offer an incentive
When you ask for feedback, you basically ask for a favor. You have to encourage clients to provide their feedback. While general phrases such as “You help make our design better” might work for some clients, you’ll likely see much better conversion if you offer incentives for feedback. A stimulus can be a coupon or discount, a free eBook, even a sample product.
Pro tip: It’s also a good idea to deliver your gift by email. This way you can automatically send the gift after the client submits their feedback.
5. Don’t forget about accessibility
Let users navigate the form with the keyboard. Set the tabbing order so the user can tab through the fields.
Adding a form to WordPress
Now it’s time to create the actual form. While there are several free and paid WordPress contact form plugins you can choose from, I want to focus on WPForms.
WPForms is one of the simplest feedback plugins to set up and start using.
It’s a drag-and-drop form builder that enables you to create a pretty complex form without writing or modifying any code. WPForms has two editions — free (WPForms Lite) and paid (WPForms Pro). I’ll use a WPForms Lite because it allows me to create a simple contact form.
1. Install plugin
You can install the WPForms plugin on your site by logging into your WordPress dashboard and choosing Plugins > Add Plugins. Simply type “WPForms” and then click Install Now.
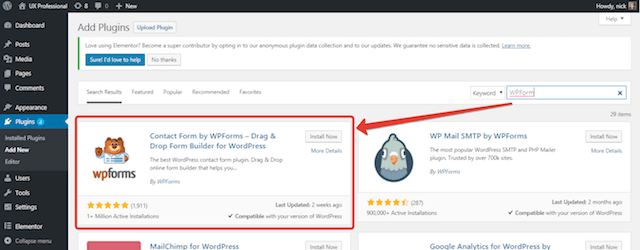
Don’t forget to active the plugin after the installation.
2. Create a new contact form
Open the WPForms drag-and-drop form builder and select your form template. WPForms Lite only comes with a few pre-built form templates (such as Blank Form, Simple Contact Form, Suggestion Form, etc.).
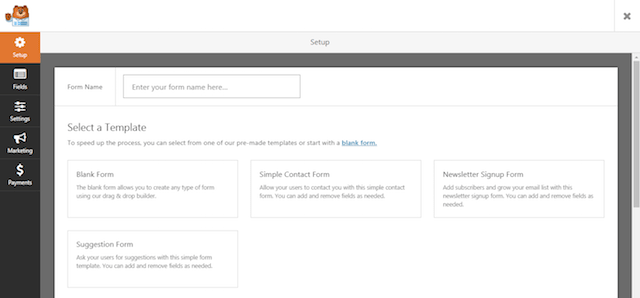
For the sake of this example, I’ll select Simple Contact Form. The plugin will automatically add a few common fields such as Name, Email, and Message fields.
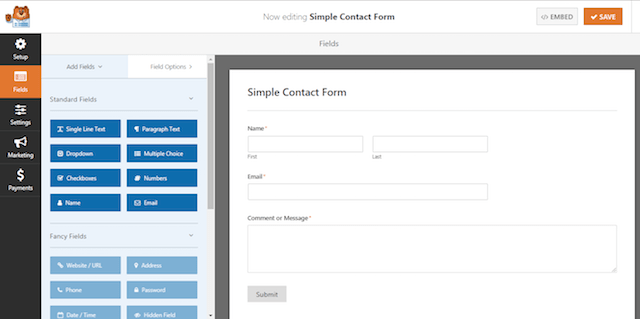
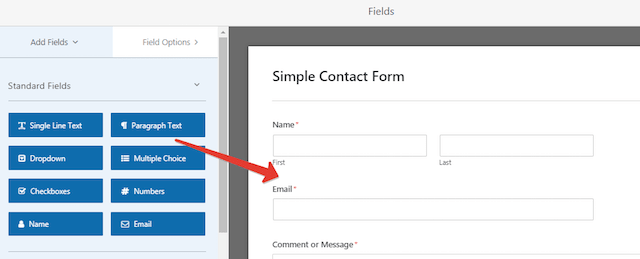
You can easily modify the form by dragging and dropping certain fields. When you’re done click Save.
3. Add a form to a page
After you create a contact form, it’s time to embed it in a page. You can either create a new page specifically for your client feedback form or modify an existing page to include the contact form in it. When editing your page, simply click on the Add Form button at the top of your editor and select the contact form you want to add.
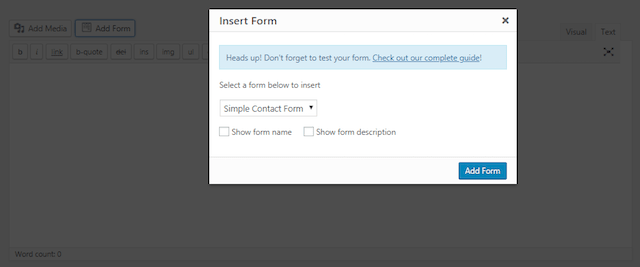
As soon as you complete this step, a contact form will be added to your page content. Now you can save your page and start using the client feedback form. That’s all!
Maximize the channel’s effectiveness
The process of designing a feedback loop doesn’t stop after you put your feedback form online. You need to use analytics to understand how your form performs. Figure out the most significant points of friction (parts where users are struggling to complete your form) and make all required changes to improve the interaction.
Conclusion
Now that you know the best ways to collect client feedback, start using this knowledge to design a perfect client feedback form. Act upon customer feedback to provide users with the products and services they need.


