Key takeaways
- Planning is crucial before building a website. This includes establishing concrete goals, defining your brand, understanding your target audience, choosing a domain name, and researching design ideas. Taking time to plan will set you up for success.
- You have options for how to build your website - either do-it-yourself (DIY) using website builders or WordPress, or hire a professional to do it for you (DIFM). Consider your technical skills, budget and time when deciding which approach to take.
- Creating quality content and optimizing for search engines are essential for growing your website. Focus on writing compelling content for core pages, using relevant keywords, getting backlinks, and considering paid advertising to increase visibility and traffic to your site.

It’s no secret that nearly 5 billion people across the world have access to the internet. From mobile devices to desktops, it seems like everyone these days is plugged in — and if your business isn’t claiming space on the web, then you’re missing out on oodles of potential customers.
No matter your niche or where you’re located, if you want to start a business, especially an online business, it’s essential to create a website.
With a website, you can sell products or services online, establish yourself as a thought leader in your industry, generate new leads for your business, reach and connect with customers, and give your brand the visibility it deserves.
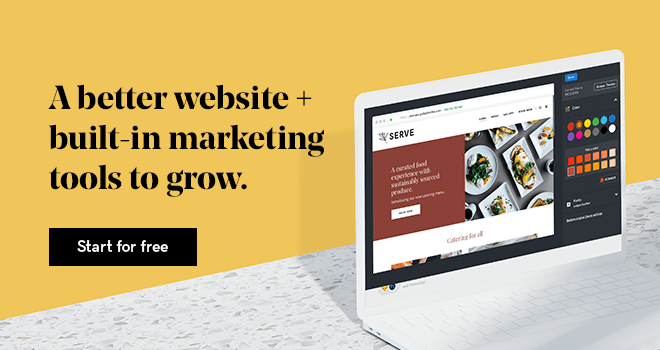
Launch your business in minutes with GoDaddy Airo™
Are you on board yet? Good, because having a website is important, but building one that suits your needs and is functional for potential visitors is the end goal.
Related: How to start a business
1. Decide on the purpose of your website
Like any large project, building a website from scratch starts with thoughtful website planning.
Before diving into design and development, you need a solid foundation of why you’re creating a site in the first place.
Will it be a blog? Perhaps it’s a lead generation page. Maybe it’s going to be the home of your podcast or a portfolio of your work.
Once you’ve addressed the type of website you will be making, start with these three key planning steps:
- Establishing concrete goals
- Defining your brand
- Carrying out competitor research
Once you’ve nailed down these essentials, you'll be better equipped to build a website tailored to your business needs that attracts your ideal audience.
Editor's Note: Discover the best products to sell online.
Establish concrete goals
Before we go any further, it’s important to think about whether or not you want to sell items online. If that is your goal, it might be more helpful to read about how to make an online store or use our ecommerce store builder to make the task of building an ecommerce website for small business quicker.
For everyone else, let’s continue.
It’s not enough to say, “I want to sell online,” or “I want to make a website.” Rather, ask yourself, “What do I want my website to accomplish for my business?” Perhaps it’s revenue or monthly visitors.
Regardless of the metric you choose, make sure it aligns with your overall brand.
Crafting measurable, attainable goals gives you a way to track your company’s success.
Instead of saying, “I want a million followers on Instagram by the end of my first year,” break it down into smaller steps you can track regularly.
Not sure where to start? Here are some things to consider:
- Keep your goals realistic.
- Make sure they’re well-defined.
- Align them with your business’s mission.
- Ensure they’re measurable.
- Set a time limit for each goal.
The purpose here isn’t to confine or stifle you — there’s merit in dreaming big. But if you set lofty goals before you have the platform to achieve them, you run the risk of low morale, which only hinders your output.
Define your brand
As appealing as it sounds to cater to the 5 billion users online, it’s not reasonable. You’re better off targeting people who closely align with your business’s niche in the marketplace. Casting a broad net makes it hard to create a recognizable identity — let alone one that’s relatable to your audience.
What kind of site are you building? Do you want to be humorous or serious? Are you selling mint-condition bobbleheads or offering legal advice?
Knowing who your audience is, and appropriately tailoring your language to their needs, means you’ll have a better chance of encouraging them to act — and by that we mean buying, subscribing, sharing or whatever your call to action might be.
Carry out competitor research
At this stage it’s wise to analyze your competitors' online presence. Researching competitors is crucial for identifying gaps or opportunities in your niche.
Study things like:
- Their website design
- Content strategy
- Product/service offerings, and
- Unique value proposition (the secret sauce that sets a business apart from the competition)
Assess strengths you may want to emulate. For example, a slick user interface or seamless shopping experience. Also pinpoint weaknesses to avoid, like confusing navigation or thin content.
Look for gaps where you can differentiate. If all competitors overlook mobile optimization, make yours user-friendly on phones. If they skimp on visuals, use stunning photography. Identify an underserved audience like busy parents or budget shoppers.
Craft a unique value proposition to stand out. If you offer specialty ingredients, highlight artisanal appeal. Feature customization options competitors lack.
In-depth competitor research ensures you build a website that elevates your business. Don't duplicate content or features. Use insights to inform strategic decisions so your site attracts your ideal audience. A fresh perspective gives you an edge.
2. Pick a domain name
Your domain name represents your brand online, so take time to choose wisely. Opt for a name that's short, memorable, and indicates your business or offerings. Including relevant keywords can boost visibility in search engines.
When performing a domain name search, check availability across top-level domains like .com, .net, and .org.
Pro Tip: Don’t limit yourself by looking only for domains ending in .com.
Newer options like .io or .co allow you to get creative. Just be sure the extension fits your business.
Avoid hyphens, numbers, and hard to spell names. And, even if your ideal .com is taken, adding your location or a descriptive keyword can help you to find an available option.
Research any names you're considering to ensure they aren't trademarked or already in use. Use tools to appraise potential names or suggest alternates. Act fast once you've found one, as great names get snapped up quickly.
How much will a domain cost?
Owning your brand online is important, but how much is a domain name? Basic domains can cost less than $20 for the first year. Established names with history can demand higher prices. But quality domains are a worthwhile investment for any serious business.
Register your favorite option right away, even if you aren't ready to build a website yet. Down the road, you can forward additional domains to your primary site. Also buy misspellings or variations to protect your brand.
With a bit of thought and domain search savvy, you can secure the perfect name to kickstart your online presence. Let your domain become synonymous with your brand.
3. Pick a hosting plan
A hosting plan is the foundation your website is built on, so choose wisely when making a website. Even if you use a site builder, you'll likely need separate hosting. When setting up a website, it’s important to match the hosting to your needs.
Which hosting plan should I get?
For simple sites like blogs or small online stores, shared hosting provides affordable, basic support.
Resources are shared with other sites, but it's cost-effective if traffic is light. Virtual private server or VPS hosting partitions server space for better performance at a higher price. It allows more storage and faster speeds.
Dedicated hosting is best for high-traffic sites, giving unlimited resources and priority support. But it is the most expensive option.
Consider bandwidth and storage needs based on site content like images and videos. Storage limits can constrain site growth, so avoid restricted plans. Uptime guarantees and 24/7 support are also vital for any business site.
Enhanced security features like firewalls guard against cyber threats. Backups protect your content if problems occur. Scalable plans let your site handle unexpected traffic spikes.
Finally, make sure the hosting provider you choose offers website backups (GoDaddy does!) just in case the unthinkable happens and your site goes offline.
Do I need both hosting and a web builder?
Not always, no. However, you'll want to read the fine print at your chosen provider to confirm included features. Many website builders bundle hosting services with domain registration, site builders, email accounts, and other tools to simplify the process.
With the right web hosting in place, you gain freedom to customize your site design and content. Do research to find a plan meeting your specifications that fits within your budget. A quality host and robust infrastructure provide a sturdy foundation upon which to build your online presence.
4. Choose a website building solution
Once you've selected your domain name and hosting plan, the next step is determining how to actually build your website. You have several options when it comes to putting your site together. In this section, we'll explore the two most popular website building solutions:
- Customer website builder
- WordPress
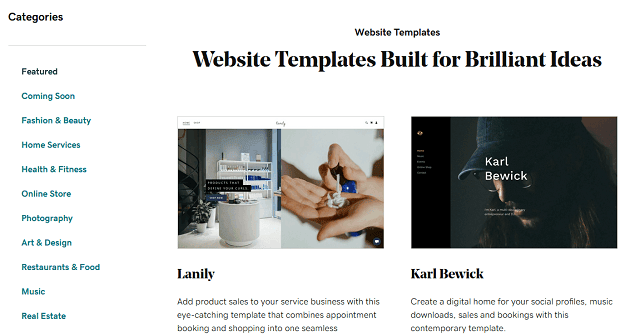
Custom website builder
A simple drag-and-drop website builder requiring no coding knowledge.
If you consider yourself non-technical or you don’t have the funds to hire a professional, but you want to easily build a website without learning to code, a free website builder like the GoDaddy Website Builder is a great option.
You can add photos, customize pages, and more in under an hour all from your mobile device. The swipe-to-style editor makes the process so simple.
Website builders are great for entrepreneurs and small business owners looking to establish an online presence quickly. They’re easy to use, require no coding, are a great way to start and now you can even create a website with the help of AI.
Launch your business in minutes with GoDaddy Airo™
WordPress
An open source content management system offering advanced customization.
If you want more flexibility and control, then WordPress is the way to go. Just keep in mind that WordPress requires a bit more technical skill than your go-to drag-and-drop builder. While you don’t need to learn coding right out of the box, there are hundreds of plugins, features and options that could provide added functionality if you’re willing to put in the time.
With GoDaddy’s WordPress hosting, you can dive into building with a simple and easy Quick Start Wizard. Before you know it, you’ll be online!
Related: Learn how to create a WordPress website
5. Build your website in 9 steps
Now we've arrived at the most exciting part of how to create a website — actually building it! With your domain, hosting, and platform selected, it's time to bring your vision to life.
Use the ideas below to transform your ideas into a fully functional, visually appealing website tailored precisely to your business.
Choose your website goals
When starting your website building journey, it's important to establish what goals you have for your website. Is your goal to inform visitors? Are you selling a product online? Is your business service-based and you'd like to be able to schedule appointments online? Knowing your goals at the start will help you to get started on the right path for building a website that fits your needs.
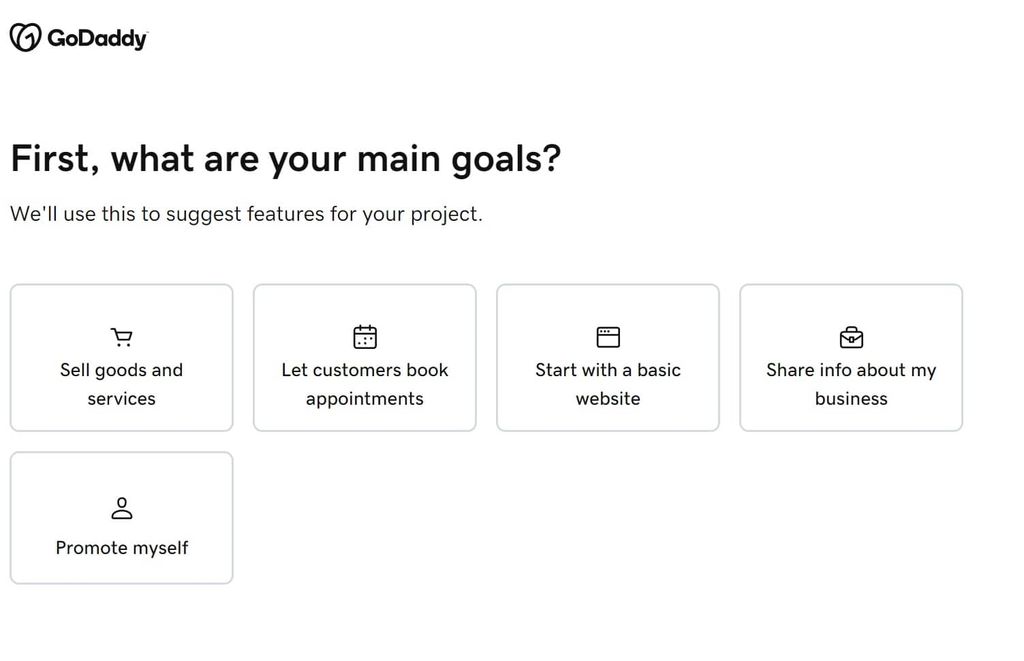
The GoDaddy Website Builder is a great place to start if you’re stumped on what your goals should be. Even if you're not using our builder, it can give you some great ideas. For example, are you looking to:
- Sell goods and services?
- Let customers book appointments?
- Start with a basic website?
- Share info about your business?
- Or, simply promote yourself?
Once you’re a little more clear on what your website goals are, you can build around them.
Decide what type of website you want
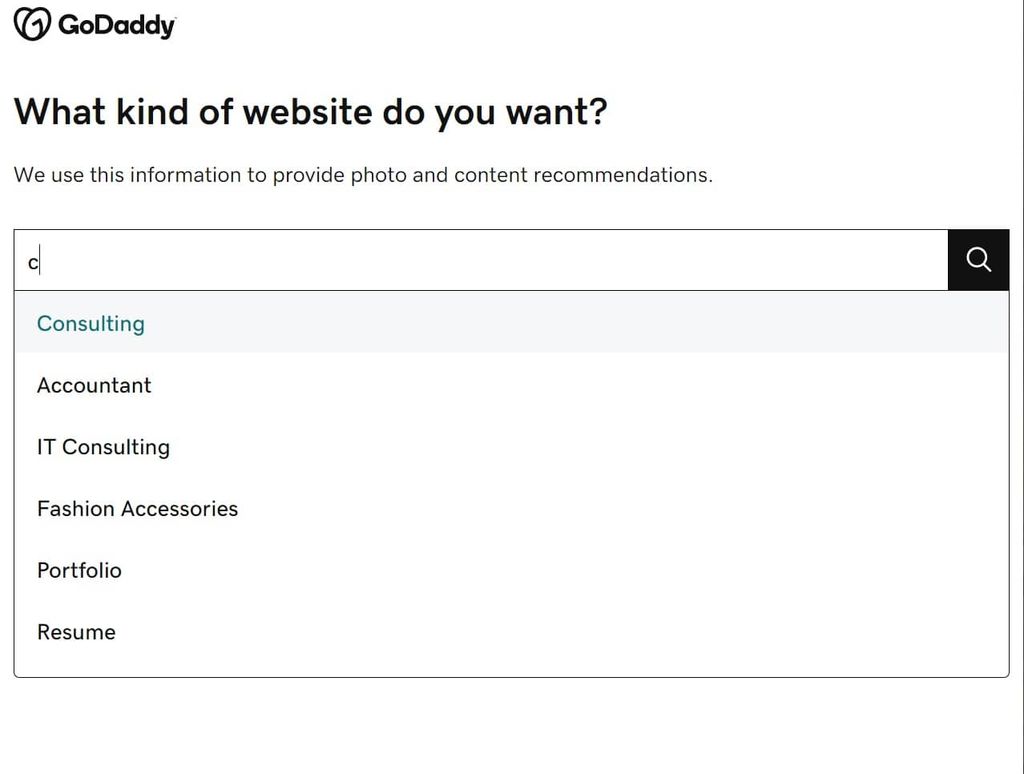
Choosing the type of website you want can help you determine the types of images and content you should include on your website. For example, an accountant might include images of calculators and bookkeeping software as well as content about taxes.
A photographer on the other hand, might have images of their team doing a photo shoot and include content related to weddings or family portraits.
Add the required information
Next, you’ll pick a name. Note: this can be updated later. We also have some fabulous resources on how to choose a name. Here just a few of them:
Then, enter your contact information. This includes the phone number and email address you would like to use for your contact areas on your website.
You can also add your business address if you’re a brick-and-mortar company.
If you are using our website builder, you will click Continue and watch the magic happen as GoDaddy populates a website mockup for you to start customizing.
Choose a theme and color scheme
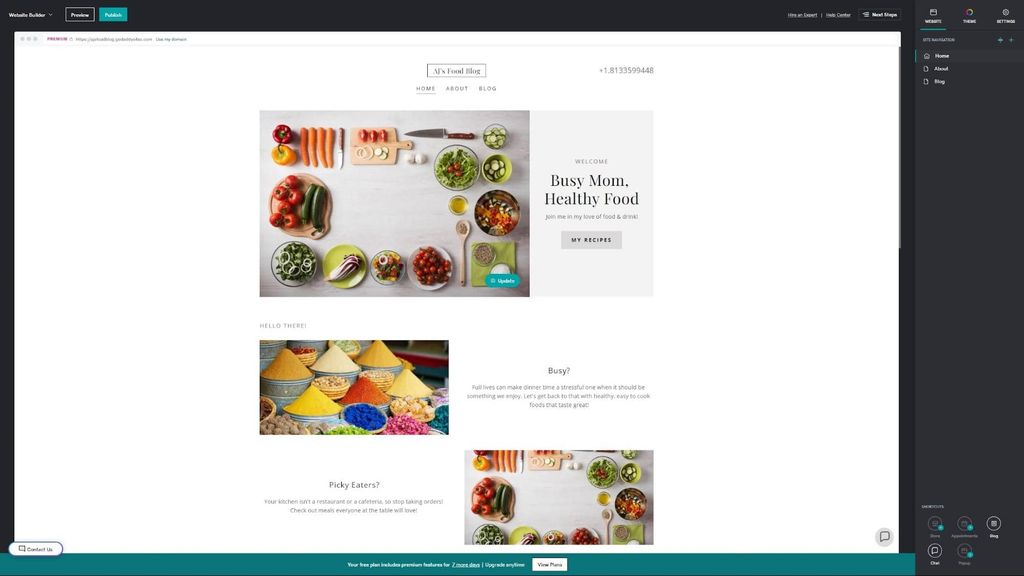
Once you have a mockup of your website, you can start to customize it. Here are some tips that might help:
- Pick a theme that aligns with your brand identity and industry. A law firm site needs a more professional look than a children's book author, for example.
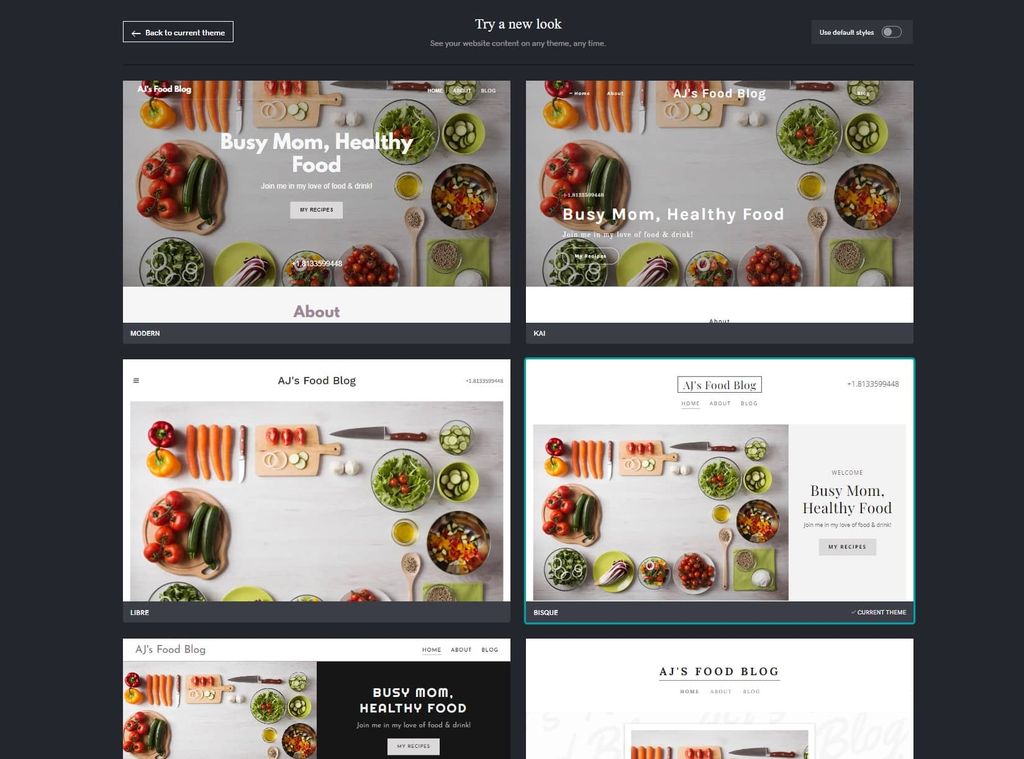
- Opt for a clean, simple theme structure that makes navigation intuitive. Avoid cluttered themes that distract from your content.
- Make sure the theme is responsive so your site looks great on all devices, not just desktop. Mobile optimization is a must.
- Limit your color palette to two or three colors. One dominant shade with one or two accent colors creates cohesion.
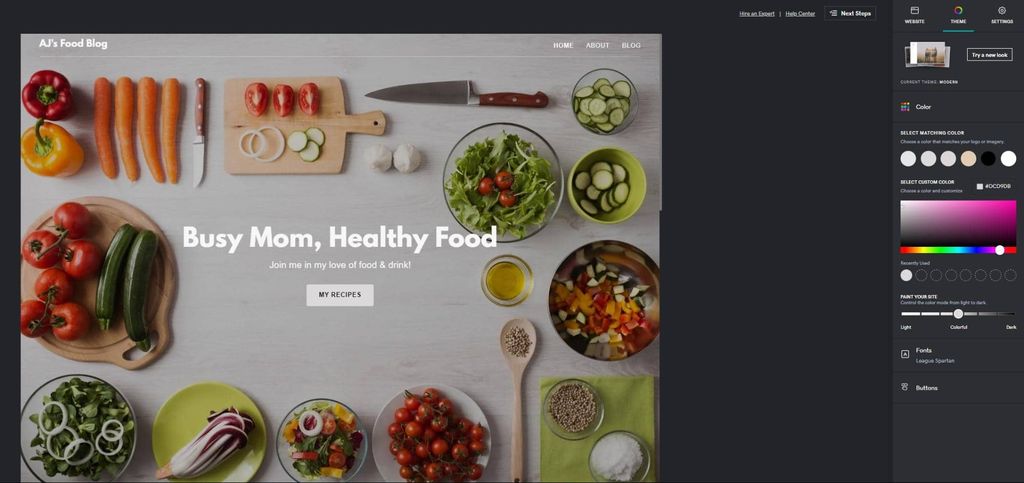
- Use color psychology to elicit the desired visitor response. For example, blue evokes trust, while red conveys excitement.
- Ensure sufficient contrast between text and background colors for readability. Dark text on a light background works best.
- Use white space generously. Too many colors or elements feel overwhelming. Allow breathing room.
- Pick a color scheme that flatters your logo design and brand image. Complementary hues reinforce branding.
- Test different themes and palettes using preview modes. View on various devices to get the full experience.
- Change can be good. Don't be afraid to redesign as your business evolves. Regularly refresh your look.
Using images on your website
Part of a standout content strategy includes captivating images. Here are a few things to remember when it comes to selecting photos for your website:
- Use images legally. You can’t just run to Google and copy the first photo you see. Stick to places like Pixabay or Unsplash for stock photos if you don’t have the means to take your own. Provide attribution as required.
- Use high-quality images. Beautiful images can inspire action. Don’t turn customers away with blurry photos. Pick or take photos that relate to your brand and resonate with your audience.
- Optimize your images. Keep reading through this guide to learn more about image optimization. For starters, make sure they’re sized appropriately, compressed so they don’t affect load time, and are named with relevant keywords.
Choose fonts
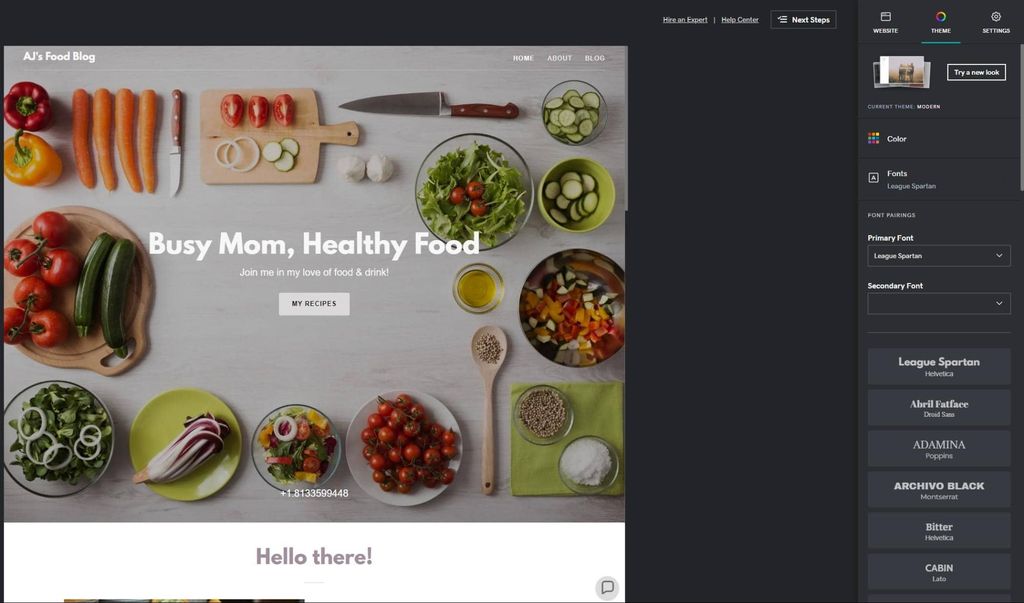
When selecting fonts, aim for readability and cohesion with your brand identity.
Limit your selections to one or two fonts to maintain simplicity.
For body text, sans serif fonts like Arial or Verdana work well online and are easy to read. Use fonts sparingly for headers and highlights.
Avoid fancy cursive or script fonts as these are harder to decipher. Standard web-safe fonts load quickest, but Google Fonts offers a wide variety of options if you want something unique.
Just be sure unfamiliar fonts render properly across devices and browsers.
Finally, ensure adequate contrast between font colors and backgrounds for maximum clarity. Remember, the reason your font choice matters so much is that your goal is to engage your audience without distracting from messaging.
Create a logo
Here are some quick tips on creating a logo for your website:
Focus on simplicity because effective logos are clean and memorable. Convey your brand identity through smart use of imagery, shapes, fonts, and color.
Make it scalable so it looks clear on all mediums, from business cards to website headers. Test it at different sizes.
Consider hiring a professional graphic designer if you want a truly unique and polished logo. However, for a budget-friendly DIY option, try GoDaddy's logo maker.
GoDaddy's logo maker lets you easily customize hundreds of templates or design your own logo. With an intuitive editor and downloadable files, you can quickly create a quality logo to represent your brand.
Related: How to make a logo
Build your site structure
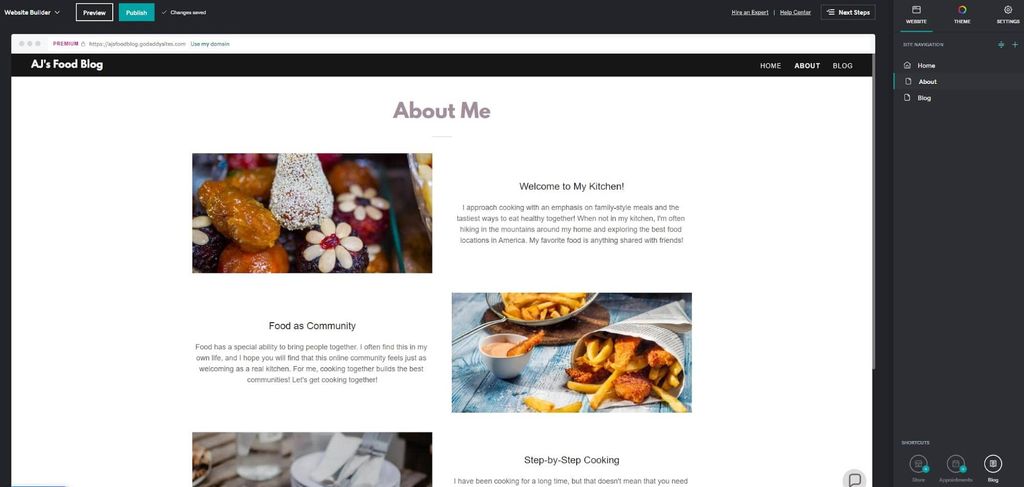
While the pages you include may vary depending on the purpose of your website, there are five generally accepted core pages you might want to consider adding to yours.
Whether you’re using a website builder, outsourcing it, or building a website from scratch, the five core pages are:
Home page
This is your landing page, and it needs to wow visitors from the get-go. Craft content that invites visitors to explore further and encourages them to act.
On your home page, you want to include the top things visitors need to know in order to decide to do business with you. Who are you? What do you do/sell? Why should I trust you? How do I contact you?
Start by doing the following:
- Describe your business in one short sentence (tagline).
- Describe your business and what’s great about it in just a few sentences.
This information will come in handy as you start to lay out your home page.
Calls-to-action
Once you’ve got that jotted down, it’s time to talk calls-to-action (CTAs). What is the one most important thing you want your visitors to do before they leave your site? Be clear, concise and tell them what you want them to do.
Here are some examples to get the ideas flowing:
- Call for a quote
- Scheduled an appointment online
- Watch our demo
- Sign up for a class
- Donate now
- Email us for a free quote
No matter your business, you should have a CTA on your home page to encourage your visitors to act in one way or another.
Primary contact information
Include one primary way for customers to contact your business on the home page; typically, this is your phone number. Your “Contact Us” page can include all of the various ways to contact your business.
Products and services section
Include a short bulleted list or a few photos of your products and services on the home page, and then add a link to the full product/services page to view all. List general categories of products or services.
List services like:
- Specializing in residential glass services
- Dual pane glass replacement
- Custom showers and mirrors
- Glass shelves and tabletops
- and more …
You don’t have to give a full-blown explanation of each here — just a quick snapshot into what you offer so visitors know they’ve come to the right place.
About Us
The About us page is your chance to shine. You’ll want to dig deep and tell your business’s story — How did you start it and why? What do you do differently than other businesses? Get personal, get passionate. Consumers are interested in the face behind the business, and a lot of potential customers are willing to go out of their way to make purchases at a shop they connect with.
Consider incorporating features like:
- Photos of yourself or your staff.
- A biography on your expertise.
- Company or product awards.
- Testimonials or specific quotes from your customers.
Remember, the goal is to connect with your customers. Be genuine and authentic.
Products/Services
Your products and/or services are likely why you started an online store in the first place. After all, your business needs to sell stuff to thrive, right? Right.
This webpage is relatively self-explanatory — list the general categories of products/services you offer, and then describe them in more detail. For example, the name of your product might be “Hot stone massage,” and the accompanying description could be “Provides a deeply relaxing experience for the body, mind and spirit.”
Remember to highlight the benefits of your goods and services, not just the features.
Create a detailed list of all your offerings, and make sure you’re highlighting how each product solves for a pain point or offers a solution to your prospective buyer. To further encourage consumers to purchase, consider incorporating the following (depending on your industry):
- Product images.
- Pricing payment options.
- Return policy, warranties or guarantees.
- Shipping options and time frames.
Pro tip: Include high-resolution, quality images with different product angles to keep visitors from abandoning your site.
Testimonials
Like your Products page, the Testimonials page is pretty straightforward. Increase visitor confidence and trust by adding recommendations, quotes and testimonials from your customers. Ask top customers to write a few sentences about your products and/or services.
Contact Us
A well-designed, easy-to-find Contact page is a must. After all, it’s basically your best salesperson. At anytime, a visitor can navigate to your Contact page and find key information about your business — hours of operation, location, contact details — so it’s important to make it shine.
When planning your contact page, you’ll want to include the following:
- Phone number.
- Hours of operation.
- Physical address, direction, map.
- Professional email that matches your domain.
Depending on your business, you may want to add contact “categories.” For example:
Product Returns — send to P.O. Box
Billing Issues — email us at billing@mycoolnewbusiness.net
Customer Support — call (800) 555-1212
Pro tip: Choose the most important way for customers to contact you and put it on every page of your website. Most importantly, add it prominently to your home page.
Blog posts or articles
Show your expertise by including blog posts or articles on your website. A blog is a great way to share news and updates about your business, such as new products, sales, or events.
Having a blog can also help you build a closer relationship with your customers. It gives you a chance to show your personality and share your thoughts. And, blogs also can help to make your website look more professional and trustworthy. It shows that you're an expert in your field and that you're committed to providing valuable information to your customers.
And lastly, not only are blog articles a great way to highlight your skills and knowledge, blog posts can help your website in search engine rankings.
Optimize for SEO
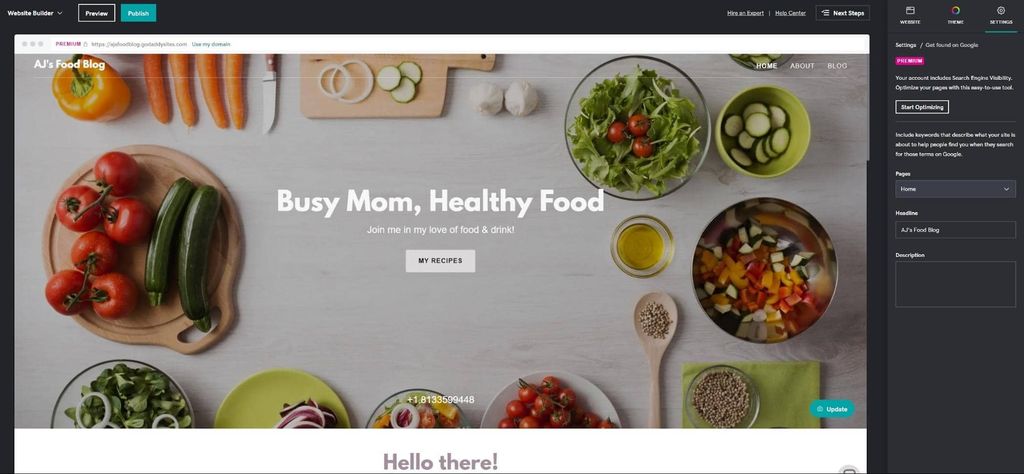
When you’re building your website, it’s important to keep in mind search engines to drive organic traffic to your new home online.
We’ve all heard the popular saying from Field of Dreams — “If you build it, they will come.” Unlike a magical baseball diamond in the middle of a cornfield, creating a website won’t automatically call to baseball heroes (or any visitors, for that matter).
Fortunately, we’ve got a few tricks up our sleeves to help you out.
Basic SEO comes down to:
- Keywords: Longer queries usually have less competition, so adding keywords like your region, or related services and products can help indicate your page is relevant.
- Links: When you get links to your website from social and respectable websites, these are like votes that tell search engines that your website is popular and authoritative.
- Tech: With website builders, most of the technical SEO elements are taken care of for you – these include things like SSL certificates, configuration files, and site speed.
For a full in-depth guide on how small businesses should approach on-page SEO, take a look at this article:
How to do SEO — A beginner’s guide for small businesses and entrepreneurs
Or, if you would like some help in this department, you can also try using GoDaddy’s SEO services.
Create amazing content
Whether you want website visitors to sign up for a newsletter, purchase a product, share on social media or anything in between, you need to present content that compels them to act. Well-crafted words, paired with eye-catching images, can make all the difference. That’s how you make your story shine online.
Time to create your content: A few days
Write your own web content
You know your story, you have a unique voice, and you can inspire trust in customers, regardless of your previous writing skills. Crafting content doesn’t have to be difficult, and we’ve got a few tips to steer you in the right direction.
- Audience. Prioritize your content to match with their unique needs, and make sure your content not only explains what you do, but why you’re the better option than your competitors.
- Voice. Once you’ve determined your audience, you can tailor your voice to match both your brand and your customers. Be true to your brand, and the rest will naturally fall into place.
- Layout. The layout of your content is just as important as the words themselves. Use images, white space, lists and headings to spread out your information in a way that is pleasing to the eye.
- Have fun! This is the most important step — have fun with your words! Don’t be afraid to test out different methods and go with the one that works best for your customers (and you).
- Get inspiration from AI: If you’re struggling with what to say on your website, don’t rule out AI as a powerful assistant to help guide you. Keep in mind that you’ll need to ensure that you’re personalizing and editing your content, as simply pasting the output from an AI tool will lead to your website being heavily penalized on search results.
6. Test and launch your website
You've put in the work to build an amazing site, but hold off on hitting publish right away. Thoroughly reviewing everything beforehand ensures a smooth launch.
Follow this checklist before you make it live for the world to see:
- Proofread all text for errors, accuracy and formatting consistency.
- Click every link and button to confirm functionality. Fix any broken links.
- Remove filler template content and customize all text/images.
- Test across multiple browsers like Chrome, Firefox, Safari to catch discrepancies.
- Check mobile responsiveness on actual phones and tablets. Tap buttons to test.
- Examine site speed using tools like Pingdom or Google PageSpeed Insights. Optimize images if needed.
- Ask trusted friends and family to critique the site for issues you may overlook. Implement feedback.
- Sign up for Google Analytics to monitor performance once live. Add tracking code before launch.
- Enable SSL certificate for security. This also boosts SEO.
- Allow one to two weeks for final tweaks and testing. Rushing risks mistakes going public.
When everything looks flawless, take a deep breath and click publish! Your creation is now live online. Promote the site on social media and update online profiles with the new URL.
Tip: Don't worry about mistakes slipping through.
You can still edit the site after launch. Don’t let the fear of a misspelling here or there prevent you from finally getting your website online.
Done is better than perfect.
That said, we’d be remiss if we didn’t note that depending on who you use to build your website, you might have difficulties switching templates once live. Just make sure you read your terms and conditions before you commit to anything.
With diligent pre-launch testing, your website will delight visitors from day one. Enjoy witnessing your vision materialize!
7. Now what? – Manage, maintain and grow
Creating a website is an ongoing process even after you hit publish. To close things out, here are tips to manage, maintain, and grow your online presence:
- Install an SSL certificate to encrypt data and boost security. This also helps with SEO.
- Incorporate targeted keywords throughout your content to improve search visibility.
- Build backlinks by guest blogging, getting reviews, and sharing testimonials.
- Optimize images by compressing files for faster loading.
- Adjust HTML tags and meta descriptions for better SEO.
- Consider using paid advertising – where you pay for ad space in order to display business information.
Note: There are two popular types of paid advertising: pay-per-click (PPC) and cost per thousand (CPM) Just like their name implies, PPC ads are only paid for when someone clicks on them.
- Create a business email that aligns with your domain name.
- Send regular email newsletters to engage subscribers. Email marketing drives sales.
- Post frequently on social media channels and interact with your audience.
- Use Google Analytics to identify high-performing pages and fix underperforming ones.
- Test new pages and layouts by tracking engagement metrics over time.
- Install security plugins if using WordPress or similar platforms to prevent hacking.
- Schedule regular malware scans and update software frequently.
- Back up your site regularly in case you need to restore due to issues.
- Consider hiring out your digital marketing services to manage the busywork.
- Outsource social media marketing so you can focus on running your business.
With the foundation built, now it's about refinement. Tweak and tailor your site based on performance data and visitor feedback. Use tools like A/B testing to optimize. And don't forget to promote your site consistently. The work doesn't stop at launch! Maintaining and growing your website leads to continued success.
Create a website FAQ
How easy is it to start a website?
With the proliferation of user-friendly website builders, starting a website is easier than ever. Options like WordPress and GoDaddy’s Website Builder provide drag-and-drop editors and templates to create a professional quality site in hours, no coding required. The learning curve is minimal.
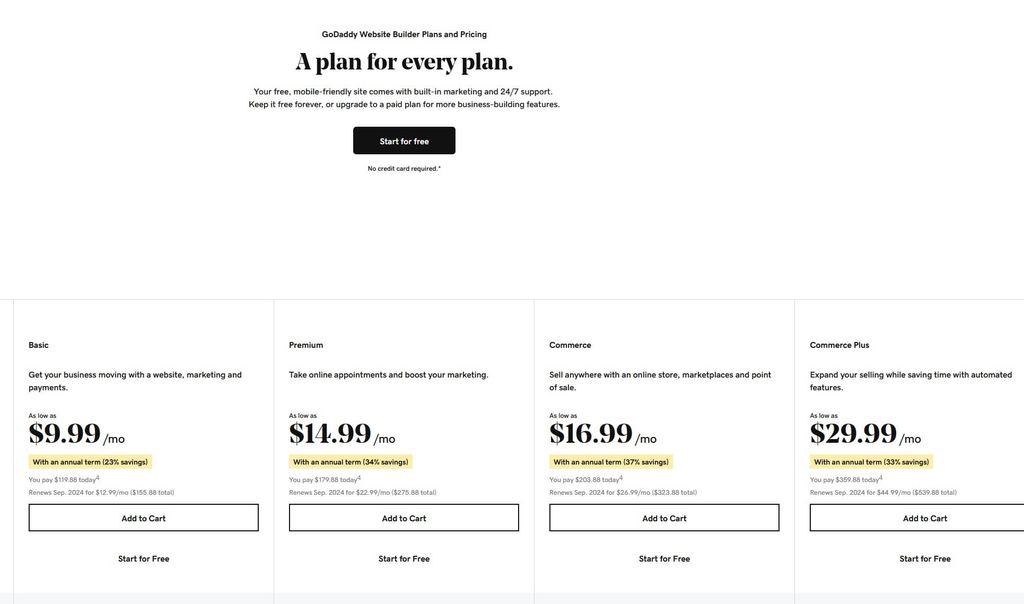
How much money do I need to start a website?
You can create a basic website for less than $20/month which covers domain registration and hosting costs. Paid website builder plans with enhanced features range from $5-50/month. Additional expenses like custom design services can add cost but are optional. Overall, starting a website is an affordable endeavor for most small businesses.
You can check out a full breakdown on how much does it cost to build a website in our guide.
It’s also worth noting that in some cases, you can get discounts and deals for annual plans and/or multi-year commitments.
Can I create my own website for free?
Yes, many website builders have free plans that handle hosting and provide site templates. Like most things, when it’s free, there are drawbacks. For example, you might see limitations like mandatory ads and restricted storage, but you can launch a functional website at no cost. Open source CMS platforms like WordPress are also free to use.
With all of that said, it’s often a good idea to purchase your website hosting at the very least. With Godaddy’s Website Builder, for example, you can get started building and customizing your site for free, and then choose and pay for the Website Builder plan that works best for your needs and budget.
Is it cheaper to build my own website?
In most cases, building your own website is cheaper than hiring a professional web developer. DIY site builders are designed to be user-friendly for beginners. Plus, new AI-powered website solutions, like GoDaddy Airo, make it even easier than before. And you avoid expensive coding fees.
But weighing cost savings against time investment for learning to build a site yourself is important. If you can afford it, hiring a pro may be worth it to get a site launched quickly.
Want even more information about building your small business? Stay tuned to the GoDaddy Blog. We regularly add new content to help entrepreneurs and startups on their business journeys.